
Verwandte Anleitungen für Infopia OSANG Healthcare finetest Auto-coding Premium


Inhaltszusammenfassung für Infopia OSANG Healthcare finetest Auto-coding Premium
- Seite 2 all-gui des.c...
-
Seite 5: Einführung
All manuals and user guides at all-guides.com Einführung Sehr geehrte Kundin, sehr geehrter Kunde, vielen Dank, dass Sie sich für das Finetest Auto-coding Premium - Blutzucker-Mess-System entschieden haben. Diese Bedienungsanleitung beinhaltet wichtige Informationen. Lesen Sie sie deshalb aufmerksam durch, um eine einwandfreie Funktion des Gerätes und eine sichere Messung zu gewährleisten. - Seite 6 All manuals and user guides at all-guides.com Kurzanleitung Dies ist lediglich eine Kurzanleitung! Bitte lesen Sie die gesamte Bedienungsanleitung, bevor Sie das Finetest Auto- coding Premium - Blutzucker-Mess-System benutzen. Finetest Auto-coding Premium - Teststreifen bei ausgeschaltetem Gerät einführen. Die Codierung wird automatisch angezeigt. Vergleichen Sie diese mit der Codierung auf dem Teststreifenröhrchen.
-
Seite 7: Vorgesehene Verwendung
All manuals and user guides at all-guides.com Vorgesehene Verwendung Das Finetest Auto-coding Premium - Blutzucker-Mess-System ist nur für den Gebrauch außerhalb des Körpers (in-vitro) bestimmt. Finetest Auto-coding Premium ist zur Selbstanwendung geeignet. Es sollte nur zur Messung von Blutzucker und nur mit frischem kapillarem Vollblut benutzt werden. - Seite 8 all-gui des.c...
-
Seite 9: Inhaltsverzeichnis
All manuals and user guides at all-guides.com Inhaltsverzeichnis Inhalt Seite 1. Das System kennenlernen Blutzucker-Mess-System: Lieferumfang Set Finetest Auto-coding Premium - Blutzucker-Messgerät Finetest Auto-coding Premium - Messgeräte-Display Finetest Auto-coding Premium - Blutzucker-Teststreifen Wichtige Informationen zum Finetest Auto-coding Premium - Teststreifen 2. -
Seite 10: Blutzucker-Mess-System: Lieferumfang Set
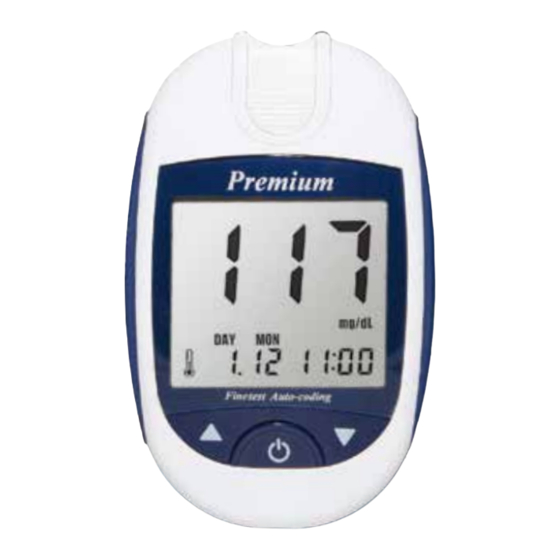
All manuals and user guides at all-guides.com Blutzucker-Mess-System: Lieferumfang Set Sterile Lanzetten können von obiger Abbildung abweichen. 1. Finetest Auto-coding Premium - Messgerät 2. Finetest Auto-coding Premium - Teststreifen 3. Automatische Stechhilfe 4. Lanzetten 5. Bedienungsanleitung 6. Garantiekarte 7. Blutzuckerpass 8. - Seite 11 All manuals and user guides at all-guides.com Blutzucker-Messgerät 1. Öffnung zum Einführen des Teststreifens 2. Teststreifen-Auswurftaste 3. Display 4. Funktionstaste: Zum Ein -und Ausschalten, Speichern von Einstellungen und Aufruf von Messergebnissen 5. Pfeiltasten: Zum Ändern von Einstellungen, Wechseln zwischen Messergebnissen und Löschen von Daten.
-
Seite 12: Lcd-Display
All manuals and user guides at all-guides.com LCD-Display Batteriewarnung Benutzer-Kennung Teststreifen-Code Symbol "Blut auftragen" Alarm vor dem Essen nach dem Essen nach sportlichen Aktivitäten nach Medikamenten-Einnahme Temperatur / Datum Symbol für Testeinheit Zeit Symbol für Fehler Symbol für Löschen Messung mit Kontroll-Lösung Mittelwert wird angezeigt... - Seite 13 All manuals and user guides at all-guides.com Teststreifen Öffnung des Messfeldes: Tragen Sie hier das Blut auf. Testfenster: Überprüfen Sie hier, ob genügend Blut aufgetragen wurde. Kontaktelektroden: Diese Seite mit dem Pfeil nach oben in das Messgerät einführen. 1. Setzen Sie die Teststreifen nicht direktem Sonnenlicht aus. 2.
- Seite 14 all-gui des.c...
- Seite 15 All manuals and user guides at all-guides.com Wichtige Informationen zum Teststreifen Grenzen des Systems: Mit den Finetest Auto-coding Premium - Teststreifen erhalten Sie genaue Messergebnisse, wenn Sie die nachfolgenden Dinge beachten: - Verwenden Sie die Finetest Auto-coding Premium - Teststreifen nur mit Finetest Auto- coding Premium -, Finetest Auto-coding - oder Finetest - Blutzucker-Mess-Geräten - Verwenden Sie zur Messung nur frisches kapillares Vollblut - Verwenden Sie keine Blutproben von Neugeborenen...
-
Seite 16: Vor Dem Messen Einstellen Des Messgerätes
All manuals and user guides at all-guides.com Vor dem Messen - Einstellen des Messgerätes Das Finetest Auto-coding Premium - Messgerät hat eine Reihe sehr nützlicher Funktionen : Bis zu 5 Alarme zur Erinnerung an die Messung, die Möglichkeit der Zuordnung von versch- iedenen Benutzern (Benutzer-ID) und Benutzer-Aktivitäten zu Messergebnissen und die Berechnung von 3 Durchschnittswerten über frei festlegbare Zeiträume. -
Seite 17: Einstellen Des Messgerätes
All manuals and user guides at all-guides.com Einstellen des Messgerätes Jahr Zur Änderung des Jahres (2007 - 2099) kurz ▲ oder ▼ drücken, mit bestätigen. Datum / Uhrzeit Zur Änderung von Datum und Uhrzeit kurz ▲ oder ▼ drücken, jeweils mit bestätigen. - Seite 18 All manuals and user guides at all-guides.com Einstellen des Messgerätes Alarm an/aus Zur Änderung des Jahres (2007 - 2099) kurz ▲ oder ▼ drücken, mit bestätigen. Alarmzeit Zur Änderung von Stunde und Minute für den Alarm kurz ▲ oder ▼ drücken, mit bestätigen.
-
Seite 19: Automatische Codierung
All manuals and user guides at all-guides.com Automatische Codierung 1. Das Finetest Auto-coding Premium -Messgerät verfügt über eine automatische Codierung. 2. Es erkennt die Codierung des Teststreifens automatisch. Diese sehr praktische Funktion erspart Ihnen die Codierung bei der Verwendung neuer Teststreifen. Achtung 1. - Seite 20 all-gui des.c...
-
Seite 21: Überprüfen Des Gerätes Mit Finetest Auto-Coding Premium
All manuals and user guides at all-guides.com Überprüfen des Gerätes mit - Kontroll-Lösung Überprüfen des Gerätes mit Finetest Auto-coding Premium - Kontroll-Lösung Mit der Finetest Auto-coding Premium Kontroll-Lösung überprüfen Sie, ob das Messgerät und die Teststreifen als Einheit funktionieren und Ihnen genaue Messergebnisse liefern. Hinweis: Die Finetest Auto-coding Premium - Kontroll-Lösung im normalen und hohen Bereich erhalten Sie in lhrer Apotheke oder über die METRADO GmbH (Kontakt: siehe letzte Seite). - Seite 22 All manuals and user guides at all-guides.com Überprüfen des Gerätes mit - Kontroll-Lösung Messablauf mit Kontrolllösung 1. Schütteln Sie das Fläschchen mit der Kontroll-Lösung gut. 2. Halten Sie das Fläschchen kopfüber, drücken Sie es vorsichtig zusammen und wischen Sie den ersten Tropfen ab. 3.
-
Seite 23: Vorbereiten Der Blutzucker-Messung
All manuals and user guides at all-guides.com Vorbereiten der Blutzucker-Messung Lesen Sie vor der Messung unbedingt sowohl dieses Kapitel der Bedienungsanleitung, als auch die Beilage zur Teststreifenpackung. Kontrollieren Sie, ob Sie alle zur Messung benötigten Utensilien haben: 1. Finetest Auto-coding Premium - Messgerät 2. -
Seite 24: Gewinnung Der Blutprobe
All manuals and user guides at all-guides.com Gewinnung der Blutprobe 1. Drehen Sie das Oberteil der Stechhilfe ab und führen Sie vorsichtig eine Lanzette in die vorgesehene Halterung ein. 2. Drücken Sie die Lanzette mit Daumen und Zeigef- inger zusammen und drehen Sie die Schutzkappe der Lanzette ab. -
Seite 25: Ablauf Der Messung
All manuals and user guides at all-guides.com Ablauf der Messung Schritt 1 Führen Sie den Teststreifen bei ausgeschaltetem Messgerät so in die Geräteöffnung ein, dass die mit dem Pfeil gekennzeichnete Seite nach oben und zum Gerät hin zeigt. Das Gerät schaltet sich automatisch ein und zeigt den Teststreifencode und die Temperatur an. - Seite 26 all-gui des.c...
- Seite 27 All manuals and user guides at all-guides.com Ablauf der Messung Schritt 2 Halten Sie Ihren Finger mit dem Blutstropfen seitlich an das schmale Ende des Teststreifens. Das Blut wird automatisch in den Testkanal aufgesogen. Halten Sie Ihren Finger so lange an den Teststreifen, bis Sie einen Bestätigungston hören.
- Seite 28 All manuals and user guides at all-guides.com Ablauf der Messung Schritt 3 Nach dem Bestätigungston beginnt die Messung automatisch und nach einem Countdown von 9 Sekunden werden das Messergebnis, die Temperatur sowie Datum und Zeit angezeigt. Tragen Sie das Ergebnis in Ihr Blutzucker-Tagebuch ein. Wenn der Teststreifen entfernt wird, schaltet sich das Gerät automatisch ab.
- Seite 29 All manuals and user guides at all-guides.com Ablauf der Messung Ablauf der Messung bei aktivierter Zuordnung von Benutzer- Aktivitäten und Benutzer-ID Schritt 4.1 Wenn die Zuordnung von Benutzer-Aktivitäten aktiviert wurde, drücken Sie kurz ▲ oder ▼, um die entsprechende Aktivität auszuwählen (siehe Seite 10).
-
Seite 30: Teststreifen-Auswurf
All manuals and user guides at all-guides.com Teststreifen-Auswurf 1. Um den Teststreifen auszuwerfen, schieben Sie nach Überprüfung Ihres Messergebnisses den Knopf für den Teststreifen-Auswurf mehrmals nach vorne. 2. Entsorgen Sie Teststreifen und Lanzette gemäß der geltenden Vorschriften an einem angemessenen Ort. Achtung Wenn Sie den Knopf des Teststreifen-Auswurfs zu heftig nach vorne drücken, kann der Teststreifen-Auswurf beschädigt werden. -
Seite 31: Messergebnisse Aufrufen
All manuals and user guides at all-guides.com Messergebnisse aufrufen Das Finetest Auto-coding Premium Blutzucker-Messgerät speichert bis zu 365 Messwerte in seinem internen Speicher und gibt Ihnen den durchschnittlichen Blutzuckerwert über die von Ihnen eingestellten Zeiträume an. Diese Werte können Sie zu jedem gewünschten Zeitpunkt im Display aufrufen. - Seite 32 all-gui des.c...
-
Seite 33: Messergebnisse Bei Aktivierter Benutzer-Id Aufrufen
All manuals and user guides at all-guides.com Messergebnisse bei aktivierter Benutzer-ID aufrufen Mittelwert Maßeinheit Anzahl der Messergebnisse Anzahl der Tage, über die der Mittelwert berechnet wurde ▼ drücken: vorheriges Messergebnis aufrufen. ▲drücken: Mittelwert über (z.B.) 7→ 14→ 21 Tage aufrufen. kurz drücken: Die Anzeige zur Benutzer-Auswahl erscheint. -
Seite 34: Messergebnisse Löschen
All manuals and user guides at all-guides.com Messergebnisse löschen Finetest Auto-coding Premium hat eine Löschfunktion für Messergebnisse Einzelne Messergebnisse löschen Um ein einzelnes Messergebnis zu löschen, drücken Sie ▲ oder ▼ für mindestens 3 Sekunden, während das zu löschende Messergebnis angezeigt wird. Es blinkt . - Seite 35 All manuals and user guides at all-guides.com Software Die Messergebnisse Ihres Finetest Auto-coding Premium - Messgerätes können zur Auswertung und Archivierung auf einen PC übertragen werden. Sie können die hierzu benötigte Software sowie das ebenfalls benötigte Datenkabel über die METRADO GmbH beziehen (Kontakt : siehe letzte Seite).
-
Seite 36: Wartung Des Messgerätes
All manuals and user guides at all-guides.com Wartung des Messgerätes Reinigung und Pflege Für einen sicheren, genauen und langlebigen Gebrauch des Finetest Auto-coding Premium - Blutzucker-Mess-Systems sollten Sie es auf folgende Art und Weise warten: 1. Reinigen Sie das Gerät nach Gebrauch mit einem weichen Tuch. Um Verschmutzungen auf der äußeren Oberfläche des Gerätes zu entfernen, können Sie auch Reinigungsalkohol einsetzen. -
Seite 37: Ersetzen Der Batterien
All manuals and user guides at all-guides.com Ersetzen der Batterien Wenn die Batterieleistung sehr niedrig ist, erscheint ein entsprechendes Warnsymbol im linken mittleren Bereich des Displays. Die Batterien sollten dann schnellst möglich gewechselt werden. Es werden zwei 3V Lithium-Batterien (Typ CR2032) benötigt. Diese sind im Geräte-Set enthalten. Bitte verwenden Sie nur Batterien vom Typ CR2032 oder gleichwertige Batterien. - Seite 38 all-gui des.c...
-
Seite 39: Fehlerbehebung
All manuals and user guides at all-guides.com Fehlerbehebung Die nachfolgende Tabelle kann lhnen helfen, die Ursache für bestimmte Probleme zu finden, unter Umständen können jedoch nicht alle auftretenden Probleme gelöst werden. In diesem Fall kontaktieren Sie bitte Ihren Fachhändler oder den Kundenservice der METRADO GmbH (Kontakt: siehe letzte Seite). - Seite 40 All manuals and user guides at all-guides.com Fehlerbehebung Meldung Ursache Maßnahmen Messung mit neuem Teststreifen Die Blutprobe wurde vor wiederholen. Anzeige des Dabei Blutprobe erst NACH Anzeige entsprechenden des entsprechenden Symbols Symbols aufgetragen. auftragen. - siehe Seite 21 - Messung mit neuem Teststreifen Generelles Problem mit Code- wiederholen.
- Seite 41 All manuals and user guides at all-guides.com Fehlerbehebung Meldung Ursache Maßnahmen System mit einer KontrollLösung. Messergebnis höher überprüfen. Bei einem normalen als 600 mg/dL Ergebnis testen Sie bitte weitere 2-3 (33,3 mmol/L) mal Ihren Blutzucker. Wenn die Meldung 'HI' weiterhin erscheint: Arzt kontaktieren! Wechseln Sie die Batterien.
-
Seite 42: Messprinzip Und Leistung
All manuals and user guides at all-guides.com Messprinzip und Leistung Messbereich: Der Messbereich des Finetest Auto-coding Premium - Blutzucker-Mess-Systems liegt zwischen 10 und 600 mg/dL (0,6 - 33,3 mmol/L). Messprinzip: Die Teststreifen sind mit einer speziellen Chemikalie beschichtet. Die Glukose der Blutprobe reagiert mit dieser Chemikalie an den Elektroden der Teststreifen und erzeugt einen elektrischen Strom. -
Seite 43: Technische Daten
All manuals and user guides at all-guides.com Technische Daten Probenart kapillares Vollblut Probenvolumen 1.5 μl Messbereich 10-600 mg/dL (0.6-33.3mmol/L) Messzeit 9 Sekunden Kalibrierung Plasma-Äquivalent Betriebs-Temperatur 10-40 °C (50-104°F) Betriebs-Luftfeuchtigkeit 10-90% Lagertemperatur Teststreifen 2-30 °C (35.6-86°F) Display-Typ Maße 85 x 56 x 20 mm Gewicht 48g (inklusive Batterien) Stromversogung... - Seite 44 all-gui des.c...
-
Seite 45: Umrechnungstabelle Mmol/L ↔ Mg/Dl
All manuals and user guides at all-guides.com Umrechnungstabelle mmol/L ↔ mg/dL mmol/L 0,55 mg/dL mmol/L mg/dL mmol/L mg/dL mmol/L 10,0 10,5 11,0 11,1 12,0 12,5 mg/dL mmol/L 13,9 14,4 15,0 16,0 16,6 17,0 18,0 19,0 20,0 mg/dL mmol/L 20,8 22,2 23,0 24,0 25,0... -
Seite 46: Garantie
All manuals and user guides at all-guides.com Garantie Wir garantieren für einen Zeitraum von 3 Jahren, dass das Finetest Auto-coding Premium - Gerät frei von Material- und Herstellungsfehlern ist. Während dieser Zeit tauschen wir lhr defektes Gerät kostenlos um, es sei denn, das Gerät wurde nicht entsprechend der Bedienungsanleitung verwendet oder mutwillig zerstört. -
Seite 47: Legende / Symbole
All manuals and user guides at all-guides.com Legende / Symbole Symbol Bedeutung... - Seite 50 all-gui des.c...
- Seite 92 all-gui des.c...