Herunterladen Inhalt Inhalt Diese Seite drucken
LENCO DIR-250 Bedienungsanleitung

LENCO DIR-250 Bedienungsanleitung

Wlan/lan-internet-, dab+- und fm-tuner mit bluetooth- und spotify-connect
Vorschau ausblenden Andere Handbücher für DIR-250:
Inhaltsverzeichnis

Werbung

Verfügbare Sprachen
  • DE

Verfügbare Sprachen

  • DEUTSCH, seite 91
Model: DIR-250
Wifi/Lan Internet, Dab+, Fm Tuner with
USER MANUAL
Bluetooth and Spotify Connect
Wifi/Lan Internet, Dab+, Fm-tuner met
HANDLEIDING
Bluetooth en Spotify Connect
WLAN/LAN-Internet-, DAB+- und FM-Tuner
BEDIENUNGSANLEITUNG
mit Bluetooth- und Spotify-Connect
Internet Wifi/Lan, Dab+, Fm Tuner avec
MODE D'EMPLOI
Bluetooth et Spotify Connect
Internet Wifi/Lan, Dab+, radio FM con
MANUAL DEL USUARIO
conexión Bluetooth y Spotify
Sintonizzatore Wi-Fi/Lan Internet, Dab+, Fm
MANUALE D'USO
con Bluetooth e Spotify Connect
1

Werbung

Inhaltsverzeichnis
loading

Inhaltszusammenfassung für LENCO DIR-250

  • Seite 1 Model: DIR-250 Wifi/Lan Internet, Dab+, Fm Tuner with USER MANUAL Bluetooth and Spotify Connect Wifi/Lan Internet, Dab+, Fm-tuner met HANDLEIDING Bluetooth en Spotify Connect WLAN/LAN-Internet-, DAB+- und FM-Tuner BEDIENUNGSANLEITUNG mit Bluetooth- und Spotify-Connect Internet Wifi/Lan, Dab+, Fm Tuner avec MODE D’EMPLOI...
  • Seite 2: Inhaltsverzeichnis

    Index: English............................3 Nederlands ..........................45 Deutsch ............................ 91 Français ..........................138 Español ..........................184 Italiano ........................... 230 Version: 2.0...
  • Seite 3: English

    English DIR-250 CAUTION: Usage of controls or adjustments or performance of procedures other than those specified herein may result in hazardous radiation exposure. PRECAUTIONS BEFORE USE KEEP THESE INSTRUCTIONS IN MIND: Do not cover or block any ventilation openings. When placing the device on a shelf, leave 5 cm (2”) free space around the whole device.
  • Seite 4 supervision or have received instructions about the correct use of the device by the person who is responsible for their safety. 19. This product is intended for non professional use only and not for commercial or industrial use. 20. Make sure the unit is adjusted to a stable position. Damage caused by using this product in an unstable position vibrations or shocks or by failure to follow any other warning or precaution contained within this user manual will not be covered by warranty.
  • Seite 5 ⚫ Disposal of a battery into fire or a hot oven, or mechanically crushing or cutting of a battery, that can result in an explosion. ⚫ Leaving a battery in an extremely high temperature surrounding environment that can result in an explosion or that leakage of flammable liquid or gas. ⚫...
  • Seite 6: Front View

    INSTALLATION • Unpack all parts and remove protective material. • Do not connect the unit to the mains before checking the mains voltage and before all other connections have been made. FRONT VIEW 1. USB Port 8. LCD Display 2. Earphone Jack 9.
  • Seite 7: Remote Control

    15. DC IN Jack 20. AUDIO OUTPUT DIGITAL OPTICAL Jack 16. W-LAN Antenna Installation Port 21. AUDIO OUTPUT DIGITAL COAXIAL Jack 17. AUDIO OUTPUT ANALOG R/L Jack 22. LAN INPUT Jack 18. ANALOG AUDIO INPUT Jack 23. Antenna Installation Port 19.
  • Seite 8 1. Standby button 12. EQ-Set button 2. Switch speaker ON/OFF 13. Up navigation button 3. Main menu 14. Left navigation button 4. Saved stations, Favorites, etc 15. Confirm selection 5. DAB/FM scan 16. Right navigation button 6. Local station 17. Down navigation button 7.
  • Seite 9 Clean the battery contacts of the device prior to replacing empty batteries. Tighten the W-lan antenna clockwise by using the proper tool as illustrated. Plug the pig-tail antenna into the Antenna port as illustrated.
  • Seite 10: Analog Audio Output Connections

    ANALOG AUDIO OUTPUT CONNECTIONS...
  • Seite 11 DIGITAL AUDIO OUTPUT CONNECTIONS...
  • Seite 12: Network Requirements

    ⚫ The Wifi network router needs to support WIFI (802.11 b/g/n) wireless connection. ⚫ A smart phone, tablet or pc which is on the same network as the DIR-250 Display symbols establishing Connection No wireless connection Wireless connection established...
  • Seite 13 Connect the power adaptor to the mains and plug the DC plug the adaptor into the DC-IN ● socket of the DIR-250 On first use the DIR-250 will start with the installation wizard. The system will ask you to: ● set Language and Network Configurations (fig 1.) (use the navigation knob(3) to select) Check network availability on power on (fig 2.)
  • Seite 14 if you Select Yes(WPS)(Only for WPS routers) and then press the WPS button on your ● router. If you answer ‘Yes’, the display goes to scanning for Wireless Network and a list of available wireless networks will appear. NOTE: Only 2.4 Ghz networks are supported The number of bars in the wireless symbol in front the network name (SSID) indicate the signal strength of the network.
  • Seite 15 4 G H I g h i 5 J K L j k l 6 M N O m n o 7 P Q R S p q r s 8 T U V t u v 9 W X Y Z w x y z buttons: ‘...
  • Seite 16: About Music Streaming

    Depending on the DLNA-compatible devices you own. With DLNA you are able to stream mp3 music stored from your laptop/NAS or other DLNA compatible device to play on the DIR-250. Lenco DIR-250 is the default device name on DLNA but you may rename it as you like. (See section 5.3) The information below is the introduction of how to setup up media steaming from PC or other media server.
  • Seite 17: Dlna Function

    Allow to share your media to Lenco DIR-250 Add the audio files and folders you want to share with Lenco DIR-250 to the media library. You may also enjoy the streaming music form other music server. Such as smart phone...
  • Seite 18 DIR-250. (It is not required to control each playback on the DIR-250) The PC system requirement for DLNA is Windows 7 and Windows Media Player 12. Setup as ● below: Firstly, share the media on your PC to DIR-250.
  • Seite 19 There will be a window for controlling music playback on Lenco DIR-250. You may search and install any free or commercial DLNA apps from Google Play or Apple Store if you are using Android mobile, tablet or iPhone/iPad. It is suggested to use Bubble UPnP, Media Share on Android mobile, tablet or iPhone/iPad.
  • Seite 20 Select Lenco DIR-250 as the player. Some apps may allow to play the music to multi players at the same time. Select music server and choose the music. Some app can create a playlist if you choose several music. Select server and player Select music When using DLNA music steaming function on Music Link, you can only control the volume ●...
  • Seite 21 5 DIR-250 Function 5.1 Overview...
  • Seite 22: Configuration

    5.2 Main menu Under the main menu, you can scan the QR code to continue 5.3 Configuration 5.3.1 Time Display Set the time display to analog or digital display. 5.3.2 Manage my mediaU My mediaU media library – managing radio stations via Internet In order to access your favourite radio stations worldwide, at any time and using any device with streaming capability, you can create a free account for a media library at www.mediayou.net and add as many devices as you like.
  • Seite 23 You can find the MAC address of the Internet radio under Information Center > System information > Wireless Info > MAC Address. After registering the device, you must enable this function on the DIR-250 under menu Configuration > Manage my mediaU.
  • Seite 24 The device automatically connects to your account and displays what has been saved there: Favorite Station Favorite Location/Genre My Local Station Manually Add Depending on your personal My mediaU settings, the display on the Internet radio may look ● different. If the device has not yet been registered with MediaYou, a corresponding message appears ●...
  • Seite 25 Under add manually, you can link the device to podcasts, for example. You must know the URL of the podcast for this purpose. 1. Fill in the highlighted fields in your MediaYou account under “Add Manually”. 2. On the Internet radio., go to Configuration > Manage my mediaU and enable once again.
  • Seite 26 If you are using a router with WPS/QSS button, you may want to set up the network connection via WPS function. Press the WPS/QSS button on your router within 120 seconds. The connection between the router and DIR-250 will then be configured automatically, so you don’t have to type in the Wifi password.
  • Seite 27 Manual Configuration ● You can choose DHCP (which assigns the IP address automatically) or enter the IP address by yourself. When you select manual setting for wired connection, the following to be entered: 1. SSID (the name of Access Point); 2.
  • Seite 28: Date & Time

    5.3.4 Date & Time The date and time settings can only be made if the Internet radio is connected to a wireless network. Set date and time: The internet radio takes the date and time automatically from a central server once a network connection has been established. However, you will need to change the time manually to account for the change from winter time to summer time.
  • Seite 29 There are three independent alarms – 2 alarms of absolute time setting (Alarm 1 and Alarm 2) and 1 alarm for relative time setting (NAP Alarm). Select Alarm in the configuration menu or press the alarm button (12) on the front panel. The first two alarms (Alarm 1 and 2): turn on alarm 1 or 2, then set the time and set it for Everyday, Once or every specific day of week.
  • Seite 30 Now you can choose Alarm Volume to configure the volume of the alarms. When the alarm(s) is/are set, there will be a clock icon with alarm time at the top of the display. During alarm, press button to stop the alarm, Press the SLEEP button on the device or press the button on the remote to enter the snooze mode.
  • Seite 31: Power Management

    15/30/60/90/120/150/180 minutes. Once the time is set, there will be a bed icon with remaining minutes at the top right corner. The DIR-250 will switch to standby when the configured time is expired. 5.3.13 Internet Radio Buffer Configure the buffer time of the music playback, 2/4/8 seconds Sound quality.
  • Seite 32: Local Radio Setup

    5.3.14 Weather Set the Location for accuracy of weather information. DIR-250 is able to display the current weather information in standby mode. Turn on Standby Display and set Temperature Unit (°C or °F) to get the weather displayed at the standby mode.
  • Seite 33: Playback Setup

    5.3.17 Playback Setup Select the playback mode of media Center – Off (no repeat or shuffle), Repeat all, Repeat one, or Shuffle. 5.3.18 Device Enter to rename the unit or use the “App” option to display the QR code for app download. 5.3.19 Key In this section, the following keys can be customized by the mode button on the unit or the remote control.
  • Seite 34: Resume When Power On

    5.3.23 Reset to Default Restore to the default settings. After the DIR-250 has been reset, the system will change to the Language setting menu and it will automatically turn to Network settings menu.
  • Seite 35: Internet Radio

    5.4 My MediaU Display and playback your own mediaU station list from the mediaU server., but you have to setup your account first (see the section 5.3.2). 5.5 Internet Radio After the connection of any station is succeeded, the information of the station will show on the screen.
  • Seite 36: Radio Station/Music

    Under the Fav. station list, move to your station, press OK to listen, You may also press OK its submenu to Delete (deletes a radio station from the favorites list), Shlft Up/down along the list, Rename (you can give the radio station a name of your choice), or Play. Press FAV., then Rotate the UP/DOWN knob on the device or using the of remote control to recall the saved station.
  • Seite 37: Media Center

    5.5.5 Service Search radio station - Enter your keyword to search radio station from the list. Add new radio station – The added stations will be stored in My Favorite. Note that the maximum character of the station name is 250. App: Enter to scan the QR code.
  • Seite 38: Clear My Playlist

    5.7.2 UPnP If you have set up shared media, you should see the shared media form UPnP. If you have more than one computer sharing media, the alternative are listed. SELECT the shared media you want to play. TipS. The radio can only read the track with the file name less than 40 characters. And the characters should be in European language.
  • Seite 39: Financial Service

    FM radio mode receives analogue radio from the FM band Press and hold button on the remote control or press and hold the button on the unit to search FM station. The frequency display starts to run up as DIR-250 scans the...
  • Seite 40 Make sure that no other Bluetooth device is connected to the radio. “Bluetooth Disconnected” will appear on the display. Enable the Bluetooth mode on the device that you want to connect to the DIR-250 and scan for new devices. Select the Lenco DIR-250 from the devices found on your device. If you are required to enter a PIN code, enter 0000 (four zeros).
  • Seite 41 Spotify Use your phone, tablet or computer as a remote control for Spotify. If wifi is enabled on your DIR-250 you can even wake it up when selecting spotify on your smartphone and select play device Lenco DIR-250. Go to spotify.com/connect to learn how.
  • Seite 42: Technical Specifications

    Technical Specifications Connections DC, 3.5mm AUX-IN/AUX-OUT, 3.5mm Headphone-Out, Audio Output ( Analog); Digital Optical, Digital Coaxial; USB; W-lan; Antenna; Input 100-240VAC – 50/60Hz Output 5V/1.5A Output power No Built in speaker Batteries in remote control AAA*2 Power consumption Max 7.5W Power consumption (standby) <1W Operating Temperature...
  • Seite 43 Power supply adaptor: (For EU only) Manufacturer: SHENZHEN SHI GUANGKAIYUAN TECHNOLOGY., LTD Model Number: GKYPS0150050EU1 Use only original AC adaptor Use only the power supply listed in the user instructions. Information Value and and precision Manufacturers name or trade mark, commercial SHENZHEN SHI registration and address GUANGKAIYUAN...
  • Seite 44 Guarantee Lenco offers service and warranty in accordance to European law, which means that in case of repairs (both during and after the warranty period) you should contact your local dealer. Important note: It is not possible to send products that need repairs to Lenco directly.
  • Seite 45: Nederlands

    Nederlands LET OP: Het gebruik van afstandsbedieningen of aanpassingen of de uitvoering van procedures die niet in dit document zijn gespecificeerd, kan leiden tot gevaarlijke blootstelling aan straling. VOORZORGSMAATREGELEN VOOR GEBRUIK ONTHOUD DE VOLGENDE INSTRUCTIES: Bedek of blokkeer de ventilatieopeningen niet. Wanneer u het apparaat op een schap plaatst, dient u 5 cm (2”) vrije ruimte rondom het gehele apparaat te behouden.
  • Seite 46 16. Indien het apparaat een USB-afspeelfunctie heeft, moet de USB-geheugenstick rechtstreeks op het apparaat worden aangesloten. Gebruik geen USB-verlengkabel, omdat die kan leiden tot storingen met foutieve gegevens als gevolg. 17. Het classificatielabel bevindt zich op de onderkant of het achterpaneel van het apparaat.
  • Seite 47 ⚫ Als de batterijhouder niet goed kan worden gesloten, dient u het product niet meer te gebruiken en buiten bereik van kinderen te houden. ⚫ Als u denkt dat batterijen zijn ingeslikt of binnenin een willekeurig lichaamsdeel terecht zijn gekomen, dient u onmiddellijk medische hulp te zoeken. 29.
  • Seite 48: Vooraanzicht

    DAB/FM-binnenantenne WIFI-antenne INSTALLATIE • Pak alle onderdelen uit en verwijder de beschermende materialen. • Sluit het apparaat niet aan op het stopcontact, voordat u de netspanning hebt gecontroleerd en voordat alle andere aansluitingen zijn gemaakt. VOORAANZICHT 1. USB-poort 8. LCD-scherm 2.
  • Seite 49: Achteraanzicht

    ACHTERAANZICHT 15. DC IN-aansluiting 20. Aansluiting AUDIO-UITGANG DIGITAAL OPTISCH 16. Installatiepoort W-LAN-antenne 21. Aansluiting AUDIO-UITGANG DIGITAAL 17. AUDIO-INGANG ANALOOG R/L- COAXIAAL aansluiting 22. Aansluiting LAN-INGANG 18. Aansluiting ANALOGE AUDIO-INGANG 23. Installatiepoort antenne 19. Aansluiting ANALOGE AUDIO- UITGANG...
  • Seite 50 AFSTANDSBEDIENING 1. Stand-by-toets 12. Toets EQ-instellen 2. Luidspreker AAN/UIT schakelen 13. Navigatietoets omhoog 3. Hoofdmenu 14. Navigatietoets links 4. Opgeslagen stations, Favorieten, enz. 15. Selecties bevestigen 5. DAB/FM zoeken 16. Navigatietoets rechts 6. Lokaal station 17. Navigatietoets omlaag 7. Ga één track terug 18.
  • Seite 51 Batterijen installeren voor de afstandsbediening: Druk op de markering ‘open’ op de batterijklep en schuif omlaag Installeer twee (2) x AAA-batterijen van 1,5 V in het batterijvak (let op de juiste polariteit bij het plaatsen) schuif de klep terug op het batterijvak Voorzorgsmaatregelen m.b.t.
  • Seite 52 Draai de W-lan-antenne rechtsom vast met het juiste gereedschap zoals afgebeeld. Steek de FM-binnenantenne in de antennepoort zoals afgebeeld.
  • Seite 53 AANSLUITINGEN ANALOGE AUDIO-UITGANG Connect the RCA cable as illustrated below. Sluit de RCA-kabel aan zoals hieronder afgebeeld. red (rood) white RCA Cable NOT Included RCA-kabel NIET inbegrepen Rear View of the TV Soundbar, Tower Achteraanzicht van de tv-soundbar, torenluidspreker enz. Speaker etc.
  • Seite 54 Connect the 3.5mm AUX OUT cable as Sluit de 3,5 mm AUX OUT-kabel aan zoals illustrated below. hieronder afgebeeld. AUX Cable NOT Included AUX-kabel NIET inbegrepen Rear View of the TV Soundbar, Tower Achteraanzicht van de tv-soundbar, Speaker, Mini Speaker etc. torenluidspreker, miniluidspreker enz.
  • Seite 55 Connect the Optical cable as illustrated Sluit de optische kabel aan zoals hieronder below. afgebeeld. Optical Cable NOT Included Optische kabel NIET inbegrepen Rear View of the TV Soundbar, Tower Achteraanzicht van de tv-soundbar, Speaker etc. torenluidspreker enz. Connect the Coaxial cable as illustrated Sluit de coaxkabel aan zoals hieronder below.
  • Seite 56: Weergegeven Symbolen

    Een breedbandverbinding in combinatie met een bekabeld/draadloos toegangspunt, router of soortgelijk netwerkapparaat. De wifi-netwerkrouter moet wifi (802.11 b/g/n) draadloze verbinding ondersteunen. Een smartphone, tablet of pc die op hetzelfde netwerk zit als de DIR-250 Weergegeven symbolen verbinding tot stand brengen...
  • Seite 57 Sluit de voedingsadapter aan op het stopcontact en steek de DC-stekker van de ● adapter in de DC-IN-aansluiting van de DIR-250 Bij het eerste gebruik start de DIR-250 met de installatiewizard. Het systeem zal u ● vragen: Instellen van Language (Taal) en Network Configurations (Netwerkconfiguraties) (afb 1.)
  • Seite 58 Selecteer Yes (Ja) om verbinding te maken met een netwerk ● als u Yes (Ja) (WPS) selecteert (alleen voor WPS-routers) en vervolgens op de WPS-toets op ● uw router drukt. Als u ‘Ja’ antwoordt, gaat het scherm naar zoeken voor draadloos netwerk en verschijnt er een lijst met beschikbare draadloze netwerken.
  • Seite 59 uw WLAN met een wachtwoord is beveiligd, dan wordt u gevraagd het wifi-wachtwoord in te voeren. Voer het wachtwoord in met de navigatietoetsen op het apparaat of de afstandsbediening. U kunt de toets OMHOOG/OMLAAG draaien om het wifi-wachtwoord in te voeren. als er per ongeluk op ‘...
  • Seite 60 Het kan enkele seconden duren voordat de netwerkverbinding tot stand is gebracht. Zodra de verbinding tot stand is gebracht, verschijnt het hoofdmenu met de volgende menu- items: Internet Radio (Internetradio): Toegang tot wereldwijde radiostations Media Centre (Mediacentrum): Toegang tot uw UPnP-apparaten via software met streaming-mogelijkheden.
  • Seite 61 Met DLNA kunt u mp3-muziek streamen die is opgeslagen op uw laptop/NAS of ander DLNA-compatibel apparaat om af te spelen op de DIR-250. Lenco DIR-250 is de standaard apparaatnaam op DLNA, maar u kunt de naam wijzigen zoals u wilt. (Zie paragraaf 5.3) De informatie hieronder betreft de introductie voor het instellen van media streaming vanaf een pc of andere mediaserver.
  • Seite 62 Android telefoon kunt delen. U kunt ook uw pc, mobiele Android telefoon of iPhone/iPad gebruiken om het afspelen van muziek te regelen op de DIR-250. (het is niet nodig elke bediening voor het afspelen op de DIR- 250 te regelen) De eisen voor de pc voor DLNA zijn Windows 7 en Windows Media Player 12.
  • Seite 63 Open Windows Media Player om Allow remote control of my Player (Sta afstandsbediening vanaf mijn speler toe) in te schakelen. Rechtsklik op het gewenste muziekbestand in de bibliotheek en selecteer Play to Lenco DIR- 250 (Afspelen op Lenco DIR-250).
  • Seite 64 Er zal een venster verschijnen om het afspelen van de muziek op de Lenco DIR-250 te regelen. U kunt elke gratis of commerciële DLNA-app van Google Play of de Apple Store zoeken en installeren als u gebruik maakt van Android mobiel, tablet of iPhone/iPad. Wij raden u aan om Bubble UPnP, Media Share op Android-mobiel, tablet of iPhone/iPad te gebruiken.
  • Seite 65 Procedures voor het afspelen van gedeelde muziek op de app zijn: Selecteer Lenco DIR-250 als speler. Sommige apps staan toe dat de muziek op meerdere spelers tegelijk wordt afgespeeld. Selecteer de (music server) muziek-server en kies de muziek. Sommige apps kunnen een afspeellijst maken als u voor meerdere muziektracks kiest.
  • Seite 66: Overzicht

    5 DIR-250 Functie 5.1 Overzicht...
  • Seite 67: Hoofdmenu

    5.2 Hoofdmenu Onder het hoofdmenu kunt u de QR-code scannen om door te gaan 5.3 Configuratie 5.3.1 Tijdweergave Stel de tijdweergave in op analoge of digitale weergave. 5.3.2 Beheer My mediaU My mediaU mediatheek - het beheren van radiostations via internet Om toegang te krijgen tot uw favoriete radiostations, wereldwijd, op elk moment, met streamingsmogelijkheden op al uw apparaten, kunt u een gratis account voor een mediatheek aanmaken op www.mediayou.net en zoveel apparaten toevoegen als u wilt.
  • Seite 68 Wireless Info > MAC Address (Informatiecentrum > Systeeminformatie > Draadloze informatie > MAC-adres). Na het registreren van het apparaat, moet u deze functie inschakelen op de DIR-250 in het menu Configuration (Configuratie) > Manage my mediaU (Beheer my mediaU. Zodat de internetradio toegang kan krijgen tot de mediabibliotheek.
  • Seite 69 Het apparaat maakt automatisch verbinding met uw account en toont wat daar is vastgelegd: - Favorite Station (Favoriete zender) - Favorite Location/Genre (Favoriete locatie/Genre) - My Local Station (Mijn lokale station) - Manually Add (Handmatig toevoegen) Afhankelijk van uw persoonlijke My mediaU-instellingen, kan de weergave op de ●...
  • Seite 70 Onder Add Manually (Handmatig toevoegen), kunt u het apparaat bijvoorbeeld met podcasts verbinden. Voor dit doel dient u de URL van de podcast te kennen. 1. Vul in uw MediaYou-account de gemarkeerde velden in via “Add Manually” (Handmatig toevoegen). 2. Ga op de internetradio naar Configuration> Manage my mediaU (Configuratie >...
  • Seite 71 Als u gebruik maakt van een router met een WPS/QSS-toets, dan kunt u de netwerkverbinding instellen via de WPS-functie. Druk binnen 120 seconden op de WPS/QSS- toets op uw router. De verbinding tussen de router en DIR-250 wordt dan automatisch geconfigureerd, dus u hoeft het wifi-wachtwoord niet in te typen.
  • Seite 72 Handmatige configuratie ● U kunt DHCP kiezen (waarmee het IP-adres automatisch wordt toegewezen) of het IP-adres zelf invoeren. Wanneer u de handmatige instelling voor de bekabelde verbinding selecteert, dient u het volgende in te voeren: 1. SSID (de naam van het toegangspunt); 2.
  • Seite 73: Datum & Tijd

    5.3.4 Datum & Tijd De instellingen voor datum en tijd kunnen alleen worden gemaakt als de internetradio is verbonden met een draadloos netwerk. Datum en tijd instellen: De internetradio neemt automatisch de datum en tijd over van de centrale server als eenmaal de netwerkverbinding tot stand is gebracht. Echter, u dient voor de overgang van wintertijd naar zomertijd de tijd handmatig te wijzigen.
  • Seite 74 Er zijn drie onafhankelijke soorten alarm - 2 keer alarm voor een absolute tijdinstelling (Alarm 1 en Alarm 2) en 1 alarm voor een relatieve tijdinstelling (NAP-alarm). Selecteer Alarm in het configuratiemenu of druk op de alarmtoets (12) op het voorpaneel. De eerste twee alarmen (Alarm 1 en 2): schakel alarm 1 of 2 in, stel vervolgens de tijd in en stel deze in op Dagelijks, Eenmaal of elke specifieke dag van de week.
  • Seite 75 Nu kunt u Alarm Volume (Alarm-volume) kiezen om het volume van de alarmen te configureren. Als het/de alarm(en) is/zijn ingesteld, verschijnt er een klokpictogram met alarmtijd bovenaan het scherm. Druk tijdens een alarm op de toets om het alarm te stoppen, druk op de toets SLEEP op het apparaat of druk op de toets op de afstandsbediening om de sluimerstand te activeren.
  • Seite 76 15/30/60/90/120/150/180 minuten. Nadat de tijd eenmaal is ingesteld, zal er rechtsboven in de hoek een slaapicoontje verschijnen met de resterende minuten. De DIR-250 schakelt naar stand-by wanneer de geconfigureerde tijd is verstreken. 5.3.13 Internetradio Buffer...
  • Seite 77 5.3.14 Het weer Stel de locatie in voor de nauwkeurigheid van de weersinformatie. De DIR-250 kan de huidige weersinformatie weergeven in de stand-bymodus. Zet de stand- by-weergave aan en stel temperatuureenheid (°C of °F) in om het weer in de stand-bymodus weer te geven.
  • Seite 78: Afspelen Instellen

    5.3.17 Afspelen instellen Selecteer de afspeelmodus van het mediacentrum - Uit (geen herhaling of shuffle), Alles herhalen, Eén herhalen of Shuffle. 5.3.18 Apparaat Voer in om het apparaat een andere naam te geven of gebruik de optie “App” om de QR- code weer te geven voor het downloaden van de app.
  • Seite 79 5.3.23 Terugzetten naar standaard Herstel naar de standaardinstellingen. Nadat de DIR-250 is gereset, schakelt het systeem over naar het menu Language setting (Taal instellen) en gaat het automatisch naar het menu Network settings (Netwerk instellen).
  • Seite 80 5.4 Mijn MediaU Toon uw eigen mediaU-stationslijst en speel deze af vanaf de mediaU-server. Maar u moet eerst uw account instellen (zie hoofdstuk 5.3.2). 5.5 Internetradio Nadat de verbinding van een station tot stand is gebracht, wordt de informatie van het station op het display weergegeven.
  • Seite 81 Ga in de lijst met favoriete stations naar uw station, druk op OK om te beluisteren. U kunt ook op drukken om het submenu te Delete (Verwijderen) (een radiostation uit de favorietenlijst verwijderen), Shlft Up/down (omhoog/omlaag) langs de lijst schuiven, Rename (Hernoemen) (u kunt het radiostation een naam naar keuze geven), of Play (Afspelen).
  • Seite 82: Lokale Radio

    Voor elk station drukt u op OK om het direct af te spelen. U kunt op drukken op het submenu te openen – u kunt Add to Favorite (Toevoegen aan favorieten), Auto Scan (Automatisch zoeken) of Play (Afspelen). Wanneer u kiest voor Auto Scan (Automatisch zoeken), wordt elk station in de historie geselecteerd weergegeven.
  • Seite 83 Tijdens het afspelen: Druk op de toets om te pauzeren/starten Druk op de toets om een track verder of terug te gaan Druk op de toets om terug te keren naar de huidige afspeellijst OPMERKING: USB-apparaat is geselecteerd wanneer het is geplaatst 5.7.2 UPnP Als u gedeelde media hebt ingesteld, moet u de gedeelde media in UPnP zien.
  • Seite 84: Financiële Informatie

    De DIR-250 kan de weersinformatie weergeven in de stand-bymodus. Wanneer weersinformatie is geselecteerd, moet u uw locatie selecteren, bijvoorbeeld ‘europa’ en op OK drukken. Selecteer nu het land en selecteer daarna uw provincie en stad. Druk op de weerinformatiepagina op Rechts en vervolgens wordt “Add to Standby Display (Toevoegen aan stand-byweergave“...
  • Seite 85 FM-station te zoeken. De frequentie op het display begint op te lopen omdat de DIR-250 de FM-band doorzoekt en stopt wanneer het een station heeft ontvangen. U kunt op op de afstandsbediening drukken om het station fijn af te stemmen, elke stap verplaatst 0,05 MHz.
  • Seite 86 Zorg ervoor dat er geen ander Bluetooth-apparaat is verbonden met de radio. “Bluetooth Disconnected (Bluetooth verbroken)” zal op het display verschijnen. Schakel de Bluetooth-modus in op het apparaat dat u met de DIR-250 wilt verbinden en zoek naar nieuwe apparaten.
  • Seite 87 Media Player niet mogelijk zijn. Spotify Gebruik uw telefoon, tablet of computer als afstandsbediening voor Spotify. Als wifi is ingeschakeld op uw DIR-250, dan kan het u zelfs wakker maken wanneer u Spotify selecteert op uw smartphone en het afspeelapparaat Lenco DIR-250 selecteert.
  • Seite 88: Technische Specificaties

    Technische specificaties Aansluitingen DC, 3,5 mm AUX-IN/AUX-UIT, 3,5 mm hoofdtelefoonuitgang, audio-uitgang (analoog); Digitaal optisch, digitaal coaxiaal; USB; W-lan; Antenne; Ingang 100-240VAC – 50/60Hz Uitgang 5 V/1,5 A Totaal vermogen Geen ingebouwde luidspreker Batterijen in de afstandsbediening AAA x 2 Opgenomen vermogen Max 7,5 W Stroomverbruik (in stand-by) <...
  • Seite 89 Voedingsadapter: (Alleen voor EU) Fabrikant: SHENZHEN SHI GUANGKAIYUAN TECHNOLOGY., LTD Modelnummer: GKYPS0150050EU1 Gebruik alleen de originele wisselstroomadapter Gebruik uitsluitend het voedingsapparaat dat in de gebruiksaanwijzingen staat vermeld. Informatie Waarde en precisie SHENZHEN SHI Naam of handelsmerk van de fabrikant, GUANGKAIYUAN handelsregistratie en adres TECHNOLOGY., LTD GKYPS0150050EU1...
  • Seite 90 Garantie Lenco biedt service en garantie aan overeenkomstig met de Europese wetgeving. Dit houdt in dat u, in het geval van reparaties (zowel tijdens als na de garantieperiode), uw lokale handelaar moet contacteren. Belangrijke opmerking: Het is niet mogelijk om producten die moeten worden gerepareerd rechtstreeks naar Lenco te sturen.
  • Seite 91: Deutsch

    Deutsch ACHTUNG: Eine andere als die hier beschriebene Bedienung, Einstellung oder Verwendung der Funktionen kann zu gefährlicher Strahlenbelastung führen. VORSICHTSMASSNAHMEN VOR DER BENUTZUNG BEFOLGEN SIE IMMER FOLGENDE ANWEISUNGEN: Blockieren oder bedecken Sie keine Lüftungsöffnungen. Wenn Sie das Gerät auf ein Regal stellen, lassen Sie um das gesamte Gerät 5 cm (2”) freien Platz.
  • Seite 92 15. Unterbrechen Sie die Verbindung nicht während einer Formatierung oder einer Datenübertragung. Bei Unterbrechung drohen Datenverlust und Datenbeschädigung. 16. Wenn das Gerät eine USB-Wiedergabefunktion besitzt, dann stecken Sie den USB-Stick direkt in das Gerät. Verwenden Sie kein USB-Verlängerungskabel, weil die erhöhte Störungsanfälligkeit zu Datenverlust führen könnte.
  • Seite 93 ⚫ [Die mit diesem Produkt mitgelieferte Fernbedienung] enthält eine Knopfbatterie. Das Verschlucken der Batterie kann innerhalb von nur 2 Stunden zu schwersten inneren Verbrennungen mit Todesfolge führen. ⚫ Halten Sie neue und gebrauchte Batterien von Kindern fern. ⚫ Verwenden Sie dieses Produkt nicht weiter und halten Sie es von Kindern fern, wenn das Batteriefach nicht sicher schließt.
  • Seite 94: Ansicht Von Vorn

    DAB/FM-Innenraumantenne WLAN-Antenne ANSCHLUSS • Packen Sie alle Teile aus und entfernen Sie danach die Schutzmaterialien. • Schließen Sie das Gerät nicht eher an das Netz an, bevor Sie die Netzspannung überprüft haben und alle anderen notwendigen Verbindungen hergestellt sind. ANSICHT VON VORN 1.
  • Seite 95: Ansicht Von Hinten

    ANSICHT VON HINTEN 15. DC-Eingangsbuchse: 20. OPTISCHE DIGITALAUDIOAUSGANGSBUCHSE 16. Anschlussbuchse WLAN-Antenne 21. KOAXIALE DIGITALAUDIOAUSGANGSBUCHSE 17. ANALOGE AUDIOAUSGANGSBUCHSE 22. LAN-EINGANGSBUCHSE 23. Antennenanschlussbuchse 18. ANALOGE AUDIOEINGANGSBUCHSE 19. ANALOGE AUDIOAUSGANGSBUCHSE...
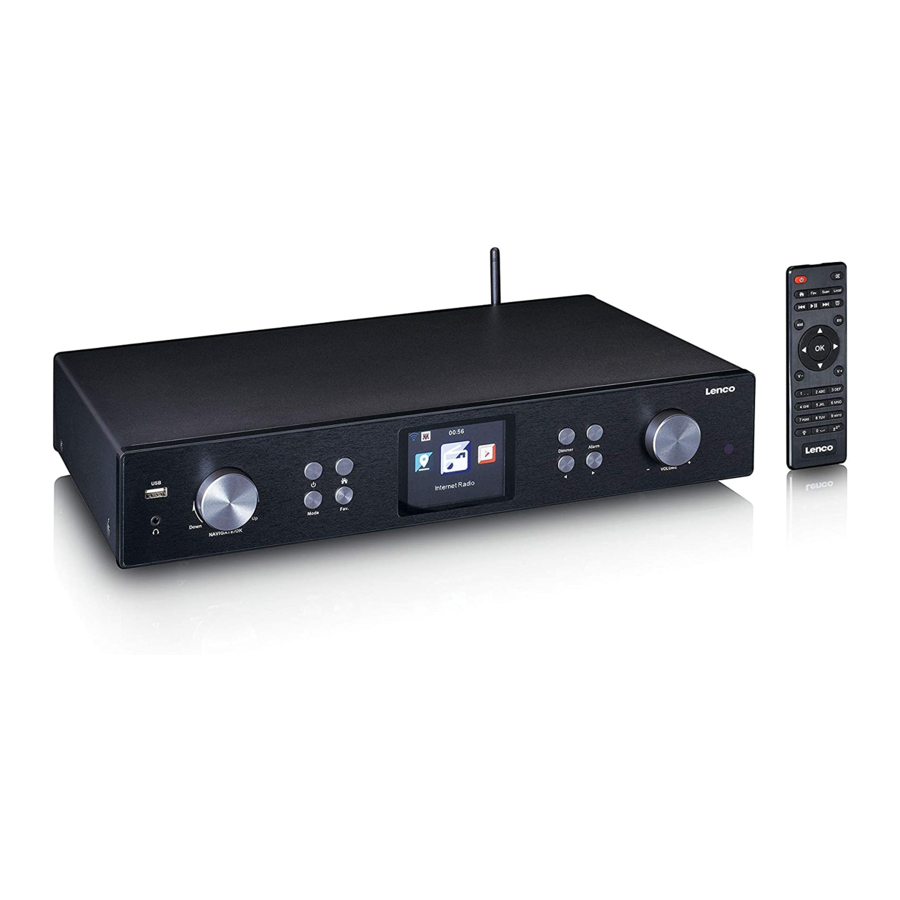
  • Seite 96: Fernbedienung

    FERNBEDIENUNG 1. Standby-Taste 12. EQ-Einstelltaste 2. Lautsprecher EIN/AUS 13. Nach-oben-Navigationstaste 3. Hauptmenü 14. Nach-links-Navigationstaste 4. Gespeicherte Radiosender, Favoriten 15. Auswahlbestätigung usw. 16. Nach-rechts-Navigationstaste 5. DAB/FM-Scan 17. Nach-unten-Navigationstaste 6. Lokale Radiosender 18. Lautstärke verringern 7. Einen Titel zurückspringen 19. Lautstärke erhöhen 8.
  • Seite 97 Einlegen der Batterie der Fernbedienung: Drücken Sie auf die sich auf der Batterieabdeckung befindliche Markierung „OPEN“ und schieben Sie dann den Batteriedeckel nach unten Legen Sie zwei (2) 1,5-V-Batterien vom Typ AAA im Batteriefach ein (achten Sie darauf, dass Sie sie polrichtig einlegen) Schieben Sie die Batterieabdeckung wieder auf das Batteriefach Vorsichtsmaßnahmen im Umgang mit Batterien: Befolgen Sie diese Sicherheitsmaßnahmen:...
  • Seite 98 Schrauben Sie die WLAN-Antenne wie abgebildet in Uhrzeigersinn unter Zuhilfenahme geeigneter Werkzeuge fest. Stecken Sie die FM-Innenraumantenne wie abgebildet in die Antennenbuchse.
  • Seite 99: Analoge Audioausgangsverbindungen

    ANALOGE AUDIOAUSGANGSVERBINDUNGEN Connect the RCA cable as illustrated below. Schließen Sie das Cinchkabel wie nachstehend abgebildet an. white Weiß RCA Cable NOT Included Cinchkabel NICHT im Lieferumfang enthalten Rear View of the TV Soundbar, Tower Rückansicht der TV-Soundbar, des Turmlautsprechers usw. Speaker etc.
  • Seite 100: Digitale Audioausgangsverbindungen

    Connect the 3.5mm AUX OUT cable as Schließen Sie das 3,5-mm-AUX- illustrated below. Ausgangskabel wie nachstehend abgebildet AUX Cable NOT Included AUX-Kabel NICHT im Lieferumfang enthalten Rear View of the TV Soundbar, Tower Rückansicht der TV-Soundbar, des Speaker, Mini Speaker etc. Turmlautsprechers, des Minilautsprechers usw.
  • Seite 101: Netzwerkvoraussetzungen

    Zum Koaxeingang des externen Verstärkers with built-in decoder mit integriertem Decoder 1 Voraussetzungen für die Benutzung des DIR-250 1.1 Netzwerkvoraussetzungen Vor der Benutzung des DIR-250 müssen nachstehende Voraussetzungen erfüllt sein: Ein Breitbandanschluss in Verbindung mit einem kabelgebundenen oder kabellosen Zugangspunkt, Router oder ähnlichem Netzwerkgerät.
  • Seite 102: Angezeigte Symbole

    Der WLAN-Router muss die WLAN-Spezifikationen (802.11 b/g/n) unterstützen. Ein sich im selben Netzwerk wie das DIR-250 befindliches Smartphone, Tablet-PC oder Computer. Angezeigte Symbole Verbindung wird aufgebaut Keine Funknetzwerkverbindung Funknetzwerkverbindung aufgebaut Kabelnetzwerkverbindung aufgebaut Keine Kabelnetzwerkverbindung VHF-Radioempfang: Mono VHF-Radioempfang: Stereo VHF-Radiofunktion ausgewählt AUX-Funktion ausgewählt...
  • Seite 103 Hinweis: Ein WLAN ermöglicht Ihnen die Datenübertragung ohne Kabelverbindung zwischen den Geräten über kurze Strecken bis 20 Meter. Wände und Decken können diese WLAN-Reichweite verringern. Versuchen Sie deshalb, Ihr DIR-250 und/oder Ihren Zugangspunkt innerhalb der obengenannten Entfernung aufzustellen und jegliche Behinderungen zwischen den beiden Geräten zu vermeiden.
  • Seite 104 Wählen Sie für den Verbindungsaufbau zu einem Netzwerk Yes (Ja) aus. ● Wenn Sie „Yes“ (Ja) (WPS) (nur für WPS-Router) auswählen, dann drücken Sie ● anschließend die WPS-Taste Ihres Routers. Wenn Sie „Yes“ (Ja) auswählen, dann wechselt der Bildschirm zum Scannen nach Funknetzwerken und zeigt anschließend die verfügbaren Funknetzwerke an.
  • Seite 105 Geben Sie das Passwort mit Hilfe der Navigationstasten am Gerät oder auf der Fernbedienung ein. Sie können für die Eingabe des WLAN-Passwortes den NACH-OBEN/UNTEN-Drehknopf drehen. Bei versehentlich falscher Eingabe können Sie „ “ drücken, um eine Eingabeposition vorzugehen. Drücken Sie „ “, um eine Eingabeposition zurückzugehen und die Eingabe zu korrigieren.
  • Seite 106 Mittels Fernbedienung Der Cursor markiert die aktuelle Eingabeposition. Drücken Sie mehrmals die entsprechende Zifferntaste. 0 (Eingabe löschen) 1 (Leerzeichen) @ ! ” # $ % & () * ’ + - { \ | }< >?... 2 A B C a b c 3 D E F d e f 4 G H I g h i 5 J K L j k l...
  • Seite 107: Über Das Streamen Von Musik

    , um in den Standby-Modus zu wechseln. Die Uhrzeit, das ● Datum und alle aktiven Weckrufe werden auf dem Display angezeigt. Wenn Sie eine Netzwerkverbindung eingerichtet haben, dann stellt das DIR-250 eine ● Verbindung zu diesem Netzwerk automatisch wieder her, wenn es erneut eingeschaltet wird.
  • Seite 108 Geräten abhängig. Mit DLNA können Sie die auf Ihrem Laptop/NAS oder anderen DLNA-kompatiblen Geräten gespeicherte MP3-Musik zu Ihrem DIR-250 streamen und wiedergeben lassen. Der standardmäßige DLNA-Name lautet Lenco DIR-250, den Sie jedoch ganz nach Belieben ändern können. (siehe Abschnitt 5.3) Nachfolgend finden Sie eine Anleitung darüber, wie Sie das Streamen von Medien vom PC...
  • Seite 109: Dlna-Funktion

    PC oder Android-Mobilgerät freigeben und Ihren PC, Ihr Android-Mobilgerät oder Ihr iPhone/iPad für die Steuerung der Musikwiedergabe auf dem DIR-250 benutzen können. (Es wird nicht benötigt, wenn Sie jede Wiedergabe über Ihr DIR-250 steuern) Die Mindestanforderung für DLNA ist ein PC mit Windows 7 und Windows Media Player ●...
  • Seite 110 Öffnen Sie den Windows Mediaplayer, um Allow remote control of my Player (Remotesteuerung meines Players erlauben) zu aktivieren. Wählen Sie mit einem Rechtsklick die gewünschte Musik in der Medienbibliothek und anschließend Play to Lenco DIR-250 (auf dem Lenco DIR-250 wiedergeben) aus.
  • Seite 111 Es erscheint ein Fenster für die Steuerung der Musikwiedergabe auf dem Lenco DIR-250. Wenn Sie ein Android-Mobilgerät, Tablet-PC oder iPhone/iPad benutzen, können Sie freie oder kostenpflichtige DLNA-Apps auf Google Play oder Apple Store suchen und von dort aus auch installieren. Es ist empfehlenswert, für die Medienfreigabe auf Android-Mobilgeräten, Tablet-PCs oder iPhones/iPads Bubble UPnP zu benutzen.
  • Seite 112: Server-, Player- Und Musikauswahl

    Die Schritte für die Wiedergabe freigegebener Musik über die App sind folgende: Wählen Sie das Lenco DIR-250 als Player aus. Einige APPs erlauben die gleichzeitige Wiedergabe der Musik auf verschiedenen Musikwiedergabegeräten. Wählen Sie einen Musikserver und danach die wiederzugebende Musik aus. Einige Apps unterstützen bei der Mehrfachauswahl von Musik das Anlegen einer Playlist...
  • Seite 113: Überblick

    5 DIR-250-Funktionen 5.1 Überblick...
  • Seite 114: Hauptmenü

    5.2 Hauptmenü Im Hauptmenü können Sie den QR-Code scannen, um fortzusetzen 5.3 Konfiguration 5.3.1 Zeitanzeige Stellen Sie Time display (Zeitanzeige) auf analoge oder digitale Zeitanzeige. 5.3.2 Mein mediaU verwalten Meine mediaU-Medienbibliothek – Verwalten der Radiosender über das Internet Sie können unter www.mediayou.net ein kostenfreies Konto für eine Medienbibliothek anlegen und so viel Geräte wie Sie möchten hinzufügen, damit Sie jederzeit mit einem beliebigen Gerät mit Streamingfunktionalität überall auf der Welt auf Ihre Lieblingsradiosender zugreifen können.
  • Seite 115 Die MAC-Adresse Ihres Internetradios finden Sie unter Information Center (Informationscenter) -> System information (Systeminformationen) -> Wireless Info (Funknetzwerkinformationen) -> MAC Address (MAC-Adresse). Nach der Registrierung des Geräts müssen Sie diese Funktion noch auf Ihrem DIR-250 unter Configuration (Konfigurationsverwaltung) -> Manage my mediaU (Mein MediaU verwalten) aktivieren.
  • Seite 116 Das Gerät verbindet sich automatisch mit Ihrem Konto und zeigt die hier gespeicherten Inhalte an. Favorite Station (Lieblingsradiosender) Favorite Location/Genre (Lieblingsstandorte/Lieblingsgenre) My Local Station (Meine lokalen Radiosender) Manually Add (Manuell hinzufügen) Je nach Ihren benutzerdefinierten My mediaU-Einstellungen kann die Anzeige des ●...
  • Seite 117 Unter Add manually (Manuell hinzufügen) können Sie das Gerät beispielsweise für Podcasts verlinken. Hierfür müssen Sie die URL des Podcasts kennen. 1. Füllen Sie die unter „Add manually“ (Manuell hinzufügen) markierten Felder in Ihrem MediaYou-Konto aus. 2. Wechseln Sie beim Internetradio zu Configuration (Konfiguration) -> Manage my mediaU (Mein MediaU verwalten) und aktivieren Sie es erneut.
  • Seite 118 Wenn Sie einen Router benutzen, der eine WPS/QSS-Taste besitzt, dann können Sie die Netzwerkverbindung auch über die WPS-Funktion einrichten. Drücken Sie innerhalb von 120 Sekunden die WPS/QSS-Taste Ihres Routers. Daraufhin wird die Verbindung zwischen Router und DIR-250 automatisch konfiguriert. In diesem Fall müssen Sie kein WLAN-Passwort eingeben.
  • Seite 119 Manuelle Konfiguration ● Sie können DHCP (das die IP-Adresse automatisch zuweist) auswählen oder die IP-Adresse selbst eingeben. Wenn Sie sich für die manuelle Einrichtung des Kabelnetzwerkes entscheiden, dann sind nachstehende Informationen einzugeben: 1. SSID (der Name des Zugangspunktes); 2. IP-Adresse; 3.
  • Seite 120: Datum Und Zeit

    5.3.4 Datum und Zeit Sowohl Datum als auch Uhrzeit können entweder automatisch bezogen werden, wenn das Internetradio mit einem Funknetzwerk verbunden ist oder über das Einrichtungsmenü per Hand eingestellt werden. Einstellen von Datum und Uhrzeit: Das Internetradio empfängt sowohl Datum als auch Uhrzeit von einem zentralen Server, sobald die Netzwerkverbindung aufgebaut ist.
  • Seite 121 Das Gerät besitzt drei voneinander unabhängige Weckrufe – 2 Weckrufe für eine absolute Zeiteinstellung (Alarm 1 und Alarm 2 (Weckruf 1 und 2)) und 1 Weckruf für eine relative Zeiteinstellung (NAP Alarm (Kurzschlafweckruf)). Wählen Sie im Konfigurationsmenü Alarm (Weckruf) aus oder drücken Sie die Weckruftaste (12) am Bedienfeld.
  • Seite 122 innerhalb einer Minute keine Netzwerkverbindung hergestellt werden kann, dann wechselt der Weckklang automatisch zu Melodie. 5.3.6 Kurzschlafweckruf: Sie können ein Nickerchen machen. Sie können eine Kurzschlafweckzeit von 5, 10, 20, 30, 60, 90 oder 120 Minuten einstellen. Anschließend können Sie Alarm Volume (Weckruflautstärke) auswählen, um die Lautstärke des Weckrufes einzustellen.
  • Seite 123: Energieverwaltung

    (Einschlafautomatik) aus, um anschließend die Dauer bis zum Ausschalten auf 15/30/60/90/120/150/180 Minuten zu setzen. Sobald Sie die Einschlafautomatik eingestellt haben, erscheint in der oberen rechten Ecke ein Bettsymbol zusammen mit der noch verbleibenden Zeit. Wenn die eingestellte Zeit abgelaufen ist, dann wechselt Ihr DIR-250 in den Standby-Modus.
  • Seite 124 5.3.14 Wetter Stellen Sie hier Ihren Standort für präzise Wetterinformationen ein. Ihr DIR-250 kann die aktuellen Wetterinformationen im Standby-Modus anzeigen. Wechseln Sie zur Standby-Anzeige und stellen Sie die Temperatureinheit (°C oder °F) ein, damit das Wetter im Standby-Modus angezeigt wird.
  • Seite 125 DAB Threshold (DAB-Empfindlichkeit): Stellen Sie hier die DAB-Empfindlichkeit auf Stark, Standard oder Schwach. Service following (FM-IR) (Dienst nachverfolgen): Aktivieren Sie es für einen der 7 Kontinente oder deaktivieren Sie es. Service following (DAB-IR) (Dienst nachverfolgen): Aktivieren Sie es für einen der 7 Kontinente oder deaktivieren Sie es.
  • Seite 126 Speicherplätze Einschlafautomatik Timer 5.3.20 Equalizer Die Standard-EQ-Einstellung ist Normal. Mögliche EQ-Einstellungen sind: Normal, Flat (Flach), Jazz, Rock, Soundtracks (Filmmusik), Classical (Klassik), Pop, News (Nachrichten) oder myEQ (benutzerdefinierter EQ). Drücken Sie die Taste EQ auf der Fernbedienung, um zwischen den verschiedenen EQ- Einstellungen zu wechseln.
  • Seite 127 Hierüber stellen Sie die Standardeinstellungen wieder her. Nachdem Sie das DIR-250 rückgesetzt haben, wechselt es zum Einstellungsmenü Language (Sprache) und anschließend automatisch zum Einstellungsmenü Network (Netzwerk). 5.4 My mediaU Hier können Sie Ihre eigene mediaU-Senderliste vom mediaU-Server anzeigen und wiedergeben lassen, wofür Sie jedoch zuerst ein Konto einrichten müssen (siehe Abschnitt 5.3.2).
  • Seite 128 Navigieren Sie in der Liste bevorzugter Sender zu Ihrem Radiosender und drücken Sie OK, um ihn wiedergeben zu lassen. Sie können aber auch durch Drücken von in sein Untermenü wechseln und Delete (Löschen) (löschen eines Radiosenders aus der Favoritenliste) auswählen, sich in der Liste Auf/Abwärts bewegen sowie Rename (Umbenennen) (Sie können dem Radiosender einen beliebigen Namen geben) oder Play (Wiedergabe) auswählen.
  • Seite 129 Sie können jeden Radiosender durch Drücken von OK direkt wiedergeben lassen. Sie können die Nach-rechts-Taste drücken, um in das entsprechende Untermenü zu gelangen – hier können Sie Add to Favorite (Den Favoriten hinzufügen), Auto Scan (Autom. Senderscan) oder Play (Wiedergabe) auswählen. Wenn Sie Auto Scan (Autom. Senderscan) ausgewählt haben, dann wird jeder Radiosender dieser Unterkategorie angespielt.
  • Seite 130: Meine Wiedergabeliste

    Das Gerät kann die IP-Adresse benutzen, um den aktuellen Standort zu ermitteln und anschließend automatisch eine Liste der lokalen Radiosender generieren. Sie können jedoch auch ein anderes Land auszuwählen. 5.7 Mediencenter 5.7.1 Hierüber wechseln Sie zum USB-Datenträger. Wenn am Gerät kein USB-Datenträger angeschlossen ist, dann wird auf dem Display „Empty“...
  • Seite 131: Wiedergabeliste Löschen

    Es sind Wetterinformationen und Wettervorhersagen für 2000 Städte verfügbar. Wählen Sie zuerst ein Land und danach eine Stadt für die Wetterinformationen aus. Ihr DIR-250 kann im Standby-Modus Wetterinformationen anzeigen. Wenn Sie Wetterinformationen auswählen, dann müssen Sie Ihren Standort wie beispielsweise „Europe“ (Europa) angeben. Bestätigen Sie Ihre Auswahl mit OK.
  • Seite 132: Systeminformationen

    Fernbedienung gedrückt oder drücken Sie am Gerät die Taste , um nach FM-Radiosendern zu suchen. Während das DIR-250 das FM-Band aufwärts scannt, wird die entsprechende Frequenz angezeigt. Der Scan stoppt, wenn ein Radiosender gefunden wurde. Sie können jetzt auf der Fernbedienung drücken, um den Radiosender in 0,05-MHz-Schritten feinabzustimmen.
  • Seite 133 Vergewissern Sie sich, dass kein anderes Bluetooth-Gerät mit dem Radio verbunden ist. Auf dem Display wird „Bluetooth Disconnected“ (Bluetooth getrennt) angezeigt. Aktivieren Sie den Bluetooth-Modus des Geräts, das Sie mit dem DIR-250 verbinden möchten und scannen Sie anschließend nach neuen Geräten.
  • Seite 134: Fernbedienen Über Apps

    Wählen Sie in der Liste gefundener Geräte Lenco DIR-250 aus. Falls ein PIN-Code verlangt wird, dann geben Sie 0000 (4 Nullen) ein. Bei bestimmten Geräten werden Sie zudem zur Bestätigung des Verbindungsaufbaus aufgefordert. Wenn die Verbindung erfolgreich aufgebaut worden ist, dann wird auf dem Display des Lenco DIR-250 „Bluetooth Connected”...
  • Seite 135: Technische Daten

    Technische Daten Anschlüsse DC, 3,5-mm-AUX-Ein-/Ausgang, 3,5-mm- Kopfhörerausgang, Audioausgang (analog), optischer Digitalaudioausgang, koaxialer Digitalaudioausgang, USB, WLAN, Antenne Eingangsspannung 100 – 240 V AC – 50/60 Hz Ausgangsspannung 5 V/1,5 A Ausgangsleistung Kein eingebauter Lautsprecher Batterien in der Fernbedienung 2 x AAA Leistungsaufnahme Max.
  • Seite 136 Netzadapter: (Nur für EU) Hersteller: SHENZHEN SHI GUANGKAIYUAN TECHNOLOGY., LTD Modellnummer: GKYPS0150050EU1 Benutzen Sie nur den original mitgelieferten Netzadapter Verwenden Sie nur die im Handbuch angegebene Stromversorgung. Informationen Wert und Genauigkeit SHENZHEN SHI Name des Herstellers oder der Handelsmarke, GUANGKAIYUAN kommerzielle Zulassung und Anschrift TECHNOLOGY., LTD GKYPS0150050EU1...
  • Seite 137 Falle von Reparaturen (sowohl während als auch nach Ablauf der Garantiezeit) mit Ihrem Fachhändler in Verbindung. Wichtiger Hinweis: Es ist nicht möglich, Produkte für Reparaturen direkt an Lenco zu schicken. Wichtiger Hinweis: Wenn dieses Gerät für welchen Grund auch immer durch ein nicht offizielles Service-Center geöffnet wurde oder durch dieses Service-Center darauf zugegriffen wurde,...
  • Seite 138: Français

    Français ATTENTION : L’utilisation de commandes ou d’ajustements ou l’exécution de procédures autres que celles spécifiées dans le présent document peuvent entraîner une exposition dangereuse aux radiations. PRÉCAUTIONS AVANT UTILISATION GARDEZ CES INSTRUCTIONS À L’ESPRIT : Ne couvrez pas et n’obturez pas les ouvertures de ventilation. Lorsque vous placez l’appareil sur une étagère, laissez 5 cm (2”) d’espace libre tout autour de l’appareil.
  • Seite 139 15. N’interrompez pas la connexion lorsque l’appareil formate ou transfère des fichiers. Dans le cas contraire, les données pourraient être endommagées ou perdues. 16. Si l’appareil a une fonction de lecture USB, il faut brancher la clé USB directement sur l’appareil.
  • Seite 140 ⚫ La télécommande fournie contient une pile bouton/pièce de monnaie. Si la pile est avalée, elle peut causer de graves brûlures internes en seulement 2 heures et peut entraîner la mort. ⚫ Tenez les piles neuves et usagées hors de portée des enfants. ⚫...
  • Seite 141: Vue De Face

    Antenne DAB/FM intérieure Antenne WiFi INSTALLATION • Déballez toutes les pièces et enlevez le matériau de protection. • Ne connectez pas l’unité au secteur avant d’avoir vérifié la tension du secteur et avant que toutes les autres connexions n’aient été effectuées. VUE DE FACE 1.
  • Seite 142: Vue De Derrière

    5. Bouton Mode 12. Bouton Alarme 6. Fav. Touche 13. Molette de réglage du volume 7. Bouton Accueil 14. Capteur de la télécommande VUE DE DERRIÈRE 15. Prise d’entrée CC 20. Prise DE SORTIE AUDIO OPTIQUE NUMÉRIQUE 16. Port d’installation de l’antenne W- 21.
  • Seite 143 TÉLÉCOMMANDE 1. Bouton veille 12. Bouton de réglage de l’égaliseur 2. COUPER/ACTIVER le son des haut- 13. Bouton Navigation vers le haut parleurs 14. Bouton Navigation vers la gauche 3. Menu principal 15. Pour confirmer la sélection 4. Stations enregistrées, Favoris, etc. 16.
  • Seite 144 Insertion des piles de la télécommande: Enfoncez le repère « open » du couvercle du compartiment à piles et faites-le glisser vers le bas. Insérez deux (2) piles AAA de 1,5 V dans le compartiment à piles (vérifiez la polarité lors de l’insertion).
  • Seite 145 Serrez l’antenne W-lan dans le sens horaire en utilisant l’outil approprié comme illustré. Branchez l’antenne FM dans le port d’antenne comme illustré.
  • Seite 146 RACCORDEMENTS DE SORTIE AUDIO ANALOGIQUE Connect the RCA cable as illustrated below. Connectez le câble RCA comme illustré ci- dessous. Rouge white Câble RCA Cable NOT Included RCA blanc NON fourni Rear View of the TV Soundbar, Tower Vue arrière de la barre de son du téléviseur, de l’enceinte colonne, etc.
  • Seite 147 Connect the 3.5mm AUX OUT cable as Connectez le câble de SORTIE AUX de illustrated below. 3,5 mm comme illustré ci-dessous. AUX Cable NOT Included Câble AUX NON fourni Rear View of the TV Soundbar, Tower Vue arrière de la barre de son du téléviseur, Speaker, Mini Speaker etc.
  • Seite 148: Configuration Réseau Requise

    1 Exigences relatives à l’utilisation du DIR-250 1.1 Configuration réseau requise Avant d’utiliser le DIR-250, les exigences suivantes sont nécessaires: Une large bande passante ainsi qu'un point d'accès filaire/sans fil, un routeur ou un dispositif de réseau similaire.
  • Seite 149: Symboles Affichés

    Le routeur de réseau Wifi doit prendre en charge la connexion WIFI sans fil (802.11 b/g/n). Un smart phone, une tablette ou un PC qui se trouve sur le même réseau que le DIR- Symboles affichés établir la connexion Aucune connexion sans fil Connexion sans fil établie Connexion câblée établie Aucune connexion câblée...
  • Seite 150 20 mètres sans devoir câbler les appareils. Les murs et les plafonds peuvent réduire la portée du WIFI. Essayez donc de localiser le DIR-250 et/ou le point d’accès dans la distance ci-dessus et d’éviter tout obstacle entre deux appareils.
  • Seite 151 Sélectionnez Yes (Oui) pour établir la connexion à un réseau ● Si vous sélectionnez Yes (Oui) (WPS) (uniquement pour les routeurs WPS) et que vous ● appuyez ensuite sur le bouton WPS de votre routeur. Si vous répondez « Yes » (Oui), l’écran passe à la recherche de réseau sans fil et une liste des réseaux sans fil disponibles s’affiche.
  • Seite 152 OK. Si votre WLAN est protégé par mot de passe, il vous sera demandé d’entrer le mot de passe wifi. Entrez le mot de passe à l’aide des boutons de navigation de l’appareil ou de la télécommande. Vous pouvez tourner le bouton HAUT/BAS pour entrer le mot de passe wifi. Si vous appuyez accidentellement sur «...
  • Seite 153 L’établissement de la connexion au réseau peut prendre quelques secondes. Une fois la connexion établie, le menu principal apparaît avec les éléments de menu suivants: Internet Radio (Radio internet): Accès aux stations de radio internationales Media Centre (Centre multimédia): Accédez à vos dispositifs UPnP via un logiciel avec capacité...
  • Seite 154 Assurez-vous que les fichiers musicaux sont à l’un des formats suivants: MP3, WMA, WAV ou AAC. Reportez-vous à la section 5.7 pour les détails du contrôle sur le DIR-250 pour la lecture de musique en continu. 3.1 UPnP Pour écouter de la musique en flux continu à...
  • Seite 155 Ajoutez les fichiers audio et les dossiers que vous souhaitez partager avec le Lenco DIR-250 à la médiathèque. Vous pouvez également profiter de la musique en continu à partir d’autres serveurs de musique comme le téléphone intelligent (plate-forme Android): Connectez le mobile au réseau Recherchez et installez des applications de partage de médias à...
  • Seite 156 Ouvrez Windows Media Player pour activer « allow remote control of tried player » (Autoriser le contrôle à distance du lecteur sélectionné). Faites un clic droit sur n’importe quelle musique de la bibliothèque et choisissez « Play to Lenco DIR-250 » (Lire sur le Lenco DIR-250).
  • Seite 157 Une fenêtre s’ouvre pour le contrôle de la lecture de la musique sur le Lenco DIR-250. Vous pouvez rechercher et installer n'importe quelle application DLNA gratuite ou payante dans Google Play ou Apple Store si vous utilisez un mobile Android, une tablette ou un iPhone/iPad.
  • Seite 158 Voici les procédures pour lire de la musique partagée sur l’application: Sélectionnez Lenco DIR-250 comme lecteur. Certaines applications peuvent permettre la lecture de musique sur plusieurs lecteurs en même temps. Sélectionnez le serveur de musique et choisissez la musique. Certaines applications peuvent créer une liste de lecture si vous choisissez plusieurs musiques.
  • Seite 159: Présentation

    5 Fonction DIR-250 5.1 Présentation...
  • Seite 160: Menu Principal

    5.2 Menu principal Dans le menu principal, vous pouvez scanner le code QR pour continuer 5.3 Configuration 5.3.1 Affichage de l'heure Réglez l’affichage de l’heure sur un affichage analogique ou numérique. 5.3.2 Gérer my mediaU Bibliothèque multimédia My mediaU: pour gérer des stations de radio par internet Pour accéder à...
  • Seite 161 > Wireless Info > MAC Address (Centre d’informations > Informations système > Informations sans fil > Adresse MAC). Après avoir enregistré l’appareil, vous devez activer cette fonction sur le DIR-250 sous le menu Configuration > Manage my mediaU (Gérer my mediaU).
  • Seite 162 L’appareil se connecte automatiquement à votre compte et affiche ce qui y a été enregistré: Favorite Station (Station favorite) Favorite Location/Genre (Emplacement favori/Genre) My Local Station (Ma station locale) Manually Add (Ajout manuel) En fonction de vos réglages personnels My mediaU, l’écran de la radio internet peut ●...
  • Seite 163 Dans « Add Manually » (Ajout manuel), vous pouvez lier l’appareil à des podcasts, par exemple. Pour cela, vous devez connaître l’URL du podcast. 1. Remplissez les champs en surbrillance dans votre compte MediaYou sous « Add Manually » (Ajout manuel). 2.
  • Seite 164 WPS. Appuyez sur le bouton WPS/QSS de votre routeur dans les 120 secondes. La connexion entre le routeur et le DIR-250 sera alors configurée automatiquement, de sorte que vous n’aurez pas à taper le mot de passe Wifi.
  • Seite 165: Date Et Heure

    Lorsque vous sélectionnez le réglage manuel pour une connexion filaire, vous devrez introduire les informations suivantes: 1. SSID (le nom du point d’accès); 2. Adresse IP; 3. Masque de sous-réseau; 4. Passerelle par défaut; 5. Serveur DNS préféré; 6. Serveur DNS auxiliaire. Vous pouvez choisir (gérer) un réseau spécifique si vous avez configuré...
  • Seite 166 Une fois le réseau sans fil connecté, l’heure GMT (+01:00) sert de référence pour le réglage de l’heure. Augmentez ou réduisez la valeur de l’heure selon votre fuseau horaire lorsque vous réglez l’heure. 5.3.5 Alarme Il y a trois alarmes indépendantes: 2 alarmes en temps absolu (Alarm 1 (alarme 1) et Alarm 2 (alarme 2) et 1 alarme en temps relatif (NAP Alarm) (alarme sieste).
  • Seite 167: Lecture Programmée

    saisie suivant à l’aide du bouton Confirmer ou en appuyant sur le bouton ok de la télécommande ou sur le bouton Navigate/OK du panneau avant. Choisissez maintenant « Sound » (Son) pour régler le son (de l’alarme) sur Beep, Melody ou Internet Radio/FM/DAB DAB+/USB (Bip, Mélodie ou Radio Internet/FM/DAB DAB +/USB).
  • Seite 168 5.3.8 Langue Sélectionner la langue du menu à l’écran English/German/French/Hungarian/Czech/Slovakian/Polish/Turkish (anglais/allemand/français/hongrois/tchèque/slovaquie/polonais/turc) etc, (au total 17 langues sont disponibles) 5.3.9 Gradateur de lumière Configurez la luminosité du rétro-éclairage de l’écran Sélectionnez « Power Saving » (Économie d'énergie) pour régler la luminosité du rétroéclairage pour le mode veille et sélectionnez «...
  • Seite 169: Minuteur De Mise En Veille

    « sleep timer » (Minuteur de mise en veille) dans le menu de configuration pour régler la durée sur 15/30/60/90/120/150/180 minutes. Une fois l’heure réglée, une icône de lit s’affiche au coin supérieur droit avec les minutes restantes. Le DIR-250 passe en mode veille lorsque le temps réglé expire. 5.3.13 Radio Internet Mémoire tampon Réglez la durée de mémoire tampon pour la lecture de musique sur 2/4/8 secondes.
  • Seite 170 5.3.14 Météo Définissez l’emplacement pour la précision des informations météorologiques. Le DIR-250 est capable d’afficher les dernières informations météorologiques en mode veille. Allumez l’écran de veille et réglez l’unité de la température (°C ou °F) pour afficher la météo en mode veille.
  • Seite 171 5.3.17 Configurer la lecture Sélectionnez le mode de lecture ou le centre multimédia: Désactivé (ni répétition ni lecture aléatoire), Répéter tout, Répéter une piste ou bien Lecture aléatoire. 5.3.18 Appareil Accédez pour renommer l’unité ou utilisez l’option « App » pour afficher le code QR pour le téléchargement de l'application.
  • Seite 172 5.3.23 Réinitialiser aux valeurs par défaut Rétablir les paramètres par défaut. Après la réinitialisation du DIR-250, le système passe au menu de réglage de la Language (Langue), puis automatiquement au menu de réglage du Network (réseau).
  • Seite 173: Radio Internet

    5.4 My MediaU Affichez et lisez votre propre liste de stations MediaU à partir du serveur MediaU, mais vous devez d’abord configurer votre compte (voir la section 5.3.2). 5.5 Radio Internet Lorsque la connexion d’une station est réussie, les informations de la station s’affichent à l’écran.
  • Seite 174: Station Radio/Musique

    Dans la liste des stations favorites, allez à votre station, appuyez sur OK pour l’écouter, Vous pouvez également appuyer sur pour accéder à son sous-menu et Delete (Supprimer) (supprime une station de radio de la liste des favoris), Shlft Up/down (Naviguer vzes lz Haut/bas) dans la liste, Rename (Renommer) (vous pouvez donner à...
  • Seite 175: Service Après-Vente

    5.5.4 Historique Liste des dernières stations écoutées. Pour chaque station, appuyez sur OK pour la lire directement. Vous pouvez appuyer sur pour accéder à son sous-menu - vous pouvez appuyer sur Add to Favorite, Auto Scan (Ajouter aux favoris, analyse auto) ou Play (Lire). Lorsque vous choisissez Auto Scan (analyse auto), l'appareil lira la bannière pour chaque station dans l'historique.
  • Seite 176 NAVIGATE de l’appareil et de la télécommande pour valider, puis sélectionnez le fichier souhaité à lire. Lors de la lecture: Appuyez sur la touche pour suspendre/lire Appuyez sur le bouton pour sauter une piste vers l’avant ou vers l’arrière Appuyez sur le bouton pour retourner à...
  • Seite 177: Centre D'informations

    Il existe des informations et prévisions météorologiques pour 2 000 villes. Sélectionnez le pays puis la ville pour les détails de la météo. Le DIR-250 est capable d’afficher les informations météorologiques en mode veille. Lorsque les informations météorologiques sont sélectionnées, vous devez choisir votre emplacement, exemple «...
  • Seite 178: Informations Système

    FM. L’affichage des fréquences commence à s’allumer lorsque le DIR-250 balaye la bande FM, il s’arrête lorsqu’il a reçu une station. Vous pouvez appuyer sur de la télécommande pour régler...
  • Seite 179 Activez le mode Bluetooth sur l’appareil que vous souhaitez connecter au DIR-250 et recherchez de nouveaux appareils. Sélectionnez le Lenco DIR-250 parmi les appareils qui se trouvent sur votre appareil. Si vous devez saisir un code PIN, entrez 0000 (quatre zéros). Certains appareils peuvent également...
  • Seite 180 Utilisez votre téléphone, tablette ou ordinateur comme une télécommande pour Spotify. Si le wifi est activé sur votre DIR-250, vous pouvez même le mettre en marche en sélectionnant spotify sur votre smartphone et en choisissant l’appareil de lecture Lenco DIR-250.
  • Seite 181: Caractéristiques Techniques

    Caractéristiques techniques Connexions CC, ENTRÉE/SORTIE AUX 3,5 mm, 3,5 mm Sortie écouteur, sortie audio (analogique ); optique numérique, coaxial numérique; USB; W-lan; antenne; Entrée 100 à 240 VCA – 50 à 60 Hz Sortie 5 V/1,5 A Sortie d’alimentation Aucun haut-parleur intégré Piles de la télécommande AAA*2 Puissance absorbée...
  • Seite 182 Adaptateur d’alimentation: (pour l’Europe uniquement) Fabricant: SHENZHEN SHI GUANGKAIYUAN TECHNOLOGY., LTD. Numéro du modèle: GKYPS0150050EU1 Utilisez uniquement l’adaptateur CA d’origine Utilisez uniquement l'alimentation électrique indiquée dans le mode d'emploi. Informations Valeur et précision Nom ou marque du fabricant, enregistrement SHENZHEN SHI commercial et adresse GUANGKAIYUAN TECHNOLOGY., LTD.
  • Seite 183 électriques (directive sur les déchets des équipements électriques et électroniques). Marquage CE Par la présente, Lenco Benelux B.V., Thermiekstraat 1a, 6361 HB Nuth, Pays-Bas, déclare que ce produit est conforme aux exigences principales des directives européennes. La déclaration de conformité peut être consultée via techdoc@commaxxgroup.com...
  • Seite 184: Español

    Español PRECAUCIÓN: El uso de controles o ajustes o rendimiento de procedimientos excepto aquellos que los aquí especificados puede provocar una exposición peligrosa a la radiación. PRECAUCIONES PREVIAS AL USO TENGA ESTAS INSTRUCCIONES EN MENTE: No cubra o bloquee ninguna apertura de ventilación. Cuando coloque el dispositivo en una estantería, deje 5 cm (2”) de espacio libre alrededor de todo el dispositivo.
  • Seite 185 16. Si la unidad dispone de función de reproducción USB, se debe conectar la memoria USB directamente en la unidad. No utilice un cable de extensión USB ya que pueden crear interferencias que causen una pérdida de datos. 17. La etiqueta calificativa se encuentra en la parte inferior o en el panel posterior del aparato.
  • Seite 186 ⚫ Si el compartimiento de las pilas no se cierra correctamente, deje de usar el producto y no lo deje al alcance los niños. ⚫ Si tiene la sospecha de que una pila ha sido ingerida o se encuentra en algún lugar del cuerpo, busque inmediatamente atención médica.
  • Seite 187: Vista Delantera

    Antena interna DAB/FM Antena WIFI INSTALACIÓN • Desembale todas las piezas y retire el material protector. • No conecte la unidad a la corriente eléctrica antes de comprobar la tensión de la corriente y antes de que se hayan hecho todas las demás conexiones. VISTA DELANTERA 1.
  • Seite 188: Vista Posterior

    5. Botón de Modo 12. Botón alarma 6. Fav. Botón 13. Mando de Volumen 7. Botón de inicio 14. Sensor del mando a distancia VISTA POSTERIOR 15. Toma de entrada CC 20. Toma ÓPTICA DIGITAL de SALIDA DE AUDIO 16. Puerto de instalación de la antena W- 21.
  • Seite 189: Mando A Distancia

    MANDO A DISTANCIA 1. Botón de modo de espera 12. Botón ECUALIZADOR-Configurar 2. Encendido/apagado del altavoz 13. Botón de navegación hacia arriba 3. Menú principal 14. Botón de navegación hacia la izquierda 4. Emisoras guardadas, favoritos, etc 15. Confirma la selección 5.
  • Seite 190 Instalación de la pila del mando a distancia: Empuje sobre la marca “open” de la cubierta de las pilas y deslícela hacia abajo Instale dos (2) pilas tamaño AAA de 1.5V en el compartimento de la batería (compruebe la polaridad correcta cuando las inserte) Vuelva a deslizar la cubierta de la batería Precauciones acerca de las pilas: Siga estas precauciones:...
  • Seite 191 Apriete la antena W-lan en sentido horario usando la herramienta adecuada tal y como se ilustra. Conecte la Antena interna FM en el puerto de la antena tal y como se ilustra.
  • Seite 192 CONEXIONES ANALÓGICAS DE SALIDA DE AUDIO Connect the RCA cable as illustrated below. Conecte el cable RCA tal y como se ilustra debajo. rojo white blanco RCA Cable NOT Included Cable RCA NO incluido Rear View of the TV Soundbar, Tower Vista posterior de la barra de sonido del TV, altavoz de torre, etc.
  • Seite 193 Connect the 3.5mm AUX OUT cable as Conecte el cable de SALIDA DE AUDIO de illustrated below. 3.5mm tal y como se ilustra debajo. AUX Cable NOT Included Cable AUXILIAR NO incluido Rear View of the TV Soundbar, Tower Vista posterior de la barra de sonido del TV, Speaker, Mini Speaker etc.
  • Seite 194 Connect the Optical cable as illustrated Conecte el cable óptico tal y como se ilustra below. debajo. Optical Cable NOT Included Cable óptico NO incluido Rear View of the TV Soundbar, Tower Vista posterior de la barra de sonido del TV, Speaker etc.
  • Seite 195: Requisitos De Red

    Es necesario que el router de red Wifi sea compatible con una conexión inalámbrica WIFI (802.11 b/g/n). Un smartphone, tableta o pc que se encuentra en la misma red que el DIR-250 Símbolos de la pantalla estableciendo conexión Sin conexión inalámbrica...
  • Seite 196 Las paredes y techos pueden reducir el alcance WIFI. Por lo tanto, intente ubicar el DIR-250 y/o el punto de acceso dentro de la distancia que se menciona arriba y evite cualquier obstáculo entre los dos dispositivos.
  • Seite 197 Seleccione Sí para establecer la conexión a una red ● Si selecciona Yes (Sí) (WPS) (Sólo para routers WPS) posteriormente pulse el botón WPS en ● su router. Si responde "Yes (Sí)" la pantalla va a buscar la red inalámbrica y aparecerá una lista de redes inalámbricas disponibles.
  • Seite 198 Introduzca la contraseña usando los botones de control de navegación del dispositivo o del mando a distancia. Puede girar el dial UP/DOWN para introducir la contraseña wifi. Si se pulsa accidentalmente " " para mover una entrada redundante, pulse " "...
  • Seite 199 Puede tardar unos segundos en establecer la conexión de red. Una vez que se establece la conexión, aparece el menú principal con los siguientes elementos del menú: Internet Radio (radio por Internet): Acceso a emisoras de radio de todo el mundo Media Centre (centro multimedia): Acceso a sus dispositivos UPnP mediante el software con capacidad de transmisión FM: Entra en el modo radio FM...
  • Seite 200 Si ha configurado una conexión de red, se conectará automáticamente a la misma ● cuando se vuelva a encender el DIR-250. Si necesita cambiar la red, vaya a configuration (configuración) - > network menu (menú de red) para cambiar la conexión.
  • Seite 201: Función Dlna

    Permita compartir sus archivos multimedia con Lenco DIR-250 Añada los archivos y carpetas de audio que desee compartir con Lenco DIR-250 a la biblioteca multimedia. Asimismo puede disfrutar de la reproducción de música desde otro servidor de música. Como un smartphone (plataforma Android ): Conecte el móvil a la red...
  • Seite 202 Abra Windows Media Player para habilitar allow remote control of tried player (permitir el control remoto del reproductor que se está probando). Haga clic con el botón derecho en cualquier música de la biblioteca y elija Play to Lenco DIR- 250 (Reproducir en Lenco DIR-250).
  • Seite 203 Habrá una ventana para controlar la reproducción de música en el Lenco DIR-250. Si utiliza un móvil o tableta Android o un iPhone/iPad, puede buscar e instalar cualquier aplicación DLNA gratuita o de pago en Google Play o la App Store. Se recomienda usar la burbuja UPnP, Media Share en un móvil, tableta Android o iPhone/iPad.
  • Seite 204 Seleccione Lenco DIR-250 como el reproductor. Algunas aplicaciones permiten reproducir la música en varios reproductores al mismo tiempo. Seleccione el servidor de música y escoja la música. Algunas aplicaciones pueden crear una lista de reproducción si escoge varias canciones. Seleccionar servidor y reproductor y seleccionar música Cuando utilice la función de transmisión de música DLNA en Music Link, sólo podrá...
  • Seite 205: Descripción General

    5 Función DIR-250 5.1 Descripción General...
  • Seite 206: Menú Principal

    5.2 Menú principal Bajo el menú principal, puede escanear el código QR para continuar 5.3 Configuración 5.3.1 Mostrar hora Configure la pantalla horaria como pantalla analógica o digital. 5.3.2 Gestionar My mediaU Biblioteca multimedia My mediaU – gestionar emisoras de radio a través de internet Para poder acceder a sus emisoras favoritas de todo el mundo, puede crear en cualquier momento una cuenta gratuita para una biblioteca multimedia utilizando cualquier dispositivo con capacidad de transmisión/recepción por internet visitando...
  • Seite 207 Wireless Info > MAC Address (Centro de información > Información del sistema > Información inalámbrica > Dirección MAC. Tras registrar el dispositivo, debe habilitar esta función en el DIR-250 bajo el menú Configuration (Configuración) > Manage my mediaU (Gestionar my media U).
  • Seite 208 El dispositivo se conectará automáticamente a su cuenta y mostrará lo que haya almacenado allí: Favorite Station (Emisora favorita) Favorite Location/Genre (Ubicación/género favoritos) My Local Station (Mi emisora local) Manually Add (Añadido manualmente) Dependiendo de sus ajustes personales de My mediaU, la pantalla de la radio por ●...
  • Seite 209 Desde la opción Add Manually (Añadir manualmente) puede, por ejemplo, conectar el dispositivo con podcasts. Para ello, debe conocer la URL de de los podcasts. 1. Rellene los campos destacados en su cuenta MediaYou en “Add Manually” (Añadir manualmente). 2. En la radio por internet, vaya a Configuration> Manage my mediaU (Configuración >...
  • Seite 210 Si usa un router con un botón WPS/QSS, puede que quiera configurar la conexión a la red mediante la función WPS. Pulse el botón WPS/QSS de su router en 120 segundos. La conexión entre el router y el DIR-250 se configurará automáticamente, así que no tiene que introducir la contraseña Wifi.
  • Seite 211 Configuración manual ● Puede elegir DHCP (que asigna la dirección IP automáticamente) o introducir usted mismo la dirección IP. Cuando seleccione la configuración manual para la conexión con cable, se debe introducir lo siguiente: 1. SSID (el nombre del punto de acceso); 2.
  • Seite 212: Fecha Y Hora

    5.3.4 Fecha y hora Los ajustes de fecha y hora sólo pueden efectuarse si la radio por internet está conectada a una red inalámbrica. Configurar fecha y hora: La radio por internet obtiene la fecha y la hora de forma automática desde un servidor central una vez establecida la conexión de red.
  • Seite 213 Hay tres alarmas independientes - 2 alarmas con ajuste de hora absoluta (Alarm 1 (Alarma 1) y Alarm 2 (Alarma 2)) y 1 alarma con ajuste de hora relativa (NAP Alarm)(Alarma de siesta). Seleccione Alarm (Alarma) en el menú de configuración o pulse el botón de alarma (12) en el panel frontal.
  • Seite 214: Reproducción Programada

    Puede fijarlo en 5/10/20/30/60/90 o 120 minutos. Ahora puede elegir Alarm Volume (Volumen de la alarma) para configurar el volumen de las alarmas. Cuando la alarma esté fijada, aparecerá un icono de un reloj con la hora la la alarma en la parte superior de la pantalla.
  • Seite 215 15/30/60/90/120/150/180 minutos. Una vez que esté configurado el tiempo, aparecerá un icono de una cama con los minutos restantes situado en la esquina superior derecha. El DIR-250 cambiará a modo en espera cuando transcurra el tiempo configurado. 5.3.13 Radio por Internet Memoria intermedia Configura el tiempo de memoria intermedia (búfer) de la música en reproducción, 2/4/8...
  • Seite 216 Configura la ubicación para una mayor precisión de la información meteorológica. El DIR-250 puede mostrar la información meteorológica actual en modo en espera. Conecte la pantalla en espera y configure la unidad de temperatura (°C o °F) para conseguir que el tiempo se muestre en el modo en espera.
  • Seite 217 Servicio siguiendo (DAB-IR): Habilítelo en uno de los 7 continentes o deshabilítelo. 5.3.16 Configuración de radio local Configure la ubicación mediante Detección automática (País), Configuración manual (País), Configuración manual (Estado) Configuración manual (Ciudad), Configuración manual (Código postal de EE.UU.) 5.3.17 Configuración de reproducción Seleccione el modo de reproducción del centro multimedia entre Off (Desactivado - no repetir ni reproducción aleatoria), Repeat all (Repetir todo), Repeat one (Repetir uno), o Shuffle (Aleatorio).
  • Seite 218 5.3.23 Restablecer valores predeterminados Restaurar la configuración predeterminada. Después de reiniciar el DIR-250, el sistema cambiará al menú configuración de Language (Idioma) y cambiará automáticamente al menú de configuración Network (Red).
  • Seite 219: Radio Por Internet

    5.4 My MediaU Muestra y reproduce su propia lista de emisoras mediaU desde el servidor mediaU, pero primero tiene que configurar su cuenta (véase la sección 5.3.2). 5.5 Radio por Internet Una vez que se realiza con éxito la conexión de cualquier emisora, se mostrará en la pantalla la información de la emisora.
  • Seite 220 Bajo la lista de emisoras de Fav., muévase a su emisora; pulse OK para escuchar; asimismo puede pulsar para aceptar su submenú y para Delete (Eliminar) (elimina una emisora de radio de la lista de favoritos), Shlft Up/down conjuntamente con la lista, Rename (Renombrar) (puede dar a la emisora de radio el nombre que elija), o Play (Reproducción).
  • Seite 221: Centro Multimedia

    5.5.4 Historial La lista de las últimas emisoras que haya escuchado. Por cada emisora, pulse OK para reproducirla directamente. Puede pulsar para ir a OK en el submenú – puede Add to Favorite (Añadir a favoritos) , Auto Scan (búsqueda automática), o Play (Reproducir).
  • Seite 222 Inserte el dispositivo USB en el puerto USB; introduzca después la selección USB; en la pantalla aparecerán carpetas; gire el dial NAVIGATE de la unidad o pulse el botón mando a distancia para seleccionar la carpeta en el dispositivo USB; pulse el dial NAVIGATE del dispositivo o del mando a distancia pata aceptar y posteriormente seleccione el archivo que desee reproducir.
  • Seite 223: Centro De Información

    Hay información y predicciones meteorológicas para 2000 ciudades. Seleccione el país y después la ciudad para ver la información meteorológica. El DIR-250 puede mostrar la información meteorológica en modo en espera. Cuando se selecciona la información meteorológica, tiene que seleccionar su ubicación, por ejemplo "Europe (Europa)"...
  • Seite 224 FM. Empieza a iniciarse la pantalla de frecuencia a medida que el DIR-250 busca en la banda FM; se detiene cuando recibe una emisora; puede pulsar en el mando a distancia para sintonizar la emisora;...
  • Seite 225 PIN, introduzca 0000 (cuatro ceros). Ciertos dispositivos pueden asimismo requerirle que apruebe la conexión. Una vez que se ha establecido con éxito la conexión, aparecerá en la pantalla del Lenco DIR- 250 “Bluetooth Connected (Bluetooth conectado)”.
  • Seite 226 Spotify Use el teléfono, tableta u ordenador como mando a distancia para Spotify. Si está habilitada la wifi en el DIR-250 y puede incluso despertarlo cuando seleccione spotify en el smartphone y seleccione como dispositivo de reproducción Lenco DIR- 250.
  • Seite 227: Especificaciones Técnicas

    Especificaciones Técnicas Conexiones DC, ENTRADA AUXILIAR/SALIDA AUXILIAR DE 3.5mm, salida de altavoces de 3.5mm, salida de audio (Analógica); óptica digital, digital coaxial; USB; W-lan; antena; Entrada 100-240 VAC – 50/60 Hz Salida 5 V/1,5 A Potencia de salida No dispone de altavoz integrado Pilas del mando a distancia AAA*2 Consumo de energía...
  • Seite 228 Adaptador de corriente: (sólo para la UE) Fabricante: SHENZHEN SHI GUANGKAIYUAN TECHNOLOGY., LTD Número de modelo: GKYPS0150050EU1 Utilice únicamente el adaptador de CA original Utilice únicamente la fuente de alimentación indicada en las instrucciones de uso. Información Valor y precisión Nombre de los fabricantes o marcas SHENZHEN SHI registradas, registro comercial y dirección...
  • Seite 229 Garantía Lenco ofrece servicio y garantía en cumplimiento con las leyes de la Unión Europea, lo cual implica que, en caso de que su producto precise ser reparado (tanto durante como después del periodo de garantía), deberá contactar directamente con su distribuidor.
  • Seite 230: Italiano

    Italiano DIR-250 ATTENZIONE: L'utilizzo di controlli o regolazioni o l'esecuzione di procedure diverse da quelle specificate può causare l'esposizione a radiazioni pericolose. PRECAUZIONI PRIMA DELL'USO CONSERVARE QUESTE ISTRUZIONI: Non coprire o bloccare le aperture di ventilazione. Quando si posiziona il dispositivo su uno scaffale, lasciare uno spazio libero di 5 cm (2") attorno all'intero perimetro.
  • Seite 231 17. L'etichetta di classificazione è stata contrassegnata sul pannello inferiore o posteriore del dispositivo. 18. Questo dispositivo non è destinato all'uso da parte di persone (compresi i bambini) con disabilità fisiche, sensoriali o mentali, o mancanti di esperienza e conoscenza, a meno che non siano sotto supervisione o abbiano ricevuto istruzioni circa l'uso corretto del dispositivo da parte di chi è...
  • Seite 232 29. Precauzioni sull'uso delle batterie: ⚫ Pericolo di esplosione se la batteria viene sostituita in modo errato. Sostituire solo con lo stesso tipo o equivalente. ⚫ Non sottoporre le batterie a temperature estreme alte o basse, bassa pressione dell'aria ad alta quota durante l'uso, lo stoccaggio o il trasporto. ⚫...
  • Seite 233: Vista Anteriore

    Antenna per interni DAB/FM Antenna Wi-Fi INSTALLAZIONE • Disimballare tutte le parti e rimuovere il materiale protettivo. • Non collegare l’unità alla rete elettrica prima di avere controllato la tensione di rete e prima che siano stati effettuati tutti gli altri collegamenti. VISTA ANTERIORE 1.
  • Seite 234: Vista Posteriore

    VISTA POSTERIORE 15. Jack Ingresso CC 20. Jack OTTICO DIGITALE USCITA AUDIO 16. Porta di Installazione Antenna W-LAN 21. Jack COASSIALE DIGITALE USCITA AUDIO 17. Jack USCITA AUDIO ANALOGICA S/D 22. Jack INGRESSO LAN 18. Jack INGRESSO AUDIO ANALOGICO 23. Porta di Installazione Antenna 19.
  • Seite 235 TELECOMANDO 1. Pulsante Standby 12. EQ-Pulsante Impostazione 2. Interruttore altoparlante ON/OFF 13. Pulsante navigazione su 3. Menu principale 14. Pulsante navigazione sinistra 4. Stazioni salvate, Preferiti, ecc. 15. Conferma scelta 5. Scansione DAB/FM 16. Pulsante navigazione destra 6. Stazioni locali 17.
  • Seite 236 Installazione della batteria nel telecomando: Premere l'indicazione ‘open’ del coperchio della batteria e far scorrere verso il basso Inserire due (2) batterie di tipo AAA da 1,5 V nel vano batteria (verificare la corretta polarità di inserimento) far scorrere indietro il coperchio della batteria Precauzioni della batteria: Osservare queste precauzioni: Utilizzare solo il tipo di batteria specificato in questo manuale.
  • Seite 237 Stringere l'antenna W-lan in senso orario servendosi di un opportuno attrezzo, come indicato nell'illustrazione. Inserire l'antenna nella relativa porta come indicato nell'illustrazione.
  • Seite 238 CONNESSIONI DELL'USCITA AUDIO ANALOGICA Connect the RCA cable as illustrated below. Collegare il cavo RCA come indicato di seguito. rosso white bianco RCA Cable Included Cavo RCA Incluso RCA CableNOT Included Cavo RCA NON Incluso Rear View of the TV Soundbar, Tower Vista Posteriore di Soundbar TV, Diffusori a Speaker etc.
  • Seite 239 Connect the 3.5mm AUX OUT cable as Collegare il cavo AUX OUT da 3,5 mm come illustrated below. indicato di seguito. AUX Cable NOT Included Cavo AUX NON Incluso Rear View of the TV Soundbar, Tower Vista Posteriore di Soundbar TV, Diffusori a Speaker, Mini Speaker etc.
  • Seite 240 CONNESSIONI DELL'USCITA AUDIO DIGITALE Connect the Optical cable as illustrated Collegare il cavo Ottico come indicato di below. seguito. Optical Cable NOT Included Cavo Ottico NON Incluso Rear View of the TV Soundbar, Tower Vista Posteriore di Soundbar TV, Diffusori a Speaker etc.
  • Seite 241: Requisiti Di Rete

    ● Il router di rete Wi-Fi deve supportare la connessione wireless Wi-Fi (802.11 b/g/n). ● Uno smartphone, tablet o computer connesso alla stessa rete dell'unità DIR-250...
  • Seite 242: Simboli Del Display

    20 metri senza dover collegare i dispositivi via cavo. La portata del Wi-Fi può essere ridotta da ostacoli quali pareti e soffitti. Per questo motivo, si consiglia di collocare l'unità DIR-250 e il dispositivo di accesso alla rete a una distanza inferiore ai 20 metri e di verificare l'assenza di ostacoli tra i dispositivi.
  • Seite 243 Collegare l'adattatore di alimentazione alla rete elettrica e inserire lo spinotto CC ● dell'adattatore nella presa DC-IN dell'unità DIR-250 Al primo utilizzo, l'unità DIR-250 avvierà la procedura guidata di installazione. Il sistema ● richiederà all'utente le seguenti impostazioni: Impostare Language (Lingua) e Network Configurations (Configurazioni di Rete) (fig 1.) (usare la manopola di navigazione (3) per effettuare la scelta) All'accensione verificare la disponibilità...
  • Seite 244 NOTA: Il sistema supporta solo reti da 2,4 Ghz Il numero di barre nel simbolo wireless davanti al nome di rete (SSID) indica la potenza del segnale di rete. Il simbolo della chiave indica che la rete è protetta da password. Se il dispositivo non trova reti wireless, il display mostra il messaggio ‘no wireless Networks found’...
  • Seite 245 5 J K L j k l 6 M N O m n o 7 P Q R S p q r s 8 T U V t u v 9 W X Y Z w x y z pulsanti: ‘...
  • Seite 246 DLNA è uno standard largamente impiegato in applicazioni di condivisione dei dati su reti domestiche. Dipende dal tipo di dispositivo dotato di capacità DNLA in uso. La funzione DLNA permette di effettuare sull'unità DIR-250 lo streaming di contenuti musicali in formato mp3 memorizzati su portatili, sistemi NAS o altri dispositivi compatibili con il sistema DLNA.
  • Seite 247 Consultare la sezione 5.7 per i dettagli sui comandi dell'unità DIR-250 per la riproduzione dello streaming musicale. 3.1 UPnP Per effettuare lo streaming musicale dal PC, applicare la seguente procedura: ● Collegare il PC alla rete. Verificare che l'unità DIR-250 sia accesa e connessa alla stessa rete del dispositivo.
  • Seite 248: Funzione Dlna

    DIR-250. (Consultare la sezione 5.7) 4 Funzione DLNA Oltre ai sistemi UPnP, l'unità DIR-250 supporta la funzione DLNA, che permette di ● condividere i file musicali da PC o cellulari Android e di usare PC, cellulari Android o dispositivi iPhone/iPad per controllare la riproduzione dei contenuti musicali sull'unità...
  • Seite 249 Fare clic col tasto destro su un qualunque brano musicale della libreria e selezionare Riproduci su Lenco DIR-250. Si aprirà una finestra per il controllo della riproduzione musicale sull'unità Lenco DIR-250.
  • Seite 250 Le procedure per riprodurre la musica condivisa sull'app sono le seguenti: Selezionare l'unità Lenco DIR-250 come lettore. Alcune app possono consentire la riproduzione della musica su più lettori contemporaneamente.
  • Seite 251 Selezionare il server e il lettore e poi i brani musicali Usando la funzione di streaming musicale DLNA su Music Link, è possibile solo ● controllare il volume e lo standby sull'unità. Il sistema è limitato è non può controllare altre funzioni.
  • Seite 252 5 Funzioni dell'unità DIR 250 5.1 Panoramica...
  • Seite 253: Menu Principale

    5.2 Menu principale Il menu principale permette di effettuare la scansione del codice QR o continuare 5.3 Configurazione 5.3.1 Visualizzazione dell'orario Impostare il display dell'orario in modalità analogica o digitale. 5.3.2 Gestione del Mio mediaU Libreria multimediale il Mio mediaU: gestione di stazioni radio via Internet Per poter sempre accedere alle proprie stazioni radio preferite di tutto il mondo, usando un qualsiasi dispositivo dotato di capacità...
  • Seite 254 (Centro Informazioni) > System information (Informazioni di Sistema) > Wireless Info > MAC Address (Indirizzo MAC). Dopo aver registrato il dispositivo, occorre abilitare questa funzione nell'unità DIR-250 nel menu Configuration (Configurazione) > Manage my mediaU (Gestisci il mio mediaU). In questo modo la radio Internet potrà accedere alla libreria multimediale.
  • Seite 255 Il dispositivo si connette automaticamente all'account e mostra le impostazioni in esso salvate: Stazione Preferita Posizione Preferita/Genere La Mia Stazione Locale Aggiunta Manuale In base alle impostazioni personali sul Mio mediaU, il display della radio Internet può ● avere un aspetto diverso. Se il dispositivo in uso non è...
  • Seite 256 L'opzione di aggiunta manuale permette ad esempio di collegare i dispositivi ai podcast. A questo scopo, occorre conoscere l'URL del podcast. 1. Compilare i campi evidenziati nel proprio account MediaYou alla voce “Aggiunta Manuale”. 2. Sulla radio Internet, accedere alla voce Configuration (Configurazione) > Manage my mediaU (Gestisci il mio mediaU) per abilitare di nuovo l'opzione.
  • Seite 257 Chi utilizza un router con pulsante WPS/QSS potrà impostare la connessione di rete tramite funzione WPS. Premere il pulsante WPS/QSS sul router entro 120 secondi. La connessione tra il router e l'unità DIR-250 sarà configurata automaticamente, in modo da non dover inserire la password Wi-Fi.
  • Seite 258 Configurazione manuale ● È possibile scegliere l'opzione DHCP (che assegna l'indirizzo IP automaticamente) o inserire manualmente l'indirizzo IP. Quando si sceglie l'impostazione manuale per le connessioni cablate, occorre inserire le seguenti informazioni: 1. SSID (nome del Punto di Accesso); 2. Indirizzo IP; 3.
  • Seite 259 5.3.4 Data e ora Le impostazioni di data e ora possono essere effettuate solo se la radio Internet è connessa a una rete wireless. Impostare data e ora: Dopo aver attivato una connessione di rete, la radio internet richiede automaticamente data e ora a un server centralizzato. Tuttavia, il passaggio dall'ora solare a quella legale e viceversa dovrà...
  • Seite 260 Ci sono tre sveglie indipendenti: 2 sveglie impostate sull'orario assoluto (Sveglia 1 e Sveglia 2) e una impostata sull'orario relativo (Sveglia PISOLINO). Selezionare l'opzione Sveglia nel menu di configurazione oppure premere il pulsante sveglia (12) sul pannello anteriore. Regolazione delle prime 2 sveglie (Sveglia 1 e 2): attivare la sveglia 1 o 2 e regolarne l'orario e la cadenza: Tutti i giorni, Una volta, un giorno specifico della settimana.
  • Seite 261: Programmazione Della Riproduzione

    La durata della sveglia può essere impostata su 5/10/20/30/60/90 o 120 minuti. A questo punto è possibile selezionare Alarm Volume (Volume Sveglia) per configurare il volume della sveglia. Dopo aver impostato e attivato una o più sveglie, la parte superiore del display mostrerà l'icona di un orologio con l'orario della sveglia.
  • Seite 262: Timer Spegnimento

    15/30/60/90/120/150/180 minuti. Dopo aver attivato il timer, l'angolo in alto a destra del display mostra l'icona di un letto con il numero dei minuti rimanenti. L'unità DIR-250 passa in standby alla scadenza della durata impostata. 5.3.13 Radio Internet Buffer...
  • Seite 263 5.3.14 Meteo Permette di impostare la località per garantire informazioni meteo accurate. L'unità DIR-250 mostra in modalità standby le informazioni meteo correnti. Per visualizzare le informazioni meteo in modalità standby, attivare lo Standby Display e impostare l'Unità di Temperatura (°C o °F).
  • Seite 264 5.3.16 Configurazione radio locale Impostare la località con una delle seguenti opzioni: Rilevamento Manuale (Paese), Configurazione Manuale (Paese), Configurazione Manuale (Stato) Configurazione Manuale (Città), Configurazione Manuale (Codice postale USA) 5.3.17 Configurazione riproduzione Selezionare la modalità di riproduzione del Centro multimediale: Off (nessuna ripetizione ciclica o casuale), Ripeti tutto, Ripeti un brano, o Ripetizione casuale.
  • Seite 265 5.3.23 Riportare alle condizioni originali Ripristino delle impostazioni originali. Dopo il ripristino dell'unità DIR-250, il sistema passa automaticamente al menu delle impostazioni Language (Lingua)e poi al menu delle impostazioni Network (Rete).
  • Seite 266 5.4 Il mio mediaU Il sistema mostra e riproduce l'elenco delle stazioni dell'utente impostate sul server mediaU, purché l'utente abbia precedentemente configurato il proprio account (consultare la sezione 5.3.2). 5.5 Radio Internet Lo schermo del sistema mostra le informazioni delle stazioni radio correttamente configurate.
  • Seite 267 Nell'elenco dei preferiti spostarsi sulla stazione richiesta, quindi premere OK per ascoltarla. È anche possibile premere per accedere al suo sottomenu, dove è possibile scegliere una delle seguenti opzioni: Delete (Elimina) (elimina una stazione radio dall'elenco dei preferiti), Shift Up/down (Sposta su/giù) per spostare gli elementi in elenco, Rename (Rinomina) (permette di scegliere un nuovo nome alla stazione radio), oppure Play (Riproduci).
  • Seite 268: Centro Multimediale

    5.5.4 Cronologia Elenco delle ultime stazioni ascoltate. Per riprodurre direttamente una singola stazione, premere OK. Premendo , è possibile accedere al sottomenu della stazione, dove sono disponibili le seguenti opzioni: Add to Favorite (Aggiungi ai Preferiti), Auto Scan (Scansione Automatica), oppure Play (Riproduci). Scegliendo Auto Scan (Scansione automatica), è...
  • Seite 269: La Mia Playlist

    Inserire un dispositivo USB nella relativa porta, accedere al menu USB e il display mostrerà le cartelle del dispositivo. Usare la manopola NAVIGATE sull'unità o premere il pulsante sul telecomando per selezionare la cartella del dispositivo USB, quindi premere la manopola NAVIGATE sul dispositivo o il tasto OK sul telecomando per selezionare il file da riprodurre.
  • Seite 270: Informazioni Meteo

    Sono disponibili informazioni meteorologiche e previsioni per 2000 città. Seleziona il paese e poi la città per i dettagli meteo. L'unità DIR-250 è in grado di mostrare in modalità standby le informazioni meteo. Dopo aver selezionato le informazioni meteo, occorre indicare la propria posizione, ad esempio selezionando 'europa', e poi premere ok.
  • Seite 271 FM. La frequenza visualizzata sul display inizia ad aumentare mentre l'unità DIR-250 effettua la scansione della banda FM e si ferma quando trova una stazione. Premendo sul telecomando, è possibile procedere alla sintonia fine, a intervalli di 0,05 MHz.
  • Seite 272 Abilitare la modalità Bluetooth sul dispositivo che si intende connettere all'unità DIR-250 ed effettuare la ricerca di nuovi dispositivi. Selezionare l'unità Lenco DIR-250 tra i dispositivi trovati. Se il sistema richiede di inserire un codice PIN, immettere 0000 (quattro zeri). Alcuni dispositivi possono anche richiedere di approvare la connessione.
  • Seite 273 Spotify È possibile usare cellulari, tablet o computer come telecomando per Spotify. Se il Wi-Fi è abilitato sull'unità DIR-250, è anche possibile attivarla selezionando spotify sullo smartphone e selezionando come dispositivo di riproduzione l'unità Lenco DIR-250. Per ulteriori informazioni accedere alla pagina spotify.com/connect.
  • Seite 274: Specifiche Tecniche

    Specifiche Tecniche Connessioni CC, AUX-IN/AUX-OUT da 3,5 mm, Uscita Cuffie da 3,5 mm, Uscita Audio (Analogica); Porta Ottica Digitale, Porta Coassiale Digitale; USB; W-lan; Antenna; Ingresso 100-240 V CA – 50/60 Hz Uscita 5V/1,5 A Potenza in uscita Nessun altoparlante integrato Batterie nel telecomando 2 batterie AAA Consumo di energia...
  • Seite 275 Alimentatore: (solo per UE) Produttore: SHENZHEN SHI GUANGKAIYUAN TECHNOLOGY., LTD Numero di modello: GKYPS0150050EU1 Utilizzare solo adattatore CA originale Utilizzare solo l'alimentazione indicata nel presente manuale. Informazioni Valore e precisione Nome del produttore o marchio commerciale, SHENZHEN SHI registrazione commerciale e indirizzo GUANGKAIYUAN TECHNOLOGY., LTD Identificatore del modello...
  • Seite 276 Garanzia Lenco offre assistenza e garanzia in conformità con la legge europea, il che significa che in caso di riparazioni (sia durante che dopo il periodo di garanzia) è necessario contattare il rivenditore locale. Nota importante: Non è possibile inviare direttamente a Lenco i prodotti da riparare.

Diese Anleitung auch für:

Dir-250bk

Inhaltsverzeichnis