Contents English Manual Manuel d’utilisation en français Gebrauchsanleitung auf Deutsch Manual de Instrucciones en Español Manuale D’istruzioni In Italiano Instrukcja obsługi. Polski...
Safety Instructions 1. In order to prevent the risk of an electrical shock, do not open or attempt to make any repairs to the fan yourself. This should be done by a qualified technician. 2. Never insert foreign objects or accessories through the grill of the fan. 3.
Seite 6
Fan Components 1 Front Cover 12 Control Box Locknut 2 Cover Ring 13 Control Panel 3 Cover Ring Screw 14 Power Switch 4 Blade Cap 15 Pole Inner Tube 5 Fan Blade 16 Pole Locknut 6 Fastening Nut 17 Pole Exterior Tube 7 Back Cover 18 Base 8 Motor Shaft Pin...
Seite 7
How to Set Up Your Fan 1. Set up the Pole Take the exterior tube (part 17), loosen the pole locknut (16) and pull out the inner steel tube (15) adjusting to the required height. Re-tighten the screw counterclock-wise to fix the poles to the correct height.
4. Fixing the pole to the Fan Head The fan head should now all be assembled and attached to the control box. Next, loosen the control box locknut (12) and place the whole assembled fan head with control box onto the inner tube (15) and fasten in place by tightening the control box locknut (12).
Seite 9
How to Use the FN65 Digital Display Oscillate Osc. Timer Timer On/speed On/Speed On/Speed Oscillate Timer The Control Pad The Remote Control 1. Adjustment of the Wind Direction The angle of the fan head is adjustable upwards or downwards by slightly lifting or pressing the mesh cover.
Maintenance And Storage 1. Unplug the unit and store the fan in a cool, dry location when not in use. 2. Never submerge the fan in water. To keep the fan clean, use a soft, damp cloth. You can use a mild detergent if necessary. After cleaning, wipe the unit dry by using a soft dry cloth.
Seite 11
Refund or replacement is at the discretion of that company. Duronic Products are offered with a 1 year guarantee under the following conditions: The product must be returned to the retailer with original proof of purchase.
Instructions de sécurité 1. Afin de prévenir les risques d'électrocutions, n’ouvrez pas le ventilateur et n’effectuez pas de réparations vous-même. Les réparations doivent être effectuées par un technicien qualifié. 2. N’insérez jamais d’objets étrangers ou d’accessoires à travers la grille du ventilateur.
Aperçu des éléments 1 Grille 12 Vis avant du boîtier de contrôle 2 Cerceau Panneau de contrôle 3 Vis 14 Bouton du cerceau d'alimentation 4 Protection 15 T des hélices interne de la perche 5 Hélices 16 Collier de serrage de la perche 6 Écrou 17 T de fixation...
Seite 15
Comment assembler le ventilateur 1. Assembler la perche Sur le tube externe (17), desserrez le collier (16) et tirez le tube interne (15) jusqu’à la hauteur désirée. Resserrez le collier (16) afin de sécuriser la perche. 2. Assembler la base et attacher la perche Détachez la vis de serrage (21) de la base (18).
4. Attacher la perche à la tête du ventilateur Desserrez la vis du boîtier de contrôle (12) et placez la tête du ventilateur, maintenant assemblée et reliée au boîtier de contrôle (11), sur le tube interne (15). Sécurisez à l’aide de la vis du boîtier de contrôle (12).
Seite 17
Comment utiliser le ventilateur Digital Display Oscillate Osc. Timer Timer On/speed On/Speed On/Speed Oscillate Timer panneau de contrôle télécommande 1. Ajuster la direction du vent L’angle de la tête du ventilateur est ajustable de haut en bas en soulevant ou en pressant légèrement les grilles. 2.
Maintenance et stockage Débranchez l’appareil lorsqu’il n’est pas utilisé et stockez-le dans un endroit sec et frais. 2. Ne submergez jamais le ventilateur sous l’eau. Pour garder le ventilateur propre, l’extérieur peut être nettoyé avec un tissu doux et humide. Vous pouvez utiliser un détergent non corrosif si nécessaire. Après nettoyage, essuyez le ventilateur avec un tissu sec.
Seite 19
Garantie Garantie et service après-vente 1 an de garantie de la part de Shine-Mart Ltd, propriétaire de la marque Duronic. NOTE : CES DÉCLARATIONS N’AFFECTENT EN RIEN VOTRE DROIT STATUTAIRE EN TANT QUE CONSOMMATEUR Ce produit a été produit en suivant les procédures de contrôle de qualité les plus strictes en utilisant des matériaux de qualité...
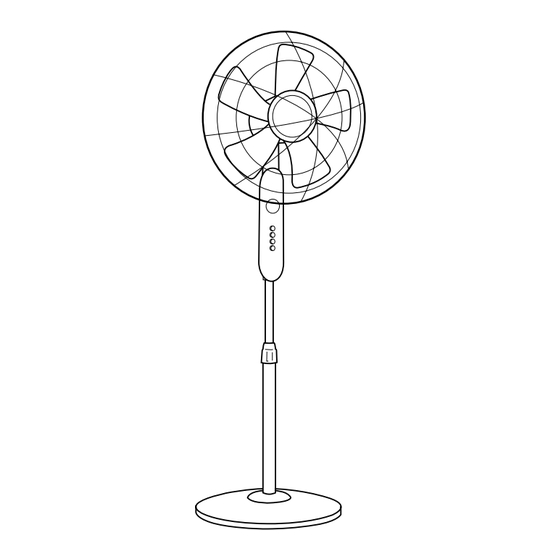
Sicherheitshinweise 1. Um das Risiko eines Stromschlages zu verhindern, versuchen Sie nicht den Ventilator selber zu öffnen oder zu reparieren. Diese Tätigkeiten sollten ausschließlich von einem qualifizierten Techniker durchgeführt werden. 2. Geben Sie niemals Fremdkörper durch die Öffnungen des Ventilators. 3.
Zusammenbau 1. Standfuß Nehmen Sie das Verbindungsstück (Teil 17), lösen Sie die Befestigungsschraube (16) und ziehen Sie die innere Ausziehleiste (15) heraus, indem Sie es auf die erforderliche Höhe einstellen. Drehen Sie die Schraube gegen den Uhrzeigersinn wieder an, um die Stangen auf die richtige Höhe zu fichieren.
4. Ventilator an die Stange befestigen Der Ventilatorkopf sollte nun zusammengebaut und am Motor befestigt sein. Lösen Sie anschließend die Kontrollbox Schraube (12) und positionieren Sie den gesamten zusammengebauten Ventilator auf die Ausziehleiste (15). Fixieren Sie ihn durch Festziehen der Kontrollbox Schraube (12). Fernbedienungsbatterien ersetzen 1.
Betrieb Digitaler Display Oszillierung Osc. Timer Timer On/speed Ein/ Geschwindigkeit Ein/Geschwindigkeit Oszillierung Timer Bedienfeld Fernbedienung 1. Ventilator laufrichtung einstellen Der Ventilator kann durch leichtes Anheben oder runterdrücken nach oben oder unten eingestellt werden. 2. Einstellung der Rotation / Oszillation Durch Drücken der Oszillierungtaste auf dem Bedienfeld oder der Fernbedienung wird die Rotationsfunktion aktiviert.
Wartung und Lagerung 1. Ziehen Sie den Stecker aus der Steckdose und lagern Sie den Ventilator an einem kühlen, trockenen Ort, wenn Sie ihn nicht verwenden. 2. Tauchen Sie den Ventilator niemals in Wasser. Verwenden Sie ein weiches, feuchtes Tuch, um den Ventilator zu reinigen. Bei Bedarf können Sie ein mildes Reinigungsmittel verwenden.
Gewährleistung Shine-Mart Ltd, der Markeninhaber von Duronic Produkten, bietet 1 Jahr Gewährleistung. HINWEIS: DIESE BEDINGUNGEN BEEINFLUSSEN IHRE GESETZLICHE RECHTE ALS VERBRAUCHER NICHT Dieses Produkt wurde unter strengen Qualitätskontrollen produziert und aus hochwertigen Materialien hergestellt, um ausgezeichnete Leistung und Zuverlässigkeit zu gewährleisten.
Instrucciones De Seguridad 1. Para evitar riesgos de descarga eléctrica, no abra o intente realizar ninguna reparación. Esto debe ser realizado por un técnico cualificado. 2. Evite introducir objetos o accesorios a través de la rejilla del ventilador. 3. Asegúrese de desenchufar el aparato antes de manipular manualmente el aparato o accesorios.
Seite 30
Partes del ventilador 1 Cubierta 12 Tornillo delantera del control de velocidades 2 Anillo 13 Panel de la cubierta de control 3 Tuerca 14 Botones de ajuste de la hélice 15 Tubo superior 5 Hélice 16 Tuerca de ajuste de altura 6 Tuerca 17 Tubo de fijación...
Seite 31
Montaje del ventilador 1. Montaje del poste Coja el tubo inferior (17), afloje la tuerca de ajuste de la altura (16) y saque el tubo superior (15) para ajustarlo a la altura que desee. Para mantener la altura del tubo fija, vuelva a apretar la tuerca (16). 2.
4. Fijar el poste al cabezal Ahora que está el cabezal del ventilador montado y unido al control de velocidades, lo siguiente que debemos hacer es unir ambas partes del ventilador. Afloje el tornillo del control de velocidades (12) y coloque el cabezal junto con el control sobre el tubo superior (15).
Seite 33
Funcionamiento del ventilador Pantalla digital Oscilar Osc. Timer Temporizador On/speed On/Velocidad On/Velocidad Oscilar Temporizador Control del poste Control remoto del ventilador 1. Ajuste de la posición El ángulo de la cabeza del ventilador se puede mover hacia arriba y hacia abajo moviendo la cubierta de este. 2.
Mantenimiento y Almacenamiento 1. Desenchufe la unidad y guarde el ventilador en un lugar fresco y seco cuando no esté en uso. 2. Nunca sumerja el ventilador en agua. Para limpiar el exterior del ventilador puede usar un paño húmedo. 3.
Seite 35
Garantía Los propietarios de la marca de productos Duronic ofrecen un año de garantía del producto. AVISO: ESTAS DECLARACIONES NO AFECTAN A SUS DERECHOS LEGALES COMO CONSUMIDOR. Este producto se ha fabricado bajo los más estrictos procedimientos de control de calidad, utilizando materiales de primera calidad para asegurar un excelente funcionamiento y durabilidad.
Seite 37
Istruzzioni di sicurezza 1. Per prevenire rischi di scosse elettriche, non aprire o tentare di riparare il ventilatore da soli. Qualsiasi intervento di riparazione deve essere condotto da un tecnico qualificato. 2. Mai inserire nessun oggetto attraverso la gabbia del ventilatore. 3.Scollegare sempre la spina dalla presa di corrente prima di spostare il ventilatore o rimuovere qualsiasi parte.
Seite 38
Componenti del ventilatore 1 Gabbia 12 Vite frontale pannello di controllo 2 Anello 13 Pannello di fissaggio di controllo 3 Vite 14 Pulsante per anello di fissaggio d'accensione 4 Fissaggio 15 Asta pale interiore 5 Pale 16 Vite fissaggio asta 6 Fissaggio 17 Asta per gabbia...
Seite 39
Montaggio del ventilatore 1. Montaggio asta Prendere l’asta supporto inferiore (parte 17), allentare la vite fissaggio dell’asta (16) ed estrarre l’asta interiore (15). Selezionare l’altezza desiderata e avvitare la vite di fissaggio dell’asta. 2. Montare l'asta alla base Svitare la vite del perno di fissaggio (21) dall’asta di supporto inferiore (17).
4. Fissare l'asta al rotore A questo punto il rotore sarà assemblato. Per fissare il rotore all’asta sarà necessario allentare la vite del pannello di controllo (12) ed inserire il rotore nell'asta interiore (15) e avvitare nuovamente la vite del pannello di controllo.
Seite 41
Istruzioni d'uso Display digitale Oscillazione Osc. Timer Timer On/speed On/Velocità On/Velocità Oscillazione Timer Pannello di controllo Telecomando 1. Regolazione della direzione del getto d'aria L'angolo del ventilatore è regolabile verso l'alto o verso il basso sollevando o abbassando leggermente la testa del ventilatore. 2.
Manutenzione e conservazione 1. Scollegare il ventilatore dalla presa di corrente e conservarlo in un luogo fresco e asciutto quando non vine utilizzato per un lungo periodo di tempo. 2. Non immergere il ventilatore in acqua. Per pulire il ventilatore, utilizzare un panno morbido e umido.
Seite 43
Inoltre, non possiamo garantire l’apparecchio se è stato modificato o riparato dall’acquirente o da terzi. 1 anno di garanzia da Shine-Mart Ltd, proprietari del marchio commerciale Duronic. NOTA: QUESTE DICHIARAZIONI NON INFLUISCONO SUI DIRITTI LEGALI DEL CONSUMATORE Questo prodotto è...
Bezpieczeństwo użytkowania 1. W celu zapobiegania ryzyku porażenia prądem nie otwieraj obudowy lub nie próbuj samodzielnie dokonywać napraw. Naprawy powinny być wykonane przez wykwalifikowanego technika. 2. Nigdy nie próbuj wkładać obiektów poprzez siatkę wentylatora. 3. Przed przystąpieniem do przenoszeniem urządzenia lub jego elementów odłącz urządzenie od zasilania.
Montaż urządzenia 1. Montaż rury teleskopowej Chwyć obudowę rurę (cześć 17) i poluzuj śrubę teleskopową (16), aby wyciągnąć stalową rurę teleskopową (15). Po dostosowaniu wysokości ponownie dokręć śrubę (16), aby zablokować rurę w miejscu. 2. Montaż podstawy i rury Odkręć śrubę mocującą (21) od dolnej części podstawy wentylatora (19).
4. Montaż śruby teleskopowej do głowy wentylatora. Na tym etapie powinieneś podłączyć głowicę wentylatora do panelu kontrolnego (11). Poluzuj śrubę panelu kontrolnego (12) i umieść prawidłowo zamontowaną głowicę wentylatora i panel kontrolny na teleskopowej rurze (15), następnie dokręć śrubę panelu kontrolnego (12), aby zablokować...
Seite 49
Obsługa FN65 Wyłącznik Cyfrowy wyświetlacz Oscylacja Osc. Timer Timer On/speed Włącznik / Włącznik / regulacja regulacja wiatru wiatru Oscylacja Timer Wyłącznik Panel sterowania Pilot 1. Dostosowanie kierunku wiatru. Głowę wentylatora można regulować nieznacznie naciskając lub podciągając za siatkę zabezpieczającą. 2. Regulacja rotacji / oscylacji.
Konserwacja i przechowywanie 1. Odłącz urządzenie od zasilania i odstaw w chłodnym i suchym miejscu, jeżeli nie będziesz używał urządzenia. 2. Nigdy nie zanurzaj wiatraka w wodzie i innych płynach. W celu utrzymania urządzenia w czystości przetrzyj obudowę wilgotną, suchą ściereczką.
Warunki Gwarancji 1 Rok Gwarancji firmy Shine-Mart LTD, marki handlowej Duronic Products. UWAGA: ten dokument nie wpływa na twoje ustawowe prawo jako konsumenta. Ten produkt został wykonany zgodnie z restrykcyjnymi normami kontroli i wykorzystuje najwyższej jakości materiały dla uzyskania doskonałej wydajności i niezawodności.