Inhaltsverzeichnis
Werbung
Verfügbare Sprachen
Verfügbare Sprachen
Quicklinks
One Year Limited Warranty
Warrantor warrants to the original purchaser that the Bora Tool PM-1100 will be free from defects in materials and workmanship under normal use and
service for a period of one (1) year from the date of original purchase.
The obligation of this Warranty is limited to repair or replacement, at our option, of components which prove defective under normal use.
Any product or component claimed to be defective should be sent during Warranty period, postage prepaid to Affinity Tool Works, 1161 Rankin Drive, Troy,
MI 48083, Attn: Warranty Department, together with a copy of your original dated sales receipt. Call for authorization number before sending.
This warranty is in lieu of all other express warranties, obligations or liabilities. ANY IMPLIED WARRANTIES, OBLIGATIONS OR LIABILITIES, SHALL BE
LIMITED IN DURATION TO THE ONE YEAR PERIOD OF THIS LIMITED WARRANTY. NO AGENT, REPRESENTATIVE, DEALER, OR EMPLOYEE OF THE
COMPANY HAS THE AUTHORITY TO INCREASE OR ALTER THE OBLIGATIONS OF THIS WARRANTY.
This Warranty shall not apply to any product or component which in the opinion of the Warrantor has been modified or altered in any way, damaged as
a result of an accident, misuse or abuse, or loss of parts. In no case shall the Warrantor be liable for any special or consequential damages, or any other
costs or warranty, expressed or implied, whatsoever.
This Warranty gives you specific legal rights, and you may also have other rights which vary from state to state.
Ein Jahr beschränkte Garantie
Der Garantiegeber garantiert dem Erstkäufer, dass das Bora Tool PM-1100 bei normalem Gebrauch und Wartung für einen Zeitraum von einem
(1) Jahr ab dem Datum des Erstkaufs frei von Material- und Verarbeitungsfehlern ist.
Die Verpflichtung dieser Garantie beschränkt sich auf die Reparatur oder den Austausch von Komponenten, die sich bei normalem Gebrauch
als defekt erweisen.
Jedes Produkt oder jede Komponente, die als defekt eingestuft wird, sollte während der Garantiezeit versandt werden, Porto im Voraus an
Affinity Tool Works, 1161 Rankin Drive, Troy, MI 48083, Attn: Warranty Department, zusammen mit einer Kopie Ihres ursprünglichen
datierten Kaufbelegs. Rufen Sie vor dem Senden die Autorisierungsnummer an.
Diese Garantie ersetzt alle anderen ausdrücklichen Garantien, Verpflichtungen oder Verbindlichkeiten. ALLE STILLSCHWEIGENDEN
GARANTIEN, VERPFLICHTUNGEN ODER HAFTUNGEN SIND AUF DIE ZEITDAUER VON EINEM JAHR DIESER BEGRENZTEN GARANTIE
BESCHRÄNKT. KEIN AGENT,
VERTRETER,
HÄNDLER
ODER
MITARBEITER
DES
UNTERNEHMENS
IST
BEFUGT,
DIE
VERPFLICHTUNGEN AUS DIESER GARANTIE ZU ERHÖHEN ODER ZU ÄNDERN.
Diese Garantie gilt nicht für Produkte oder Komponenten, die nach Ansicht des Garantiegebers in irgendeiner Weise abgewandelt oder
verändert wurden, die durch einen Unfall, unsachgemäßen Gebrauch oder Missbrauch oder durch den Verlust von Teilen beschädigt
wurden. In keinem Fall haftet der Garantiegeber für besondere oder Folgeschäden oder andere Kosten oder Garantien, weder ausdrücklich
noch stillschweigend.
Diese Garantie gibt Ihnen spezifische gesetzliche Rechte, und Sie können auch andere Rechte haben, die von Staat zu Staat unterschiedlich
sind.
Garantía Limitada de Un Año
El fiador le garantiza al comprador original que el Bora Tool PM-1100 estará libre de defectos de materiales y mano de obra bajo uso y servicio normales
durante un período de un (1) año a partir de la fecha de la compra original.
La obligación de esta Garantía está limitada a reparación o reemplazo, a nuestra opción, de los componentes que se comprueben defectuosos bajo uso
normal.
Cualquier producto o componente que se reclame defectuoso debe ser enviado durante el periodo de Garantía, franqueo prepago a Affinity Tool Works,
1161 Rankin Drive, Troy, MI 48083, Attn: Warranty Department, junto con una copia de su recibo de compra original fechado. Llámenos antes de
enviarlo para obtener un número de autorización.
Esta Garantía precede a todas las demás garantías expresas, obligaciones o responsabilidades. CUALQUIER GARANTÍA IMPLÍCITA, OBLIGACIÓN O
RESPONSABILIDAD, ESTARÁ LIMITADA EN CUANTO A DURACIÓN AL PERIODO DE UN AÑO DE ESTA GARANTÍA LIMITADA. NINGÚN AGENTE,
REPRESENTANTE, COMERCIANTE NI EMPLEADO DE LA COMPAÑÍA TIENE LA AUTORIDAD DE AUMENTAR O ALTERAR LAS OBLIGACIONES DE
ESTA GARANTÍA.
Esta Garantía no aplicará a ningún producto ni componente que en la opinión del Fiador haya sido modificada o alterada de manera alguna, dañada
como resultado de un accidente, mal uso o abuso, o pérdida de partes. Bajo ninguna circunstancia el Fiador será responsable por daños especiales ni
consecuentes, ni por cualquier otro costo o garantía, expresada o implícita, pase lo que pase.
Esta Garantía le brinda derechos legales específicos y usted puede además contar con otros derechos que pueden variar de estado a estado.
Customer Service Department • Kundendienstabteilung • Departamento de Atención al Cliente
866-588-0395 • www.boratool.com
Troy, MI 48083 USA
©2018 Affinity Tool Works, LLC
Part # PM-1100
Werbung
Inhaltsverzeichnis

Verwandte Anleitungen für Bora Portamate Plywood PM-1100

Inhaltszusammenfassung für Bora Portamate Plywood PM-1100
- Seite 1 One Year Limited Warranty Warrantor warrants to the original purchaser that the Bora Tool PM-1100 will be free from defects in materials and workmanship under normal use and service for a period of one (1) year from the date of original purchase. The obligation of this Warranty is limited to repair or replacement, at our option, of components which prove defective under normal use.
- Seite 2 PM-1100 Plywood Universal Mobile Base Kit ASSEMBLY INSTRUCTIONS Assembly • Parts List • Warnings • Warranty Caution: Read all instructions carefully. SAVE THESE INSTRUCTIONS. Refer to them often and use them to instruct others. MONTAGEANLEITUNGEN Montage • Stückliste • Warnhinweise • Garantie Vorsicht: Lesen Sie alle Anweisungen sorgfältig durch.
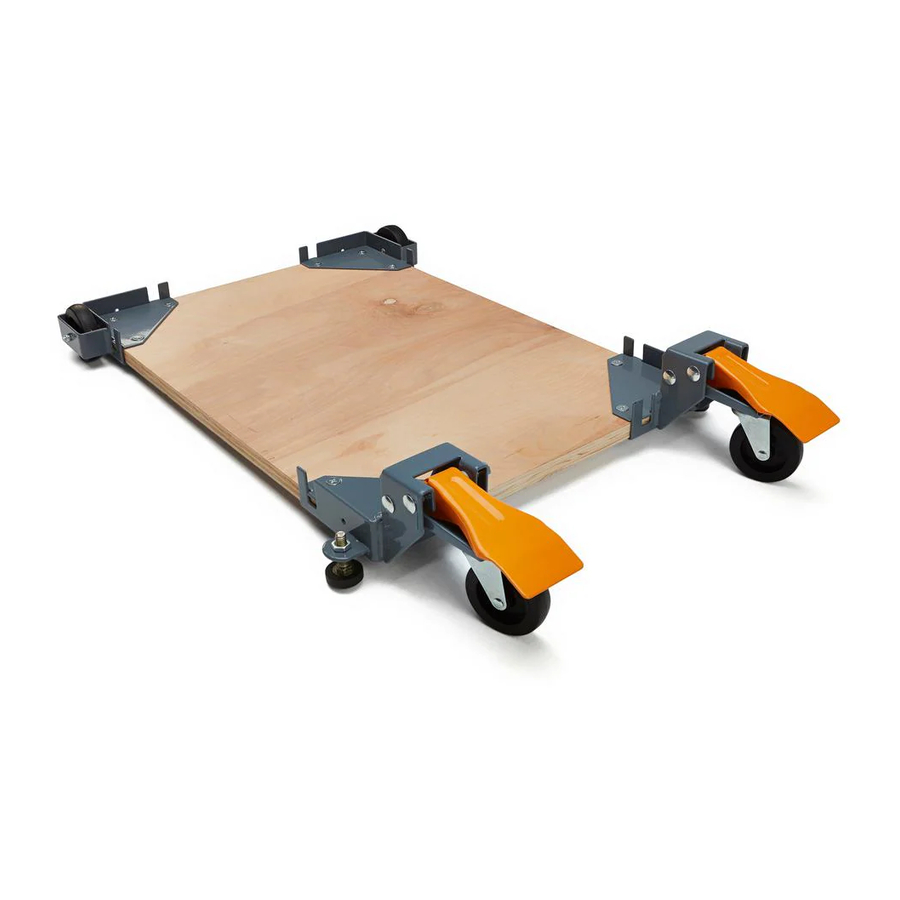
- Seite 3 Congratulations You have just purchased a Mobile Base Extension For The Bora Tool PM-1100 Universal Mobile Base Kit. This product has been specifically designed to make your Mobile Base any size you need using plywood as the base. Parts Figure 1 Description Part No.
-
Seite 4: General Safety Instructions For Power Tools
Warning: Any power tool must be bolted securely to stand before use. Warning: Read Owners Manual carefully and be completely familiar with the correct and safe operation of each power tool before use. Failure to follow these rules may result in serious personal injury. General Safety Instructions for Power Tools Using power tools of any kind can be dangerous if safe operating procedures are not followed. - Seite 5 Safety Instructions for Mobile Bases Be careful when moving to limit any finger pinch points. Place base on a level surface and adjust levelers before placing the machine in position. This should keep the machine from rocking, while testing it for stability. Test the stability in both the up (on the casters) and the down positions.
- Seite 6 Repeat this process for the other swivel bracket 3. Assemble the back corners, to the right are the components you will need: 2 e. Install the back wheel using the M6-45 axle bolt, nylon wheel bushing, and M6 lock nut. 4.
- Seite 7 6. Cut the plywood you are using down to size. 7. You will now need to attach the corners to the plywood, begin by marking the holes using the corner plates as your template. 8. Drill the holes using a ½” drill bit, it is a good idea to check that the holes are lined up to the plate before drilling each hole.
- Seite 8 10. Attach the corners in the correct positions using the Philips screwdriver, do not tighten the bolts until all three machine screws are partially threaded into the bottom plate. 11. Congratulations! You have successfully completed assembly of the PM-1100 mobile base.
- Seite 9 Glückwunsch Sie haben gerade einen Bora-Tool PM-1100 Universal Mobile Base Kit gekauft. Dieses Produkt wurde speziell entwickelt, um Ihr Mobile Base in jeder Größe herzustellen, die Sie benötigen, wenn Sie Sperrholz als Basis verwenden. Teile Abbildung 1 Description Nº de la pièce Quantité...
-
Seite 10: Allgemeine Sicherheitshinweise Für Elektrowerkzeuge
Warnung: Jedes Elektrowerkzeug muss vor dem Gebrauch fest mit dem Ständer verschraubt sein. Warnung: Lesen Sie die Bedienungsanleitung sorgfältig durch und seien Sie vollständig mit der korrekten und sicheren Bedienung jedes Motorgerätes vertraut, bevor Sie es benutzen. Die Nichtbeachtung dieser Regeln kann zu schweren Verletzungen führen. Allgemeine Sicherheitshinweise für Elektrowerkzeuge Die Verwendung von Elektrowerkzeugen jeglicher Art kann gefährlich sein, wenn sichere Betriebsverfahren... -
Seite 11: Sicherheitshinweise Für Mobile Geräte
Sicherheitshinweise für mobile Geräte Seien Sie vorsichtig, wenn Sie sich bewegen, um jegliche Fingerabdrücke zu begrenzen. Stellen Sie den Sockel auf eine ebene Fläche und stellen Sie die Richtmaschinen ein, bevor Sie die Maschinenposition einrichten. Dies sollte verhindern, dass die Maschine schaukelt, während sie auf ihre Stabilität getestet wird. - Seite 12 e. Montieren Sie den Fußhebel R mit der M8-85 Schlossschraube N, den Nylon-Unterlegscheiben O, der Sicherungsscheibe P und der Mutter Q. 3. Montieren Sie die hinteren Ecken, rechts sind die Komponenten, die Sie benötigen: 2 e. Montieren Sie das Hinterrad K mit der Achsenschraube V M6-45, der Radbuchse T aus Nylon und der Kontermutter U M6.
- Seite 13 6. Schneiden Sie das von Ihnen verwendete Sperrholz auf Maß zu. 7. Sie müssen nun die Ecken am Sperrholz befestigen, beginnen Sie mit der Markierung der Löcher mit den Eckplatten als Vorlage. 8. Bohren Sie die Löcher mit einem 1/2" (13mm) Bohrer, es ist eine gute Idee, vor dem Bohren jedes Lochs zu überprüfen, ob die Löcher mit der Platte übereinstimmen.
- Seite 14 10. Befestigen Sie die Ecken in der richtigen Position mit dem Kreuzschlitzschraubendreher, ziehen Sie die Schrauben erst an, wenn alle drei Maschinenschrauben teilweise in die Bodenplatte eingeschraubt sind. 11. Herzlichen Glückwunsch! Sie haben die Montage der PM-1100 Mobilbasis erfolgreich abgeschlossen.
- Seite 15 Felicitaciones Acaba de adquirir una extensión de base móvil para el kit de base móvil universal Portamate PM-1100. Este producto ha sido diseñado específicamente para hacer que su base móvil de cualquier tamaño que usted necesita utilizando madera contrachapada como base. Parts Figura 1 Descripción...
-
Seite 16: Instrucciones Generales De Seguridad Para Herramientas Eléctricas
Advertencia: Cualquier herramienta eléctrica debe estar atornillada firmemente para estar parada antes de usarla. Advertencia: Lea detenidamente el Manual del Propietario y esté completamente familiarizado con la operación correcta y segura de cada herramienta eléctrica antes de usarla. El incumplimiento de estas reglas puede resultar en lesiones personales graves. Instrucciones generales de seguridad para herramientas eléctricas Usar herramientas eléctricas de cualquier tipo puede ser peligroso si no se siguen los procedimientos de... - Seite 17 Instrucciones de seguridad para bases móviles Tenga cuidado al mover para limitar cualquier punto de pellizcar con los dedos. Coloque la base sobre una superficie nivelada y ajuste los niveladores antes de colocar la máquina en su posición. Esto debe evitar que la máquina se balancee mientras se prueba la estabilidad. Pruebe la estabilidad tanto en las posiciones hacia arriba (en las ruedas) como hacia abajo.
-
Seite 18: Ejemplos De Montaje
Repita este proceso para el otro soporte giratorio. 3. Montar las esquinas posteriores, a la derecha Los componentes que necesitará: Instale la rueda posterior, utilizando el tornillo 2 e. de eje M6-45, buje de rueda de nylon y la tuerca de seguridad M6. 4. - Seite 19 6. Corte la madera contrachapada que está utilizando abajo al tamaño. 7. Ahora tendrá que unir las esquinas a la madera contrachapada, comience marcando los agujeros usando las placas de la esquina como su plantilla. 8. Taladre los agujeros con una broca de ½ ", es una buena idea comprobar que los agujeros están alineados a la placa antes de perforar cada agujero.
- Seite 20 10. Fije las esquinas en las posiciones correctas con el destornillador Philips, no apriete los pernos hasta que los tres tornillos de la máquina estén parcialmente roscados en la placa inferior. 11. ¡Enhorabuena! Ha completado con éxito el montaje de la base móvil PM-1100.