
Verwandte Anleitungen für Gigaset Smart Doorbell

Inhaltszusammenfassung für Gigaset Smart Doorbell
- Seite 1 Smart Doorbell Kurzanleitung Quick start guide Mémento Istruzioni per l‘uso Beknopte bedieningsinstructies Guía rápida...
- Seite 2 Bevor Sie anfangen … Bevor Sie Gigaset Smart Doorbell von einem Elektriker anbringen lassen, müssen Sie sicherstellen, dass 1. Gigaset Smart Doorbell an Ihrer Haustür eine gute Internetverbindung hat (min. 2 MBIT Upload) 2. Sie eine derzeit mechanische Klingel mit 8-24 V nutzen 3.
- Seite 3 Before having the Gigaset Smart Doorbell installed by an electrician, you must ensure that 1. the Gigaset Smart Doorbell on your house door has a good Internet connection (min. 2 Mbit upload) 2. you are currently using a mechanical 8 to 24 V bell 3.
- Seite 4 Gigaset elements app Um Gigaset Smart Doorbell in Betrieb zu nehmen, installieren Sie bitte die kostenlose Gigaset elements app und folgen den Schritten und Anweisungen. Bitte lesen Sie auch unsere beiliegenden Sicherheitshinweise. Mehr Informationen erhalten Sie auch auf www.gigaset.com Gigaset elements app starten und auf „Elements“...
- Seite 5 Gigaset elements app To set up your Gigaset Smart Doorbell please install the free Gigaset elements app – and follow the steps and instructions. Please also take notice on our added security information brochure. For more information, go to www.gigaset.com Launch the Gigaset elements app and click on "Elements";...
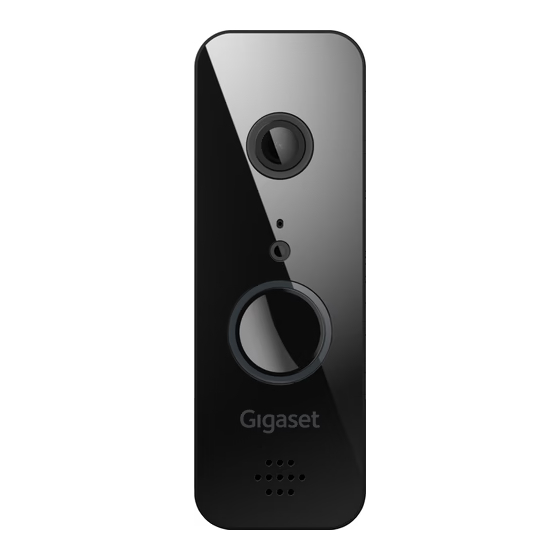
- Seite 6 Zur Anbindung an eine klassische Bohrloch Infrarot LEDs mechanische Klingel Kamera Lichtsensor Mikrofon Kabeldurchführung Bohrloch Lautsprecher Der mitgelieferte Power Kit Adapter ist ein kleines Gerät, das die ausreichende Stromversorgung Ihrer Gigaset Smart Doorbell sicherstellt und für ihre ordnungsgemäße Funktion unerlässlich ist.
- Seite 7 Drilled hole Infra-red LEDs mechanical doorbell Camera Light sensor Microphone Cable feedthrough Drilled hole Speaker The Power Kit Adapter is a small device that provides sufficient power to the Gigaset Smart Doorbell, and is indispensable for proper functioning.
-
Seite 8: Installation
Installation Nur ein Elektriker sollte Gigaset Smart Doorbell installieren. Schalten Sie die Sicherung aus! 2. Entfernen Sie Ihre alte Klingel von der Hauswand. 3. Platzieren Sie die Bohrvorlage und markieren die Bohrlöcher (6 mm) in einer Höhe von 1,20-1,50 Meter. 4. Führen Sie die vorhandenen Kabel durch die Öffnung. - Seite 9 Installation Only an electrician should install your Gigaset Smart Doorbell. – Switch off the fuse! 2. Remove your old doorbell from the wall. 3. Position the hole template and mark the drill holes (6 mm) at a height of 1.20 to 1.50 metres.
- Seite 10 Rückwand und befestigen Sie diese mit den mitgelieferten Dübeln und Schrauben. 6. Schließen Sie nun ein Kabel pro Anschlusspunkt an Gigaset Smart Doorbell an. 7. Richten Sie mit Hilfe der Rückwand die Türklingel aus und schieben Gigaset Smart Doorbell auf (heraufschieben/ herunterschieben).
- Seite 11 6. Now connect one cable per terminal to the Gigaset Smart Doorbell. 7. Use the back to line up the doorbell and slide on the Gigaset Smart Doorbell (by pushing up/down). 8. Secure the doorbell: Use the screwdriver provided to tighten the screw at the bottom.
- Seite 12 Installation 9. Öffnen Sie den Kasten Ihrer Klingel. 10. Schließen Sie den Power Kit Adapter an die Klemmen Ihrer mechanischen Klingel an. Wenn Sie Ihre mechanische Klingel nie mehr nutzen möchten, können Sie auf diesen Schritt verzichten. 11. Nach der Installation schließen Sie den Klingelkasten und schalten die Sicherung wieder ein.
- Seite 13 Installation 9. Open the housing for your doorbell. – 10. Connect the Power Kit Adapter to the terminals of your mechanical bell. You can skip this step if you do not want to use your mechanical bell again. 11. After the installation, close the doorbell housing and switch the fuse back on. Ò...
- Seite 14 Einrichten Nachdem Sie den Anweisungen in der App gefolgt sind, haben Sie Gigaset Smart Doorbell eingerichtet. Bitte stellen Sie sicher, dass Sie sich an alle gesetzlichen Vorgaben Ihres Landes halten. Klicken Sie in der App auf Elements und auf „Doorbell“, um weitere Einstellungen vorzunehmen.
- Seite 15 Setup Once the instructions in the app are followed, you have set up Gigaset Smart – Doorbell. Please ensure that you are observing all of the legal stipulations for your country. To configure more settings, click Elements in the app and then "Doorbell".
-
Seite 16: Was Sie Wissen Sollten
Durch die Verwendung des Power Kit Adapters geht Ihre Klingel auch dann, wenn Gigaset Smart Doorbell kein Internet hat. Outdoor Pakete Wenn Sie verschiedene Aufnahmen wünschen, benötigen Sie ein Service Paket, welches Sie im Gigaset Shop oder in Ihrer App über Google oder Apple kaufen können. -
Seite 17: What You Should Know
If you have missed a visitor and have an add-on Outdoor package, you can later watch the video of your visitor from the Gigaset elements app. Power Kit Adapter Using the Power Kit Adapter means your bell also works when the Gigaset Smart Doorbell does not have Internet. Outdoor packages If you would like different recordings, you require a Service package (available to buy in the Gigaset Shop or from Google/Apple from your app). -
Seite 18: Auf Werkseinstellung Zurücksetzen
1. Öffnen Sie die Gigaset elements App. 2. Gehen Sie im Menü auf Elements und dann auf Gigaset Smart Doorbell. 3. Drücken Sie nun auf den Mülleimer, um Gigaset Smart Doorbell zu löschen. Bestätigen Sie Ihre Wahl. 4. Entfernen Sie die Türklingel mit dem mitgelieferten Sicherheitsschraubendreher von der Halterung. -
Seite 19: Reset To The Default Settings
1. Open the Gigaset elements app. – 2. From the menu, go to Elements and then Gigaset Smart Doorbell. 3. Now press the rubbish bin to clear the Gigaset Smart Doorbell. Confirm your selection. 4. Use the screwdriver provided to remove the doorbell from the holder. - Seite 20 Wieso muss ich „intelligentes Netzwerk“ vor der Installation in meinem Smartphone ausschalten? Um Gigaset Smart Doorbell mit Ihrem Handy zu verbinden, müssen Sie sich im Pairing Prozess mit dem „Gigaset“ Netzwerk verbinden. Da dieses Netzwerk kein Internet hat, kann es sein, dass Ihr Smartphone sonst wieder auf Ihr vorheriges Netzwerk wechseln möchte.
- Seite 21 – smartphone? To connect your Gigaset Smart Doorbell to your mobile, you need to connect to the "Gigaset" network in the pairing process. Because this network does not have Internet, your smartphone might want to switch back to your previous network.
- Seite 22 Warum läuft Gigaset Smart Doorbell nicht mit meinem alten Camera-Tarif? Unter Service gibt es verschiedene zubuchbare Pakete mit verschiedenen Funktionen. Wichtig zu wissen ist, dass Gigaset Smart Doorbell zu den Outdoor Produkten gehört. Falls Sie heute schon ein Outdoor Service Paket (Outdoor Safety oder 360°) haben, können Sie Gigaset Smart Doorbell darunter auch nutzen...
- Seite 23 Why does my bell now sound different? – If your bell sounds strange after Gigaset Smart Doorbell is connected, it is most probably because your bell requires a different current rating. Contact a trusted electrician to help you with an adapter.
-
Seite 24: Led-Verhalten
LED-Verhalten Verbindet sich mit dem Router 2 x kurz, 1 x lang Smart Camera fährt hoch leuchtet durchgehend Keine Verbindung blinkt langsam Verbunden kein Licht, nachts dezentes Nachtlicht Firmware-Update blinkt sehr schnell Aufnahme startet 1 x kurz Liveview wurde aktiviert keine LED Technische Daten Leistungsaufnahme... -
Seite 25: Technical Details
LED sequences Connects to the router 2 x short, 1 x long – Smart camera starts up Lights permanently No connection Flashes slowly Connected No light, muted light at night Firmware update Flashes very quickly Recording starts 1 x short Liveview has been activated No LED Technical details... - Seite 26 Weitere Möglichkeiten … Gigaset Smart Doorbell kann auf verschiedene Arten in Betrieb genommen werden: Anschluss über Sicherungskasten Ein professioneller Elektriker kann Gigaset Smart Doorbell auch direkt an einen Sicherungskasten anschließen und so die Nutzung in Mehrfamilienhäusern zulassen. Anschluss mit Steckdose Wenn Sie auf den Austausch einer Klingel verzichten möchten, könnten Sie Gigaset...
- Seite 27 With a power socket If you do not want to replace a bell, you can also operate the Gigaset Smart Doorbell with a suitable off-the-shelf 12V/1A charger. Contact your electrician for advice.
- Seite 28 4. vous savez où est installé le boîtier de la sonnette 5. votre routeur supporte 2,4 GHz 6. avant le montage, vous décidez si vous souhaitez utiliser la cale en plastique fournie 7. la Gigaset Smart Doorbell ne doit pouvoir montrer que votre sphère privée...
- Seite 29 Prima di iniziare … Prima di fare applicare Gigaset Smart Doorbell da un elettricista, occorre assicurarsi che 1. Gigaset Smart Doorbell disponga di una buona connessione Internet (min. 2 Mbit di upload) sulla porta di casa – 2. si stia attualmente utilizzando un campanello meccanico da 8-24 V 3.
- Seite 30 Gigaset elements app Pour mettre en service la Gigaset Smart Doorbell, veuillez installer l'application gratuite Gigaset elements et suivre les étapes et les consignes. Veuillez également lire nos consignes de sécurité jointes. Vous trouverez également de plus amples informations sur www.gigaset.com Démarrez l'application Gigaset elements...
- Seite 31 Gigaset elements app Per mettere in funzione la Gigaset Smart Doorbell, installare l'app gratuita Gigaset elements e seguire i passaggi e le istruzioni. Leggere anche le nostre note di sicurezza allegate. Ulteriori informazioni sono disponibili anche sul sito www.gigaset.com – Avviare l'app Gigaset elements e fare clic su "Elements";...
- Seite 32 Trou de mécanique perçage classique Caméra Capteur de luminosité Microphone Passage de câble Trou de perçage Haut-parleur Le Power Kit Adapter fourni est un petit appareil garantissant l'alimentation électrique suffisante de votre Gigaset Smart Doorbell et indispensable pour son bon fonctionnement.
- Seite 33 – classico Telecamera Sensore di luce Microfono Passaggio cavi Foro Altoparlante Il Power Kit Adapter fornito in dotazione è un piccolo dispositivo che assicura un'alimentazione di corrente sufficiente a Gigaset Smart Doorbell ed è indispensabile per il suo regolare funzionamento.
-
Seite 34: Installation
Installation Seul un électricien peut installer la Gigaset Smart Doorbell. Désactivez le fusible ! 2. Retirez l'ancienne sonnette du mur de la maison. 3. Placez le gabarit de perçage et marquez les trous (6 mm) à une hauteur de 1,20 à 1,50 mètre. -
Seite 35: Installazione
Installazione Gigaset Smart Doorbell deve essere installato solo da un elettricista. Disinserire il fusibile! 2. Rimuovere il vecchio campanello dal muro di casa. 3. Posizionare la maschera di foratura e contrassegnare la posizione dei fori (6 mm) a un'altezza di 1,20-1,50 metri. 4. Fare passare i cavi attraverso il foro –... - Seite 36 à l'aide des vis et des douilles fournies. 6. Ne raccordez qu'un câble par point de connexion à la Gigaset Smart Doorbell. 7. A l'aide de la paroi arrière, alignez la sonnette et poussez la Gigaset Smart Doorbell (vers le haut/vers le bas).
- Seite 37 6. Quindi collegare un cavo per ogni punto di allacciamento a Gigaset Smart Doorbell. 7. Con l'ausilio della parete posteriore allineare il campanello e applicare Gigaset Smart Doorbell – (spingendolo verso l'alto/verso il basso). 8. Fissare il campanello: stringere la vite di sicurezza con il cacciavite in dotazione sul lato inferiore della parete posteriore.
- Seite 38 Installation 9. Ouvrez le boîtier de votre sonnette. 10. Raccordez le Power Kit Adapter aux bornes de votre sonnette mécanique. Si vous ne souhaitez plus utiliser votre sonnerie mécanique, vous pouvez renoncer à cette étape. 11. Après l'installation, fermez le boîtier de la sonnette et réactivez le fusible. Ò...
- Seite 39 Installazione 9. Aprire la scatola del campanello. 10. Collegare il Power Kit Adapter ai morsetti del campanello meccanico. Se non si desidera più utilizzare il campanello meccanico, è possibile saltare questo passaggio. 11. Dopo l'installazione, chiudere la scatola del campanello e riattivare il fusibile. –...
- Seite 40 Cliquez dans l'application sur Elements et sur « Doorbell » pour effectuer d'autres réglages. Détection de mouvement Sélectionnez le profil de mouvement de votre Gigaset Smart Doorbell. Si, sous Zone, vous cliquez sur quelques parallélépipèdes, les mouvements y seront ignorés et ne déclencheront pas un enregistrement.
- Seite 41 Nell'app fare clic su Elements e su "Doorbell" per effettuare ulteriori impostazioni. Riconoscimento del movimento Selezionare il profilo di movimento di Gigaset Smart Doorbell. Se sotto Zone si fa clic su alcuni riquadri, un movimento in quel punto viene ignorato e non avvia –...
-
Seite 42: Ce Que Vous Devez Savoir
Ce que vous devez savoir Alarme anti-vol Lors du fonctionnement avec Gigaset Smart Home System, 30 secondes sont automatiquement enregistrées en cas d'effraction. Hôtes indésirables Si vous n'êtes pas chez vous et si une notification arrive sur votre smartphone, vous indiquant que quelqu'un se trouve devant votre porte, vous pouvez décider si vous souhaitez lui parler ou non. -
Seite 43: Informazioni Utili
Informazioni utili Allarme anti-effrazione Se si utilizza un sistema Gigaset Smart Home, in caso di effrazione la registrazione avviene automaticamente per 30 secondi. Ospiti importuni Se si è fuori casa e sullo smartphone si riceve la notifica che qualcuno è davanti alla propria porta, è... - Seite 44 Gigaset Smart Doorbell. 6. Appuyez sur le bouton de réinitialisation pendant environ 11 secondes. 7. Gigaset Smart Doorbell est réinitialisé dès que la touche clignote lentement en blanc. 8. Vous pouvez maintenant raccorder Gigaset Smart Doorbell avec un nouveau compte.
-
Seite 45: Reset Alle Impostazioni Di Fabbrica
4. Rimuovere il campanello dal supporto con il cacciavite – di sicurezza in dotazione. 5. Cercare il tasto Reset sul retro di Gigaset Smart Doorbell. 6. Premere il tasto Reset per circa 11 secondi. 7. Gigaset Smart Doorbell è resettato non appena lampeggia lentamente in bianco. -
Seite 46: Questions Fréquentes
Gigaset Smart Doorbell. Comment puis-je redémarrer Gigaset Smart Doorbell sans la réinitialiser ? Si le SAV vous a demandé de redémarrer la Gigaset Smart Doorbell, retirez la vis de sécurité, sortez la Gigaset Smart Doorbell et appuyez pendant 4 secondes environ sur le bouton de réinitialisation (11 secondes correspondent à... - Seite 47 Gigaset Smart Doorbell funzioni senza inconvenienti. Come posso riavviare Gigaset Smart Doorbell senza resettarlo? Se il Service le ha chiesto di riavviare una volta Gigaset Smart Doorbell, rimuova la vite di sicurezza, estragga Gigaset Smart Doorbell e prema il tasto Reset per 4 secondi (una pressione di 11 secondi determina un reset completo).
- Seite 48 Questions fréquentes Pourquoi ma sonnette sonne-t-elle différemment maintenant ? Si votre sonnette sonne bizarrement après la connexion de la Gigaset Smart Doorbell, cela est probablement dû au fait qu'elle a besoin d'une autre intensité de courant. L'électricien de votre choix pourra vous aider avec un adaptateur.
- Seite 49 Perché ora il mio campanello suona diversamente? Se il suo campanello suona in modo strano dopo aver collegato Gigaset Smart Doorbell, con tutta probabilità il campanello necessita di un altro amperaggio. Il suo elettricista di fiducia potrà aiutarla con un adattatore.
-
Seite 50: Caractéristiques Techniques
Comportement de la LED Connexion avec le routeur 2 x court, 1 x long Smart Camera démarre allumée en continu Aucune connexion clignote lentement Connexion aucune lumière, lumière nocturne décente Mise à jour du micrologiciel clignote très rapidement L'enregistrement démarre 1 x court Liveview activée pas de LED... -
Seite 51: Dati Tecnici
Comportamento del LED Collegamento al router 2 x breve, 1 x lungo Avvio della Smart Camera acceso ininterrottamente Nessuna connessione lampeggio lento Collegato nessuna luce, di notte luce notturna discreta Update del firmware lampeggio molto veloce Inizio registrazione 1 x breve –... - Seite 52 Autres possibilités … Gigaset Smart Doorbell peut être mise en service de différentes façons : Raccordement via boîte à fusibles Un électricien professionnel peut également brancher Gigaset Smart Doorbell directement au niveau d'une boîte à fusibles et permettre ainsi l'utilisation dans les maisons multifamiliales.
- Seite 53 Se si rinuncia alla sostituzione del campanello, è possibile utilizzare Gigaset Smart Doorbell anche con un caricabatterie commerciale da 12V/1A adatto. Chiedere consiglio al proprio elettricista. Si potrebbe così scegliere una presa vicina alla porta di casa. Il campanello meccanico non sarà quindi collegato a Gigaset Smart Doorbell.
- Seite 54 Voordat u begint … Voordat u begint met de installatie van de Gigaset Smart Doorbell, controleer of: 1. de Gigaset Smart Doorbell op uw huisdeur een goede internetverbinding heeft (min. 2 MBIT upload) 2. u momenteel een deurbel van 8-24 V gebruikt 3.
- Seite 55 Antes de encargar a un electricista la instalación del Gigaset Smart Doorbell debe asegurarse de lo siguiente: 1. El Gigaset Smart Doorbell dispone de buena conexión a Internet en la puerta de su casa (mín. 2 MBIT de subida) 2. En la actualidad está utilizando un timbre mecánico con 8-24 V 3.
- Seite 56 Gigaset elements app Installeer de gratis elements-app van Gigaset en volg de stappen en instructies om Gigaset Smart Doorbell in gebruik te nemen. Lees ook de meegeleverde veiligheidsinstructies. Meer informatie vindt u ook op www.gigaset.com Gigaset elements app starten en op „Elements“...
- Seite 57 Gigaset elements app Para poner la Gigaset Smart Doorbell en funcionamiento, instale la Gigaset elements App gratuita y siga los pasos y las instrucciones. Lea también las indicaciones de seguridad adjuntas. También encontrará más información en www.gigaset.com Abra la Gigaset elements App y haga clic en "Elements";...
- Seite 58 LED's deurbel Camera Lichtsensor Microfoon Kabelgeleiding Boorgat Luidspreker De meegeleverde Power Kit Adapter is een klein apparaat dat ervoor zorgt dat uw Gigaset Smart Doorbell voldoende stroom krijgt. De adapter is technisch noodzakelijk voor de werking van de innovatieve deurbel.
- Seite 59 Micrófono – Paso de cables Orificio Altavoz El Power Kit Adapter incluido en el volumen de suministro es un pequeño dispositivo destinado a garantizar que su Gigaset Smart Doorbell reciba suficiente corriente y es imprescindible para el correcto funcionamiento.
- Seite 60 Installatie Bent u niet technisch onderlegd? Overweeg dan om de Gigaset Smart Doorbell door iemand met de vereiste technische kennis of een erkende electriciën te laten installeren. BELANGRIJK: schakel de zekering uit. 2. Verwijder de oude deurbel van de muur. 3. Breng het boorsjabloon aan en markeer de boorgaten (6 mm) op de gewenste hoogte, aanbevolen wordt tussen 1.20 en 1.50 meter voor het...
-
Seite 61: Instalación
Instalación Solo un electricista debería instalar el Gigaset Smart Doorbell. ¡Desconecte el fusible! 2. Desmonte el timbre viejo de la pared. 3. Coloque la plantilla de taladrado y marque los orificios (6 mm) a una altura de 1,20-1,50 metros. 4. Pase los cables existentes a través del agujero. - Seite 62 6. Sluit per aansluitpunt niet meer dan één kabel op de Gigaset Smart Doorbell aan. 7. Breng de deurbel met behulp van de achterwand in de juiste positie en schuif de Gigaset Smart Doorbell erop...
- Seite 63 Fije el panel trasero con los tacos y tornillos suministrados. 6. A continuación, conecte un cable a cada punto de conexión del Gigaset Smart Doorbell. 7. Con la ayuda del panel trasero, alinee el timbre y coloque el Gigaset Smart Doorbell (deslizándolo hacia arriba/abajo).
- Seite 64 Installatie 9. Open het kastje van uw gong. 10. Sluit de Power Kit Adapter aan op de klemmen van uw mechanische bel. Deze stap kunt u overslaan, als u niet van plan bent, de mechanische bel nog te gebruiken. 11. Na de installatie sluit u het belkastje en schakelt u de zekering weer in. Ò...
- Seite 65 Instalación 9. Abra la caja de su timbre. 10. Conecte el Power Kit Adapter a los bornes de su timbre mecánico. Si no quiere seguir utilizando su timbre mecánico, puede prescindir de este paso. 11. Después de la instalación, cierre la caja del timbre y vuelva a conectar el fusible. –...
- Seite 66 Configureren Nadat u de instructies in de app hebt uitgevoerd, is de Gigaset Smart Doorbell gereed voor gebruik. Zorg ervoor dat u zich aan alle geldende wettelijke bepalingen houdt. Klik in de app op Elements en op „Deurbel“ voor nog meer instellingen.
- Seite 67 En la app, haga clic en Elements y, a continuación, en "Doorbell" para realizar ajustes adicionales. Detección de movimiento Seleccione el perfil de movimiento de su Gigaset Smart Doorbell. Si hace clic en algunos ortoedros del aparatado Zone, el movimiento se ignorará en esas zonas y no se procederá a la grabación.
-
Seite 68: Wat U Moet Weten
Gigaset elements app de videobeelden van uw bezoeker op een later moment terugkijken. Power Kit Adapter Met de Power Kit Adapter is de beltoon ook te horen als de Gigaset Smart Doorbell geen internet heeft. Outdoor-pakketten Wilt u verschillende opnames kunnen maken? Dan heeft u een servicepakket nodig. - Seite 69 Mediante el uso del Power Kit Adapter, su timbre seguirá funcionando aunque el Gigaset Smart Doorbell no tenga conexión a Internet. Paquetes Outdoor Si desea realizar diferentes grabaciones necesitará un paquete de servicios que puede adquirir en la tienda Gigaset o desde su aplicación a través de Google o Apple.
-
Seite 70: Resetten Naar Fabrieksinstelling
5. Ga naar de reset-toets op de achterzijde van de Gigaset Smart Doorbell. 6. Houd de reset-toets ca. 11 sec. ingedrukt. 7. De Gigaset Smart Doorbell is gereset zodra er een wit licht langzaam knippert. 8. Nu kunt u de Gigaset Smart Doorbell aan een nieuwe account koppelen. -
Seite 71: Restablecer Los Ajustes De Fábrica
5. Busque la tecla de reseteo (Reset) en la parte trasera de su Gigaset Smart Doorbell. 6. Pulse la tecla Reset durante aprox. 11 segundos. 7. El Gigaset Smart Doorbell se habrá reseteado una vez – que la tecla parpadee lentamente en color blanco. - Seite 72 Waarom moet ik „intelligent netwerk“ voor installatie in mijn smartphone uitschakelen? Om de Gigaset Smart Doorbell aan uw mobiele telefoon te koppelen, dient u in het pairing-proces verbinding te hebben met het „Gigaset“-netwerk. Omdat dit netwerk geen internet heeft, kan het zijn dat uw smartphone automatisch wil terugschakelen naar uw vorige netwerk.
- Seite 73 – Si el servicio técnico le ha solicitado que reinicie una vez el Gigaset Smart Doorbell, retire el tornillo de seguridad, desplace el Gigaset Smart Doorbell para extraerlo del soporte y pulse la tecla Reset durante 4 segundos (si la mantiene pulsada 11 segundos se restablece la configuración de fábrica).
- Seite 74 Waarom klinkt mijn bel zo anders? Wanneer uw bel een beetje vreemd klinkt nadat u de Slimme Gigaset Deurbel hebt aangesloten, ligt dat hoogstwaarschijnlijk aan het feit dat uw bel een andere stroomsterkte nodig heeft. Dit is op te lossen met een andere adapter.
- Seite 75 Un electricista de su confianza podrá ayudarle con un adaptador. ¿Por qué no funciona el Gigaset Smart Doorbell con mi antigua tarifa de cámara? En el apartado Servicio encontrará los diferentes paquetes que se pueden contratar, con sus funciones correspondientes.
-
Seite 76: Technische Specificaties
's nachts onopvallend nachtlicht Firmware-update knippert zeer snel Opname start 1 x kort Liveview is geactiveerd geen LED Technische specificaties Stroomverbruik Smart Doorbell max 9,6 W Weersbestendigheid IP55 Zicht bij nacht tot 3 m Kijkhoek 140° zicht, 115° horizontaal, 57° verticaal... -
Seite 77: Indicadores Led
Indicadores LED Conectándose con el router 2 x brevemente, 1 x prolongadamente Smart Camera iniciándose encendido permanentemente Sin conexión parpadea lentamente Conectado ninguna luz; por la noche, una luz nocturna tenue Actualización de firmware parpadea muy rápido Se inicia la grabación 1 x brevemente Se activa la visión en directo ningún LED... - Seite 78 Aansluiting met contactdoos Indien u de bestaande bel niet wilt vervangen, kunt u de Gigaset Smart Doorbell ook met een gewone 12V/1A voedingsadapter gebruiken. U kunt dan de dichtstbijzijnde contactdoos bij de huisdeur gebruiken. De traditionele bel is hierbij niet verbonden...
- Seite 79 Doorbell a una caja de fusibles, permitiendo así el uso en viviendas multifamiliares. Conexión a la toma de corriente Si no quiere sustituir un timbre, también puede utilizar el Gigaset Smart Doorbell con un cargador 12 V/1 A convencional adecuado. Pida consejo a su electricista.
- Seite 82 Wir freuen uns über Ihren Besuch auf www.gigaset.com. Sie finden auch hilfreiche Videos auf YouTube oder unserer Facebook Präsenz. Den Support erreichen Sie direkt aus der App oder auf www.gigaset.com/support. We are here to help. Do you have any questions or want detailed information on our security solutions? Follow the safety information included.
- Seite 83 We heten u van harte welkom op www.gigaset.com. Op YouTube of onze Facebook-pagina vindt u bovendien handige video‘s. U bereikt onze support rechtstreeks uit de app of op www.gigaset.com/support. Estamos encantados de ayudarle. ¿Tiene alguna duda o necesita información detallada sobre nuestras soluciones de seguridad? Tenga en cuenta las recomendaciones de seguridad adjuntas.
- Seite 84 Your unique Gigaset Smart Doorbell ID Issued by © Gigaset Communications GmbH 2021 Gigaset Communications GmbH Subject to availability. Frankenstr. 2a, D-46395 Bocholt All rights reserved. Rights of modification reserved. www.gigaset.com *A31008-N2560-R101-1-4U19* A31008-N2560-R101-1-4U19...