Behringer 904A Bedienungsanleitung
Inhaltsverzeichnis
Quick Start Guide
904A VOLTAGE CONTROLLED
LOW PASS FILTER
Legendary Analog Low Pass VCF
Module for Eurorack
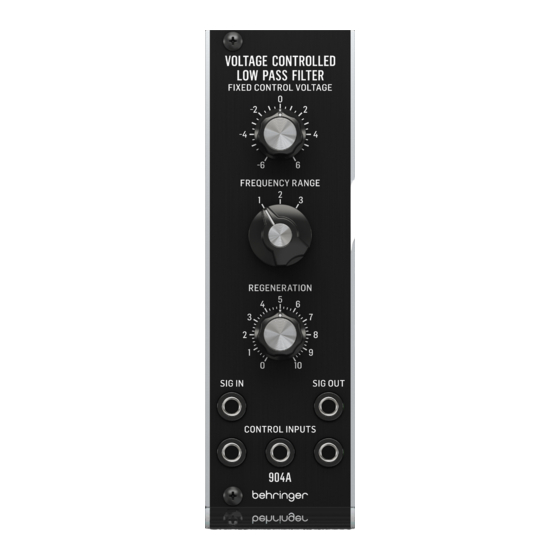
Controls
(1)
(2)
(3)
(4)
FIXED CONTROL VOLTAGE – Also referred to as "cutoff
(1)
frequency", this knob manually determines the frequency
above which frequencies are attenuated. The resulting
frequency will depend on this knob's setting as well as
voltage received from the control inputs.
FREQUENCY RANGE – Select one of 3 frequency bands
(2)
in which the fixed control voltage operates. Position 1 is
1 Hz to 5 kHz, position 2 is 4 Hz to 20 kHz, and position 3 is
16 Hz to 80 kHz.
REGENERATION – This knob varies the amount of
(3)
internal feedback, creating a resonant peak at the cutoff
frequency. At higher settings this becomes self-oscillation.
SIGNAL INPUT – Connect the incoming signal via 3.5 mm
(4)
TS cable.
SIGNAL OUTPUT – Send the processed signal to another
(5)
module via 3.5 mm TS cable.
CONTROL INPUTS – Connect control voltage signals from
(6)
other modules to affect the cutoff frequency. The sum of
the voltage received doubles the frequency cutoff point
for each 1 V increase.
V 1.0
Power Connection
The 904A comes with the required power cable for connecting
to a standard Eurorack power supply system. Follow these
steps to connect power to the module. It is easier to make these
connections before the module has been mounted into a rack case.
1.
Turn the power supply or rack case power off and
disconnect the power cable.
2.
Insert the 16-pin connector on the power cable into the
socket on the power supply or rack case. The connector has
a tab that will align with the gap in the socket, so it cannot
be inserted incorrectly. If the power supply does not have
a keyed socket, be sure to orient pin 1 (-12 V) with the red
stripe on the cable.
3.
Insert the 10-pin connector into the socket on the back of
the module. The connector has a tab that will align with the
socket for correct orientation.
4.
After both ends of the power cable have been securely
(5)
attached, you may mount the module in a case and turn on
the power supply.
(6)
Installation
The necessary screws are included with the module for mounting
in a Eurorack case. Connect the power cable before mounting.
Depending on the rack case, there may be a series of fixed holes
spaced 2 HP apart along the length of the case, or a track that
allows individual threaded plates to slide along the length
of the case. The free-moving threaded plates allow precise
positioning of the module, but each plate should be positioned in
the approximate relation to the mounting holes in your module
before attaching the screws.
Hold the module against the Eurorack rails so that each of the
mounting holes are aligned with a threaded rail or threaded
plate. Attach the screws part way to start, which will allow
small adjustments to the positioning while you get them all
aligned. After the final position has been established, tighten the
screws down.
Inhaltsverzeichnis

Verwandte Anleitungen für Behringer 904A


Inhaltszusammenfassung für Behringer 904A
- Seite 1 Legendary Analog Low Pass VCF Module for Eurorack Controls The 904A comes with the required power cable for connecting to a standard Eurorack power supply system. Follow these steps to connect power to the module. It is easier to make these connections before the module has been mounted into a rack case.
-
Seite 2: Instalación
Réglages (ES) (FR) Le 904A est livré avec le câble d’alimentation requis pour la connexion à un système d’alimentation standard Eurorack. Suivez ces étapes pour connecter l’alimentation au module. Il est plus facile d’effectuer ces connexions avant que le module n’ait été... - Seite 3 (DE) (PT) Der 904A wird mit dem erforderlichen Stromkabel für den O 904A vem com o cabo de alimentação necessário para conexão Anschluss an ein Standard-Eurorack-Stromversorgungssystem a um sistema de fonte de alimentação Eurorack padrão. Siga estas geliefert. Befolgen Sie diese Schritte, um das Modul mit Strom etapas para conectar a alimentação ao módulo.
-
Seite 4: Stroomaansluiting
Bediening (IT) (NL) Il 904A viene fornito con il cavo di alimentazione necessario per il collegamento a un sistema di alimentazione Eurorack standard. Seguire questi passaggi per collegare l’alimentazione al modulo. È più facile effettuare questi collegamenti prima che il modulo sia stato montato in un case rack. - Seite 5 Kontroller Sterownica (SE) (PL) 904A levereras med den nödvändiga strömkabeln för anslutning Model 904A jest dostarczany z wymaganym kablem zasilającym till ett vanligt Eurorack-nätaggregat. Följ dessa steg för att ansluta do podłączenia do standardowego systemu zasilania Eurorack. ström till modulen. Det är lättare att göra dessa anslutningar Wykonaj poniższe czynności, aby podłączyć...
-
Seite 6: Specifications
904A VOLTAGE CONTROLLED LOW PASS FILTER Quick Start Guide Specifications Controls Fixed control voltage +/-6 V, summed with CV inputs 1 = 1 Hz to 5 kHz, 24 dB per octave 2 = 4 Hz to 20 kHz, Frequency range selector... - Seite 7 Midas, Klark Teknik, zijn eigendom van hun respectievelijke eigenaren. Midas, Klark Teknik, TC Electronic, TC Helicon, Behringer, Bugera, Oberheim, Auratone, propriétaires respectifs. Midas, Klark Teknik, Lab Gruppen, Lake, Lab Gruppen, Lake, Tannoy, Turbosound, TC Electronic, TC Helicon,...
- Seite 8 Wszystkie znaki towarowe są własnością ich odpowiednich właścicieli. Midas, Klark Teknik, Lab Gruppen, Lake, Tannoy, Turbosound, TC Electronic, TC Helicon, Behringer, Bugera, Oberheim, Auratone, Aston Microphones i Coolaudio są znakami towarowymi lub zastrzeżonymi znakami towarowymi firmy Music Tribe Global Brands Ltd.
- Seite 9 904A VOLTAGE CONTROLLED LOW PASS FILTER Quick Start Guide Hereby, Music Tribe declares that this product is in compliance with Directive 2014/30/EU, Directive 2011/65/EU and Amendment 2015/863/EU, Directive 2012/19/EU, Regulation 519/2012 REACH SVHC and Directive 1907/2006/EC. Full text of EU DoC is available at https://community.musictribe.com/...
- Seite 10 904A VOLTAGE CONTROLLED LOW PASS FILTER Quick Start Guide...
- Seite 11 We Hear You...