
Verwandte Anleitungen für Baninni TOTTI BNBW011


Inhaltszusammenfassung für Baninni TOTTI BNBW011
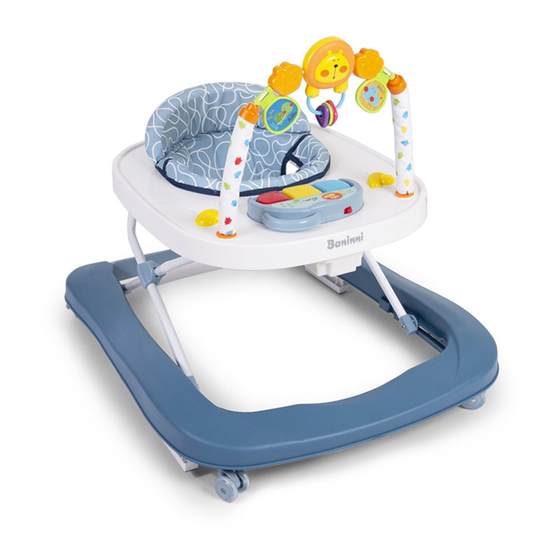
- Seite 1 BABYWALKER TOTTI BNBW011 HANDLEIDING - MANUAL - MODE D’EMPLOI - GEBRAUCHSHANTLEITUNG...
-
Seite 2: Inhaltsverzeichnis
Nederlands Onderdelenlijst Waarschuwingen Montage procedure Hoe verander je de wandelaar in een U-vorm Hoe de hoogte van de wandelaar instellen Hoe vouw je de wandelaar op Gebruik van elektronisch speelstukjesbakje Onderhoud en reiniging BELANGRIJK: VOOR HET GEBRUIK LEEST U DEZE HANDLEIDING AANDACHTIG DOOR OM DE VEILIGHEID VAN UW KIND NIET OP HET SPEL TE ZETTEN. -
Seite 3: Onderdelenlijst
Onderdelenlijst speelgoed set 2 wielen 2 achterste 6 veiligheids vaste wielen rubbers Baby looprek Gevuld blad Elektronische speeltafel... -
Seite 4: Waarschuwingen
Waarschuwingen • LET OP: controleer voor het gebruik of het product en de onderdelen geen transportschade hebben opgelopen. Controleer periodiek de eventuele slijtagestaat van het product. Houd het artikel in geval van beschadiging buiten het bereik van het kind. • LET OP: het product mag uitsluitend door een volwassene in elkaar worden gezet. Volg de vervolgens gegeven aanwijzingen voor een correcte assemblage. - Seite 5 Waarschuwingen Elektronisch speelblad: ٠ LET OP: controleer het product regelmatig op slijtage en eventuele gebreken. Bij schade of storing houd u het product buiten het bereik van kinderen, gebruikt u het niet en/of probeert u het niet te repareren, maar wendt u zich uitsluitend tot vakmensen. Het speelblad reinigen en onderhouden: •...
-
Seite 6: Montage Procedure
Montage procedure Assembling Procedures Stap 1 Step 1 Voorzijde Front Side 1. Draai het baby looprekje ondersteboven. Bevestig de wielen in de daarvoor bestemde behuizingen. Zorg 1. Turn the baby walker frame upside down. Fix the wheels in the appropriate housings. Ensure that the ervoor dat de wielen stevig in de behuizing aan de onderkant van de loopwagen worden geschoven. - Seite 7 Montage procedure Stap 4 Step 4 Step 4 4. Open the baby walker frame in the in-use position, ensuring that all wheels touch the floor. Slowly raise the tray by pulling it in an upward direction, until a click indicates that the frame has been locked correctly in one 4.
-
Seite 8: Hoe Verander Je De Wandelaar In
Montage procedure Stap 7 Step 7 Step 7 7. Zet het muziekbord op de groef op het bovenste dienblad, luister voor 3 klikken om er zeker van 7. Put the music toy board onto the groove on the upper tray, listen for 3 clicks to make sure it's installed te zijn dat het stevig is geïnstalleerd. -
Seite 9: Hoe De Hoogte Van De
Hoe verander je de wandelaar in een U-vorm WAARSCHUWING Voor de veiligheid zet u eerst de twee achter- ste greepwielen vast, dan neemt u de stoel af en verwijdert u de afneembare achterste stang aan de onderkant. How to Adjust the Height of Baby Walker Frame Hoe de hoogte van de How to Adjust the Height of Baby Walker Frame wandelaar instellen... -
Seite 10: Hoe Vouw Je De Wandelaar Op
Hoe vouw je de wandelaar op How to Fold the Walker How to Fold the Walker Step 11 Stap 11 Step 11 90 degree 90 degrees rotation rotation 90 degree 90 degrees rotation rotation The front The front press press 11. -
Seite 11: Onderhoud En Reiniging
Onderhoud & reiniging • Dit artikel heeft geregeld onderhoud nodig. Reinigings- en onderhoudswerkzaamheden mogen alleen door een volwassene worden verricht. • Reinig de stof, de kunststof delen, inclusief de stoppers, met een vochtige doek. • Gebruik voor de reiniging geen schuur- of oplosmiddelen. •... - Seite 12 ENGLISH Part list Warning Assembling procedures How to change the walker to U shape How to adjust the height of baby walker frame How to fold the walker Using electronic play toy tray Care and maintenance IMPORTANT: READ THE INSTRUCTIONS CAREFULLY BEFORE USE AND KEEP THEM FOR FUTURE REFERENCE .
-
Seite 13: Part List
Part List 2 wheels 2 rear fix wheels 6 safe rubbers toy set Baby walker frame Fadded sheet Electronic play tray... -
Seite 14: Warning
Warning WARNING: Before first use, check that the product and all its components show no signs of damage caused by transportation. Check the product regularly for signs of wear and damage. Keep all damaged parts out of children’s reach. • WARNING: This product must only be assembled by an adult. Follow the instructions below to guarantee correct assembly of all the components. - Seite 15 Warning ELECTRONIC TOY WARNING: Check the product regularly for signs of wear and damage and to ensure that it is assembled correctly. If you notice any damage or malfunctions, keep the product out of reach of children, do not use it, do not attempt to repair it and contact qualified service centres only.
-
Seite 16: Assembling Procedures
Assembling Procedures Assembling Procedures Step 1 Front Side 1. Turn the baby walker frame upside down. Fix the wheels in the appropriate housings. Ensure 1. Turn the baby walker frame upside down. Fix the wheels in the appropriate housings. Ensure that the that the wheels are firmly pushed all the way into the housing on the down base of the walker wheels are firmly pushed all the way into the housing on the down base of the walker. - Seite 17 Assembling Procedures Step 4 Step 4 4. Open the baby walker frame in the in-use position, ensuring that all wheels touch the floor. Slowly raise the tray by pulling it in an upward direction, until a click indicates that the frame has been locked correctly in one 4.
-
Seite 18: How To Change The Walker To U Shape
Assembling Procedures Step 7 Step 7 7. Put the music toy board onto the groove on the upper tray, listen for 3 clicks to make sure it’s 7. Put the music toy board onto the groove on the upper tray, listen for 3 clicks to make sure it's installed installed firmly firmly. -
Seite 19: How To Adjust The Height
How to change the walker to U shape WARNING To convert to a push-walking mode, for safety, firstly tighten the two rear grip wheels, then take off seat and remove detachable rear bar on bottom base. How to Adjust the Height of Baby Walker Frame How to adjust the height of How to Adjust the Height of Baby Walker Frame baby walker frame... -
Seite 20: How To Fold The Walker
How to fold the walker How to Fold the Walker How to Fold the Walker Step 11 Step 11 90 degree 90 degrees rotation rotation 90 degree 90 degrees rotation rotation The front The front press press 11. Firstly, pull down the button under top tray, make sure the button finally parallel to the 11. -
Seite 21: Cleaning And Maintenance
Cleaning and maintenance • This product requires periodic maintenance. The cleaning and maintenance operations must only be carried out by an adult. • Use a soft damp cloth to clean the fabric, plastic parts and the stoppers. • Do not clean the product with abrasive products or solvents. •... - Seite 22 FRANCAIS Liste des parties Avertissement Procédures d’assemblage Comment changer le déambulateur en forme de U Comment ajuster la hateur de cadre de marchette pour bébé Comment plier le déambulateur Utilisation d’un plateau de jeu électronique Nettoyage et entretien IMPORTANT: LIRE ATTENTIVEMENT CETTE NOTICE D’UTILISATION POUR NE PAS COMPROMETTRE LA SECURITE DE VOTRE ENFANT.
-
Seite 23: Liste Des Parties
Liste des parties 2 roues 2 roues arrière fixes 6 caoutchoucs ensemble de sûrs jouets Cadre de marcheur Feuille volante Plateau de jeu pour bébé électronique... -
Seite 24: Avertissement
AVERTISSEMENT • AVERTISSEMENT : Avant d’utiliser le trotteur, vérifier qu’aucun élément n’a été endommagé pendant le transport. Contrôler régulièrement l’état d’usure du produit. En cas d’endommagements, tenir le produit hors de portée de l’enfant. • AVERTISSEMENT : L’assemblage du produit doit être effectué exclusivement par un adulte. Pour un assemblage correct des éléments, suivre les indications ci-dessous. - Seite 25 AVERTISSEMENT JEU ÉLECTRONIQUE ٠ AVERTISSEMENT : Vérifier régulièrement l’état d’usure du produit et la présence éventuelle de dommages. En cas d’endommagements ou de mauvais fonctionnement, tenir le produit hors de portée des enfants, ne pas l’utiliser et/ou ne pas tenter de le réparer et s’adresser exclusivement à du personnel qualifié. NETTOYAGE ET ENTRETIEN DU JEU •...
-
Seite 26: Procédures D'assemblage
Procédures d’assemblage Assembling Procedures Étape 1 Step 1 Avant Front Side 1. Retournez le cadre du trotteur. Fixez les roues dans les boîtiers appropriés. Assurez-vous que 1. Turn the baby walker frame upside down. Fix the wheels in the appropriate housings. Ensure that the les roues sont bien enfoncées jusqu’au bout dans le boîtier, sur la base du marcheur wheels are firmly pushed all the way into the housing on the down base of the walker. - Seite 27 Procédures d’assemblage Step 4 Étape 4 Step 4 4. Open the baby walker frame in the in-use position, ensuring that all wheels touch the floor. Slowly raise the tray by pulling it in an upward direction, until a click indicates that the frame has been locked correctly in one 4.
-
Seite 28: Comment Changer Le Déambulateur
Procédures d’assemblage Étape 7 Step 7 Step 7 7. Placez la planche à musique sur la rainure du plateau supérieur, écoutez 3 clics pour vous assurer 7. Put the music toy board onto the groove on the upper tray, listen for 3 clicks to make sure it's installed qu’elle est bien installée firmly. -
Seite 29: Comment Ajuster La Hateur De
Comment changer le déambulateur en forme de U AVERTISSEMENT Pour passer en mode de marche par pous- sée, par sécurité, il faut d’abord serrer les deux roues arrière à adhérence, puis enlever le siège et retirer la barre arrière amovible sur la base inférieure. -
Seite 30: Comment Plier Le Déambulateur
Comment plier le déambulateur How to Fold the Walker How to Fold the Walker Step 11 Étape 11 Step 11 90 degree 90 degrees rotation rotation 90 degree 90 degrees rotation rotation The front The front press press 11. Firstly, pull down the button under top tray, make sure the button finally parallel to the 11. -
Seite 31: Nettoyage Et Entretien
Nettoyage et entretien • Ce produit doit être entretenu régulièrement. Les opérations de nettoyage et d’entretien doivent être effectuées par un adulte. • Nettoyer les tissus, les parties en plastique, y compris les taquets avec un chiffon humide. • Ne pas utiliser de produits abrasifs ou de solvants pour le nettoyage. •... - Seite 32 DEUTSCH Teilie-Liste Warnung Verfahren zur Montage Wie man die Gehhilfe in U-Form bringt So stellen Sie die Höhe von Lauflernhilfe-Rahmen Wie faltet man die Gehhilfe zusammen? Elektronische Spielzeugablage verwenden Tipps für die pflege WICHTIG: LESEN SIE BITTE VOR DEM GEBRAUCH DIESE ANLEITUNGEN AUFMERKSAM DURCH, UM DIE SICHERHEIT IHRES KINDES NICHT ZU GEFÄHRDEN.
-
Seite 33: Teileliste
Teile-Liste 2 Räder 2 hintere festste- 6 sichere Beläge Spielzeug-Set hende Räder Lauflernhilfe-Rahmen Gefaltetes Blatt Elektronisches Ablagefach... -
Seite 34: Warnung
Warnung • WARNUNG: Vor dem Gebrauch prüfen, ob das Produkt und seine Komponenten keine Transportschäden aufweisen. Regelmäßig den Abnutzungszustand des Produkts kontrollieren. Im Falle von Beschädigungen das Produkt außerhalb der Reichweite von Kindern aufbewahren. • WARNUNG: Die Montage des Produktes darf ausschließlich von einem Erwachsenen vorgenommen werden. - Seite 35 Warnung LEKTRONISCHES SPIEL WARNUNG: Regelmäßig den Abnutzungsgrad des Produktes überprüfen und es auf evtl. Schäden untersuchen. Im Falle von Beschädigung oder Fehlfunktion, bewahren Sie das Produkt außerhalb der Reichweite von Kindern auf und benutzen Sie es nicht mehr. Versuchen Sie nicht, es zu reparieren, sondern wenden Sie sich ausschließlich an Fachpersonal.
-
Seite 36: Verfahren Zur Montage
Verfahren zur Montage Assembling Procedures Schritt 1 Step 1 Vorderseite Front Side 1. Drehen Sie den Lauflernhilfe-Rahmen auf den Kopf. Befestigen Sie die Räder in den entsprechenden Gehäusen. Achten 1. Turn the baby walker frame upside down. Fix the wheels in the appropriate housings. Ensure that the Sie darauf, dass die Räder fest bis zum Anschlag in das Gehäuse an der Unterseite der Lauflernhilfe eingeschoben sind. - Seite 37 Verfahren zur Montage Step 4 Schritt 4 Step 4 4. Open the baby walker frame in the in-use position, ensuring that all wheels touch the floor. Slowly raise the tray by pulling it in an upward direction, until a click indicates that the frame has been locked correctly in one 4.
-
Seite 38: Wie Man Die Gehhilfe In U-Form Bringt
Verfahren zur Montage Schritt 7 Step 7 Step 7 7. Legen Sie das Musikspielzeugbrett in die Nut der oberen Ablage und achten Sie auf 3 Klicks, um 7. Put the music toy board onto the groove on the upper tray, listen for 3 clicks to make sure it's installed sicherzustellen, dass es fest installiert ist. -
Seite 39: So Stellen Sie Die Höhe
Wie man die Gehhilfe in U-Form bringt WARNUNG Um in einen Schiebe-Walking-Modus um- zuschalten, ziehen Sie zur Sicherheit zuerst die beiden hinteren Griffräder fest, nehmen Sie dann den Sitz ab und entfernen Sie die abnehmbare hintere Stange am unteren Fußende. How to Adjust the Height of Baby Walker Frame So stellen Sie die Höhe von How to Adjust the Height of Baby Walker Frame... -
Seite 40: Wie Faltet Man Die Gehhilfe Zusammen
Wie faltet man die Gehhilfe zusammen? How to Fold the Walker How to Fold the Walker Step 11 Schritt 11 Step 11 90 degree 90 degrees rotation rotation 90 degree 90 degrees rotation rotation The front The front press press 11. -
Seite 41: Tipps Für Die Pflege
Tipps für die pflege • Dieses Produkt benötigt regelmäßige Wartung. Die Reinigungs und Wartungsarbeiten dürfen nur von einem Erwachsenen durchgeführt werden. • Die Stoffe und Kunststoffteile einschließlich der Stopper mit einem feuchten Tuch reinigen. • Verwenden Sie zur Reinigung keine Scheuer- oder Lösungsmittel. •... - Seite 42 IMPORTED BY BANINNI BELGIUM...