
Verwandte Anleitungen für MAJORITY SHELFORD II SEL-DAB-BLK-2


Inhaltszusammenfassung für MAJORITY SHELFORD II SEL-DAB-BLK-2
- Seite 1 S H E L F O R D P O R T A B L E D I G I T A L R A D I O SEL-DAB-BLK-2 Instructions Guide...
-
Seite 2: Inhaltsverzeichnis
Bluetooth ����������������������������������������������������������������� Clock & Date Settings ����������������������������������������������� Dual Alarm Settings ������������������������������������������������� Alarm Functions ������������������������������������������������������� Other Functions ������������������������������������������������������� Troubleshooting ������������������������������������������������������ Specifications ���������������������������������������������������������� Warranty ����������������������������������������������������������������� Safety Information��������������������������������������������������� YEAR Watch video tutorials and register your product for a FREE 3-year warranty WARRANTY at https://www.majority.co.uk... -
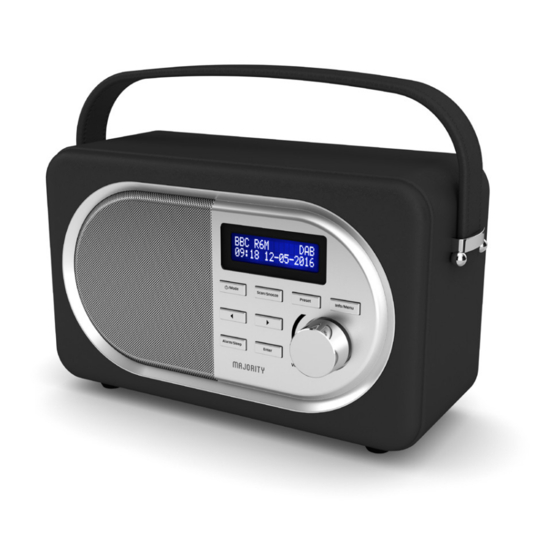
Seite 3: Front View
Controls And Functions Front View Dimmer Preset Info/Menu /Mode Alarm/Sleep Enter/ Standby/Mode Previous Dimmer Alarm/Sleep Preset Enter/BT Play & Pause Info/Menu Next Volume... -
Seite 4: Rear View
Controls And Functions Rear View OFF 0N DC 5V DC 5V 10. Antenna 11. Off/On 12. Headphone Jack 13. DC 5V Power Input 14. Battery Compartment... -
Seite 5: What's In The Box
What’s In The Box? Box Contents 1. Majority Shelford II Radio 2. UK Power Supply 3. User Guide... -
Seite 6: Support
Instructions Guide Support Thank you for your purchase of the Majority Shelford II. Please follow the guidance of the manual to set up your radio and enjoy its fantastic variety of stations and features. If you require further assistance with your new radio, please contact our support team on the Majority website: https://www.majority.co.uk/support/... -
Seite 7: Basic Operation
Instructions Guide Basic Operation Please note all (Ref.) refer to Page 1 Controls and Functions mapping guide. Plug the connector into the back of the system labelled DC 5V (Ref.13) and the power supply into the mains. Alternatively, insert 4 x C batteries into the battery compartment for portability. -
Seite 8: Dab/Dab+ Radio
Instructions Guide DAB/DAB+ Radio Press the ‘Standby/Mode’ button (Ref.1) to switch to DAB/DAB+ Radio. On first use it will automatically scan all stations and save them. Fully extend the antenna (Ref.10). The radio should have scanned in the DAB stations upon original set up. -
Seite 9: Dab/Dab+ Presets
Instructions Guide DAB/DAB+ Presets How to store a preset DAB station To be able to quickly access your favourite DAB stations, you can preset the stations. Up to 10 different preset stations can be set for you to browse between. To store a station as your preset, it is best to be listening to the station at the time. -
Seite 10: Station Information For Dab Radio
Instructions Guide Station Information for DAB Radio When you are listening to a DAB/DAB+ radio station with good signal, you can press the ‘Info/Menu’ button (Ref.4) repeatedly to show the different programme information. Signal Strength: Displays a signal bar with the strength of the current station. -
Seite 11: Fm Radio
Instructions Guide FM Radio Press the ‘Standby/Mode’ button (Ref.1) multiple times to switch between DAB, FM and Bluetooth. The first time you do this, the FM frequency “87.5 MHz” will be displayed on the screen. Fully extend the antenna (Ref.10). To scan for the available stations with good signal, press and hold the ‘Next’... - Seite 12 Instructions Guide FM Scan Setting Choose between scanning strong and weak signals (All) or only the strong stations (Only). Press and hold the ‘Info/Menu’ button (Ref.4).To make your choice, use the ‘Previous’ or ‘Next’ buttons (Ref.6/9) to choose your option. Select “Scan Setting”...
-
Seite 13: Fm Radio Presets
Instructions Guide FM Radio Presets How to store a preset FM station To be able to quickly access your favourite FM stations, you can preset the stations. Up to 10 stations can be set for you to browse between. To store a station as your preset, it is best to be listening to the station at the time. -
Seite 14: Station Information For Fm Radio
Instructions Guide Station Information for FM Radio When you are listening to a FM station with good signal, you can press the ‘Info/Menu’ button (Ref.4) repeatedly to show the different programme information. Programme Type: Displays a description of the type of programme provided by the broadcaster. -
Seite 15: Bluetooth
(Ref.1) repeatedly until Bluetooth mode is selected. Go to Bluetooth settings on your device and ensure that it is switched on. “Majority Shelford” should then display in available devices. Select this option to connect to it and the screen will display “Connected”. -
Seite 16: Clock & Date Settings
Instructions Guide Clock & Date Settings Once the radio has been put into DAB mode, the time and date should automatically set. If this does not happen or you wish to alter the time and date, follow the below guidance: Manually Setting the time Ensure the unit is turned on. -
Seite 17: Manually Setting The Date
Instructions Guide Manually Setting the Date The date can be changed straight after changing the time. The year will flash on the display screen. To change the date year, press the ‘Previous’ or ‘Next’ buttons (Ref.6/9) until the required year is displayed. To confirm the year, press the ‘Enter’... -
Seite 18: Dual Alarm Settings
Instructions Guide Dual Alarm Settings 1. Press the ‘Alarm/Sleep’ button (Ref.7) once for Alarm 1 or twice for Alarm 2. Press the ‘Enter’ button (Ref.8) to confirm the alarm you wish to set. 2. Once alarm 1 or 2 are selected, OFF will display on the screen. To turn the alarm on, use the ‘Next’... -
Seite 19: Alarm Functions
Instructions Guide Alarm Functions To Cancel Alarm 1 or Alarm 2 To cancel the alarm, press the ‘Alarm/Sleep’ button (Ref.7) once for Alarm 1 or twice for Alarm 2. Press the ‘Enter’ button (Ref.8) to confirm. To turn the Alarm on or off, use the ‘Previous’ or ‘Next’ buttons (Ref.6/9) so that “OFF”... -
Seite 20: Other Functions
Instructions Guide Other Functions Sleep setting This enables you to programme the radio to switch off at a selection of set times up to 120 minutes from activation. Press and hold the ‘Alarm/Sleep’ button (Ref.7). Choose from 120/90/60/45/30/15/5 mins or OFF using the ‘Previous’... -
Seite 21: System Reset
Instructions Guide System Reset To reset your radio and erase all setting and preset options, perform a factory reset. This would be advisable if you are having any functionality issues with your raido. To perform a factory reset, press and hold the ‘Info/Menu’ button (Ref.4). -
Seite 22: Troubleshooting
Troubleshooting Observation Potential Cause/Solution No sound The station is not tuned in properly. Please perform a rescan for available stations or manually scroll through available stations. Cannot preset Ensure that you are pressing and holding down the stations Preset button for 2-3 seconds to open Preset Store settings. -
Seite 23: Specifications
Warranty All products come with a standard 12 month warranty. All items must be registered on https://www.majority.co.uk for the warranty to be valid. Once on the web page, use the menu to find “ register your product”. You will also be given the chance to extend your warranty for an additional 24 months, free of charge. -
Seite 24: Safety Information
ADDITIONAL WARNINGS 2. Keep these instructions. Instructions are also The apparatus shall not be exposed to dripping or available for download at www.majority.co.uk splashing and no objects filled with liquid, such as 3. Heed all Warnings vases, shall be places on the apparatus. - Seite 25 www.majority.co.uk...
- Seite 26 S H E L F O R D T R A G B A R E S D I G I T A L E S R A D I O SEL-DAB-BLK-2 Bedienungsanleitung...
-
Seite 27: Jahre Garantie
Bluetooth ����������������������������������������������������������������� Uhrzeit und Datum einstellen ���������������������������������� Dual Alarmeinstellung ��������������������������������������������� Alarm Funktionen ���������������������������������������������������� Andere Funktionen �������������������������������������������������� Fehlerbehebung ������������������������������������������������������ Technische Daten ���������������������������������������������������� Garantie ������������������������������������������������������������������ Sicherheitsinformation �������������������������������������������� Video-Tutorials ansehen und Ihr Produkt JAHRE für eine kostenlose 3-jährige Garantie GARANTIE registrieren bei www.majority.co.uk... -
Seite 28: Frontansicht
Bedienelemente Frontansicht Dimmer Preset Info/Menu /Mode Alarm/Sleep Enter/ 1. Standby/Modus 6. Zurück 2. Dimmer 7. Alarm/Schlaf 3. Voreinstellen 8. Enter/Abspielen/Pause 4. Info/Menü 9. Weiter 5. Lautstärke... -
Seite 29: Rückansicht
Bedienelemente Rückansicht OFF 0N DC 5V DC 5V 10. Antenne 13. DC 5V 11. An/Aus 14. Batteriefach 12. Kopfhöreranschluss... -
Seite 30: Was Ist In Der Box
Was ist in der Box? Box Inhalt 1. Majority Shelford II Radio 2. Standard Stecker DC 5V, 1A Netzteil (EU) 3. Bedienungsanleitung... -
Seite 31: Unterstützung
Unterstützung Unterstützung Vielen Dank für Ihren Kauf der Majority Shelford II. Befolgen Sie die Anweisungen des Handbuchs, um Ihren neuen Kauf einzurichten und mit den Funktionen zu beginnen. Wenn Sie weitere Unterstützung bei Ihrem neuen Radio benötigen, wenden Sie sich bitte an unser Support-Team auf der Majority-Website: https://www.majority.co.uk/support... -
Seite 32: Bedienungsanleitung
Bedienungsanleitung Grundbetrieb Bitte beachten Sie, dass sich alle (Ref.) auf Seite 1, Bedienelemente und Funktionen, beziehen Stecken Sie den Stecker in die Rückseite des Systems mit der Bezeichnung DC 5V (Ref.13) und das Netzteil in das Stromnetz. Alternativ können Sie auch 4 x C-Batterien in das Batteriefach einlegen. -
Seite 33: Dab/Dab+ Radio
Bedienungsanleitung DAB/DAB+ Radio Drücken Sie die Taste “Standby/Mode” (Ref.1), um auf DAB/DAB+ Radio umzuschalten. Bei der ersten Benutzung werden alle Sender automatisch gescannt und gespeichert. Im DAB-Modus synchronisiert sich das Radio mit der Uhrzeit und dem Datum des Senders. Die Antenne vollständig ausfahren (Ref.10). Das Radio sollte in dem DAB-Sender auf Original-Einrichtung gescannt hat. -
Seite 34: Dab/Dab+ Voreingestellten
Bedienungsanleitung DAB/DAB+ Voreingestellten Speichern eines voreinstellten Senders Es können bis zu 10 verschiedene voreingestellte Sender eingestellt werden, zwischen denen Sie navigieren können. Um einen Sender als Voreinstellung zu speichern, hören Sie zu diesem Zeitpunkt am besten den Sender. Halten Sie nach dem Abhören des Senders die ‘Preset’-Taste (Ref.3) 2-3 Sekunden lang gedrückt, bis die voreingestellter Speicher-Einstellungen geöffnet werden und “voreingestellter Speicher <1: (Leeren)“... -
Seite 35: Dab/Dab+ Radio Senderinformationen
Bedienungsanleitung DAB/DAB+ Radio Senderinformationen Wenn Sie sich auf einer DAB-Station mit Signal befinden, können Sie die verfügbaren Senderinformationen abfragen. Drücken Sie wiederholt die Taste “Menu/Info” (Ref.4), um die Programminformationen anzuzeigen. Bit Error Rate (BER): Liefert Details zur Signalfehlerrate. Kanalnummer und Frequenz: Zeigt die Nummer des Übertragungskanals und die Frequenz der Station an. -
Seite 36: Ukw Radio
Bedienungsanleitung UKW Radio Drücken Sie die Taste “Standby/Mode” (Ref.1) mehrmals, um zwischen DAB und FM umzuschalten. Beim ersten Mal wird die FM-Frequenz “87,5 MHz” auf dem Bildschirm angezeigt. Die Antenne vollständig ausfahren (Ref.10). Um nach den verfügbaren Sendern mit gutem Signal zu suchen, drücken und halten Sie die Taste Zurück (>) (Ref.9) und lassen Sie sie los, damit das Radio mit dem Scannen des Frequenzbandes beginnt. -
Seite 37: Ukw Einstellung
Bedienungsanleitung UKW Einstellung Wählen Sie zwischen dem Scannen von starken und schwachen Signalen (Alle) oder nur von starken Sendern (Nur). Halten Sie die Taste “Info/Menu” gedrückt (Ref.4). Um Ihre Wahl zu treffen, benutzen Sie die Zurück (<) oder Weiter (>) (Ref.6/9), um Ihre Wahl zu treffen. -
Seite 38: Ukw Voreingestellten
Bedienungsanleitung UKW Voreingestellten So speichern Sie einen voreingestellten UKW-Sender Es können bis zu 10 verschiedene voreingestellte Sender eingestellt werden, zwischen denen Sie navigieren können. Um einen Sender als Voreinstellung zu speichern, hören Sie zu diesem Zeitpunkt am besten den Sender. Halten Sie nach dem Abhören des Senders die ‘Preset’-Taste (Ref.3) 2-3 Sekunden lang gedrückt, bis die voreingestellter Speicher-Einstellungen geöffnet werden und “voreingestellter Speicher <1: (Leeren)“... -
Seite 39: Ukw-Radio Senderinformationen
Bedienungsanleitung UKW-Radio Senderinformationen Wenn Sie sich auf einem UKW-Sender mit Signal befinden, können Sie die verfügbaren Senderinformationen abfragen. Drücken Sie wiederholt die Taste “Menu/Info” (Ref.4), um die Programminformationen anzuzeigen. Signalstärkeleiste: Zeigt eine Signalleiste mit der Stärke des aktuellen Senders an. Uhrzeit und Datum: Zeigt die Uhrzeit und das Datum an. -
Seite 40: Bluetooth
Taste ‘Standby/Mode’ (Ref.1), bis der Bluetooth-Modus ausgewählt ist. Gehen Sie zu den Bluetooth-Einstellungen Ihres Geräts und stellen Sie sicher, dass es eingeschaltet ist. "Majority Shelford" sollte dann in verfügbaren Geräten angezeigt werden. Wählen Sie diese Option, um eine Verbindung herzustellen, und auf dem Bildschirm wird „Connected“... -
Seite 41: Uhrzeit Und Datum Einstellen
Bedienungsanleitung Uhrzeit und Datum einstellen Sobald das Radio in den DAB-Modus versetzt wurde, sollten Uhrzeit und Datum automatisch eingestellt werden. Wenn dies nicht der Fall ist oder Sie die Uhrzeit und das Datum ändern möchten, befolgen Sie die folgenden Anweisungen: Manuelles Einstellen der Uhrzeit Vergewissern Sie sich, dass das Gerät eingeschaltet ist. -
Seite 42: Manuelles Einstellen Des Datums
Bedienungsanleitung Manuelles Einstellen des Datums Das Datum kann direkt nach dem Ändern der Uhrzeit geändert werden. Die Jahreszahl blinkt auf dem Display. Um das Jahr des Datums zu ändern, drücken Sie die Tasten Zurück (<) oder Weiter (>) (Ref.6/9), bis das gewünschte Jahr angezeigt wird. Um das Jahr zu bestätigen, drücken Sie die Taste “Enter”... -
Seite 43: Dual Alarmeinstellung
Bedienungsanleitung Dual Alarmeinstellung 1. Drücken Sie die Taste “Alarm/Sleep” (Ref.7) einmal für Alarm 1 oder zweimal für Alarm 2. Drücken Sie die Taste “Enter” (Ref.8), um den Alarm zu bestätigen, den Sie einstellen möchten. 2. Sobald der Alarm 1 oder 2 ausgewählt wurde, wird OFF auf dem Bildschirm angezeigt. -
Seite 44: Alarm Funktionen
Bedienungsanleitung 6. Sie können nun den Alarmton wählen. Drücken Sie die Tasten Zurück (<) oder Weiter (>) (Ref.6/9), um zwischen den gewünschten. Tönen zu wechseln: Alarm, DAB oder UKW-Radio. Drücken Sie zur Bestätigung die Taste “Enter” (Ref.8). Alarm Funktionen Abbrechen von Alarm 1 oder Alarm 2 Um den Alarm abzubrechen, drücken Sie die Taste “Alarm/Sleep”... -
Seite 45: Andere Funktionen
Bedienungsanleitung Andere Funktionen Schlafeinstellung Auf diese Weise können Sie das Radio so programmieren, dass es sich bei einer Auswahl von eingestellten Zeiten bis zu 120 Minuten nach der Aktivierung ausschaltet. Halten Sie die Taste “Alarm/Sleep” (Ref.7) gedrückt. Wählen Sie zwischen 120/90/60/45/30/15/15/5 Min. oder OFF mit den Tasten Zurück (<) oder Weiter (>) (Ref.6/9). - Seite 46 Bedienungsanleitung Auf dem Display erscheint dann “ Werksreset?” Wählen Sie mit den Zurück (<) oder Weiter (>) (Ref.6/9) die Option “Yes/Ja” oder “No/Nein”. Drücken Sie zur Bestätigung die Taste “Enter” (Ref.8). Systemversion Halten Sie die Taste “Info/Menü” (Ref.4) gedrückt. Wählen Sie mit den Tasten Zurück (<) oder Weiter (>) (Ref.6/9) die Option”Systemversion”.
-
Seite 47: Fehlerbehebung
Fehlerbehebung Beobachtung Mögliche Ursachen / Maßnahmen Kein Ton Der Sender ist nicht eingeschaltet. Feineinstellung des Senders. Die Lautstärke wird auf eine niedrige Position eingestellt. Erhöhen Sie die Lautstärke. Es können Kopfhörer angeschlossen werden. Trennen Sie die Kopfhörer ab. Sender können nicht Stellen Sie sicher, dass Sie die Preset-Taste 2-3 Sekunden voreingestellt werden lang gedrückt halten, um die Preset Store-Einstellungen... -
Seite 48: Technische Daten
Garantie Alle Produkte werden mit einer Standardgarantie von 12 Monaten geliefert. Alle Artikel müssen auf www.majority.co.uk registriert sein, damit die Garantie gültig ist. Wenn Sie sich auf der Webseite befinden, finden Sie im Menü “Produkt registrieren”. Sie erhalten auch die Chance, Ihre... -
Seite 49: Sicherheitsinformation
2. Bewahren Sie diese Anleitung auf. Anleitungen Das Gerät darf keinen Tropfen oder Spritzwasser stehen auch zum Download unter ausgesetzt werden, und es dürfen keine mit Flüssigkeit www.majority.co.uk zur Verfügung. gefüllten Gegenstände, wie Vasen, auf das Gerät gestellt 3. Beachten Sie alle Warnungen. werden. - Seite 50 www.majority.co.uk...