
Verwandte Anleitungen für Lilin iMEGAPRO LR7224EX3.6


Inhaltszusammenfassung für Lilin iMEGAPRO LR7224EX3.6
- Seite 1 IPR424/428ESX D/N 1080P HD Vari-Focal Infrared IP Camera LR7224/7228EX D/N 1080P HD Vari-Focal Infrared IP Camera IPR434/438ESX D/N 3MP HD Vari-Focal Infrared IP Camera Quick Installation Guide...
- Seite 2 CAUTION Do not drop or strike this equipment Do not install the equipment near any naked flames or heat sources Do not expose this unit to rain, moisture, smoke or dust environment Do not cover the opening of the cabinet with cloth and plastic or to install this unit in poor ventilated places.
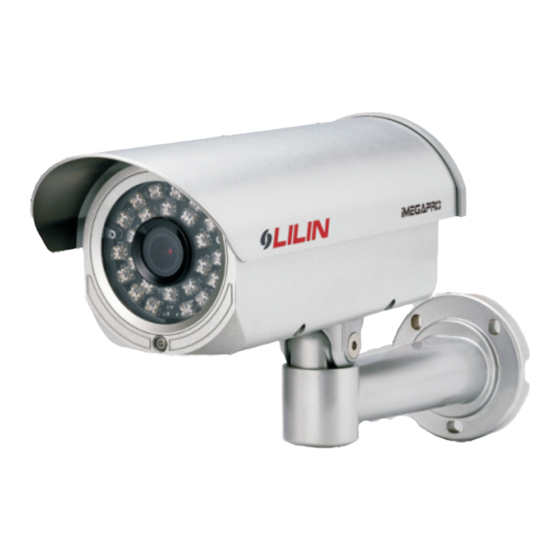
- Seite 4 Product Overview Unit: mm Sun Shield Top Cover Bottom Chassis Bracket Pan Adjustment Screw Tilt Adjustment Screw Lens Light Sensor - 1 -...
-
Seite 5: Installation
Installation 1. Take out the bracket from the box. Put the power cable and network cable through the bracket and then fix it to the wall (FIG.1 & FIG.2). 2. Take out the camera body and open the top cover with screw driver (FIG.3). - Seite 6 4. Use the provided 1/4”-20UNC screws (4 silver ones) to fix the camera body on the bracket with hexagon screw driver (FIG.6). 5. Loose the pan and tilt adjustment screws on the bracket to turn the camera body to the desired angle and then tighten the screws (FIG.7).
-
Seite 7: System Overview
6. Adjust the lens on focus and zoom for recording clear video image. After that, tighten the screws (FIG.8). 7. Replace the top cover and tighten the screws (FIG.9 & FIG.10). System Overview Top View - 4 -... - Seite 8 Input/Output Device Component Description Alarm In/Out & Audio In/Out Connector SD Card Connector RJ-45 Jack Video Out Jack Load Default Button System Architectures For connecting HD IP cameras to the network, please follow one of the system architectures: (1). Use AC24V or AC100~240V power supply and a network switch to connect to the network.
- Seite 9 Emergency Factory Default To restore factory default settings by hardware, please follow these steps: 1. Hold “RESET Key” for 10 seconds, then release. 2. After about 40 seconds, the network LED light should turn off, and the back on again. 3.
-
Seite 10: Software Requirements
JPEG or H.264 Full HD video. When you login to the IP camera by Internet Explorer, the security warning dialog box will prompt the installation of the LILIN Universal ActiveX. Click Install to download it. Configuring IP Addresses by IPScan Software... - Seite 11 Configuring IP Addresses via Web Interface To change an IP address via web interface, type the default IP address (192.168.0.200) in the Internet browser and follow the steps below: 1. Login to the H.264 Full HD IP camera by the default username “admin”...
- Seite 12 Internet Browser Settings & Application Required Make sure your Internet browser allows the signed ActiveX plug-in to work on your computer. Set “Download Signed ActiveX plug-in controls” to “Prompt” and “Run ActiveX control and plug-in” to “Enable”. You can set this option via Internet Explorer-> Tools-> Options->...
- Seite 13 Login There are two levels of user authentication, including admin and guest, that can access the IP camera. Administrator is authorized to reset basic mode settings and see live video, while the guest is allowed to see only live video. The default usernames and passwords are as follows: Administrator Viewer...
- Seite 14 Produktübersicht Einheit: mm Sonnenschutz Außenabdeckung Gehäuseunterteil Halterung Schwenkeinstellschraube Neigungseinstellschraube Objektiv Lichtsensor - 11 -...
- Seite 15 Installation 1. Nehmen Sie eine Halterung aus dem Karton heraus. Führen Sie das Netzkabel und das Netzwerkkabel durch die Halterung, und befestigen Sie sie an der Wand (FIG.1 & FIG.2). 2. Öffnen Sie das Außengehäuse mit dem Schraubendreher (FIG.3). 3. Ziehen Sie das Netzkabel und das Netzwerkkabel durch das Halterungsgummi und dann durch den unteren Teil der Kamera (FIG.
- Seite 16 4. Schrauben sie die Kamera mit den mitgelieferten Schrauben (Vier Silbere Schrauben 1/4 "-20UNC) an der Halterung fest (FIG.6). 5. Lösen Sie die Schwenk- und Neigungseinstellschraube an der Halterung, um die Kamera auf den gewünschten Winkel einzustellen. Ziehen Sie dann die Schrauben wieder fest (FIG.7). - 13 -...
- Seite 17 6. Richten Sie den Zoom und Fokus für das Objektiv ein, um bei der Aufnahme ein hohe Bildschärfe zu erhalten. Ziehen Sie dann die Arretierungsschrauben am Objekt fest (FIG.8). 7. Setzen Sie die Abdeckung wieder auf, und ziehen Sie die Schrauben fest (FIG.9 &...
-
Seite 18: Systemarchitektur
Beschreibung der Eingangs-/Ausgangsgerätekomponenten Alarm-Eingang/-Ausgang und Audio-Eingang/-Ausgang SD-Kartenanschluss RJ-45-Anschluss Video-Ausgang Taste zum Wiederherstellen der Standardeinstellungen Systemarchitektur Schließen Sie die HD IP-Kameras auf eine der folgenden Arten an das Netzwerk an: (1). Verwenden Sie ein Netzteil AC24V oder AC100~240V und ein Netzwerkswitch, um die Kamera mit dem Netzwerk zu verbinden. (2). -
Seite 19: Zurücksetzen Der Standardeinstellungen
Zurücksetzen der Standardeinstellungen Um die Standardeinstellungen hardwaremäßig wieder herzustellen, führen Sie die folgenden Schritte aus: (1). Drücken Sie 10 Sekunden lang auf die RESET-Taste. (2). Nach etwa 40 Sekunden erlischt die Netzwerk-LED kurz und beginnt gleich wieder zu leuchten. (3). Die Kamera wurde auf die Werkseinstellungen zurückgesetzt und kann jetzt neu gestartet werden. -
Seite 20: Softwarevoraussetzungen
Softwarevoraussetzungen Merit LILIN Universal ActiveX Softwarekomponenten sind zur Webanzeige von JPEG oder H.264 FULL-HD-Video erforderlich. Beim ersten Einloggen der IP-Kamera mit Internet Explorer wird eine Sicherheitswarnung als Dialogfenster zum Download von LILIN Universal ActiveX angezeigt. Klicken Sie zum Herunterladen auf “Install”. -
Seite 21: Konfigurieren Der Ip-Adressen Mittels Html Seite
6. Klicken Sie auf “Refresh” (Aktualisieren), um die Einstellungen zu überprüfen Konfigurieren der IP-Adressen mittels HTML Seite Zur Änderung der IP-Adresse mit der HTML-Seite geben Sie die Standard IP-Adresse (192.168.0.200) im Internet-Browser ein und folgen Sie den nach- stehenden Schritten: 1. - Seite 22 Internetbrowser Einstellungen & benötigte Softwarekomponenten Stellen Sie sicher, dass Ihr Internetbrowser signierte ActiveX Plug-ins auf Ihrem PC akzeptiert. Stellen Sie “Download Signed ActiveX plug-in controls” (ActiveX-Steuerelemente ausführen, die für Scripting sicher sind) auf “Prompt” (Eingabeaufforderung) und “Run ActiveX control and plug-in” (ActiveX-Steuerelemente und Plugins ausführen) auf “Enable”...
- Seite 23 Login Es gibt verschiedene Stufen der Benutzerauthentifizierung, darunter Administrator und Gast. Die Standareinstellungen von Benutzername und Kennwort sind wie folgt beschriegen: Administrator Gast Benutzername admin guest Kennwort pass guest Zur Anmeldung der H.264 FULL-HD IP-Kamera geben Sie den Benutzernamen und das Kennwort auf der HTML Seite ein und klicken Sie auf “Submit”...
- Seite 24 Présentation du produit Unité : mm Pare-soleil Couvercle supérieur Châssis inférieur Support Vis de réglage de panoramique Vis de réglage d'inclinaison Objectif Capteur de lumière - 21 -...
- Seite 25 Installation 1. Sortez le support de la boîte. Passez le câble d'alimentation et le câble réseau à travers le support et fixez-le au mur (FIG.1 et FIG.2). 2. Sortez le corps de la caméra et ouvrez le couvercle supérieur avec le tournevis (FIG.3). 3.
- Seite 26 4. Utilisez les vis 1/4”-20UNC fournies (les 4 en argent) pour fixer le corps de la caméra sur le support avec un clé Allen (FIG.6). 5. Desserrez la vis de réglage d'inclinaison et de panoramique sur le support pour tourner le corps de la caméra à l'angle désiré et serrez les vis (FIG.7).
-
Seite 27: Présentation Du Système
6. Réglez la mise au point et le zoom de l'objectif pour enregistrer une image vidéo claire et nette. Ensuite, serrez les vis (FIG.8). 7. Replacez le couvercle supérieur et serrez les vis (FIG.9 et FIG.10). Présentation du système Vue de dessus - 24 -... - Seite 28 Description des composants des périphériques d'entrée/sortie Connecteur d'entrée/sortie d'alarme et d'entrée/sortie audio Connecteur de carte SD Prise RJ-45 Prise de sortie vidéo Bouton de chargez des valeurs par défaut Architectures du système Pour la connexion des caméras IP HD au réseau, veuillez suivre l'une des architectures système : (1).
- Seite 29 Valeurs par défaut d'usine d'urgence Pour restaurer les paramètres par défaut d'usine par le matériel, veuillez suivre ces étapes : (1). Maintenez la « Touche de réinitialisation » pendant 10 secondes, puis relâchez-la. (2). Après environ 40 secondes, la LED réseau devrait s'éteindre, puis se rallumer.
-
Seite 30: Configuration Logicielle Requise
Configuration logicielle requise Les composants logiciels Merit LILIN Universal ActiveX sont nécessaires pour l’affichage de l’interface web en format vidéo JPEG ou H.264 FULL HD. Lorsque vous connectez pour la première fois une caméra IP à l’aide d’Internet Explorer, le navigateur vous invite, au moyen d’une boite de dialogue d’avertissement de sécurité, à... - Seite 31 5. Cliquez sur « Apply » (Appliquer) pour valider la configuration 6. Cliquez sur « Refresh » (Actualiser) pour vérifier la configuration Configurer les adresses IP avec une page HTML Pour changer l'adresse IP avec une page HTML, veuillez saisir l'adresse IP par défaut (192.168.0.200) dans le navigateur Internet et suivez les étapes ci-dessous : 1.
- Seite 32 Paramètres du navigateur Internet et composants logiciels requis Assurez-vous que votre navigateur Internet autorise le plugin signé ActiveX à fonctionner sur votre PC. Paramétrez « Download Signed ActiveX plug-in controls » (Télécharger les contrôles du plugin signé ActiveX) sur « Prompt » (Invite) et « Run ActiveX control and plug-in »...
- Seite 33 Connexion Il existe plusieurs niveaux d'authentification utilisateur, y compris administrateur et invité. Les zones de noms d'utilisateur et de mots de passe sont les suivantes : Administrateur Invité Nom d'utilisateur admin guest Mot de passe pass guest Pour vous connecter à la caméra IP, veuillez saisir le nom d'utilisateur et le mot de passe dans la page de connexion HTML et cliquez sur «...
- Seite 34 Vista general del producto Unidad: mm Protector solar Tapa superior Chasis inferior Soporte Tornillo de ajuste panorámico Tornillo de ajuste de inclinación Lente Detector de luz - 31 -...
-
Seite 35: Instalación
Instalación 1. Saque el soporte de la caja. Pase el cable de corriente y el cable de red a través del soporte y fije el soporte a la pared (FIG.1 et FIG.2). 2. Saque el cuerpo de la cámara la tapa superior con el destornillador (FIG.3). - Seite 36 4. Utilice los tornillos 1/4”-20UNC incluidos (4 cromados) y un destornillador hexagonal para fijar el cuerpo de la cámara al soporte (FIG.6). 5. Afloje los tornillos de ajuste de panorámico e inclinación del soporte para girar el cuerpo de la cámara al ángulo deseado y, a continuación, apriete los tornillos (FIG.7).
-
Seite 37: Vista General Del Sistema
6. Ajuste el enfoque y el zoom de la lente para grabar imágenes de vídeo nítidas. Posteriormente, apriete los tornillos (FIG.8). 7. Coloque la tapa superior y apriete los tornillos (FIG.9 et FIG.10). Vista general del sistema Vista superior - 34 -... - Seite 38 Descripción de componentes de entrada/salida del dispositivo Conector de entrada/salida de alarma y entrada/salida de audio Conector de tarjeta SD Toma RJ-45 Toma de salida de vídeo Botón predeterminado de carga Arquitecturas del sistema Para la conexión de cámaras HD IP a la red, siga una de las arquitecturas del sistema: (1).
- Seite 39 Configuración de emergencia a ajustes de fábrica Para volver a los ajustes de fábrica a través del hardware, siga estos pasos: (1). Mantenga pulsada la “tecla RESET” durante 10 segundos, y suéltela. (2). Después de aproximadamente 40 segundos, se apagará el LED de red y volverá...
- Seite 40 JPEG o H.264 Full HD. Cuando inicie sesión por primera vez con la cámara IP usando Internet Explorer, aparecerá un cuadro de diálogo para el LILIN Universal ActiveX. Haga clic en “Install” (Instalar) para descargarlo.
- Seite 41 Configurar direcciones IP usando la página HTML Para cambiar una dirección IP usando una página web, escriba la dirección IP predeterminada (192.168.0.200) en el explorador de Internet y siga los pasos siguientes: 1. Inicie sesión en la cámara IP H.264 Full HD con el nombre de usuario predeterminado “admin”...
- Seite 42 Configuración del navegador de Internet y componentes de software necesarios Asegúrese de que su navegador de Internet esté preparado para que los complementos ActiveX con firma puedan ejecutarse en su PC. Ajuste “Download Signed ActiveX plug-in controls” (Descargar controles de complementos ActiveX con firma) a “Prompt” (Preguntar) y “Run ActiveX control and plug-in”...
-
Seite 43: Iniciar Sesión
Iniciar sesión Hay varios niveles de autenticación de usuario incluyendo administrador e invitado. Los nombres y contraseñas de usuario son los siguientes: Administrador Observador Nombre de usuario admin guest Contraseña pass guest Para iniciar sesión en la cámara IP, escriba el nombre de usuario y la contraseña en la página de inicio de sesión HTML y haga clic en “Submit”... - Seite 44 Panoramica del prodotto Unità: mm Parasole Coperchio superiore Telaio inferiore Staffa Vite regolazione panoramica Vite regolazione tilt Obiettivo Sensore luminoso - 41 -...
-
Seite 45: Installazione
Installazione 1. Estrarre la staffa dalla scatola. Inserire il cavo di alimentazione e il cavo di rete attraverso la staffa e quindi fissare alla parete (FIG.1 e FIG.2). 2. Estrarre il corpo della telecamera e aprire il coperchio superiore con un cacciavite (FIG.3). 3. - Seite 46 4. Utilizzare le viti fornite 1/4”-20UNC (4 viti d'argento) per fissare il corpo della telecamera sulla staffa con un cacciavite esagonale (FIG.6). 5. Allentare le viti di regolazione pan e titl sulla staffa per portare il corpo della telecamera nell'angolazione desiderata e poi stringere le viti (FIG.7).
-
Seite 47: Panoramica Del Sistema
6. Regolare la messa a fuoco e zoom dell'obiettivo per registrare un'immagine video nitida. Dopodiché serrare le viti (FIG.8). 7. Riposizionare il coperchio superiore e serrare le viti (FIG.9 e FIG.10). Panoramica del sistema Vista Alto - 44 -... - Seite 48 Descrizione componente dispositivo di Ingresso/Uscita Connettore Ingresso/Uscita Allarme e Ingresso/Uscita Audio Connettore scheda SD Jack RJ-45 Jack uscita video Pulsante caricamento predefiniti Architetture sistema Per collegare le telecamere IP HD alla rete, applicare una delle architetture dei sistema: (1). Usare una alimentazione AC24V o AC100~240V e uno switch di rete per collegare alla rete.
- Seite 49 Impostazioni di fabbrica di emergenza Per ripristinare le impostazioni di fabbrica tramite hardware, seguire questi passi: (1). Tenere rpemuto per 10 seocndi il "Tasto RESET" quindi rilasciare. (2). Dopo circa 40 secondi, la luce del LED di rete si deve spegnere e quindi riaccendere.
-
Seite 50: Requisiti Software
Quando si esegue il primo login alla telecamera IP tramite Internet Explorer, una appare una finestra di dialogo di avviso di sicurezza per LILIN Universal ActiveX. Fare clic su "Install (Installa)" per scaricare. Configurazione degli indirizzi IP utilizzando l'utilità di scansione IP Per configurare un indirizzo IP tramite l'utilità... - Seite 51 Configurazione indirizzi IP utilizzando la pagina HTML Per modificare un indirizzo IP tramite una pagina HTML, digitare nel browser Internet l'indirizzo IP predefinito (192.168.0.200) e seguire i passaggi qui sotto: 1. accedere alla telecamera IP H.264 Full HD utilizzando il nome utente predefinito "admin"...
- Seite 52 Impostazioni del browser Internet & componenti software necessari Assicurarsi che il proprio browser Internet permetta l'esecuzione sul proprio PC di plug-in ActiveX firmati. Impostare "Download Signed ActiveX plug-in controls (Scarica controlli plug-in ActiveX firmati" su "Prompt" e "Run ActiveX control and plug-in (Esegui controlli e plug-in ActiveX)"...
- Seite 53 Accesso Ci sono diversi livelli di autenticazione degli utenti tra cui amministratore e guest. Le aree nome utente e password sono le seguenti: Amministratore Visualizzatore Nome utente admin guest Password pass guest Per eseguire il login dellaTelecamera IP, digitare il nome utente e la password nella pagina di login HTML e fare clic su "Submit (Invia)".
- Seite 54 Visão geral do produto Unit: mm Anteparo para sol Tampa superior Chassis inferior Suporte Parafuso de ajuste de rotação Parafuso de ajuste de inclinação Lente Detector de luz - 51 -...
- Seite 55 Instalação 1. Tire o suporte da caixa. Coloque o cabo de alimentação e o cabo de rede pelo suporte e depois fixe-o à parede (FIG.1 & FIG.2). 2. Tire o corpo da câmera e abra a tampa superior com a chave de fenda (FIG.3).
- Seite 56 4. Use os parafusos 1/4”-20UNC fornecidos (2 parafusos de prata) para fixar o corpo da câmera ao suporte com uma chave hexagonal de fenda (FIG.6). 5. Folgue os parafusos de ajuste de giro e inclinação do suporte para girar o corpo da câmera para o ângulo desejado e depois aperte os parafusos (FIG.7).
-
Seite 57: Visão Geral Do Sistema
6. Ajuste a lente em foco e zoom para gravar imagens de vídeo claras. Depois disso, aperte os parafusos (FIG.8). 7. Substitua a tampa superior e aperte os parafusos (FIG.9 e FIG.10). Visão geral do sistema Vista de cima - 54 -... - Seite 58 Descrição do componente do dispositivo entrada/saída Conector de entrada/saída do alarme e entrada/saída de áudio Conector do cartão SD Tomada RJ-45 Tomada de saída de vídeo Botão padrão de carga Arquiteturas de sistema Para conectar câmeras HD IP à rede, siga uma das seguintes arquiteturas: (1).
- Seite 59 Padrão de fábrica de emergência Para restaurar as configurações de fábrica por hardware, siga os seguintes passos: (1). Aperte a tecla “RESTABELECER” POR 10 SEGUNDOS, DEPOIS SOLTE. (2). Depois de cerca e 40 segundos, a lus LED de rede se desligará e voltará...
-
Seite 60: Requisitos Do Sistema
H.264 Full HD. Na primeira vez que você se conectar à câmera IP usando o Internet Explorer, uma caixa de diálogo de aviso de segurança será exibida para o LILIN Universal ActiveX. Clique em "Instalar" para fazer o download. Configuração de endereço IP usando o utilitário de verificação IP... - Seite 61 Configuração de endereço IP usando o utilitário de verificação HTML Para alterar um endereço IP usando uma página HTML, digite o endereço IP (192.168.0.200) no navegador de Internet e siga as etapas abaixo: 1. Conecte-se à câmera H.264 Full HD IP usando o nome padrão "admin"...
- Seite 62 Configurações de navegador de Internet e componentes de software necessários Certifique-se de que seu navegador de Internet possibilite o que plug-in ActiveX assinado seja executado em seu computador. Defina as opções "Baixar controles de plug-in ActiveX assinados" e "Executar controle e plug-in ActiveX" para "Ativar". É possível ajustar isso através das opções Internet Explorer->Ferramentas->Opções->...
- Seite 63 Conexão Há vários níveis de autenticação de usuário, incluindo administrador e convidado. As áreas de nome de usuário e senha são as seguintes: Administrador Visualizador Nome de usuário admin guest Senha pass guest Para se conectar à câmera IP, digite o nome de usuário e senha na página de acesso HTML e clique em "Enviar".
- Seite 64 Oбзор изделия Ед. измерения: мм Солнцезащитный козырек Верхняя крышка Основание Кронштейн Винт регулировки поворота Винт регулировки наклона Объектив Светочувствительный датчик - 61 -...
- Seite 65 Установка 1. Извлеките кронштейн из коробки. Пропустите кабель питания и сетевой кабель сквозь кронштейн и прикрепите его к стене (FIG.1 & FIG.2). 2. Достаньте корпус камеры и откройте верхнюю крышку с помощью отвертки (FIG.3). 3. Пропустите кабель питания и сетевой кабель через резиновый...
- Seite 66 4. С помощью входящих в комплект поставки винтов 1/4”-20UNC (4 шт. серебристого цвета) и шестигранного ключа закрепите корпус камеры на кронштейне (FIG.6). 5. Ослабьте винты регулировки поворота и наклона на кронштейне, чтобы повернуть корпус камеры на требуемый угол, а затем затяните винты (FIG.7). - 63 -...
- Seite 67 6. Настройте фокус и масштаб объектива для записи четкого видеоизображения. После этого затяните винты (FIG.8). 7. Установите на место верхнюю крышку и затяните винты (FIG.9 e FIG.10). Oбзор системы Вид сверху - 64 -...
- Seite 68 Описание компонентов устройства ввода-вывода Разъем вх./вых. сигнализации и аудиовхода/выхода Гнездо для карты SD Разъем RJ-45 Разъем видеовыхода Кнопка сброса настроек в значения по умолчанию Bарианты архитектуры системы Для подключения IP-камер HD-качества к сети используйте одну из следующих архитектур системы. (1). Подключение к сети с помощью источника питания 24 В перем.
- Seite 69 Bосстановление заводских настроек Для аппаратного сброса настроек в заводские значения по умолчанию выполните следующее. (1). Нажмите и удерживайте кнопку "СБРОС" в течение 10 секунд, а затем отпустите ее. (2). Приблизительно через 40 секунд светодиодный индикатор сети должен погаснуть и снова загореться. (3).
- Seite 70 требуется установить программные компоненты Merit LILIN Universal ActiveX. При первом доступе к IP-камере веб-через браузер Internet Explorer на экране появится предупреждающее сообщение системы безопасности о необходимости установки программы LILIN Universal ActiveX. Для загрузки программы нажмите Install (Установить). Hастройка IP-адресов с помощью утилиты IP Scan Utility Для...
- Seite 71 6. Для проверки настроек нажмите Refresh (Обновить) Hастройка IP-адресов через страницу веб-интерфейса Для настройки IP-адресов через веб-интерфейс введите в строку браузера IP-адрес по умолчанию (192.168.0.200) и выполните следующие действия: 1. Получите доступ к IP-камере H.264 Full HD с использованием исходного имени пользователя - «admin» и исходного...
- Seite 72 Hастройки веб-браузера и требуемые программные компоненты Убедитесь, что в веб-браузере разрешен запуск на вашем ПК подписанных подключаемых модулей ActiveX. Установите параметр «Download Signed ActiveX plug-in controls» (Загружать подписанные элементы в значение ActiveX) «Prompt» (Предлагать), а параметр «Run ActiveX control and plug-in» (Запуск...
- Seite 73 Bход Существует несколько уровней аутентификации пользователей, в том числе гостевой и административный уровни. Ниже приведены имена пользователей и соответствующие пароли: Администратор Зритель Имя пользователя admin guest Пароль pass guest Для получения доступа к IP-камере введите на странице доступа исходные имя пользователя и пароль, и нажмите Submit (Ввод).
- Seite 74 部件說明及尺寸 單位: mm 遮陽罩 上蓋 底座 繁 繁 繁 繁 腳架 體 體 體 體 中 中 中 中 水平方向調整螺絲 文 文 文 文 垂直方向調整螺絲 鏡頭 光線感應器 - 71 -...
- Seite 75 安裝 1. 首先取出腳架,把電源線、RJ-45 網路線穿過腳架,並將腳架固 定在牆上 (FIG.1 & FIG.2). 2. 接著使用螺絲起子打開攝影機主體的上蓋 (FIG.3). 3. 將電源線、RJ-45 網路線先穿過腳架橡膠,再穿入攝影機主體的 底部 (FIG.4),電源線插入電源端子並鎖緊,RJ-45 網路線插入 RJ-45 網路接頭 (FIG.5). 繁 繁 繁 繁 體 體 體 體 中 中 中 中 文 文 文 文 - 72 -...
- Seite 76 4. 接著取出所附的 1/4”-20UNC 螺絲(銀色 4 顆),使用六角板手將 攝影機主體鎖緊在腳架上 (FIG.6). 5. 轉鬆腳架上的水平及垂直調整螺絲,轉動攝影機主體到所需的攝 影角度後,再將其調整螺絲鎖緊 (FIG.7). 繁 繁 繁 繁 體 體 體 體 中 中 中 中 文 文 文 文 - 73 -...
- Seite 77 6. 調整鏡頭的焦距、放大倍數到所需的成像畫面,調整完畢後再將 其螺絲鎖緊 (FIG.8). 7. 將攝影機主體上蓋蓋上並且鎖緊 (FIG.9 & FIG.10). 系統簡介 俯視圖 俯視圖 俯視圖 俯視圖 繁 繁 繁 繁 體 體 體 體 中 中 中 中 文 文 文 文 - 74 -...
- Seite 78 輸入/ / / / 輸出 輸入 輸出 裝置描述 裝置描述 輸入 輸入 輸出 輸出 裝置描述 裝置描述 警報輸入輸出、聲音輸入輸出端子 SD Card 插槽 RJ-45 網路接頭 類比影像輸出 BNC 接頭 回復出廠預設值鍵 系統架構 請依據下列其中一種系統架構,連結高畫質網路攝影機和您的網路。 (1). 使用 AC24V 或 AC100-240V 電源和網路交換器連接網路。 (2). 使用配備 PoE+(30W) 的網路交換器連接網路。 繁 繁 繁 繁...
- Seite 79 回復出廠預設值 使用硬體來回復出廠預設值,請按照下列步驟: (1). 按住 "回復出廠預設值按鍵" 10 秒鐘。 (2). 約 40 秒鐘後網路連接 LED 燈將熄滅再點亮。 (3). 網路伺服器將重新開機。 (4). 使用 IPScan 軟體搜尋此 IP 設備。 (5). 使用網路瀏覽器開啟此 IP 設備。 (6). 輸入預設使用者 (admin) 名稱及密碼 (pass) 進行操作。 註:為方便使用者起見,回復出廠預設值會回復到預設 IP 位址 註: 註: 註: 192.168.0.200。 安裝前準備 在使用 H.264 FULL HD IP 攝影機之前,請先確認攝影機 RJ-45 網路接 頭和電源接頭是否接妥,並請網管人員提供一組未經使用的...
- Seite 80 軟體需求 Full HD 網路攝影機需要 H.264 軟體解壓縮器顯示影像,Full HD 網路 攝影機的網頁介面需使用該軟體。 當您第一次登錄本產品,Full HD 網路攝影機的網頁介面會自動安裝 LILIN Universal ActiveX 元件,請按 下「安裝」鍵安裝該元件。 使用 IPScan 軟體工具來設定 IP 位址 欲使用 IPScan(網路設備搜尋軟體)工具來設定 IP 位址,你可以從隨貨 附贈軟體安裝光碟拷貝 IPScan 軟體工具到你的電腦,或直接在安裝光 碟上執行 IPScan 軟體。要更改 IP 位址、子網路遮罩、網路閘道、或 HTTP 連接埠,請參照下列步驟: 1. 執行 IPScan 軟體工具...
- Seite 81 使用 HTML 頁面來設定 IP 位址 請先在網路瀏覽器網址列,輸入預設 IP 位址 192.168.0.200。並按照下 列步驟執行,使用 HTML 頁面來更改 IP 位址: 1. 使用預設使用者名稱及密碼 「admin」 及 「pass」 ,登錄 H.264 FULL HD IP 攝影機 2. 按「組態設定」超連結 3. 按「網路設定」「一般設定」超連結 4. 輸入或修改 IP 位址、子網路遮罩、網路閘道(Gateway)或 HTTP 連接埠 5. 按「確認」鍵,完成上述修改 繁 繁 繁 繁...
- Seite 82 網路瀏覽器設定及軟體元件需求 使用 H.264 FULL HD IP 攝影機前,請先確認網路瀏覽器的安全性設定 項目:ActiveX 控制項是否已啟用。設定 ActiveX 控制項請執行,控制 台網際網路選項安全性自訂層級。將「下載簽名的 ActiveX 控 制項」設為「提示」,並將「執行 ActiveX 控制項與插件」,設定為 啟用。 在完成上述設定後,您可以利用 H.264 FULL HD IP 攝影機預設的 IP 位 址,透過網際網路瀏覽器在網址列輸入預設的 IP 位址,來存取 H.264 FULL HD IP 攝影機的影像,第一次使用 H.264 FULL HD IP 攝影機時, 網際網路瀏覽器將提示下載 「ActiveX 控制項與插件」 ,請按下確認鍵, 繁...
- Seite 83 登錄 系統提供兩階層的使用者授權,包括管理者(admin)和一般使用者 (guest),其中最大的不同在於:管理者可以執行組態設定,而一般使 用者只能夠監看即時影像。欲執行登錄 H.264 FULL HD IP 攝影機時, 請在編輯欄位中輸入使用者名稱及密碼,再按「確認」鍵確認登入系 統。 出廠預設的使用者名稱和密碼如下: 管理者 一般使用者 使用者名稱 admin guest 繁 繁 繁 繁 密碼 pass guest 體 體 體 體 中 中 中 中 文 文 文 文 欲登錄 H.264 FULL HD IP 攝影機,請在登錄頁面,輸入使用者名稱及 密碼並按下確認鍵。...
- Seite 84 "#$%&$ظرة +-%, +*) ا ة ا وا98 ا543س ط?ء =<ويA 8<BC لEFھ 3?س <بI5ط اJK 8AرJ M5?3Nط اJK 8AرJ MC=د ء ا - 81 -...
- Seite 85 اɸت Y<= Z[J\ ك \مC?35^ل اV ا لJ?E وM9?ل ا5طJ?E XK دوقQR5ك 3ن اC?35رج اVأ ا5`?_ط (FIG.1 & FIG.2) (FIG.3) كB35دام اV[C?J <ويa5ط?ء اb5 اc[dر واF3?E5م اCe رجVأ لEFل ھBC^ل أV ^تJ?E5`ب اCك \م اC?35^ل 3ط?ط اV ا لJ?E وM9?ل ا5طJ?E XK ا...
- Seite 86 دامV[gggggg g Cر اF3?gggg g C3 1/4 "20UNC Mggg g 3دI35 4( اZg g Q3 اMFgggggggggKd) ^حgggg g RN مgg g Ce (FIG.6) راF3?gggggggE5 Yggg<= وسgg g 9 X3 ?_قggggg g C 3?رggg g C358 اggggggg g CداC5ا طJ \م ارMJ ا53ط<وMF ا5زاوY5را إF3?E5م اCe رFك 5[دوC?358 اd M5?3N<ب واI58 اAراJ `رر (FIG.7) 8AراJ5ا...
- Seite 87 M`Kو واFدFd ورةR لFeC[5 رFbR[5ر واFJE[5ز، واFE ا5[رY<= MCدa5ط اJKا رFbR[5ا رFJE[5 ا (FIG.8) 8AراJ5ط اJ<وي وارa5ط?ء اb5دال اJ[Cا (FIG.9 & FIG.10) $ظرة +-%, +*) ا&98-ز ا&;رج ف %?ون 98-ز ا&د;لAو - 84 -...
- Seite 88 ZFJQ[5رج اV لVد وتR5رج اV لVل دR3و & SD M9?طJ لR3و RJ-45 سJ?9 وFدFB5رج اV سJI3 لF3`[<5 8K[راdmا5زر ا %;طط ا&$ظ-م م ا ت ا ا ، & %$ ا# ع أ ( ات / . # ر ( دد و( ح / .
- Seite 89 ﻣﺘطﻠﺑ ـ ــــــﺎت = رW& ض وا%5 اF ً 1 ( P( I F& Merit LILIN Universal ActiveX ( ا ول ( ةZ لK 6 اS مH# ( 9 ا 6 دةR & / أو...
- Seite 90 IP -+دة &ـI%& اJI%&#;دام أداة اI-3 IP #?و2ن +$-و2ن ا ص ـQS 7 ا # `S B ، 9 ة ـS اQS ام أداة ا &8 9 ان # M & ،M أو > ً (8 ذ QS ...
- Seite 91 HTML ,LMA #;دامI-3 IP #?و2ن +$-و2ن R:ا>/ ا 9 انW ، ا ام 9 ان 192.168.0.200 HTML هIات أد . وا# < اI I; اQ = ( R/ م S اB)ام ا ا 6 دة ( ا ...
- Seite 92 ,3$#ر$ت و%?و$-ت ا&3را%" ا&%ط*وN اJMA#% إ+دادات < ا 8 A Q S& M . ا صI I; اQ = ( (8 أنU# ActiveX plug ? A B M ا صR= # ا ا Download Signed ActiveX plug و A ا...
- Seite 93 .2فO&ول واPI%& ذ&ك اST -%3 #;دمI%&#و2-ت &#و62ق اI% #و9د +دة لK 6 اS# O R/ ور م و 1 ا S اB) اW ، ا ( ا $ ل إK ا ور ( 8 و 1 ت ا S ...
- Seite 94 66-LR7228CSM...