Thrustmaster ADVANCE WIRELESS DUAL TRIGGER Benutzerhandbuch
Inhaltsverzeichnis
Verfügbare Sprachen
Verfügbare Sprachen
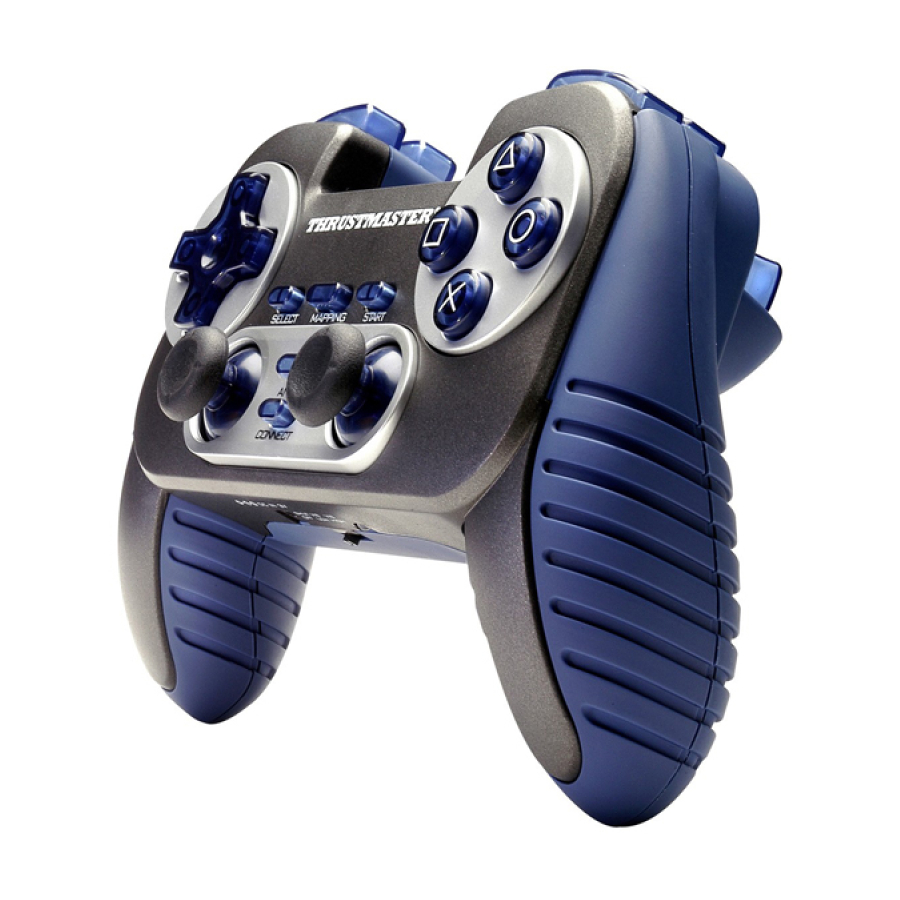
TECHNICAL FEATURES
1. Programmable and progressive triggers
2. 8 analog action buttons
3. START + SELECT buttons
4. 2 analog mini-sticks + 2 digital action buttons
5. D-Pad (Point Of View)
6. Switch (Gamepad OFF / Vibration Low/High)
SAFETY NOTICE
• Do not twist or pull on the cable.
• Do not spill liquid on the cable and/or connectors.
• In the event of malfunction during use due to electrostatic emission, please exit the game and unplug
the device from the console. Resume normal game play by plugging the device back in and restarting
the game.
7.
MODE button (Analog / Digital)
8.
MAPPING button (for
programming trigger functions)
9.
CONNECT button
10. 2 built-in independent motors
11. Gameport receiver
1/4
User Manual
Inhaltsverzeichnis

Verwandte Anleitungen für Thrustmaster ADVANCE WIRELESS DUAL TRIGGER


Inhaltszusammenfassung für Thrustmaster ADVANCE WIRELESS DUAL TRIGGER
-
Seite 9: Technische Daten
Benutzerhandbuch TECHNISCHE DATEN 1. Programmierbare, progressive Trigger MODE Button (Analog / Digital) 2. 8 analoge Action-Buttons MAPPING Button (zur Trigger- 3. START + SELECT Buttons Programmierung) 4. 2 analoge Mini-Sticks + 2 digitale Action-Buttons CONNECT Button 5. D-Pad (Sichtwahl) 10. 2 eingebaute Motoren 6. -
Seite 10: Erweiterte Funktionen
INSTALLATION 1. Entfernen Sie den Batteriefachdeckel. 2. Legen Sie die wiederaufladbaren Batterien ein, dann setzen Sie den Deckel wieder ein. 3. Stecken Sie den Gameport Empfänger (11) in einen Controller-Anschluß Ihrer Konsole. 4. Schalten Sie das Gamepad mit dem Schalter (6) an. 5. - Seite 11 • MAPPING (8) Button (zum belegen des rechten und linken Triggers): - Drücken Sie kurz den MAPPING Button (LED blinkt langsam). - Drücken Sie kurz den Button oder die Richtung mit welcher Sie den Trigger belegen wollen (LED blinkt schnell). - Bedienen Sie kurz den Trigger, den Sie mit dieser Funktion belegen wollen (LED geht aus).
-
Seite 12: Technischer Support
TECHNISCHER SUPPORT Sollten Sie mit Ihrem Produkt ein Problem haben, besuchen Sie bitte die Seite http://ts.thrustmaster.com und klicken Sie auf Technischer Support. Von dort aus können Sie auf verschiedene Instrumente zugreifen (Fragen und Antworten (FAQ), die neuesten Versionen von Treibern und Software), die Ihnen bei der Lösung Ihres Problems helfen könnten.