BWT RTM HF S-500 Montage- Und Bedienungsanleitung
Schwimmbad-sandfilter
Verfügbare Sprachen
Verfügbare Sprachen
RTM HF
Filtre à sable
pour piscine
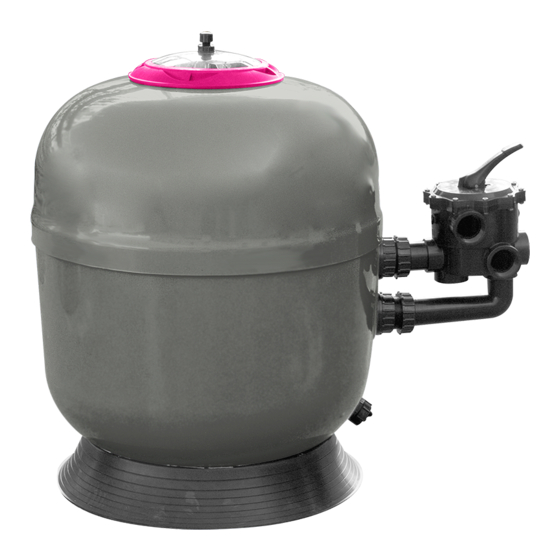
S-500 - S-610-A - S-610-B
S-760 - S-920
10 ANS
NOTICE D'INSTALLATION ET CONSEILS D'UTILISATION
à lire attentivement et à conserver pour utilisation ultérieure
CONSTRUCTION & RÉNOVATION
FR | PAGE 1 - GB | PAGE 11 - DE | PAGE 21
2020/10 - Indice de révision : H - Code : 26680
1/32
Inhaltsverzeichnis

Verwandte Anleitungen für BWT RTM HF S-500

Inhaltszusammenfassung für BWT RTM HF S-500
- Seite 21 RTM HF Schwimmbad- Sandfilter S-500 - S-610-A - S-610-B S-760 - S-920 10 JAHRE MONTAGE- UND BEDIENUNGSANLEITUNG Lesen Sie sie sorgfältig durch und verwahren Sie sie an einem sicheren Platz 21/32 KONSTRUKTION & RENOVATION 2020/10 - Indice de révision : H - Code : 26680...
- Seite 22 Anzahl Artikelbezeichnung Tank Sockel Diffusor Entlüftungsrohr Saugrohr Sammelrohr-Bogen Wanddurchführung Ablass Deckel Deckel-O-Ring O-Ring Manometer Mehrwegeventil Sicherungsring FILTER Ø 500 Ø 610 Ø 760 Ø 920 Filterlast: Kies / Sand (kg) 25 / 50 25 / 100 50 / 200 75 / 275 Filtrationsoberfläche (m²) 0,28 0,44...
- Seite 23 MONTAGEHINWEISE Der Filter sollte vorzugsweise unterhalb des Schwimmbad-Wasserpegels montiert werden. Anderenfalls muss ein Rückschlagventil an der Saugleitung installiert werden, das durch eine Wartungsklappe zugänglich ist. Für die Installation wird eine freie Fläche von 1200 mm x 1200 mm benötigt. Um den Zugriff für Bedienereingriffe zu erleichtern, sollte das Steuergerät möglichst nahe am Mehrwegeventil platziert werden.
-
Seite 24: Montage Des Filters
MONTAGE DES FILTERS Stellen Sie sicher, dass Entfernen Entleerungsventil Diffusor und kippen Sie geschlossen ist. die Sammelleitung zur Seite. Füllen Sie die Pumpe mit Wasser, sodass die Saugrohre 5 cm unter Wasseroberfläche liegen. Füllen Sie vorsichtig den Setzen Sie die O-Ringe Sand ein (Korngröße Rillen 0,6/1,25),... - Seite 25 Montieren Sie Ziehen Sie den den Deckel. Sicherungsring vorsichtig fest. Montieren Mehrwegeventil: Bringen Sie zuerst die untere, anschließend die obere Wanddurchführung an. Ziehen Sie die Muttern vorsichtig fest. 25/32 KONSTRUKTION & RENOVATION 2020/10 - Indice de révision : H - Code : 26680...
-
Seite 26: Funktionen Des Mehrwegeventils
FUNKTIONEN DES MEHRWEGEVENTILS FILTRATION: Normale Ventilstellung. Das Wasser aus der Pumpe fließt von oben nach unten durch den Filter und kehrt ins Schwimmbecken zurück. ENTLEERUNG: Das Wasser aus der Pumpe wird direkt zum Ablass geleitet, ohne durch den Filter zu fließen. GESCHLOSSEN: Keine Wasserzirkulation. -
Seite 27: Hinweise Zum Betrieb Des Filters
HINWEISE ZUM BETRIEB DES FILTERS WICHTIG Bei der ersten Inbetriebnahme des Filters muss die Flussrichtung des Wassers sorgfältig überwacht werden: In der Position FILTRATION muss das Wasser von oben nach unten durch den Filter fließen. Falls die Rohre umgekehrt eingebaut wurden oder das Mehrwegeventil defekt ist, fließt das Wasser möglicherweise von unten nach oben. -
Seite 28: Rückspülung Des Filters
RÜCKSPÜLUNG DES FILTERS Vor der Inbetriebnahme des Filters sollte eine Rückspülung durchgeführt werden, um den Filter zu reinigen und überschüssigen Sand und Schmutzablagerungen zu entfernen. Stellen Sie anschließend das Ventil auf FILTRATION und schalten Sie die Pumpe ein. Der schwarze Zeiger am Manometer zeigt den Nenndruck des Filters an. -
Seite 29: Überwinterung Der Anlage
• Stellen Sie das Mehrwegeventil auf FILTRATION. • Schalten Sie die Pumpe ein. • Schließen Sie den Kugelhahn F an der Entsorgungsleitung. Nach der Rückspülung sollte der schwarze Zeiger wieder den Nennwert, also gleichen Wert wie der blaue, anzeigen. Falls der Druck nach einer (oder gegebenenfalls einer zweiten) Rückspülung nicht auf den Nennwert zurückfällt, setzen Sie sich bitte mit Ihrem Installateur in Verbindung. - Seite 30 GARANTIE Beginnend mit dem Rechnungsdatum*, ausgestellt von PROCOPI auf den Namen des Kundenunternehmens. Der Tank verfügt über eine Garantie von 10 Jahren gegen Lecks verursacht durch Porosität, Materialfehler-oder Rissbildung, nicht zurückzuführen auf eine äußere Krafteinwirkung, den Betrieb des Filters außerhalb der in der Anleitung genannten Druckbedingungen, eine Abnutzung der Innenfläche durch eine falsche Sandeinfüllung, umgekehrte Wasserzirkulation, das Gefrieren von Wasser innerhalb des Tanks usw.
- Seite 31 31/32 2020/10 - Indice de révision : H - Code : 26680...
- Seite 32 32/32 2020/10 - Indice de révision : H - Code : 26680...