Herunterladen Inhalt Inhalt Diese Seite drucken
Viesta C2Z Bedienungsanleitung
Vorschau ausblenden Andere Handbücher für C2Z:
Inhaltsverzeichnis

Werbung

Verfügbare Sprachen
  • DE

Verfügbare Sprachen

  • DEUTSCH, seite 37
KEN001ACK
21.08.2017 • v09
Self-sufficient glass ceramic hob
Autarkes Glaskeramik-Kochfeld
Table vitrocéramique auto-suffisante
Piano cottura vetroceramico independiente
Placa vitrocerámica independiente
Autarkische keramische kookplaat
Instruction manual / Gebrauchsanleitung / Manuel d'utilisation
Istruzioni per l'uso / Manual de instrucciones / Handleiding
MODEL
Viesta C2Z
Viesta C3Z
Viesta C4Z
Viesta C5Z
[English] [Deutsch] [Français] [Italiano] [Español] [Nederlands]
[p. 2 - 36]
[S. 37 - 71]
[p. 72 - 106]
[p. 107 - 141]
[p. 142 - 176]
[p. 177 - 211]

Werbung

Inhaltsverzeichnis
loading

Inhaltszusammenfassung für Viesta C2Z

  • Seite 1 Placa vitrocerámica independiente Autarkische keramische kookplaat Instruction manual / Gebrauchsanleitung / Manuel d‘utilisation Istruzioni per l’uso / Manual de instrucciones / Handleiding MODEL Viesta C2Z Viesta C3Z Viesta C4Z Viesta C5Z [English] [Deutsch] [Français] [Italiano] [Español] [Nederlands] [p. 2 - 36] [S.
  • Seite 2: Inhaltsverzeichnis

    Product information ..................7 Before using your new ceramic hob.............. 12 Using your ceramic hob Using the touch controls for Viesta C2Z, Viesta C3Z, Viesta C4Z..... 14 Locking the controls ..................16 Using the timer ..................... 17 Using the touch controls for Viesta C5Z ............20 Locking the controls ..................
  • Seite 3: Safety Warnings

    KEN001AKC 21.08.2017 • v09 [English] Safety warnings Your safety is important to us. Please read this information before using your cooktop. Please note that the induction hob must be installed by a qualifie technician. Do not install yourself, as your warranty expires immediately when not properly installed.
  • Seite 4: Health Hazard

    KEN001AKC 21.08.2017 • v09 [English] Electrical shock hazard during operation and maintenance • Do not cook on a broken or cracked cooktop. If the cooktop surface should break or crack, switch the appliance off immediately at the mains power supply (wall switch) and contact a qualified technician.
  • Seite 5 KEN001AKC 21.08.2017 • v09 [English] Important safety instructions • Never leave the appliance unattended when in use. Boil over causes smoking and greasy spillovers that may ignite. • Never use your appliance as a work or storage surface. • Never leave any objects or utensils on the appliance. •...
  • Seite 6 KEN001AKC 21.08.2017 • v09 [English] Important safety instructions • WARNING: The appliance and its accessible parts become hot during use. Care should be taken to avoid touching heating elements. Children less than 8 years of age shall be kept away unless continuously supervised.
  • Seite 7: Product Information

    For installation, please read the installation section. Read all the safety instructions carefully before use and keep this Instruction / Installation Manual for future reference. Product information Viesta C5Z Top view 1. max. 1200 W zone 2. max. 2300/1600/800 W zone 3.
  • Seite 8 KEN001AKC 21.08.2017 • v09 [English] Power limitation function for C5Z Group A Group B (no limitation) The 5 zones were divided into Group A and Group B. See above picture. Power management function on Group A If both zones are working on/above power stage 7, the two zones will be automatically switched on and off in turns, this is controlled by the software.
  • Seite 9 KEN001AKC 21.08.2017 • v09 [English] Product information Viesta C4Z Top view 1. max. 2000 W zone 2. max. 1200 W zone 3. max. 2200 W zone 4. max. 1200 W zone 5. Glass plate 6. Control panel Control panel 1. Cooking zone selecting 2.
  • Seite 10 KEN001AKC 21.08.2017 • v09 [English] Product information Viesta C3Z Top view 1. max. 1800 W zone 2. max. 1200 W zone 3. max. 2300 W zone 4. Glass plate 5. Control panel Control panel 1. Cooking zone selecting 2. Timer Function 3.
  • Seite 11 KEN001AKC 21.08.2017 • v09 [English] Product information Viesta C2Z Top view 1. Glass plate 2. max. 1800 W zone 3. max. 1200 W zone 4. Control panel Control panel 1. Cooking zone selecting 2. Timer function 3. Power or timer regulating controls 4.
  • Seite 12: Before Using Your New Ceramic Hob

    KEN001AKC 21.08.2017 • v09 [English] A word on ceramic hob The microcomputer ceramic cooker hob can meet different kinds of cuisine demands because of resistance wire heating, micro-computerized control and multi-power selection, really the optimal choice for modern families. The ceramic cooker hob centers on customers and adopts personalized design.
  • Seite 13: Choosing The Right Cookware

    KEN001AKC 21.08.2017 • v09 [English] Choosing the right cookware Do not use cookware with jagged edges or a curved base. Make sure that the base of your pan is smooth, sits flat against the glass, and is the same size as the cooking zone. Always centre your pan on the cooking zone.
  • Seite 14: Using Your Ceramic Hob

    KEN001AKC 21.08.2017 • v09 [English] Using your ceramic hob for Viesta C2Z, Viesta C3Z and Viesta C4Z To start cooking 1. Touch the ON/OFF control, the buzzer beeps once, all the indicators light up for 1 second then go out, indicating that the ceramic hob has entered the state of standby mode.
  • Seite 15: When You Have Finished Cooking

    KEN001AKC 21.08.2017 • v09 [English] Using your ceramic hob 5. Touch the heating zone selection control, then touch the key, dual ring zone will begin to work. The LED indicator will light up, which is on the left side of the double fire key. When you have finished cooking 1.
  • Seite 16: Locking The Controls

    KEN001AKC 21.08.2017 • v09 [English] Locking the controls • You can lock the controls to prevent unintended use (for example children accidentally turning the cooking zones on). • When the controls are locked, all the controls except the ON/OFF control are disabled.
  • Seite 17: Using The Timer

    KEN001AKC 21.08.2017 • v09 [English] Using the timer You can use the timer in two different ways: • You can use it as a minute minder. In this case, the timer will not turn any cooking zone off when the set time is up. •...
  • Seite 18 KEN001AKC 21.08.2017 • v09 [English] 5. When the time is set, it will begin to count down immediately. The display will show the remaining time and the timer indicator will flash for 5 seconds. 6. Buzzer will beep and the timer indicator will show “- - “...
  • Seite 19 KEN001AKC 21.08.2017 • v09 [English] 5. When the time is set, it will begin to count down immediately. The display will show the remaining time and the timer indicator flash for 5 seconds. Note: The red dot next to power level indicator will illuminate indicating that zone is selected.
  • Seite 20: Using The Touch Controls For Viesta C5Z

    KEN001AKC 21.08.2017 • v09 [English] Using your ceramic hob for Viesta C5Z To start cooking 1. Touch the ON/OFF control, the buzzer beeps once, all the indicators light up for 1 second then go out, indicating that the ceramic hob has entered the state of standby mode.
  • Seite 21 KEN001AKC 21.08.2017 • v09 [English] Using your ceramic hob When you have finished cooking 1. Turn the whole cooktop off by touching the ON/OFF control. 2. Beware of hot surfaces “ H” will show which cooking zone is hot to touch. It will disappear when the surface has cooled down to a safe temperature.
  • Seite 22: Locking The Controls

    KEN001AKC 21.08.2017 • v09 [English] Locking the controls • You can lock the controls to prevent unintended use (for example children accidentally turning the cooking zones on). • When the controls are locked, all the controls except the ON/OFF control are disabled.
  • Seite 23: Using The Timer

    KEN001AKC 21.08.2017 • v09 [English] Using the timer You can use the timer in two different ways: • You can use it as a minute minder. In this case, the timer will not turn any cooking zone off when the set time is up. •...
  • Seite 24 KEN001AKC 21.08.2017 • v09 [English] Setting the timer to turn one cooking zone off 1. Touch the „-“ or „+“ of the corresponding cooking zone you want to set the timer for. 2. Set the time by touching the “-” or “+” control of the timer, and touch “-” or “+” to set the power to the level you want.
  • Seite 25 KEN001AKC 21.08.2017 • v09 [English] Setting the timer to turn more than one cooking zone off 1. If more than one heating zone use this function, the timer indicator will show the lowest time. The red dot next to power level indicator will flash. (set to 6 minutes) (set to 3 minutes) 2.
  • Seite 26: Cooking Guidelines

    KEN001AKC 21.08.2017 • v09 [English] Cooking Guidelines Take care when frying as the oil and fat heat up very quickly, particularly if you’re using PowerBoost. At extremely high termperatures oil and fat will ignite spontaneously and this presents a serious fire risk. Cooking Tips •...
  • Seite 27: Heat Settings

    KEN001AKC 21.08.2017 • v09 [English] Heat settings Heat Settings The settings below are guidelines only. The exact setting will depend on several factors, including your cookware and the amount you are cooking. Experiment with the ceramic hob to find the settings that best suit you. Heat Settings Suitability 1 - 2...
  • Seite 28: Care And Cleaning

    KEN001AKC 21.08.2017 • v09 [English] Care and Cleaning Was? Wie? Wichtig! Everyday soiling on glass 1. Switch the power to the cooktop • When the power to the cooktop is (fingerprints, marks, stains off. switched off, there will be no ‘hot left by food or non-sugary 2.
  • Seite 29: Hints And Tips

    50/60 Hz 220-240V~, Viesta C3Z 3 Zonen 4849-5771W 590x520x52 560x490 50/60 Hz 220-240V~, Viesta C2Z 2 Zonen 2745-3267W 288x520x52 268x500 50/60 Hz Note: Dimensions are approximate. Because we continually strive to improve our products we may change specifications and designs without prior notice.
  • Seite 30: Installation

    As shown below: Model L (mm) W (mm) H (mm) D (mm) A (mm) B (mm) X (mm) Viesta C5Z 50 mini Viesta C4Z 50 mini Viesta C3Z 50 mini [ 30 ]...
  • Seite 31 50 mm 50 mm 50 mm mini mini mini mini Viesta C2Z can be used on the table top of cabinet. The ceramic hob should be placed horizontally. As shown below: 50 mm mini 50 mm mini [ 31 ]...
  • Seite 32 KEN001AKC 21.08.2017 • v09 [English] Installation Under any circumstances, make sure the ceramic cooker hob is well ventilated and the air inlet and outlet are not blocked. Ensure the ceramic cooker hob is in good work state. As shown below: Note: The safety distance between the hotplate and the cupboard above the hotplate should be at least 760mm.
  • Seite 33: Before Locating The Fixing Brackets

    KEN001AKC 21.08.2017 • v09 [English] Installation Before locating the fixing brackets The unit should be placed on a stable, smooth surface (use the packaging). Do not apply force onto the controls protruding from the hob. Fix the hob on the work surface by screw four brackets on the bottom of hob (see picture) after installation.
  • Seite 34 KEN001AKC 21.08.2017 • v09 [English] Installation Adjust the bracket position to suit for different work surface’s thickness. Precautions 1. The ceramic cooker hob must be installed by qualified personnel or technicians. Do not install yourself, as your warranty expires immediately when not properly installed.
  • Seite 35: Connecting The Hob To The Mains Power Supply

    The power supply should be connected in compliance with the relevant standard, or a single-pole circuit breaker. The method of connection is shown below. Viesta C3Z, Viesta C4Z, Viesta C5Z Viesta C2Z 220V~ / 32A 2 x 220V~ / 16A...
  • Seite 36 KEN001AKC 21.08.2017 • v09 [English] This appliance is labeled in compliance with European directive 2002/96/EC for Waste Electrical and Electronic Equipment (WEEE). By ensuring that this appliance is disposed of correctly, you will help prevent any possible damage to the environment and to human health, which might otherwise be caused if it were disposed of in the wrong way.
  • Seite 37: Inhaltsverzeichnis

    Gefahrenhinweise.................... 38 Produktinformationen ..................42 Vor der Benutzung Ihres neuen Glaskeramikkochfeldes ......47 Anwendung Ihres Glaskeramik-Kochfelds Touch-Bedienfeld Anleitung Viesta C2Z, Viesta C3Z, Viesta C4Z ..... 49 Kindersicherung ................... 51 Verwendung der Zeitschaltuhr ..............52 Touch-Bedienfeld Anleitung Viesta C5Z ............55 Kindersicherung ...................
  • Seite 38: Wichtige Gefahrenhinweise

    KEN001AKC 21.08.2017 • v09 [Deutsch] Gefahrenhinweise Ihre Sicherheit ist uns wichtig. Bitte lesen Sie diese Informationen, bevor Sie Ihr Kochfeld benutzen. Bitte beachten Sie, dass das Kochfeld nur von qualifiziertem Fachpersonal oder Technikern installiert werden darf. Nehmen Sie den Anschluss niemals selbst vor, da bei unsachgemäßer Installation Ihr Gewährleistungsanspruch erlischt.
  • Seite 39: Stromschlaggefahr Bei Betrieb Und Wartung

    KEN001AKC 21.08.2017 • v09 [Deutsch] Stromschlaggefahr bei Betrieb und Wartung • Kochen Sie nicht auf einem defekten oder gerissenen Kochfeld. Sollte die Oberfläche des Kochfelds brechen oder reißen, schalten Sie das Gerät sofort an der Hauptstromzufuhr (Wandschalter) aus und setzen Sie sich mit einem qualifizierten Techniker in Verbindung.
  • Seite 40: Wichtige Sicherheitshinweise

    KEN001AKC 21.08.2017 • v09 [Deutsch] Wichtige Sicherheitshinweise • Lassen Sie das Gerät niemals unbeaufsichtigt, wenn es in Gebrauch ist. Durch Überkochen kann es zu rauchenden und fettigen Verschmutzungen kommen, die sich entzünden können. • Verwenden Sie Ihr Gerät nicht als Arbeits- oder Ablagefläche. •...
  • Seite 41 KEN001AKC 21.08.2017 • v09 [Deutsch] Wichtige Sicherheitshinweise • Dieses Gerät ist für die Verwendung in Haushalten oder ähnlichen Anwendungen vorgesehen wie: - Mitarbeiterküchen in Läden, Büros und anderen Arbeitsumfeldern; - Bauernhöfen; - von Kunden in Hotels, Motels und in anderen wohnraumartigen Umfeldern; - in Bed &...
  • Seite 42: Produktinformationen

    Lesen Sie für die Installation bitte den Abschnitt Einbau. Lesen Sie alle Gefahrenhinweise vor der Anwendung sorgfältig durch und bewahren Sie diese Bedienungs-/Einbauanleitung zum späteren Nachschlagen auf. Produktinformation Viesta C5Z Draufsicht 1. max. 1200 W Zone 2. max. 2300/1600/800 W Zone 3.
  • Seite 43: Leistungsbegrenzungsfunktion Für C5Z

    KEN001AKC 21.08.2017 • v09 [Deutsch] Leistungsbegrenzungsfunktion für C5Z Gruppe A Gruppe B (keine Einschränkung) Die 5 Zonen wurden unterteilt in Gruppe A und Gruppe B. Siehe Bild oben. Power Management Funktion der Gruppe A Wenn beide Zonen auf / über der Leistungsstufe 7 eingeschaltet sind, werden die beiden Zonen automatisch ein- und ausgeschaltet, dies wird von der Software gesteuert.
  • Seite 44 KEN001AKC 21.08.2017 • v09 [Deutsch] Produktinformation Viesta C4Z Draufsicht 1. max. 2000 W Zone 2. max. 1200 W Zone 3. max. 2200 W Zone 4. max. 1200 W Zone 5. Glasplatte 6. Bedienfeld Bedienfeld 1. Auswahl der Kochzone 2. Zeitschaltuhr 3.
  • Seite 45 KEN001AKC 21.08.2017 • v09 [Deutsch] Produktinformation Viesta C3Z Draufsicht 1. max. 1800 W zone 2. max. 1200 W zone 3. max. 2300 W zone 4. Glasplatte 5. Bedienfeld Bedienfeld 1. Auswahl der Kochzone 2. Zeitschaltuhr 3. Temperatur- oder Zeitschaltsteuerung 4. Zweikreis-/Bräterzoneensteuerung 5.
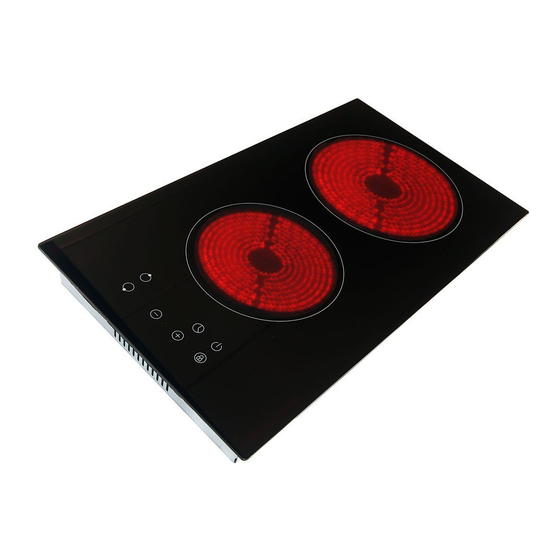
  • Seite 46 KEN001AKC 21.08.2017 • v09 [Deutsch] Produktinformation Viesta C2Z Draufsicht 1. Glasplatte 2. max. 1800 W Zone 3. max. 1200 W Zone 4. Bedienfeld Bedienfeld 1. Auswahl der Kochzone 2. Zeitschaltuhr 3. Temperatur- oder Zeitschaltuhrsteuerung 4. Kindersicherung 5. EIN-/AUSSCHALTER [ 46 ]...
  • Seite 47: Einige Worte Zum Glaskeramikkochfeld

    KEN001AKC 21.08.2017 • v09 [Deutsch] Einige Worte zum Glaskeramikkochfeld Das Glaskeramikkochfeld mit Mikrocomputer kann wegen seines Heizelements mit Widerstandsdraht, der Steuerung mit Mikrocomputer und der Mehrfach-Leistungsauswahl verschiedenen Arten von Kochansprüchen genügen, wirklich die optimale Wahl für moderne Familien. Das Glaskeramikkochfeld richtet sich an Kunden und deren persönliche Wünsche.
  • Seite 48: Auswahl Des Richtigen Kochgeschirrs

    KEN001AKC 21.08.2017 • v09 [Deutsch] Auswahl des richtigen Kochgeschirrs Verwenden Sie kein Kochgeschirr mit gezackten Ecken oder einem verbogenen Boden. Stellen Sie sicher, dass der Boden Ihres Kochtopfs glatt ist, flach auf dem Glas liegt und die gleiche Größe hat wie die Kochzone. Stellen Sie Ihren Kochtopf immer in die Mitte der Kochzone.
  • Seite 49: Touch-Bedienfeld Anleitung Viesta C2Z, Viesta C3Z, Viesta C4Z

    KEN001AKC 21.08.2017 • v09 [Deutsch] Touch-Bedienfeld Anleitung Gültig für die folgenden Modelle: Viesta C2Z, Viesta C3Z und Viesta C4Z Mit dem Kochen beginnen 1. Tippen Sie auf die EIN / AUS-Taste. Nach dem Einschalten ertönt der Summer ein Mal, alle Anzeigen zeigen „-“ oder „- -“, was darauf hinweist, dass sich das Glaskeramikkochfeld im Bereitschaftsmodus befindet.
  • Seite 50: Gebrauch Ihres Glaskeramikkochfeldes

    KEN001AKC 21.08.2017 • v09 [Deutsch] Gebrauch Ihres Glaskeramikkochfeldes 5. Tippen Sie auf die Heizzone Auswahlsteuerung, und berühren Sie die Taste oder , und die Doppelringzone geht an. Die LED-Anzeige auf der linken Seite der Zweikreis- / Bräterzonensteuerung leuchtet auf. Nach dem Kochen 1.
  • Seite 51: Kindersicherung

    KEN001AKC 21.08.2017 • v09 [Deutsch] Tastensperre (Kindersicherung) • Sie können die Tasten sperren, um unabsichtliche Bedienung zu verhindern (zum Beispiel, dass Kinder zufällig die Kochfelder einschalten). • Wenn die Tasten gesperrt sind, ist nur die Ein-/Ausschalttaste aktiv. Zum Sperren der Tasten Berühren Sie die Taste für die Tastensperre.
  • Seite 52: Verwendung Der Zeitschaltuhr

    KEN001AKC 21.08.2017 • v09 [Deutsch] Verwenden der Zeitschaltuhr Sie können die Zeitschaltuhr auf zwei verschiedene Weisen benutzen: • Sie können sie als Kurzzeitmesser verwenden. In diesem Fall schaltet die Zeitschaltuhr keine Kochzone aus, wenn die eingestellte Kochzeit abgelaufen ist. • Sie können sie so einstellen, dass sie eine Kochzone ausschaltet, wenn die eingestellte Zeit abgelaufen ist.
  • Seite 53: Einstellen Der Zeitschaltuhr Zum Ausschalten Einer Kochzone

    KEN001AKC 21.08.2017 • v09 [Deutsch] 5. Der Countdown startet sofort, nachdem die Zeit eingestellt wurde. Auf dem Bedienfeld wird die verbleibende Zeit angezeigt und die Zeitschaltuhranzeige blinkt 5 Sekunden lang auf. 6. Wenn die eingestellte Zeit abgelaufen ist, ertönt der Summer und die Zeitschaltuhranzeige zeigt “- - “...
  • Seite 54: Wenn Die Zeitschaltuhr Für Mehr Als Eine Kochzone Eingestellt Wurde

    KEN001AKC 21.08.2017 • v09 [Deutsch] 5. Der Countdown startet sofort, nachdem die Zeit eingestellt wurde. Auf dem Bedienfeld wird die verbleibende Zeit angezeigt und die Zeitschaltuhranzeige blinkt 5 Sekunden lang auf. HINWEIS: Der erleuchtete rote Punkt neben der Temperaturanzeige zeigt die ausgewählte Zone an. Wenn die Zeitschaltuhr für mehr als eine Kochzone eingestellt wurde: 1.
  • Seite 55: Mit Dem Kochen Beginnen

    KEN001AKC 21.08.2017 • v09 [Deutsch] Touch-Bedienfeld Anleitung Gültig für die folgenden Modelle: Viesta C5Z Mit dem Kochen beginnen 1. Berühren Sie die Ein-/Ausschalttaste. Nach dem Einschalten ertönt der Summer ein Mal. Alle Anzeigen leuchten 1 Sekunde lang auf und erlöschen dann.
  • Seite 56 KEN001AKC 21.08.2017 • v09 [Deutsch] Gebrauch Ihres Glaskeramikkochfeldes Nach dem Kochen 1. Schalten Sie das gesamte Kochfeld aus, indem Sie die Ein-/Ausschalttaste berühren. 2. Achten Sie auf heiße Oberflächen. Das „H“ zeigt an, welche Kochzone zu heiß zum Berühren ist. Es verschwindet, wenn sich die Oberfläche auf eine sichere Temperatur abgekühlt hat.
  • Seite 57: Kindersicherung

    KEN001AKC 21.08.2017 • v09 [Deutsch] Tastensperre (Kindersicherung) • Sie können die Tasten sperren, um unabsichtliche Bedienung zu verhindern (zum Beispiel, dass Kinder zufällig die Kochfelder einschalten). • Wenn die Tasten gesperrt sind, ist nur die Ein-/Ausschalttaste aktiv. Zum Sperren der Tasten Berühren Sie die Taste für die Tastensperre.
  • Seite 58: Verwendung Der Zeitschaltuhr

    KEN001AKC 21.08.2017 • v09 [Deutsch] Verwenden der Zeitschaltuhr Sie können die Zeitschaltuhr auf zwei verschiedene Weisen benutzen: • Sie können sie als Kurzzeitmesser verwenden. In diesem Fall schaltet die Zeitschaltuhr keine Kochzone aus, wenn die eingestellte Kochzeit abgelaufen ist. • Sie können sie so einstellen, dass sie eine Kochzone ausschaltet, wenn die eingestellte Zeit abgelaufen ist.
  • Seite 59 KEN001AKC 21.08.2017 • v09 [Deutsch] Einstellen der Zeitschaltuhr zum Ausschalten einer Kochzone 1. Berühren Sie die Taste „-“ oder „+“ des Kochfeldes, für welches Sie die Zeitschaltuhr einstellen möchten. 2. Stellen Sie die Zeit ein indem Sie auf die Tasten „-“ und „+“ drücken und stellen Sie mithilfe der „-“...
  • Seite 60 KEN001AKC 21.08.2017 • v09 [Deutsch] Wenn die Zeitschaltuhr für mehr als eine Kochzone eingestellt wurde: 1. Wenn Sie die Zeitschaltuhr gleichzeitig für mehrere Kochzonen einstellen, erscheinen die Dezimalpunkte auf den entsprechenden Kochzonen. Die Minutenanzeige gibt die kürzeste eingestellte Zeit an. Der Punkt der entsprechenden Kochzone blinkt.
  • Seite 61: Richtlinien Zum Kochen

    KEN001AKC 21.08.2017 • v09 [Deutsch] Richtlinien zum Kochen Seien Sie beim Braten vorsichtig, denn Öl und Fett erhitzen sich schnell, insbesondere, wenn Sie den Turbostart verwenden. Bei extrem hohen Temperaturen können sich Öl und Fett spontan entzünden. Das stellt eine ernste Brandgefahr dar. Kochtipps •...
  • Seite 62: Temperatureinstellungen

    KEN001AKC 21.08.2017 • v09 [Deutsch] Heat settings Temperatureinstellungen Die nachstehenden Einstellungen sind lediglich Richtlinien. Die genaue Einstellung hängt von verschiedenen Faktoren ab, unter anderem von Ihrem Kochgeschirr und der Menge, die Sie zubereiten. Experimentieren Sie mit dem Glaskeramikfeld, um die für Sie am besten geeigneten Einstellungen zu finden.
  • Seite 63: Reinigung Und Pflege

    KEN001AKC 21.08.2017 • v09 [Deutsch] Reinigung und Pflege Was? Wie? Wichtig! Alltägliche 1. Schalten Sie die Stromzufuhr • Wenn die Stromzufuhr des Verschmutzungen auf dem des Glaskeramikfelds aus. Glaskeramikfelds ausgeschaltet Glas (Fingerabdrücke, 2. Tragen Sie einen ist, ist keine Warnung vor heißen Flecken von Lebensmitteln Glaskeramikreiniger auf, solange Oberflächen vorhanden, die...
  • Seite 64: Hinweise Und Tipps

    50/60 Hz 220-240V~, Viesta C3Z 3 Zonen 4849-5771W 590x520x52 560x490 50/60 Hz 220-240V~, Viesta C2Z 2 Zonen 2745-3267W 288x520x52 268x500 50/60 Hz Hinweis: Maße sind ungefähre Angaben. Da wir unsere Produkte kontinuierlich verbessern, können wir Leistungsmerkmale und Bauarten ohne vorherige Mitteilung ändern.
  • Seite 65: Einbau

    Wärmestrahlung des Glaskeramikfelds nicht zu größeren Deformierungen kommt. Siehe unten: Dichtung Model L (mm) W (mm) H (mm) D (mm) A (mm) B (mm) X (mm) Viesta C5Z mind. 50 Viesta C4Z mind. 50 Viesta C3Z mind. 50 [ 65 ]...
  • Seite 66 21.08.2017 • v09 [Deutsch] Einbau Dichtung Model Viesta C2Z mind. mind. mind. mind. 50mm 50mm 50mm 50mm Viesta C2Z können Sie auf der Arbeitsfläche abstellen. Das Kochfeld sollte horizontal aufgestellt werden. Siehe unten: mind. 50mm mind. 50mm [ 66 ]...
  • Seite 67 KEN001AKC 21.08.2017 • v09 [Deutsch] Einbau Stellen Sie unter allen Umständen sicher, dass das Glaskeramikkochfeld gut belüftet wird und Lufteinlass und -auslass nicht blockiert sind. Stellen Sie sicher, dass sich das Glaskeramikkochfeld in gutem Funktionszustand befindet. Siehe unten: Hinweis: Der Sicherheitsabstand zwischen dem Glaskeramikfeld und einem darüber angebrachten Schrank muss mindestens 760 mm betragen.
  • Seite 68: Vor Dem Positionieren Der Halterungen

    KEN001AKC 21.08.2017 • v09 [Deutsch] Einbau Vor dem Positionieren der Halterungen Das Gerät muss auf einer stabilen, glatten Oberfläche platziert werden (verwenden Sie die Verpackung). Üben Sie auf die aus dem Glaskeramikfeld ragenden Tasten keine Krafteinwirkung aus. Befestigen Sie das Glaskeramikfeld nach der Installation durch Anschrauben von vier Halterungen an den Boden des Glaskeramikfelds an der Arbeitsplatte (siehe Abbildung).
  • Seite 69: Vorsichtsmaßnahmen

    KEN001AKC 21.08.2017 • v09 [Deutsch] Einbau Stellen Sie die Halterung so ein, dass sie zur Stärke der Arbeitsplatte passt. Kochfeld Kochfeld Platte Platte Halterung Halterung Vorsichtsmaßnahmen 1. Das Glaskeramikfeld muss von qualifiziertem Personal oder Technikern installiert werden. Nehmen Sie den Anschluss niemals selbst vor, da bei unsachgemäßer Installation Ihr Gewährleistungsanspruch erlischt.
  • Seite 70: Anschließen Des Kochfelds An Die Stromversorgung

    Anschließen des Kochfelds an die Stromversorgung Die Stromzufuhr muss in Übereinstimmung mit den entsprechenden Normen oder mit einem einpoligen Trennschalter angeschlossen werden. Die Anschlussmethode wird nachstehend gezeigt. Viesta C3Z, Viesta C4Z, Viesta C5Z Viesta C2Z 220V~ / 32A 2 x 220V~ / 16A...
  • Seite 71 KEN001AKC 21.08.2017 • v09 [Deutsch] Dieses Gerät wurde in Übereinstimmung mit der europäischen Direktive 2002/96/EC für Elektro- und Elektronik-Altgeräte (Waste Electrical and Electronic Equipment, WEEE) gekennzeichnet. Indem Sie gewährleisten, dass dieses Gerät richtig entsorgt wird, tragen Sie zum Verhindern von Schädigungen der Umwelt und menschlichen Gesundheit bei, zu denen es bei falscher Entsorgung kommen kann.
  • Seite 72: Index

    Viesta C2Z, Viesta C3Z, Viesta C4Z ..............84 Verrouiller les commandes ................86 Comment utiliser le minuteur ................ 87 Instructions commande tactile pour le modèle Viesta C5Z ....... 90 Verrouiller les commandes ................92 Comment utiliser le minuteur ................ 93 Directives de cuisine ..................
  • Seite 73: Avertissements De Sécurité

    KEN001AKC 21.08.2017 • v09 [Français] Avertissements de sécurité Votre sécurité est importante pour nous. Veuillez lire ces informations avant d‘utiliser votre plaque de cuisson. S‘il vous plaît noter que la plaque d‘induction doit être installé par un technicien qualifié. Ne pas installer vous-même, votre garantie expire immédiatement lorsqu‘ils n’est pas installés correctement.
  • Seite 74: Risque Pour La Santé

    KEN001AKC 21.08.2017 • v09 [Français] Fonctionnement et maintenance risque d‘électrocution • Ne pas cuisiner sur une plaque de cuisson cassée ou fendue. Si la surface de la plaque casse ou craque, éteignez immédiatement l‘appareil en utilisant l‘interrupteur d‘alimentation électrique (interrupteur mural) et contactez un technicien qualifié.
  • Seite 75 KEN001AKC 21.08.2017 • v09 [Français] Instructions de sécurité importantes • Ne laissez jamais l‘appareil sans surveillance quand il fonctionne. L‘eau bouillante débordante peut causer des fumées et les renversements de graisse peuvent prendre feu. • Ne vous servez jamais de votre appareil comme d‘une surface de travail ou de rangement.
  • Seite 76 KEN001AKC 21.08.2017 • v09 [Français] Instructions de sécurité importantes • Cet appareil est conçu pour une utilisation domestique et des applications similaires telles que : zone de cuisine des personnels dans des boutiques, des bureaux et autres environnements de travail ; fermes ;...
  • Seite 77: Vue D'ensemble

    Pour l‘installation, veuillez lire la section d‘installation. Lisez attentivement les instructions de sécurité avant toute utilisation et conservez ce manuel d‘instructions/d‘installation pour pouvoir vous y référer dans le futur. Vue d‘ensemble Viesta C5Z Vue de haut 1. max. 1200 W zone 2. max. 2300/1600/800 W zone 3.
  • Seite 78 KEN001AKC 21.08.2017 • v09 [Français] Fonction de limitation de puissance pour C5Z Groupe A Groupe B (no limitation) Les 5 zones ont été divisés en groupes A et B. Voir l‘image ci-dessus. Fonction de gestion de l‘alimentation sur le groupe A Si les deux zones fonctionnent au-dessus du niveau de puissance 7, les deux zones seront automatiquement activées et désactivées par tour, ce qui est contrôlé...
  • Seite 79 KEN001AKC 21.08.2017 • v09 [Français] Vue d‘ensemble Viesta C4Z Vue de haut 1. max. 2000 W zone 2. max. 1200 W zone 3. max. 2200 W zone 4. max. 1200 W zone 5. Plaque de verre 6. Panneau de commande Panneau de commande 1.
  • Seite 80 KEN001AKC 21.08.2017 • v09 [Français] Vue d‘ensemble Viesta C3Z Vue de haut 1. max. 1800 W zone 2. max. 1200 W zone 3. max. 2300 W zone 4. Plaque de verre 5. Panneau de commande Panneau de commande 1. Sélectionner la zone de cuisson 2.
  • Seite 81 KEN001AKC 21.08.2017 • v09 [Français] Vue d‘ensemble Viesta C2Z Vue de haut 1. Plaque de verre 2. max. 1800 W zone 3. max. 1200 W zone 4. Panneau de commande Panneau de commande 1. Sélectionner la zone de cuisson 2. Commandes de réglage de minuteur 3.
  • Seite 82: Informations Produit

    KEN001AKC 21.08.2017 • v09 [Français] Informations produit La plaque de cuisine vitrocéramique avec micro-ordinateur permet de faire différents types de cuisine grâce au chauffage par résistance, à la commande par micro-ordinateur et au choix de plusieurs puissances. C‘est vraiment le choix optimal pour les familles modernes. La plaque de cuisine en vitrocéramique se centre sur les clients et adopte un design personnalisé.
  • Seite 83 KEN001AKC 21.08.2017 • v09 [Français] Choisir le bon matériel de cuisine N‘utilisez pas des ustensiles de cuisine avec des bords dentelés ou un fonds arrondi. Assurez-vous que la base de votre casserole soit lisse, soit à plat sur le verre et soit de la même taille que la zone de cuisson.
  • Seite 84: Instructions Commande Tactile Pour Les Modèles Viesta C2Z, Viesta C3Z, Viesta C4Z

    KEN001AKC 21.08.2017 • v09 [Français] Instructions des commandes tactiles Pour les modèles Viesta C2Z, Viesta C3Z und Viesta C4Z Pour commencer à cuisiner 1. Commande ON/OFF. Après la mise sous tension, l‘alerte sonore sonne une fois, tous les écrans affichent “ – “ or “ – – “, indiquant que la plaque à...
  • Seite 85 KEN001AKC 21.08.2017 • v09 [Français] Instructions des commandes tactiles 5. Appuyez sur la commande de sélection de zone de chauffage, puis appuyez sur la touche et la zone double anneau va commencer à travailler. L‘indicateur LED, qui est sur le côté gauche de la touche double feu, s’allume. Quand vous avez fini de cuisiner 1.
  • Seite 86: Verrouiller Les Commandes

    KEN001AKC 21.08.2017 • v09 [Français] Verrouiller les commandes • Vous pouvez verrouiller les commandes pour éviter un usage involontaire (par exemple des enfants allumant les zones de cuisson). • Quand les commandes sont verrouillées, toutes les commandes sont désactivées sauf ON/OFF. Pour verrouiller les commandes Touchez la commande de verrouillage L‘indicateur de minuteur affichera«...
  • Seite 87: Comment Utiliser Le Minuteur

    KEN001AKC 21.08.2017 • v09 [Français] Utiliser le minuteur Vous pouvez utiliser le minuteur de deux manières différentes : • Vous pouvez vous en servir comme d‘un minuteur. Dans ce cas-ci, le minuteur n‘éteindra aucune zone de cuisson que le temps réglé est écoulé. •...
  • Seite 88 KEN001AKC 21.08.2017 • v09 [Français] 5. Quand le temps est réglé, le compte à rebours commencera immédiatement. L‘affichage montrera le temps restant et l‘indicateur de minuteur clignotera 5 secondes. 6. Le bipeur bippera et l‘indicateur de minuteur affichera « -- » quand le réglage du temps sera fini.
  • Seite 89 KEN001AKC 21.08.2017 • v09 [Français] 5. Quand le temps est réglé, le compte à rebours commencera immédiatement. L‘affichage montrera le temps restant et l‘indicateur de minuteur clignotera 5 secondes. REMARQUE : Le point rouge près de l‘indicateur de niveau de puissance s‘éclairera, indiquant que la zone est sélectionnée.
  • Seite 90: Instructions Commande Tactile Pour Le Modèle Viesta C5Z

    KEN001AKC 21.08.2017 • v09 [Français] Instructions des commandes tactiles Pour le modèle : Viesta C5Z Pour commencer à cuisiner 1. Après la mise sous tension, l‘alerte sonore sonne une fois, tous les indicateurs s‘allument une seconde puis s‘éteignent, indiquant que la plaque de cuisson en vitrocéramique est entré...
  • Seite 91 KEN001AKC 21.08.2017 • v09 [Français] Instructions des commandes tactiles Quand vous avez fini de cuisiner 1. Touchez la commande de sélection de zone de chauffage que vous voulez éteindre. 2. Faites attention aux surfaces chaudes : « H » affichera la zone de cuisson chaude au toucher. La lettre disparaîtra une fois que la surface aura refroidi à...
  • Seite 92: Verrouiller Les Commandes

    KEN001AKC 21.08.2017 • v09 [Français] Verrouiller les commandes • Vous pouvez verrouiller les commandes pour éviter un usage involontaire (par exemple des enfants allumant les zones de cuisson). • Quand les commandes sont verrouillées, toutes les commandes sont désactivées sauf ON/OFF. Pour verrouiller les commandes Touchez la commande de verrouillage L‘indicateur de minuteur affichera «...
  • Seite 93: Comment Utiliser Le Minuteur

    KEN001AKC 21.08.2017 • v09 [Français] Utiliser le minuteur Vous pouvez utiliser le minuteur de deux manières différentes : • Vous pouvez vous en servir comme d‘un minuteur. Dans ce cas-ci, le minuteur n‘éteindra aucune zone de cuisson que le temps réglé est écoulé. •...
  • Seite 94 KEN001AKC 21.08.2017 • v09 [Français] Régler le minuteur pour éteindre une zone de cuisson 1. Appuyez sur „-“ ou „+“ de la zone correspondante pour quelle vous souhaitez régler la minuterie. 2. Réglez le temps en touchant la commande du minuteur puis toucher les commande pour pour régler la puissance au niveau que vous voulez.
  • Seite 95 KEN001AKC 21.08.2017 • v09 [Français] Si le minuteur est réglé pour plus d‘une zone : 1. Quand vous réglez le temps pour plusieurs zones de cuisson simultanément, les points des décimales sur les zones de cuisson concernées sont allumés. L‘affichage des minutes montre le minuteur de min. Le point des zones concernées clignote.
  • Seite 96: Directives De Cuisine

    KEN001AKC 21.08.2017 • v09 [Français] Directives de cuisine Faites attention que l‘huile et la graisse se réchauffent très rapidement, surtout si vous utilisez la fonction PowerBoost. A températures extrêmement hautes, l‘huile et la graisse enflamment spontanément et cela représente un grave risque d‘incendie. Astuces de cuisine •...
  • Seite 97: Réglages De Chaleur

    KEN001AKC 21.08.2017 • v09 [Français] Heat settings Réglages de chaleur Réglages de chaleur Convient 1 - 2 • chauffage délicat pour de petites quantités de nourriture • faire fondre du chocolat, du beurre, et des aliments brûlant vite • faire mijoter doucement •...
  • Seite 98: Entretien Et Nettoyage

    KEN001AKC 21.08.2017 • v09 [Français] Entretien et nettoyage Quoi ? Comment ? Important ! Les salissures de tous les 1. Eteignez l‘alimentation de la • Quand la puissance de la plaque jours sur le verre plaque de cuisson. de cuisson est éteinte, il n‘y aura (empreintes digitales, 2.
  • Seite 99: Tuyaux Et Astuces

    220-240V~, Viesta C3Z 3 Zones 4849-5771W 590x520x52 560x490 50/60 Hz 220-240V~, Viesta C2Z 2 Zones 2745-3267W 288x520x52 268x500 50/60 Hz Remarque : Les dimensions sont approximatifs. Parce que nous nous efforçons de continuellement améliorer nos produits, il est possible que nous changions les spécifications et les designs sans prévenir au préalable.
  • Seite 100: Installation

    Comme montré ci-dessous : joint Modèle L (mm) W (mm) H (mm) D (mm) A (mm) B (mm) X (mm) Viesta C5Z 50 mini Viesta C4Z 50 mini Viesta C3Z 50 mini [ 100 ]...
  • Seite 101 Installation joint Modèle Viesta C2Z 50mm 50mm 50mm 50mm mini mini mini mini Viesta C2Z peut être utilisé sur la table haut de l‘armoire . La plaque vitrocéramique doit être placé horizontalement . 50mm mini 50mm mini [ 101 ]...
  • Seite 102 KEN001AKC 21.08.2017 • v09 [Français] Installation Assurez-vous à tout moment que la plaque de cuisson vitrocéramique soit bien ventilée et que l‘admission et l‘évacuation d‘air ne soient pas bloqués. Assurez-vous que la plaque de cuisson vitrocéramique soit en bon état. Comme montré...
  • Seite 103: Avant De Localiser Les Supports De Fixation

    KEN001AKC 21.08.2017 • v09 [Français] Installation Avant de localiser les supports de fixation Cette unité doit être placée sur une surface stable et lisse (utilisez l‘emballage). Ne pas appliquer de coup sur les commandes dépassant de la plaque de cuisson. Fixez la plaque de cuisson sur la surface de travail en vissant 4 supports sur le dos de la plaque de cuisson (voir image) après installation.
  • Seite 104 KEN001AKC 21.08.2017 • v09 [Français] Installation Ajustez la position des supports pour aller avec l‘épaisseur de différentes surfaces de travail. Plaque Plaque Plateau Plateau Support Support Attention 1. La plaque de cuisson en vitrocéramique doit être installé par des personnels ou techniciens qualifiés.
  • Seite 105: Brancher La Plaque De Cuisson À L'alimentation Électrique

    Brancher la plaque de cuisson à l‘alimentation électrique L‘alimentation électrique doit être branché en respect des normes correspondantes ou un disjoncteur mono-pôle. La méthode de branchement est affichée ci-dessous. Viesta C3Z, Viesta C4Z, Viesta C5Z Viesta C2Z 220V~ / 32A 2 x 220V~ / 16A...
  • Seite 106 KEN001AKC 21.08.2017 • v09 [Français] Cet appareil est étiqueté en accord de la directive européenne 2002/96/EC déchets d‘équipements électriques et électronique. En assurant que cet appareil soit jeté correctement, vous aiderez à éviter tout dommage à l‘environnement et à la santé humaine, dommages qui pourraient être autrement causés si l‘appareil était jeté...
  • Seite 107: Indice

    Viesta C2Z, Viesta C3Z, Viesta C4Z ............... 118 Blocco di sicurezza per bambini ..............121 Utilizzo del timer ..................122 Istruzioni per l’uso comandi touch screen Viesta C5Z ........125 Blocco di sicurezza per bambini ..............127 Utilizzo del timer ..................128 Linee guida per la cottura ................
  • Seite 108: Importanti Indicazioni Di Pericolo

    KEN001AKC 21.08.2017 • v09 [Italiano] Indicazioni di pericolo La sua sicurezza è importante per noi. Leggere le presenti informazioni prima di iniziare a utilizzare il piano cottura. Si prega di notare che il piano a induzione può essere installato soltanto da personale specializzato o da tecnici qualificati. Si raccomanda di non eseguire mai da soli l’allaccio in quanto il diritto alla garanzia decade in caso di installazione inappropriata.
  • Seite 109: Rischi Per La Salute

    KEN001AKC 21.08.2017 • v09 [Italiano] Pericolo di folgorazione durante l’uso e manutenzione • Non cucinare su un piano cottura difettoso o danneggiato. Qualora la superficie del piano cottura dovesse rompersi o spaccarsi, scollegare subito l’apparecchio dall’alimentazione elettrica (tramite l’interruttore a parete) e contattare un tecnico qualificato. •...
  • Seite 110: Importanti Informazioni Sulla Sicurezza

    KEN001AKC 21.08.2017 • v09 [Italiano] Importanti informazioni sulla sicurezza • Non lasciare mai l’apparecchio incustodito durante l’utilizzo. Un eventuale surriscaldamento può causare la formazione di residui grassi fumanti che potrebbero infiammarsi. • Non utilizzare l’apparecchio come piano di lavoro o superficie di appoggio. •...
  • Seite 111 KEN001AKC 21.08.2017 • v09 [Italiano] Importanti informazioni sulla sicurezza • Questo apparecchio è progettato per l’utilizzo in ambiti domestici o per scopi simili, come: cucine per i dipendenti in negozi, uffici e altri ambienti lavorativi; agriturismi; per i clienti di hotel, motel e altri ambienti abitativi; in Bed &...
  • Seite 112: Informazioni Sul Prodotto

    Per quanto riguarda l’installazione si rimanda al paragrafo “Montaggio”. Si prega di leggere attentamente le indicazioni di pericolo prima dell’utilizzo e di conservare le presenti istruzioni per l’utilizzo successivo. Informazioni sul prodotto Viesta C5Z Vista dall’alto 1. Fuoco max. 1200 W 2. Fuoco 2 max. 2300/1600/800 W 3.
  • Seite 113 KEN001AKC 21.08.2017 • v09 [Italiano] Funzione di limitazione della potenza di C5Z. Gruppo A Gruppo B (nessuna limitazione) Le 5 zone sono stati divisi in gruppo A e B, come da sopra. Funzione di gestione dell‘alimentazione sul gruppo A Se entrambe zone stanno lavorando sopra il livello 7 di potenza, le due aree si accendono e spengono automaticamente ed è...
  • Seite 114 KEN001AKC 21.08.2017 • v09 [Italiano] Informazioni sul prodotto Viesta C4Z Vista dall’alto 1. Fuoco max. 2000 W 2. Fuoco max. 1200 W 3. Fuoco max. 2200 W 4. Fuoco max. 1200 W 5. Piano in vetro 6. Comandi Comandi 1. Selezione fuochi 2.
  • Seite 115 KEN001AKC 21.08.2017 • v09 [Italiano] Informazioni sul prodotto Viesta C3Z Vista dall’alto 1. Fuoco max. 1800 W 2. Fuoco max. 1200 W 3. Fuoco max. 2300 W 4. Piano in vetro 5. Comandi Comandi 1. Selezione fuochi 2. Timer 3. Regolazione temperatura o timer 4.
  • Seite 116 KEN001AKC 21.08.2017 • v09 [Italiano] Informazioni sul prodotto Viesta C2Z Vista dall’alto 1. Piano in vetro 2. Fuoco max. 1800 W 3. Fuoco max. 1200 W 4. Comandi Comandi 1. Selezione fuochi 2. Timer 3. Regolazione temperatura o timer 4. Blocco di sicurezza per bambini 5.
  • Seite 117: Informazioni Sul Prodotto

    KEN001AKC 21.08.2017 • v09 [Italiano] Informazioni sul prodotto Grazie all’unità riscaldante con resistenza a filo, alla regolazione con micro computer e alla selezione di potenze diverse, il piano cottura in vetroceramica con micro computer soddisfa esigenze diverse di cottura e rappresenta la soluzione perfetta per le famiglie moderne.
  • Seite 118: Viesta C2Z, Viesta C3Z, Viesta C4Z

    KEN001AKC 21.08.2017 • v09 [Italiano] Scelta delle pentole adatte Non utilizzare stoviglie con gli angoli dentellati o con fondo deformato. Assicurarsi che il fondo della pentola utilizzata sia liscio, che poggi bene sul vetro e che sia delle stesse dimensioni del fuoco. Posizionare la pentola sempre al centro del fuoco.
  • Seite 119: Istruzioni Per L'uso Comandi Touch Screen

    KEN001AKC 21.08.2017 • v09 [Italiano] Istruzioni per l’uso comandi touch screen Valido per i seguenti modelli Viesta C2Z, Viesta C3Z und Viesta C4Z Iniziare a cucinare 1. Toccare il tasto on/off Dopo l’accensione il dispositivo di segnalamento acustico suona una volta, tutte le spie indicano “ – “ oppure “ – – “.
  • Seite 120 KEN001AKC 21.08.2017 • v09 [Italiano] Istruzioni per l’uso comandi touch screen 5. Premere sul pulsante di selezione del fuoco desiderato e toccare il tasto oppure per azionare il fuoco doppio. La spia led sul lato sinistro della regolazione del fuoco doppio/grill si illumina. A fine cottura 1.
  • Seite 121: Blocco Di Sicurezza Per Bambini

    KEN001AKC 21.08.2017 • v09 [Italiano] Blocco di sicurezza per bambini • È possibile bloccare i tasti per evitarne l’accensione involontaria (ad esempio per prevenire che i bambini azionino i fuochi per caso). • Quando i tasti sono bloccati funziona soltanto l’interruttore on/off. Bloccare i tasti Toccare il tasto Sull’indicatore del timer compare „Lo“.
  • Seite 122: Utilizzo Del Timer

    KEN001AKC 21.08.2017 • v09 [Italiano] Utilizzo del timer È possibile utilizzare il timer in due modi diversi: • Utilizzo come contaminuti. In questo caso il timer non spegne nessun fuoco allo scadere del tempo di cottura impostato. • È possibile impostare il timer per spegnere un fuoco allo scadere del tempo di cottura impostato.
  • Seite 123 KEN001AKC 21.08.2017 • v09 [Italiano] 5. Il conto alla rovescia inizia subito dopo aver impostato la durata. Sul display viene mostrato il tempo rimanente e la spia del timer lampeggia per 5 secondi. 6. Allo scadere dell’intervallo impostato il dispositivo di segnalamento acustico suona e sull’indicatore del timer compare “- - “.
  • Seite 124 KEN001AKC 21.08.2017 • v09 [Italiano] 5. Il conto alla rovescia inizia subito dopo aver impostato la durata. Sul display comandi è indicato il tempo rimanente e la spia del timer lampeggia per 5 secondi. AVVISO: Il puntino rosso luminoso accanto all’indicatore della temperatura indica il fuoco selezionato.
  • Seite 125: Istruzioni Per L'uso Comandi Touch Screen Viesta C5Z

    KEN001AKC 21.08.2017 • v09 [Italiano] Istruzioni per l’uso comandi touch screen Valido per i seguenti modelli: Viesta C5Z Iniziare a cucinare • Dopo l’accensione il dispositivo di segnalamento acustico suona una volta. Tutte le spie si accendono 1 secondo per poi rispegnersi.
  • Seite 126 KEN001AKC 21.08.2017 • v09 [Italiano] Istruzioni per l’uso comandi touch screen A fine cottura 1. Spegnere l’intero piano cottura tramite il pulsante on/off. 2. Fare attenzione alle superfici calde. Il simbolo “H” indica quale fuoco non deve essere toccato in quanto ancora troppo caldo.
  • Seite 127: Blocco Di Sicurezza Per Bambini

    KEN001AKC 21.08.2017 • v09 [Italiano] Blocco di sicurezza per bambini • È possibile bloccare i tasti per evitarne l’accensione involontaria (ad esempio per prevenire che i bambini azionino i fuochi per caso). • Quando i tasti sono bloccati funziona soltanto l’interruttore on/off. Bloccare i tasti Toccare il tasto Sull’indicatore del timer compare „Lo“.
  • Seite 128: Utilizzo Del Timer

    KEN001AKC 21.08.2017 • v09 [Italiano] Utilizzo del timer È possibile impostare il timer nei seguenti modi:: • Impostazione come contaminuti. In questo modo non verrà spento nessun fuoco allo scadere della durata impostata. • È possibile impostare il timer per spegnere un fuoco allo scadere del tempo di cottura impostato.
  • Seite 129 KEN001AKC 21.08.2017 • v09 [Italiano] Impostazione del timer per lo spegnimento di un fuoco 1. Toccare il tasto „-“ oppure „+“ relativo al fuoco per il quale si desidera impostare il timer. 2. Impostare la durata tramite i pulsanti „-“ e „+“ e regolare la potenza desiderata per il fuoco attraverso i pulsanti „-“...
  • Seite 130 KEN001AKC 21.08.2017 • v09 [Italiano] Impostazione del timer per più di un fuoco: 1. Se si imposta il timer contemporaneamente per più fuochi compaiono i puntini sui rispettivi fuochi. L’indicatore dei minuti riporta la durata minore tra quelle impostate. Il puntino del fuoco corrispondente lampeggia. (impostato su 6 minuti) (impostato su 3 minuti) 2.
  • Seite 131: Linee Guida Per La Cottura

    KEN001AKC 21.08.2017 • v09 [Italiano] Linee guida per la cottura Fare attenzione mentre si frigge, olio e grasso si riscaldano rapidamente, soprattutto se si attiva la funzione Turbo Start. A temperature estremamente elevate olio e grasso possono infiammarsi spontaneamente. Questo comporta un serio pericolo di incendio. Suggerimenti per la cottura •...
  • Seite 132: Regolazione Della Temperatura

    KEN001AKC 21.08.2017 • v09 [Italiano] Heat settings Regolazione della temperatura Le seguenti impostazioni sono semplici linee guida. La precisa regolazione delle impostazioni dipende da diversi fattori, tra gli altri dalle pentole utilizzate e dai quantitativi preparati. Fare delle prove con il piano in vetroceramica per trovare le impostazioni giuste. Regolazione della temperatura 1 - 2...
  • Seite 133: Pulizia E Manutenzione

    KEN001AKC 21.08.2017 • v09 [Italiano] Pulizia e manutenzione Cosa? Come? Importante! Sporco quotidiano che si 1. Staccare l’alimentazione del • Quando l’alimentazione del piano forma sul piano in vetro piano in vetroceramica. in vetroceramica è spenta l’avviso (impronte, macchie di 2.
  • Seite 134: Avvertenze E Suggerimenti

    50/60 Hz 220-240V~, Viesta C3Z 3 fuochi 4849-5771W 590x520x52 560x490 50/60 Hz 220-240V~, Viesta C2Z 2 fuochi 2745-3267W 288x520x52 268x500 50/60 Hz Avviso: i dati relativi a dimensioni sono indicativi. Poiché miglioriamo continuamente i nostri prodotti, potenza e struttura potrebbero essere modificate senza preavviso.
  • Seite 135: Montaggio

    Si veda sotto: Sigillo Modello L (mm) W (mm) H (mm) D (mm) A (mm) B (mm) X (mm) Viesta C5Z min. 50 Viesta C4Z min. 50 Viesta C3Z min. 50 [ 135 ]...
  • Seite 136 Montaggio Sigillo Modello Viesta C2Z min. min. min. min. 50mm 50mm 50mm 50mm È possibile poggiare Viesta C2Z sulla superficie di lavoro. Il piano cottura va installato in posizione orizzontale. Si veda sotto: min. 50mm min. 50mm [ 136 ]...
  • Seite 137 KEN001AKC 21.08.2017 • v09 [Italiano] Montaggio Assicurarsi in ogni caso che il piano cottura in vetroceramica sia ben ventilato e che l’ingresso e l’uscita dell’aria non siano bloccati. Assicurarsi che il piano cottura in vetroceramica funzioni bene. Si veda sotto: Nota: la distanza di sicurezza tra il piano in vetroceramica e un pensile posizionato sopra di esso deve essere di almeno 760 mm.
  • Seite 138: Prima Del Posizionamento Dei Supporti

    KEN001AKC 21.08.2017 • v09 [Italiano] Montaggio Prima del posizionamento dei supporti L’apparecchio deve essere posizionato su una superficie stabile e liscia (utilizzare l’imballaggio). Non fare forza sui tasti che spuntano dal piano in vetroceramica. Dopo l’installazione fissare il piano in vetroceramica avvitando nel piano di lavoro i quattro supporti presenti sul fondo del piano cottura (vedere immagine).
  • Seite 139 KEN001AKC 21.08.2017 • v09 [Italiano] Montaggio Posizionare il supporto in modo tale che sia adeguato allo spessore del piano lavoro. Piano Piano Panello Panello Supporto Supporto Misure di sicurezza 1. Il piano in vetroceramica deve essere installato da personale o tecnici qualificati. Si raccomanda di non eseguire mai da soli l’allaccio in quanto il diritto alla garanzia decade in caso di installazione inappropriata.
  • Seite 140: Allacciamento Del Piano Cottura All'alimentazione Elettrica

    L’allaccio elettrico deve avvenire nel rispetto delle norme in materia o attraverso un sezionatore a un polo. Di seguito viene mostrata la modalità di allaccio. Viesta C3Z, Viesta C4Z, Viesta C5Z Viesta C2Z 220V~ / 32A 2 x 220V~ / 16A...
  • Seite 141 KEN001AKC 21.08.2017 • v09 [Italiano] Su questo apparecchio è riportata la sigla prevista dalla direttiva europea 2002/96/EC per i rifiuti di apparecchiature elettriche ed elettroniche (Waste Electrical and Electronic Equipment, WEEE). Smaltendo questo apparecchio nel modo corretto contribuirà a evitare i danni all’ambiente e alla salute umana che deriverebbero da un errato smaltimento.
  • Seite 142: Índice

    Viesta C2Z, Viesta C3Z, Viesta C4Z ............... 154 Bloqueo para niños ..................156 Cómo utilizar el temporizador ..............157 Instrucciones del panel de control táctil Viesta C5Z ........160 Bloqueo para niños ..................162 Cómo utilizar el temporizador ..............163 Guía para cocinar ..................
  • Seite 143: Indicaciones De Seguridad

    KEN001AKC 21.08.2017 • v09 [Español] Indicaciones de seguridad Su seguridad es importante para nosotros. Por favor, lea estas instrucciones antes de utilizar la placa de cocina. Tenga en cuenta que la cocina de inducción solo podrá ser instalada por personal técnico especializado. Nunca conecte la placa usted mismo ya que una instalación inadecuada anulará...
  • Seite 144: Peligro Por Superficies Calientes

    KEN001AKC 21.08.2017 • v09 [Español] Peligro de descarga eléctrica durante el funcionamiento y el mantenimiento • Nunca cocine sobre una placa de cocina defectuosa o rota. Si se rompe o rasga la superficie de una placa, apague inmediatamente el aparato desde el cuadro principal de corriente (interruptor de pared) y póngase en contacto con un técnico cualificado.
  • Seite 145 KEN001AKC 21.08.2017 • v09 [Español] Información de seguridad importante • Nunca deje el aparato sin vigilancia mientras esté en uso. Cocinar en exceso puede provocar restos de grasa y de humo que podrían resultar inflamables. • Nunca utilice el aparato como encimera o superficie de almacenamiento. •...
  • Seite 146 KEN001AKC 21.08.2017 • v09 [Español] Información de seguridad importante • Este aparato está indicado para usos domésticos o similares como: Cocinas para empleados en tiendas, oficinas u otros entornos de trabajo Fincas Clientes de hoteles, moteles y otros espacios habitables Establecimientos tipo Bed &...
  • Seite 147: Información Del Producto

    Para instalarlo, lea el apartado «Montaje». Lea atentamente todas las indicaciones de seguridad antes de utilizar la placa y conserve este manual de instrucciones y montaje para poder consultarlo en el futuro. Información del producto Viesta C5Z Vista superior 1. Zona máx. 1200 W 2. Zona máx. 2300/1600/800 W 3.
  • Seite 148 KEN001AKC 21.08.2017 • v09 [Español] Función de limitación de potencia para C5Z. Grupo A Grupo B (ninguna limitación) Las 5 zonas de cocción se dividen en dos grupos A y B respectivamente. Función de administración de energía en el grupo A. Si ambas zonas están trabajando por encima de la etapa de potencia 7, las dos zonas se encenderán y apagarán automáticamente por turnos, es controlado por el software.
  • Seite 149 KEN001AKC 21.08.2017 • v09 [Español] Información del producto Viesta C4Z Vista superior 1. Zona máx. 2000 W 2. Zona máx. 1200 W 3. Zona máx. 2200 W 4. Zona máx. 1200 W 5. Placa de vidrio 6. Panel de control Panel de control 1.
  • Seite 150 KEN001AKC 21.08.2017 • v09 [Español] Información del producto Viesta C3Z Vista superior 1. Zona máx. 1800 W 2. Zona máx. 1200 W 3. Zona máx. 2300 W 4. Placa de vidrio 5. Panel de control Panel de control 1. Selección de las zonas de cocción 2.
  • Seite 151 KEN001AKC 21.08.2017 • v09 [Español] Información del producto Viesta C2Z Vista superior 1. Placa de vidrio 2. Zona máx. 1800 W 3. Zona máx. 1200 W 4. Panel de control Panel de control 1. Selección de las zonas de cocción 2.
  • Seite 152: Información Del Producto

    KEN001AKC 21.08.2017 • v09 [Español] Información del producto La placa vitrocerámica con microcomputador puede satisfacer las necesidades de cocción de distintos tipos de alimentos gracias a sus elementos caloríficos con resistencia eléctrica, el ajuste con microordenador y la selección de potencia variable. La elección perfecta para las familias modernas.
  • Seite 153 KEN001AKC 21.08.2017 • v09 [Español] Cómo elegir la batería de cocina correcta No emplee baterías de cocina con cantos dentados ni bases curvas. Asegúrese de que la base de su olla quede plana sobre el vidrio y que tenga el mismo tamaño que la zona de cocción.
  • Seite 154: Instrucciones Del Panel De Control Táctil

    21.08.2017 • v09 [Español] Instrucciones del panel de control táctil Válido para los siguientes modelos Viesta C2Z, Viesta C3Z und Viesta C4Z Comenzar a cocinar 1. Toque el interruptor de encendido/apagado. Cuando lo active escuchará un zumbido una vez y todos los indicadores mostrarán «...
  • Seite 155 KEN001AKC 21.08.2017 • v09 [Español] Instrucciones del panel de control táctil 5. Toque el ajuste de selección de la zona térmica deseada y pulse el botón para activar la zona de doble ciclo. Se encenderán los indicadores LED del ajuste de doble ciclo/olla para asado en el lateral izquierdo.
  • Seite 156: Bloqueo Para Niños

    KEN001AKC 21.08.2017 • v09 [Español] Bloqueo para niños • Usted puede bloquear los botones para evitar que el aparato se utilice sin vigilancia (por ejemplo, que un niño encienda la placa por accidente). • Mientras los botones estén bloqueados, solo el interruptor de encendido/apagado permanecerá...
  • Seite 157: Cómo Utilizar El Temporizador

    KEN001AKC 21.08.2017 • v09 [Español] Cómo utilizar el temporizador Puede utilizar el temporizador de dos maneras distintas: • Puede utilizarlo como avisador de cocina. En este caso, una vez transcurrido el tiempo de cocción ajustado, el temporizador no apaga ninguna zona de cocción. •...
  • Seite 158 KEN001AKC 21.08.2017 • v09 [Español] 5. La cuenta atrás comenzará justo después de regular el tiempo. En el panel de control se mostrará el tiempo restante y el indicador del temporizador parpadeará durante 5 segundos. 6. Cuando el tiempo seleccionado se haya agotado, sonará...
  • Seite 159 KEN001AKC 21.08.2017 • v09 [Español] 5. La cuenta atrás comenzará justo después de regular el tempo. En el panel de control se mostrará el tiempo restante y el temporizador parpadeará durante 5 segundos. Nota: El punto rojo iluminado junto al indicador de temperatura mostrará...
  • Seite 160: Instrucciones Del Panel De Control Táctil Viesta C5Z

    KEN001AKC 21.08.2017 • v09 [Español] Instrucciones del panel de control táctil Válido para los siguientes modelos: Viesta C5Z Comenzar a cocinar • Cuando encienda la placa escuchará un zumbido una vez. Todos los indicadores se iluminarán durante 1 segundo y se apagarán.
  • Seite 161 KEN001AKC 21.08.2017 • v09 [Español] Instrucciones del panel de control táctil Después de cocinar 1. Apague toda la placa tocando el interruptor de encendido/apagado. 2. Tenga cuidado con las superficies calientes. La letra «H» le indicará qué zonas de cocción están demasiado calientes como para tocarlas.
  • Seite 162: Bloqueo Para Niños

    KEN001AKC 21.08.2017 • v09 [Español] Bloqueo para niños • Usted puede bloquear los botones para evitar que el aparato se utilice sin vigilancia (por ejemplo, que un niño encienda la placa por accidente). • Mientras los botones estén bloqueados, solo el interruptor de encendido/apagado permanecerá...
  • Seite 163: Cómo Utilizar El Temporizador

    KEN001AKC 21.08.2017 • v09 [Español] Cómo utilizar el temporizador Puede utilizar el temporizador de dos maneras distintas: • Puede utilizarlo como avisador de cocina. En este caso, una vez transcurrido el tiempo de cocción ajustado, el temporizador no apaga ninguna zona de cocción. •...
  • Seite 164 KEN001AKC 21.08.2017 • v09 [Español] Cómo ajustar el temporizador para apagar una zona de cocción 1. Toque el botón „-“ o „+“ de la placa de cocina para la que quiera ajustar el temporizador. 2. Ajuste el tiempo pulsando los botones „-“ y „+“ y seleccione la potencia deseada en la zona de cocción con ayuda de „-“...
  • Seite 165 KEN001AKC 21.08.2017 • v09 [Español] Si el temporizador se ajusta para más de una zona de cocción: 1. Si regula el temporizador para varias zonas de cocción simultáneamente aparecerá un punto decimal en la zona correspondiente. El indicador de minutos muestra el tiempo más corto ajustado. El punto de la zona de cocción correspondiente parpadea.
  • Seite 166: Guía Para Cocinar

    KEN001AKC 21.08.2017 • v09 [Español] Guía para cocinar Al freír proceda con cuidado, ya que el aceite y la grasa se calientan rápido, especialmente cuando se utiliza la opción de calentamiento rápido («Turbostart»). El aceite y la grasa pueden comenzar a arder de manera espontánea si se encuentran a temperaturas extremadamente altas.
  • Seite 167: Ajustes De Temperatura

    KEN001AKC 21.08.2017 • v09 [Español] Heat settings Ajustes de temperatura Los siguientes ajustes que indicamos son solo orientativos. El ajuste exacto depende de distintos factores, entre otros, de su batería de cocina y de la cantidad de alimentos que cocine. Experimente con su placa vitrocerámica para encontrar los ajustes más apropiados.
  • Seite 168: Limpieza Y Cuidados

    KEN001AKC 21.08.2017 • v09 [Español] Limpieza y cuidado ¿Qué? ¿Cómo? ¡Importante! Suciedad normal sobre el 1. Desconecte la corriente eléctrica • Mientras la corriente eléctrica vidrio (huellas dactilares, de la placa vitrocerámica. de la placa esté desconectada no salpicaduras, manchas de 2.
  • Seite 169: Advertencias Y Consejos

    50/60 Hz 220-240V~, Viesta C3Z 3 zonas 4849-5771W 590x520x52 560x490 50/60 Hz 220-240V~, Viesta C2Z 2 zonas 2745-3267W 288x520x52 268x500 50/60 Hz Nota: Las dimensiones son datos aproximados. Mejoramos nuestros productos continuamente y por ello es posible que modifiquemos las características de rendimiento y construcción sin previo aviso.
  • Seite 170: Montaje

    Ver abajo: Junta Modelo L (mm) W (mm) H (mm) D (mm) A (mm) B (mm) X (mm) Viesta C5Z 50 mini Viesta C4Z 50 mini Viesta C3Z 50 mini [ 170 ]...
  • Seite 171 Model Viesta C2Z 50 mm 50 mm 50 mm 50 mm mini mini mini mini Puede colocar la placa Viesta C2Z sobre la encimera. Posicione la placa de cocina en horizontal. 50 mm mini 50 mm mini [ 171 ]...
  • Seite 172 KEN001AKC 21.08.2017 • v09 [Español] Montaje Asegúrese principalmente de que la placa vitrocerámica esté bien ventilada y de que las entradas y salidas de aire no estén bloqueadas. Asegúrese de que la placa vitrocerámica se encuentre en buen estado de funcionamiento.
  • Seite 173: Antes De Colocar Los Soportes

    KEN001AKC 21.08.2017 • v09 [Español] Montaje Antes de colocar los soportes Coloque el aparato sobre una superficie estable y plana (utilice el embalaje). No ejerza ninguna fuerza sobre los botones que sobresalen de la placa vitrocerámica. Una vez instalada, fije la placa atornillando los cuatro soportes de la base de la placa de cocina a la encimera (ver imagen).
  • Seite 174 KEN001AKC 21.08.2017 • v09 [Español] Montaje Coloque el soporte de manera que se ajuste al grosor de la encimera. Cocina Cocina Tablero Tablero Soporte Soporte Precaución 1. La cocina vitrocerámica solo podrá ser instalada por personal técnico especializado o cualificado. Nunca conecte la placa usted mismo ya que una instalación inadecuada anulará...
  • Seite 175: Conectar La Placa Vitrocerámica Al Suministro Eléctrico

    La instalación eléctrica deberá cumplir con la normativa correspondiente o estar conectada a un interruptor unipolar. A continuación se muestra el esquema de conexión. Viesta C3Z, Viesta C4Z, Viesta C5Z Viesta C2Z 220V~ / 32A 2 x 220V~ / 16A...
  • Seite 176 KEN001AKC 21.08.2017 • v09 [Español] Este aparato cumple con la directiva europea 2002/96/CE sobre Residuos de Aparatos Eléctricos y Electrónicos (RAEE) (Waste Electrical and Electronic Equipment, WEEE). Al garantizar que este aparato se deseche adecuadamente, estará contribuyendo a evitar los daños en el medioambiente y en la salud de las personas que podría provocar una eliminación inadecuada.
  • Seite 177: Inhoudsopgave

    Productinformatie ..................182 Voor het gebruik van uw nieuwe keramische kookplaat ......187 Anwendung Ihres Glaskeramik-Kochfelds Touch-bedieningsveld handleiding Viesta C2Z, Viesta C3Z, Viesta C4Z ..189 Blokkeringstoets ..................191 Gebruik van de timer .................. 192 Touch-bedieningsveld handleiding Viesta C5Z ..........195 Blokkeringstoets ..................
  • Seite 178: Gevarenaanduidingen

    KEN001AKC 21.08.2017 • v09 [Nederlands] Gevarenaanduidingen Uw veiligheid is belangrijk voor ons. Lees deze informatie door voordat u uw kookplaat gebruikt Houd er rekening mee dat de inductiekookplaat alleen door gekwalificeerd deskundig personeel of technici mag worden geïnstalleerd. Voer de aansluiting nooit zelf uit, omdat bij onjuiste installatie de garantie vervalt.
  • Seite 179: Gevaar Voor De Gezondheid

    KEN001AKC 21.08.2017 • v09 [Nederlands] Risico op elektrische schokken tijdens het gebruik en onderhoud • Kook niet op een defecte of gebarsten kookplaat. Als het oppervlak van de kookplaat breekt of scheurt,schakel het apparaat direct uit via de hoofdvoeding (wandschakelaar) en neem contact op met een gekwalificeerd technicus. •...
  • Seite 180: Belangrijke Veiligheidsinstructies

    KEN001AKC 21.08.2017 • v09 [Nederlands] Belangrijke veiligheidsinstructies • Laat het apparaat nooit onbeheerd achter, terwijl het in gebruik is. Door overkoken kan rook en vettig vuil ontstaan, dat kan ontbranden. • Gebruik uw apparaat niet als werkblad of opslagruimte. • Laat geen (gebruiks)voorwerpen op het apparaat liggen.
  • Seite 181 KEN001AKC 21.08.2017 • v09 [Nederlands] Belangrijke veiligheidsinstructies • Dit apparaat is bedoeld voor het gebruik in huishoudens of soortgelijke toepassingen, zoals: - personeelskeukens in winkels, kantoren en andere werkomgevingen; - landbouwbedrijven; - door klanten in hotels, motels en in andere huiskamerachtige omgevingen; - in bed &...
  • Seite 182: Productinformatie

    Lees voor de installatie de sectie Installatie. Lees alle gevaarsinstructies voor het gebruik zorgvuldig door en bewaar deze gebruiks- en montagehandleiding voor toekomstig gebruik. Productinformatie Viesta C5Z Bovenaanzicht 1. max. 1200 W zone 2. max. 2300/1600/800 W zone 3. max. 2000/1100 W zone 4.
  • Seite 183 KEN001AKC 21.08.2017 • v09 [Nederlands] Begrenzingsfunctie vermogen voor C5Z Groep A Groep B (geen beperking) De 5 zones worden onderverdeeld in groep A en groep B. Zie de bovenstaande afbeelding. Power management functie van groep A Wanneer beide zones op / over de vermogensklasse 7 zijn ingeschakeld, worden de beide zones automatisch in- en uitgeschakeld, dit wordt door de software gecontroleerd.
  • Seite 184 KEN001AKC 21.08.2017 • v09 [Nederlands] Productinformatie Viesta C4Z Bovenaanzicht 1. max. 2000 W zone 2. max. 1200 W zone 3. max. 2200 W zone 4. max. 1200 W zone 5. Glasplaat 6. Gebruiksgebied Gebruiksgebied 1. Keuzeregelaar kookplaat 2. Timerbesturing 3. Temperatuur- en timerbesturing 4.
  • Seite 185 KEN001AKC 21.08.2017 • v09 [Nederlands] Productinformatie Viesta C3Z Bovenaanzicht 1. max. 1800 W zone 2. max. 1200 W zone 3. max. 2300 W zone 4. Glasplaat 5. Gebruiksgebied Gebruiksgebied 1. Keuzeregelaar kookplaat 2. Timerbesturing 3. Temperatuur- en timerbesturing 4. Braadpan zoneregeling 5.
  • Seite 186 KEN001AKC 21.08.2017 • v09 [Nederlands] Productinformatie Viesta C2Z Bovenaanzicht 1. Glasplaat 2. max. 1800 W zone 3. max. 1200 W zone 4. Gebruiksgebied Gebruiksgebied 1. Keuzeregelaar kookplaat 2. Timerbesturing 3. Temperatuur- en timerbesturing 4. Blokkeringstoets 5. Aan- / uit-schakelaar [ 186 ]...
  • Seite 187: Voor Het Gebruik Van Uw Nieuwe Keramische Kookplaat

    KEN001AKC 21.08.2017 • v09 [Nederlands] Een paar woorden over de keramische kookplaat De keramische kookplaat met microcomputer kan door zijn verwarmingselement met weerstandsdraad, aan de besturing met microcomputer en de meervoudige-vermogenskeuze van diverse soorten kookaanspraken voldoen, werkelijk de optimale keuze voor moderne gezinnen. De keramische kookplaat is ontworpen voor klanten en hun persoonlijke wensen.
  • Seite 188 KEN001AKC 21.08.2017 • v09 [Nederlands] Het kiezen van het juiste kookgerei Gebruik geen kookgerei met gekartelde randen of een kromgetrokken bodem. Zorg ervoor dat de bodem van de pan glad is en vlak op het glas ligt, en dezelfde afmeting als de gekozen kookzone heeft. Centreer altijd uw pannen in de kookzone.
  • Seite 189: Touch-Bedieningsveld Handleiding Viesta C2Z, Viesta C3Z, Viesta C4Z

    21.08.2017 • v09 [Nederlands] Gebruik van uw keramische kookplaat Geldig voor de volgende modellen: Viesta C2Z, Viesta C3Z en Viesta C4Z Met het koken beginnen 1. Tik op de AAN / UIT-toets. Na het inschakelen toont piept de zoemer een keer, alle displays tonen „-“ of „- -“, wat erop wijst, dat de keramische kookplaat zich...
  • Seite 190: Na Het Koken

    KEN001AKC 21.08.2017 • v09 [Nederlands] Gebruik van uw keramische kookplaat 5. Tik op de kookzone selectie controle, en druk op de knop en een dubbele ring zone gaat. De LED indicator aan de linkerkant van de dubbele-keten / braadpan zoneregeling brandt. Na het koken 1.
  • Seite 191: Blokkeringstoets

    KEN001AKC 21.08.2017 • v09 [Nederlands] Blokkeringstoets • U kunt de toetsen blokkeren, om onbedoeld gebruik te voorkomen (bijvoorbeeld kinderen die toevallig de kookplaat inschakelen). • Wanneer de toetsen geblokkeerd zijn, is alleen de Aan-/Uitschakelaar actief. Blokkeren van de toetsen Raak de toets aan voor de toetsenblokkering Het timerdisplaygeeft „Lo“...
  • Seite 192: Gebruik Van De Timer

    KEN001AKC 21.08.2017 • v09 [Nederlands] Gebruiken van de timer U kunt de timer op twee verschillende manier gebruiken: • U kunt deze als timer gebruiken. Zó dat de timer geen kookzone uischakelt, wanneer de ingestelde tijd is afgelopen. • U kunt deze ook zo instellen, dat een kookzone uitschakelt, wanneer de ingestelde tijd is afgelopen.
  • Seite 193 KEN001AKC 21.08.2017 • v09 [Nederlands] 5. Het aftellen start direct nadat de tijd isingesteld. Op het bedieningspaneel wordt de resterende tijd weergegeven en de timer knippert voor 5 seconden. 6. Wanneer de ingestelde tijd afgelopen is, klinkt de zoemer en de timer toont “- - “. Instellen van de timer voor het uitschakelen van een kookzone 1.
  • Seite 194 KEN001AKC 21.08.2017 • v09 [Nederlands] 5. Het aftellen start direct nadat de tijd isingesteld. Op het bedieningspaneel wordt de resterende tijd weergegeven en de timer knippert voor 5 seconden. Opmerking: De verlichte rode stip naast het temperatuurdisplay geeft de gekozen zone weer. Wanneer de timer voor meer dan een kookzone is ingesteld: 1.
  • Seite 195: Touch-Bedieningsveld Handleiding Viesta C5Z

    21.08.2017 • v09 [Nederlands] Gebruik van uw keramische kookplaat Geldig voor de volgende modellen: Viesta C5Z Met het koken beginnen 1. Tik op de AAN / UIT-toets. Na het inschakelen toont piept de zoemer een keer, alle displays tonen „-“ of „- -“, wat erop wijst, dat de keramische kookplaat zich...
  • Seite 196 KEN001AKC 21.08.2017 • v09 [Nederlands] Gebruik van uw keramische kookplaat Na het koken 1. Schakel de hele kookplaat uit, door de Aan-/uitknop aan te raken. 2. Let op hete oppervlakken. De „H“ geeft aan welke kookzone te heet is om aan te raken. Dit verdwijnt wanneer het oppervlak tot een bepaalde temperatuur is afgekoeld.
  • Seite 197: Blokkeringstoets

    KEN001AKC 21.08.2017 • v09 [Nederlands] Blokkeringstoets • U kunt de toetsen blokkeren, om onbedoeld gebruik te voorkomen (bijvoorbeeld kinderen die toevallig de kookplaat inschakelen). • Wanneer de toetsen geblokkeerd zijn, is alleen de Aan-/Uitschakelaar actief. Blokkeren van de toetsen Raak de toets aan voor de toetsenblokkering Het timerdisplaygeeft „Lo“...
  • Seite 198: Gebruik Van De Timer

    KEN001AKC 21.08.2017 • v09 [Nederlands] Gebruiken van de timer U kunt de timer op twee verschillende manier gebruiken: • U kunt deze als timer gebruiken. Zó dat de timer geen kookzone uischakelt, wanneer de ingestelde tijd is afgelopen. • U kunt deze ook zo instellen, dat een kookzone uitschakelt, wanneer de ingestelde tijd is afgelopen.
  • Seite 199 KEN001AKC 21.08.2017 • v09 [Nederlands] Instellen van de timer voor het uitschakelen van een kookzone 1. Raak de knop voor de verwarmingszone aan, waarvoor u de timer in wilt stellen 2. Stel de tijd in, waarbij u de „-“ of „+“ toets van de timer aanraakt. Maken met behulp van de toetsen „-“...
  • Seite 200 KEN001AKC 21.08.2017 • v09 [Nederlands] Wanneer de timer voor meer dan een kookzone is ingesteld: 1. Als u de timer voor meerdere kookzones ingesteld, de decimale punten verschijnen op de betreffende kookzones. Op het moment dat display geeft de kortste ingestelde tijd. De punt van de betreffende kookzone knippert.
  • Seite 201: Richtlijnen Om Te Koken

    KEN001AKC 21.08.2017 • v09 [Nederlands] Richtlijnen om te koken Let er bij het braden op dat olie en vet zeer snel verhitten, vooral als u de Powerboost-functie gebruikt. Bij extreem hoge temperaturen ontbranden olie en vet spontaan en dit vormt een ernstig risico op brand. Kooktips •...
  • Seite 202: Temperatuurinstellingen

    KEN001AKC 21.08.2017 • v09 [Nederlands] Heat settings Temperatuurinstellingen De volgende instellingen zijn slechts richtlijnen. De precieze instelling hang af van verschillende factoren, waaronder uw kookgerei en de hoeveelheid die u voorbereidt. Experimenteer met de keramische kookplaat, om de beste instellingen voor u te vinden.
  • Seite 203: Reiniging En Onderhoud

    KEN001AKC 21.08.2017 • v09 [Nederlands] Reiniging en onderhoud Wat? Hoe? Belangrijk! Normale verontreiniging op 1. Schakel de stroomtoevoer van • Wanneer de stroomtoevoer van het glas (vingerafdrukken, de kookplaat uit. de kookplaat is uitgeschakeld, is afdrukken, vlekken van 2. Breng een reinigingsmiddel voor er geen waar-schuwing voor hete voeding of vloeistoffen glaskeramiek aan zolang het...
  • Seite 204: Instructies En Tips

    50/60 Hz 220-240V~, Viesta C3Z 3 Zonen 4849-5771W 590x520x52 560x490 50/60 Hz 220-240V~, Viesta C2Z 2 Zonen 2745-3267W 288x520x52 268x500 50/60 Hz Opmerking: De maten zijn bij benadering. Omdat wij onze producten continu verbeteren, kan het zijn dat we specifcaties en ontwerpen zonder voorafgaande kennisgeving wijzigen.
  • Seite 205: Montage

    Zoals hieronder weergegeven: Model L (mm) W (mm) H (mm) D (mm) A (mm) B (mm) X (mm) Viesta C5Z 50 mini Viesta C4Z 50 mini Viesta C3Z 50 mini [ 205 ]...
  • Seite 206 KEN001AKC 21.08.2017 • v09 [Nederlands] Montage seal Model Viesta C2Z 50mm 50mm 50mm 50mm mini mini mini mini Viesta C2Z kunt u parkeren op het werkblad. De kookplaat moet horizontaal gepositioneerd. Zie hieronder: 50mm mini 50mm mini [ 206 ]...
  • Seite 207 KEN001AKC 21.08.2017 • v09 [Nederlands] Montage Zorg ervoor dat ten koste van alles, dat de keramische kookplaat goed ontlucht en luchtinlaat en -uitlaat niet zijn geblokkeerd. Zorg ervoor dat de keramische kookplaat veilig is in goede staat. Zie hieronder: Opmerking: De veiligheidsafstand tussen de keramische veld en een overhead kast moet ten minste bedraagt 760 mm.
  • Seite 208: Voor Het Plaatsen Van De Beugels

    KEN001AKC 21.08.2017 • v09 [Nederlands] Montage Voor het plaatsen van de beugels Het apparaat moet op een stabiel en glad oppervlak worden gelegd (gebruik de verpakking). Oefen geen kracht uit op knoppen die uit de keramische kookplaat steken. Bevestig de keramische kookplaat na de installatie door het aanschroeven van vier beugels aan de bodem van de inductiekookplaat op het werkblad (zie afbeelding).
  • Seite 209 KEN001AKC 21.08.2017 • v09 [Nederlands] Montage Stel de beugel, zodat deze overeenkomt met de dikte van het werkblad. kookplaat kookplaat werkblad werkblad beugel beugel 1. De keramische kookplaat moet door gekwalificeerd personeel of monteurs worden geïnstalleerd. Voer de aansluiting nooit zelf uit, omdat bij onjuiste installatie de aanspraak op garantie vervalt.
  • Seite 210: Aansluiten Van De Kookplaat Op De Voedingsspanning

    Aansluiten van het kookplaat op de voedingsspanning De voeding moet in overeenstemming zijn met de relevante normen of zijn verbonden met een enkelpolige zekeringen. De verbinding wordt hieronder weergegeven. Viesta C3Z, Viesta C4Z, Viesta C5Z Viesta C2Z 220V~ / 32A 2 x 220V~ / 16A...
  • Seite 211 KEN001AKC 21.08.2017 • v09 [Nederlands] Dit apparaat wordt in overeenstemming met de Europese richtlijn 2002/96/EC voor afgedankte elektrische en elektronische apparatuur (Waste Electrical and Electronic Equipment, WEEE) gekenmerkt. Terwijl u ervoor zorgt dat dit apparaat juist wordt weggegooid, draagt u bij tot het voorkomen van het schade toebrengen aan het milieu en de menselijke gezondheid, wat kan ontstaan bij onjuiste verwijdering.

Diese Anleitung auch für:

C3zC4zC5z

Inhaltsverzeichnis