Herunterladen Inhalt Inhalt Diese Seite drucken
AKASO Brave 7 LE Handbuch
Vorschau ausblenden Andere Handbücher für Brave 7 LE:
Inhaltsverzeichnis

Werbung

Verfügbare Sprachen
  • DE

Verfügbare Sprachen

  • DEUTSCH, seite 26
USER MANUAL
AKASO Brave 7 LE Action Camera
v1.2

Werbung

Inhaltsverzeichnis
loading

Inhaltszusammenfassung für AKASO Brave 7 LE

  • Seite 1 USER MANUAL AKASO Brave 7 LE Action Camera v1.2...
  • Seite 2 01 - 23 25 - 46 47 - 69 70 - 92 93 - 115 116 - 138 日本語...
  • Seite 3: Inhaltsverzeichnis

    CONTENTS What's in the Box Your Brave 7 LE Getting Started Overview of Modes Customizing Your Brave 7 LE Conncting to the App Playing Back Your Content Deleting Your Content Offloading Your Content Maintenance Your Camera Maximizing Battery Life Battery Storage and Handling...
  • Seite 4: What's In The Box

    Housing Pole Mount Mount 2 Mount 3 Mount 4 Mount 5 Mount 6 Mount 7 Mount 8 Charger Helmet Mounts USB Cable Battery Remote Quick Start Guide AKASO Brave 7 LE Action Camera Tethers Lens Cloth Bandages Quick Start Guide...
  • Seite 5: Your Brave 7 Le

    YOUR BRAVE 7 LE 14 5...
  • Seite 6 Shutter/Select Button Touch Screen Mode/Exit Button Charging Indicator Front Screen Working Indicator Speaker Power Button Micro HDMI Port Tripod Hole Micro USB Port Battery Door Lens MicroSD Slot Note: Camera does not record sound when it is in the waterproof case.
  • Seite 7 01:19:42 Normal 4K30 Mode Battery Status Recording Time/Photos Remaining Audio Recording Playback Zoom Level Current Shooting Mode Settings Swipe your finger from the button to the top on the screen, you can quickly adjust the resolution, quality and EIS settings on the shortcut menu. Swipe your finger across the screen to scroll through the options.
  • Seite 8 Swipe your finger from the top to the button on the screen, you can quickly turn off your screen or power off your camera on the shortcut menu. To turn on your screen again, press the Shutter button or tap the screen then swipe your finger from left to right on the screen.
  • Seite 9: Getting Started

    GETTING STARTED Welcome to your AKASO Brave 7 LE. To capture videos and photos, you need a microSD card to start recording (sold separately). MICROSD CARDS Please use brand name memory cards that meet these requirements: • microSD, microSDHC or microSDXC •...
  • Seite 10: Overview Of Modes

    OVERVIEW OF MODES There are 5 modes: Video, Photo, Playback, Video Setup and Photo Setup. VIDEO MODE Video Mode is the default mode when you turn on the camera. In Video Mode, press Shutter button, the camera starts recording video. Press Shutter button again to stop recording video.
  • Seite 11: Customizing Your Brave 7 Le

    CUSTOMIZING YOUR BRAVE 7 LE Video Shortcut Menu 1. Normal Video Default setting is Normal Video. 2. Loop Record: 1 Min/3 Min/5 Min Default setting is 1 Min. Loop recording allows your camera to overwrite old files with new files. Once the memory card becomes full, the camera will delete the first video file to make room...
  • Seite 12: Video Setup

    Photo Shortcut Menu 1. Single Photo Default setting is Single Photo. 2. Burst Photo: 3 shots/7 shots/15 shots/30 shots Default setting is 3 shots. In burst mode, several photographs are captured in quick succession, so it is perfect for capturing fast-moving activities. 3.
  • Seite 13 2. Video Record: Off/On Default setting is On. 3. Image Stabilization: Off/On Default setting is Off. This setting adjusts the footage to offset for motion during capture. The result is smoother footage, especially in activities with relatively small but fast motion including cycling, motorcycling, and handheld uses.
  • Seite 14: Photo Setup

    7. EV: -2.0/-1.0/0.0/+1.0/+2.0 Default setting is 0. By default, your camera uses the entire image to determine the appropriate exposure level. However, exposure lets you select an area that you want the camera to prioritize when determining exposure. This setting is particularly useful in shots where an important region might otherwise be over or underexposed.
  • Seite 15: Camera Settings

    4. EV: -2.0/-1.0/0.0/+1.0/+2.0 Default setting is 0. By default, your camera uses the entire image to determine the appropriate exposure level. However, exposure lets you select an area that you want the camera to prioritize when determining exposure. This setting is particularly useful in shots where an important region might otherwise be over-or underexposed.
  • Seite 16 4. Effect: Normal/BW/Natural/Negative/Warm/Brightness Contrast Default setting is Normal. 5. Distortion Calibration: Off/On Default setting is Off. Turn on Distortion Calibration, it can correct the image distortion. 6. Driving Mode: Off/On Default setting is Off. If you turn on Driving Mode and connect camera with car cigarette lighter, the camera will turn on automatically if you start your car and will turn off...
  • Seite 17 12. Date&Time: MM/DD/YY 13. Language: English/ Deutsch/ Français/ Italiano/Español/Português/日本語 Default setting is English. 14. Format Card: Yes/No Default setting is No. To keep your microSD card in good condition, reformat it on a regular basis. Reformatting erases all of your content, so be sure to offload your photos and videos first.
  • Seite 18: Conncting To The App

    2. Connect the Wifi “Brave 7 LE” and enter the password on your smartphone WLAN setting. 3. Open AKASO GO App, tap “+” icon on the upper right corner. Add “Brave 7 LE” and click the “Live Preview”. 4. Your camera will be connected with the AKASO GO App.
  • Seite 19: Playing Back Your Content

    files to a computer. Transferring also frees up space on your microSD card for new content. Viewing Files on Your Brave 7 LE Turn on the camera, tap the Playback button on the left side of the screen to enter the Playback Mode.
  • Seite 20: Deleting Your Content

    5. To exit Playback mode, tap Cancel and Return button. Deleting Files on AKASO App 1. Open the AKASO GO App. Connect the camera with the App. 2. Tap Playback icon to see all the videos and photos. 3. Select the photo or video you want to delete and then tap the More icon at the right upper corner, and choose Delete.
  • Seite 21: Maintenance Your Camera

    MAINTAINING YOUR CAMERA Please follow these guidelines to get the best performance from your camera: 1. For best audio performance, shake the camera or blow on the mic to remove debris from the microphone holes. 2. To clean the lens, wipe it with a soft, lint-free cloth. Do not insert foreign objects around the lens.
  • Seite 22: Remote

    • Do not make any unauthorized alterations to the camera. Doing so may compromise safety, regulatory compliance, performance, and may void the warranty. WARNING: Do not drop, disassemble, open, crush, bend, deform, puncture, shred, microwave, incinerate or paint the camera or battery. Do not insert foreign objects into the battery opening on the camera.
  • Seite 23: Mounting Your Camera

    PHOTO To capture a photo, verify the camera in Photo mode. To take a photo: Press the Photo Button. The camera will emit a camera shutter sound. MOUNTING YOUR CAMERA Attach your camera to helmets, gear and equipment. Open Close Push Note: Push and make sure that there is no gap between the waterproof strips of the waterproof case.
  • Seite 25: Contact Us

    CONTACT US For any inquiries with AKASO products, please feel free to contact us, we will respond within 24 hours. E-mail: cs@akasotech.com Tel: (888) 466-9222 (US) Mon-Fri (except holiday) 9am-5pm (EST) Official website: www.akasotech.com...
  • Seite 26 INHALT Was ist in der Box Dein Brave 7 LE Loslegen Übersicht Über die Modi Anpassen Ihres Brave 7 LE Verbindung Mit der App Spielen sie Ihren Inhalt Zurück Löschen Ihres Inhalts Entladen Ihres Inhalts Wartung Ihrer Kamera Batterie-leben Maximieren...
  • Seite 27: Was Ist In Der Box

    Brave 7 LE Befestigung 1 Gehäuse montieren Befestigung 2 Befestigung 3 Befestigung 4 Befestigung 5 Befestigung 6 Befestigung 7 Befestigung 8 Ladegerät Helm Anschlüsse USB Kabel Batterie Fernbedienung Quick Start Guide AKASO Brave 7 LE Action Camera Bandagen Kabel Linsentuch Kurzanleitung...
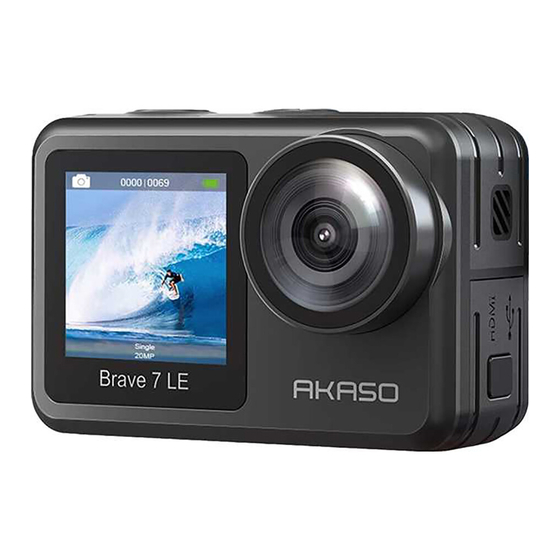
  • Seite 28: Dein Brave 7 Le

    DEIN BRAVE 7 LE 14 5...
  • Seite 29 Shutter/Select Button Touchscreen Modus/Exit-Taste Ladeanzeige Frontscheibe Arbeitsindikator Lautsprecher Ein-/Ausschalter Micro-HDMI-Anschluss Stativloch Micro-USB-Anschluss Batterietür Linse MicroSD-Steckplatz Hinweis: Die Kamera nimmt keinen Ton auf, wenn sie sich im wasserdichten Gehäuse befindet.
  • Seite 30 01:19:42 Normal 4K30 Modus Batteriestatus Aufnahmezeit/verbleibende Fotos Audio Aufnahme Wiedergabe Zoomstufe Aktueller Aufnahmemodus Einstellungen Wischen Sie mit dem Finger von der Schaltfläche nach oben auf dem Bildschirm. Sie können die Einstellungen für Auflösung, Qualität und EIS im Kontextmenü schnell anpassen. Wischen Sie mit dem Finger über den Bildschirm, um durch die Optionen zu scrollen.
  • Seite 31 Wischen Sie mit dem Finger von oben über die Schaltfläche auf dem Bildschirm. Sie können den Bildschirm schnell ausschalten oder die Kamera im Kontextmenü ausschalten. Um Ihren Bildschirm wieder einzuschalten, drücken Sie den Auslöser oder tippen Sie auf den Bildschirm. Streichen Sie dann mit dem Finger über den Bildschirm von links nach rechts.
  • Seite 32: Loslegen

    LOSLEGEN Willkommen in Ihrem AKASO Brave 7 LE. Zum Aufnehmen von Videos und Fotos benötigen Sie eine microSD-Karte, um die Aufnahme zu starten (separat erhältlich). MICROSD-KARTEN Bitte verwenden Sie Markenspeicherkarten, die diese Anforderungen erfüllen: • microSD, microSDHC oder microSDXC • Class 10 oder UHS-I rating •...
  • Seite 33: Übersicht Über Die Modi

    ÜBERSICHT ÜBER DIE MODI Es gibt 5 Modi: Video, Foto, Wiedergabe, Video-Setup und Foto-Setup. VIDEO MODUS Der Videomodus ist der Standardmodus, wenn Sie die Kamera einschalten. Drücken Sie im Videomodus den Auslöser. Die Kamera beginnt mit der Videoaufnahme. Drücken Sie den Auslöser erneut, um die Videoaufnahme zu beenden.
  • Seite 34: Anpassen Ihres Brave 7 Le

    ANPASSEN IHRES BRAVE 7 LE Video-Kontextmenü 1. Normal Video Die Standardeinstellung ist Normales Video. 2. Loop Record: 1 Min/3 Min/5 Min Die Standardeinstellung ist 1 Min. Mit der Loop-Aufnahme kann Ihre Kamera alte Dateien mit neuen Dateien überschreiben. Sobald die Speicherkarte voll ist, löscht die Kamera die erste Videodatei, um Platz für die neueste Datei zu schaffen.
  • Seite 35 Foto-Kontextmenü 1. Einzelfoto Die Standardeinstellung ist Einzelfoto. 2. Burst Foto: 3 Aufnahmen/7 Aufnahmen/15 Aufnahmen/30 Aufnahmen Die Standardeinstellung ist 3 Aufnahmen. Im Burst-Modus werden mehrere Fotos schnell hintereinander aufgenommen, sodass Sie sich schnell bewegen können. 3. Zeitraffer Zeitraffer: 3 Sek./5 Sek./10 Sek./30 Sek./1 Min Zeitraffer Dauer: Unbegrenzt/5 Min/10 Min/15 Min/20 Min/30 Min/60 Min Die Standardeinstellung ist 3 Sek.
  • Seite 36 2. Videoaufzeichnung: Aus/Ein Die Standardeinstellung ist Ein. 3. Bildstabilisierung: Aus/Ein Die Standardeinstellung ist Aus. Mit dieser Einstellung wird das Filmmaterial so angepasst, dass es während der Aufnahme für die Bewegung versetzt wird. Das Ergebnis ist ein flüssigeres Filmmaterial, insbesondere bei Aktivitäten mit relativ kleinen, aber schnellen Bewegungen, einschließlich Radfahren, Motorradfahren und Handheld-Anwendungen.
  • Seite 37 Diese Einstellung ist besonders nützlich bei Aufnahmen, bei denen ein wichtiger Bereich ansonsten über-oder unterbelichtet sein könnte. 8. Messung: Center/Multi Die Standardeinstellung ist Multi. Der Messmodus bezieht sich auf die Art und Weise, wie eine Kamera die Belichtung bestimmt. 9. Datenstempel: Aus/Datum/Datum & Uhrzeit Die Standardeinstellung ist Datum &...
  • Seite 38: Kameraeinstellungen

    5. Messung: Center/Multi Die Standardeinstellung ist Multi. Der Messmodus bezieht sich auf die Art und Weise, wie eine Kamera die Belichtung bestimmt. 6. Datenstempel: Aus/Datum/Datum & Uhrzeit Die Standardeinstellung ist Datum & Uhrzeit. Aktivieren Sie den Datumsstempel. Diese Kamera fügt den von Ihnen aufgenommenen Videos und Fotos einen Datumsstempel hinzu.
  • Seite 39 6. Fahrmodus: Aus/Ein Die Standardeinstellung ist Aus. Wenn Sie den Fahrmodus einschalten und die Kamera mit dem Zigarettenanzünder des Autos verbinden, schaltet sich die Kamera automatisch ein, wenn Sie Ihr Auto starten, und aus, wenn Sie Ihr Auto anhalten. 7. Umgedreht: Aus/Ein Die Standardeinstellung ist Aus.
  • Seite 40 14. Formatkarte: Ja/Nein Die Standardeinstellung ist Nein. Formatieren Sie Ihre microSD-Karte regelmäßig neu, um sie in gutem Zustand zu halten. Durch die Neuformatierung werden alle Ihre Inhalte gelöscht. Laden Sie daher zuerst Ihre Fotos und Videos aus. 15. System: Werksreset/Systeminfo/Karteninfo In diesem Menü...
  • Seite 41: Verbindung Mit Der App

    Der WLAN-Name und das Kennwort werden auf dem Kamerabildschirm angezeigt. 2. Verbinden Sie das WLAN „Brave 7 LE“ und geben Sie das Passwort in die WLAN-Einstellung Ihres Smartphones ein. 3. Öffnen Sie die AKASO GO App und tippen Sie oben rechts auf das Symbol „+“.
  • Seite 42: Spielen Sie Ihren Inhalt Zurück

    Sie diese Dateien zuerst auf einen Computer übertragen. Durch das Übertragen wird auch Speicherplatz auf Ihrer microSD-Karte für neue Inhalte frei. Anzeigen von Dateien auf Ihrem Brave 7 LE Schalten Sie die Kamera ein und tippen Sie auf die Wiedergabetaste auf der linken Seite des Bildschirms, um die einzugeben Wiedergabemodus.
  • Seite 43: Löschen Ihres Inhalts

    5. Um den Wiedergabemodus zu verlassen, tippen Sie auf Abbrechen und Zurück. Dateien in der AKASO App löschen 1. Öffnen Sie die AKASO GO App. Verbinden Sie die Kamera mit der App. 2. Tippen Sie auf das Wiedergabesymbol, um alle Videos und Fotos anzuzeigen.
  • Seite 44: Wartung Ihrer Kamera

    WARTUNG IHRER KAMERA Befolgen Sie diese Richtlinien, um die beste Leistung Ihrer Kamera zu erzielen: 1. Für eine optimale Audioleistung schütteln Sie die Kamera oder blasen Sie auf das Mikrofon, um Schmutz von den Mikrofonlöchern zu entfernen. 2. Um die Linse zu reinigen, wischen Sie sie mit einem weichen, fusselfreien Tuch ab. Führen Sie keine Fremdkörper um das Objektiv ein.
  • Seite 45: Fernbedienunge

    • Nehmen Sie keine unbefugten Änderungen an der Kamera vor. Dies kann die Sicherheit, die Einhaltung gesetzlicher Vorschriften und die Leistung beeinträchtigen und zum Erlöschen der Garantie führen. WARNUNG: Lassen Sie die Kamera oder den Akku nicht fallen, zerlegen, öffnen, zerdrücken, biegen, verformen, durchstechen, zerkleinern, mikrowellen, verbrennen oder lackieren Sie sie nicht.
  • Seite 46: Montage Ihrer Kamera

    FOTO Überprüfen Sie die Kamera im Fotomodus, um ein Foto aufzunehmen. Ein Foto machen: Drücken Sie die Fototaste. Die Kamera gibt einen Kameraverschlusston aus. MONTAGE IHRER KAMERA Befestigen Sie Ihre Kamera an Helmen, Ausrüstung und Ausrüstung. Öffnen Schließen Drücken Hinweis: Drücken Sie und stellen Sie sicher, dass zwischen den wasserdichten Streifen des wasserdichten Gehäuses kein Spalt vorhanden ist.
  • Seite 48: Kontaktiere Uns

    KONTAKTIERE UNS Bei Fragen zu AKASO-Produkten können Sie sich gerne an uns wenden. Wir werden uns innerhalb von 24 Stunden bei Ihnen melden. E-Mail: cs@akasotech.com Offizielle Website: www.akasotech.com...
  • Seite 49 CONTENIDO Qué hay en la caja Su Brave 7 LE Cómo Comenzar Resumen de Modos Personalizar Su Brave 7 LE Conectando a la APP Reproducir Su Contenido Eliminar Su Contenido Descargar Su Contenido Mantener Su Cámara Maximizar la Vida Útil de Batería Almacenamiento y Manipulación de Batería...
  • Seite 50: Qué Hay En La Caja

    Monte 2 Monte 3 Monte 4 Monte 5 Monte 7 Monte 6 Monte 8 Cargador Monturas de casco USB Cable Batería Remoto Quick Start Guide AKASO Brave 7 LE Action Camera Vendajes Ataduras Paño de lente Guía de inicio rápido...
  • Seite 51: Su Brave 7 Le

    SU BRAVE 7 LE 14 5...
  • Seite 52 Botón de Obturador/Selección Pantalla Táctil Botón de modo/salida Indicador de carga Pantalla frontal Indicador de trabajo Altavoz Botón de encendido Puerto micro HDMI Agujero del trípode Puerto micro USB Tapa de la batería Lentes Ranura MicroSD Nota: La cámara no graba sonido cuando está en la funda impermeable.
  • Seite 53 01:19:42 Normal 4K30 Modo Estado de la batería Tiempo de grabación/fotos restantes Grabación de audio Reproducción Nivel de zoom Modo de disparo actual Configuraciones Pase el dedo desde el botón hacia la parte superior de la pantalla, puede ajustar rápidamente la resolución, la calidad y la configuración de EIS en el menú contextual. Pase el dedo por la pantalla para desplazarse por las opciones.
  • Seite 54 Deslice el dedo desde la parte superior hacia el botón en la pantalla, puede apagar rápidamente la pantalla o apagar la cámara en el menú contextual. Para volver a encender la pantalla, presione el botón Obturador o toque la pantalla y luego deslice el dedo de izquierda a derecha en la pantalla.
  • Seite 55: Cómo Comenzar

    CÓMO COMENZAR Bienvenido a su AKASO Brave 7 LE. Para capturar video y fotos, necesita una tarjeta de microSD (vendida por separado). TARJETA MICROSD Use tarjetas de memoria de marca que cumplan con estos requisitos: • microSD, microSDHC or microSDXC •...
  • Seite 56: Resumen De Modos

    RESUMEN DE MODOS Hay 5 modes: Vídeo, Foto, Reproducción, Configuración de video y configuración de fotos. MODO DE VÍDEO Modo de video es el modo predeterminado cuando enciende la cámara. En el modo de video, presione el botón del obturador, la cámara comienza a grabar video.
  • Seite 57: Personalizar Su Brave 7 Le

    PERSONALIZAR SU BRAVE 7 LE Menú de acceso directo a vídeo 1. Vídeo Normal La configuración predeterminada es Vídeo Normal. 2. Grabación en bucle: 1 Min/3 Min/5 Min Default setting is 1 Min. La configuración predeterminada es 1 Min. La grabación en bucle permite que su cámara sobrescriba archivos antiguos con archivos nuevos.
  • Seite 58: Configuración De Vídeo

    Menú de acceso directo a fotos 1. Foto individual La configuración predeterminada es Foto individual. 2. Foto en ráfaga: 3 disparos/7 disparos/15 disparos/30 disparos La configuración predeterminada es 3 disparos. En modo ráfaga, se capturan varias fotos en rápida sucesión, por lo que es perfecto para capturar actividades de movimiento rápido.
  • Seite 59 3. Estabilización de imagen: Apagado/Encendido La configuración predeterminada es Apagado. Esta configuración ajusta el metraje para compensar el movimiento durante la captura. El resultado es un metraje más suave, especialmente en actividades con movimiento relativamente pequeño pero rápido, como ciclismo, motociclismo y usos manuales.
  • Seite 60 9. Sello de fecha: Apagado/Fecha/Fecha&Hora La configuración predeterminada es Fecha&Hora. Active el Sello de fecha, esta cámara agrega el sello de fecha a los videos y fotos que toma. CONFIGURACIÓN DE FOTO 1. Resolución de fot: 20MP/16MP/14MP/10MP/8MP/5MP/2MP La configuración predeterminada es 20MP. 2.
  • Seite 61 6. Sello de fecha: Apagado/Fecha/Fecha&Hora La configuración predeterminada es Fecha&Hora. Active el Sello de fecha, esta cámara agrega el sello de fecha a los videos y fotos que toma. CONFIGURACIÓN DE CÁMARA 1. Sonidos: Obturador/Arrancar/Bip/Volumen Puede activar o desactivar estos efectos de sonido y ajustar el volumen de la cámara en esta configuración.
  • Seite 62 6. Modo de conducción: Apagado/Encendid La configuración predeterminada es Apagado. Si activa el modo de conducción y conecta la cámara con el encendedor del automóvil, la cámara se encenderá automáticamente si enciende su automóvil y se apagará si lo detiene. 7.
  • Seite 63 14. Formatear tarjeta: SÍ/NO La configuración predeterminada es NO. Para mantener su tarjeta microSD en buenas condiciones, vuelva a formatearla regularmente. Reformatear borra todo su contenido, así que asegúrese de descargar primero sus fotos y videos. 15. Sistema: Restablecimiento de fábrica/Información del sistema/ Información de tarjeta Puede consultar la información del sistema de su cámara en este menú.
  • Seite 64: Conectando A La App

    1. Encienda la cámara, presione el botón de encendido para encender el Wifi. El nombre y la contraseña de Wifi se muestran en la pantalla de la cámara. 2. Conecte el Wifi "Brave 7 LE" e ingrese la contraseña en la configuración WLAN de su Smartphone.
  • Seite 65: Reproducir Su Contenido

    La transferencia también libera espacio en su tarjeta microSD para contenido nuevo. Ver archivos en su Brave 7 LE Encienda la cámara, toque el botón de Reproducción en el lado izquierdo de la pantalla para ingresar al Modo de reproducción.
  • Seite 66: Eliminar Su Contenido

    1. Si no puede descargar videos o fotos a iPhone o iPad, ingrese Configuración → Privacidad → Fotos, busque "AKASO GO" y seleccione "Leer y Escribir". 2. iPhone y iPad no le permiten descargar videos 4K o 2.7K a través de la APP,...
  • Seite 67: Mantener Su Cámara

    MANTENER SU CÁMARA Siga estas reglas para obtener el mejor rendimiento de su cámara: 1. Para obtener el mejor rendimiento de audio, agite la cámara o sople el micrófono para eliminar la suciedad de los orificios del micrófono. 2. Para limpiar la lente, límpiela con un paño suave y sin pelusa. No inserte objetos extraños alrededor de la lente.
  • Seite 68: Control Remoto

    • No realice modificaciones no autorizadas a la cámara. Hacerlo puede comprometer la seguridad, el cumplimiento normativo, el rendimiento y anular la garantía. ADVERTENCIA: No deje caer, desmonte, abra, aplaste, doble, deforme, perfore, triture, cocine en microondas, incinere o pinte la cámara o la batería. No inserte objetos extraños en la abertura de la batería de la cámara.
  • Seite 69: Montaje Su Cámara

    FOTO Para capturar una foto, verifique la cámara en modo Foto. Tomar una foto: Presione el botón de foto. La cámara emitirá un sonido de obturador de cámara. MONTAJE SU CÁMARA Sujete su cámara a cascos, equipos y equipo. Abierto Cerca Empuje Nota: Empuje y asegúrese de que no haya espacio entre las tiras impermeables de...
  • Seite 71: Contáctenos

    CONTÁCTENOS Para cualquier consulta con los productos AKASO, sin duda en contactarnos, le responderemos dentro de las 24 horas. E-mail: cs@akasotech.com Sitio web oficial: www.akasotech.com...
  • Seite 72 CONTENU Qu'y a-t-il dans la boîte? Votre Brave 7 LE Commencez Vue D'ensemble des Modes Personnalisation de votre Brave 7 LE Connectez à l'application Lecture de votre contenu Suppression de votre contenu Déchargement de votre contenu Entretenir votre caméra Maximiser la durée de vie de la batterie Stockage et manipulation de la batterie Télécommande...
  • Seite 73: Qu'y A-T-Il Dans La Boîte

    Montage 2 Montage 3 Montage 4 Montage 5 Montage 6 Montage 7 Montage 8 Chargeur Support de casque Cable USB Batterie Télécommande Quick Start Guide AKASO Brave 7 LE Action Camera Guide de Attaches Tissu de lentille Bandages Démarrage Rapide...
  • Seite 74: Votre Brave 7 Le

    VOTRE BRAVE 7 LE 14 5...
  • Seite 75 Bouton de Obturateur/Sélection Écran Tactile Bouton Mode/Sortie Indicateur de Charge Écran Avant Indicateur de Travail Orateur Bouton d'Alimentation Port Micro HDMI Trou de Trépied Port Micro USB Porte de Batterie Lentille Emplacement MicroSD Remarque: La caméra sport n'enregistre pas de son lorsqu'elle se trouve dans le boîtier étanche.
  • Seite 76 01:19:42 Normal 4K30 Mode Battery Status Recording Time/Photos Remaining Audio Recording Playback Zoom Level Current Shooting Mode Settings Swipe your finger from the button to the top on the screen, you can quickly adjust the resolution, quality and EIS settings on the shortcut menu. Swipe your finger across the screen to scroll through the options.
  • Seite 77 Faites glisser votre doigt du haut vers le bouton sur l'écran, vous pouvez rapidement éteindre votre écran ou éteindre votre caméra sport dans le menu contextuel. Pour réactiver votre écran, appuyez sur le déclencheur ou appuyez sur l'écran, puis faites glisser votre doigt de gauche à...
  • Seite 78: Commencez

    COMMENCEZ Bienvenue sur votre AKASO Brave 7 LE. Pour prendre des vidéos et des photos, vous avez besoin d'une carte microSD pour commencer l'enregistrement (vendu séparément). CARTES MICROSD Veuillez utiliser des cartes mémoire de marque répondant à ces exigences: • microSD, microSDHC ou microSDXC •...
  • Seite 79: Vue D'ensemble Des Modes

    VUE D'ENSEMBLE DES MODES Il y a 5 modes: Vidéo, photo, lecture, paramètre vidéo et paramètres photo. MODE VIDÉO Le mode vidéo est le mode par défaut lorsque vous allumez la caméra de sport. En mode vidéo, appuyez sur l'obturateur, la caméra de sport commence l'enregistrement vidéo.
  • Seite 80: Personnalisation De Votre Brave 7 Le

    PERSONNALISATION DE VOTRE BRAVE 7 LE Menu de Raccourcis Vidéo 1. Vidéo Normale Le réglage par défaut est Vidéo normale. 2. Enregistrement en boucle: 1 Min/3 Min/5 Min Le réglage par défaut est 1 min. L'enregistrement en boucle permet à votre caméra de sport de remplacer les anciens fichiers par de nouveaux fichiers.
  • Seite 81 Menu de Raccourcis Photo 1. Photo Unique Le réglage par défaut est Photo Unique. 2. Photo en Rafale: 3 plans/7 plans/15 plans/30 plans Le réglage par défaut est 3 plans. En mode rafale, plusieurs photos sont capturées en succession rapide, ce qui est parfait pour capturer des activités rapides.
  • Seite 82 2. Enregistrement vidéo: Ouvert/Fermer Le réglage par défaut est Ouvert. 3. Stabilisation d'Image: Ouvert/Fermer Le réglage par défaut est Fermer. Ce paramètre ajuste le métrage pour compenser le mouvement pendant la capture. Le résultat est des images plus fluides, en particulier dans les activités avec des mouvements relativement petits mais rapides, y compris le cyclisme, la moto et les utilisations portables.
  • Seite 83 8. Mesure: Center/Multi Le réglage par défaut est Multi. Le mode de mesure fait référence à la manière dont un appareil photo détermine l'exposition. 9. Cachet Date: Fermer/Date/Date & Heure Le réglage par défaut est Fermer. Activez le tampon de cachet Date, cette caméra ajoute la date et l'heure à la vidéo ou aux photos que vous prenez.
  • Seite 84: Paramètres De La Caméra

    5. Metering: Center/Multi Le réglage par défaut est Multi. Le mode de mesure fait référence à la manière dont un appareil photo détermine l'exposition. 6. Cachet Date: Fermer/Date/Date & Heure Le réglage par défaut est Fermer. Activez le tampon de cachet Date, cette caméra ajoute la date et l'heure à la vidéo ou aux photos que vous prenez.
  • Seite 85 6. Mode de Voiture: Ouvert/Fermer Le réglage par défaut est Fermer . Si vous activez le mode de voiture et connectez la caméra à l'allume-cigare de la voiture, la caméra s'allumera automatiquement si vous démarrez votre voiture et s'éteindra si vous arrêtez votre voiture. 7.
  • Seite 86 13. Langue: English/ Deutsch/ Français/ Italiano/Español/Português/日本語 Le réglage par défaut est English. 14. Formater Carte: Oui/Non Le réglage par défaut est Non. Pour garder votre carte microSD en bon état, reformatez-la régulièrement. Le reformatage efface tout votre contenu, alors assurez-vous de sauvegarder d'abord vos photos et vidéos.
  • Seite 87: Connectez À L'application

    1. Allumez la caméra, appuyez sur le bouton d'alimentation pour activer le Wifi. Le nom et le mot de passe Wifi s'affichent sur l'écran de la caméra. 2. Connectez le Wifi «Brave 7 LE» et entrez le mot de passe sur le réglage WLAN de votre smartphone.
  • Seite 88: Lecture De Votre Contenu

    fichiers sur un ordinateur. Le transfert libère également de l'espace sur votre carte microSD pour le nouveau contenu. Affichage des Fichiers sur Votre Brave 7 LE Allumez la caméra, appuyez sur le bouton Lecture sur le côté gauche de l'écran pour entrer en mode lecture.
  • Seite 89: Suppression De Votre Contenu

    fichiers sélectionnés à l'aide de l'explorateur de fichiers. Transférez de Votre Contenu sur un Smartphone 1. Ouvrez l'application AKASO GO. Connectez la camera avec l'application. 2. Appuyez sur l'icône de lecture pour voir toutes les vidéos et photos.
  • Seite 90: Entretenir Votre Caméra

    ENTRETENIR VOTRE CAMÉRA Veuillez suivre ces directives pour obtenir les meilleures performances de votre caméra: 1. Pour de meilleures performances audio, secouez la caméra ou soufflez sur le micro pour retirer les débris des trous du microphone. 2. Pour nettoyer l'objectif, essuyez-le avec un chiffon doux non pelucheux. N'insérez pas d'objets étrangers autour de l'objectif.
  • Seite 91: Télécommande

    • Ne stockez pas votre batterie avec des objets métalliques, tels que des pièces de monnaie, des clés ou des colliers. Si les bornes de la batterie entrent en contact avec des objets métalliques, cela peut provoquer un incendie. • N'apportez aucune modification non autorisée à la caméra. Cela pourrait compromettre la sécurité, la conformité...
  • Seite 92: Montage De Votre Caméra

    Pour Arrêter l'Enregistrement: Appuyez à nouveau sur le bouton vidéo. La caméra émet un bip et la lumière de la caméra cesse de clignoter pendant l'enregistrement. PHOTO Pour capturer une photo, vérifiez la caméra en mode photo. Prendre une Photo: Appuyez sur le bouton photo.
  • Seite 94: Contactez-Nous

    CONTACTEZ-NOUS Pour toute demande concernant les produits AKASO, n'hésitez pas à nous contacter, nous vous répondrons dans les 24 heures. E-mail: cs@akasotech.com Site Officiel: www.akasotech.com...
  • Seite 95 CONTENUTI Cosa C'è Nella Scatola La Tua Brave 7 LE Iniziare Panoramica Della Modalità Personalizzazione Brave 7 LE Connessione All'app Riprodurre Il Contenuto Eliminazione Dei Contenuti Scaricare i Tuoi Contenuti Manutenzione Della Fotocamera Massimizzare la Durata Della Batteria Conservazione e Gestione Della Batteria...
  • Seite 96: Cosa C'è Nella Scatola

    Supporto fisso 3 Supporto fisso 4 Supporto fisso 5 Supporto fisso 6 Supporto fisso 7 Supporto fisso 8 Caricabatterie Casco Supporto fisso USB Cavo Batteria Telecomando Quick Start Guide AKASO Brave 7 LE Action Camera Pastoie Panno per lenti Bende Guida Rapida...
  • Seite 97: La Tua Brave 7 Le

    LA TUA BRAVE 7 LE 14 5...
  • Seite 98 Pulsante di scatto/Selezione Touch Screen Modalità/Pulsante Esci Indicatore di carica Schermo frontale Indicatore di lavoro Altoparlanti Pulsante di accensione Porta micro HDMI Foro per treppiede Porta micro USB Sportello batteria Lente Slot MicroSD Nota: La fotocamera non registra l'audio quando è nella custodia impermeabile.
  • Seite 99 01:19:42 Normal 4K30 Modalità Stato della batteria Tempo di registrazione/foto rimanenti Registrazione audio Riproduzione Livello di zoom Modalità di scatto attuale Impostazioni Scorri il dito dal pulsante verso l'alto sullo schermo, puoi regolare rapidamente la risoluzione, la qualità e le impostazioni EIS nel menu di scelta rapida. Fai scorrere il dito sullo schermo per scorrere tra le opzioni.
  • Seite 100 Scorri il dito dall'alto verso il pulsante sullo schermo, puoi spegnere rapidamente lo schermo o spegnere la fotocamera dal menu di scelta rapida. Per riaccendere lo schermo, premi il pulsante Otturatore o tocca lo schermo, quindi fai scorrere il dito da sinistra a destra sullo schermo.
  • Seite 101: Iniziare

    INIZIARE Benvenuti nel vostro AKASO Brave 7 LE. Per catturare video e foto, è necessaria una scheda microSD per avviare la registrazione (venduta separatamente). CARTE MICROSD Utilizzare schede di memoria di marca che soddisfino questi requisiti: • microSD, microSDHC or microSDXC •...
  • Seite 102: Panoramica Della Modalità

    PANORAMICA DELLA MODALITÀ Sono disponibili 5 modalità: Video, foto, Playback, Impostazione del video e Impostazione del foto. Modalità video La modalità video è la modalità predefinita all'accensione della fotocamera. In modalità video, premere il pulsante dell'otturatore, la fotocamera inizia a registrare video.
  • Seite 103: Personalizzazione Brave 7 Le

    PERSONALIZZAZIONE BRAVE 7 LE Menu di scelta rapida video 1. Video Normale L'impostazione predefinita è Video normale. 2. Registrazione del ciclo: 1 Min/3 Min/5 Min L'impostazione predefinita è 1 Min. Registrazione del ciclo consente alla fotocamera di sovrascrivere i vecchi file con nuovi file.
  • Seite 104: Impostazione Video

    Menu di scelta rapida foto 1. Foto singola L'impostazione predefinita è Foto singola. 2. Burst Foto: 3 shots/7 shots/15 shots/30 shots L'impostazione predefinita è 3 colpi. In modalità di scatto continuo, diverse fotografie vengono catturate in rapida successione, quindi è perfetta per catturare attività in rapido movimento. 3.
  • Seite 105 3. Stabilizzazione dell'immagine: Off/On L'impostazione predefinita è Off. Questa impostazione regola il metraggio per compensare il movimento durante l'acquisizione. Il risultato è un filmato più fluido, in particolare nelle attività con movimento relativamente piccolo ma veloce, tra cui ciclismo, motociclismo e uso portatile.
  • Seite 106 8. Misurazione: Centro/Multi L'impostazione predefinita è Multi. La modalità di misurazione si riferisce al modo in cui una fotocamera determina l'esposizione. 9. Timbro data: Off/Data/Data&Ora L'impostazione predefinita è Data&Ora. Attiva il timbro data, la fotocamera aggiunge il timbro data ai video e alle foto che scatti.
  • Seite 107 5. Misurazione: Centro/Multi L'impostazione predefinita è Multi. La modalità di misurazione si riferisce al modo in cui una fotocamera determina l'esposizione. 6. Timbro data: Off/Data/Data&Ora L'impostazione predefinita è Data&Ora. Attiva il timbro data, la fotocamera aggiunge il timbro data ai video e alle foto che scatti.
  • Seite 108 6. Modalità di guida: Off/On L'impostazione predefinita è Off. Se si attiva la modalità di guida e si collega la fotocamera con l'accendisigari dell'auto, la fotocamera si accenderà automaticamente se si avvia l'auto e si spegnerà se si ferma l'auto. 7.
  • Seite 109 14. Scheda formato: Sì/No L'impostazione predefinita è No. Per mantenere la scheda microSD in buone condizioni, riformattala regolarmente. La formattazione cancella tutti i tuoi contenuti, quindi assicurati prima di scaricare foto e video. 15. Sistema: Ripristino delle impostazioni di fabbrica/Informazioni di sistema/ Informazioni sulla scheda È...
  • Seite 110: Connessione All'app

    1. Accendi la fotocamera, premi il pulsante di accensione per accendere il Wifi. Il nome e la password Wifi vengono visualizzati sullo schermo della fotocamera. 2. Collegare il Wifi “Brave 7 LE” e inserire la password sull'impostazione WLAN dello smartphone.
  • Seite 111: Riprodurre Il Contenuto

    file su un computer. Il trasferimento libera anche spazio sulla scheda microSD per nuovi contenuti. Visualizzazione dei file sulla tua Brave 7 LE Accendi la fotocamera, tocca il pulsante Riproduzione sul lato sinistro dello schermo per accedere alla modalità di riproduzione.
  • Seite 112: Eliminazione Dei Contenuti

    1. Se non riesci a scaricare video o foto su iPhone o iPad, inserisci Impostazioni → Privata → Foto, trova "AKASO GO" e seleziona "Leggi e scrivi". 2. iPhone e iPad non ti consentono di scaricare video 4K o 2.7K tramite App, scarica...
  • Seite 113: Manutenzione Della Fotocamera

    MANUTENZIONE DELLA FOTOCAMERA Seguire queste linee guida per ottenere le migliori prestazioni dalla fotocamera: 1. Per prestazioni audio ottimali, agitare la fotocamera o soffiare sul microfono per rimuovere i detriti dai fori del microfono. 2. Per pulire l'obiettivo, pulirlo con un panno morbido e privo di lanugine. Non inserire oggetti estranei attorno all'obiettivo.
  • Seite 114: Telecomando

    • Non apportare modifiche non autorizzate alla fotocamera. Ciò potrebbe compromettere la sicurezza, la conformità alle normative, le prestazioni e potrebbe invalidare la garanzia. Avvertimento: Non far cadere, smontare, aprire, schiacciare, piegare, deformare, forare, distruggere, microonde, incenerire o verniciare la fotocamera o la batteria. Non inserire oggetti estranei nell'apertura della batteria sulla fotocamera.
  • Seite 115: Montare La Fotocamera

    PHOTO Per acquisire una foto, verificare la fotocamera in modalità Foto. Fare una foto: Premi il pulsante Foto. La fotocamera emetterà un suono di scatto della fotocamera. MONTARE LA FOTOCAMERA Collega la tua fotocamera a caschi, equipaggiamento e attrezzatura. Aperto Vicino Spingere Nota: Spingere e assicurarsi che non vi siano spazi tra le strisce impermeabili della...
  • Seite 117: Contattaci

    CONTATTACI Per qualsiasi domanda con i prodotti AKASO, non esitate a contattarci, risponderemo entro 24 ore. E-mail: cs@akasotech.com Sito ufficiale: www.akasotech.com...
  • Seite 118 目次 パッケージ詳細 Brave 7 LE はじめに モード一覧 Brave 7 LEのカスタマイズ アプリへの接続 コンテンツを再生する コンテンツの削除 コンテンツのオフロード カメラのメンテナンス バッテリー寿命の最大化 バッテリーの保管と取り扱い リモート カメラをマウントする お問い合わせ...
  • Seite 119 防水ケース マウント 1 Brave 7 LE ポールマウント マウント 2 マウント 3 マウント 4 マウント 5 マウント 6 マウント 7 マウント 8 充電器 ヘルメッ トマウント USBケーブル 充電器 リモート Quick Start Guide AKASO Brave 7 LE Action Camera テザー レンズクロス 固定バンド 取扱説明書...
  • Seite 120 BRAVE 7 LE 14 5...
  • Seite 121 シャッター/選択ボタン タッチスクリーン モード/終了ボタン 充電インジケーター フロントスクリーン 作業インジケーター スピーカー 電源スイッチ 三脚穴 Micro HDMIポート バッテリードア Micro USBポート レンズ MicroSDスロッ ト 注 : 防水ケースに入っている場合、 カメラは音声を記録しません。...
  • Seite 122 01:19:42 Normal 4K30 モード バッテリー ステータス 残りの録画時間/写真の枚数 録音 再生 ズームレベル 現在の撮影モード 撮影設定 指をボタンから画面の上部までスワイプして、 ショートカッ トメニューで解像度、 画質、 EIS の設定をすばやく調整できます。 指を画面でスワイプして、 オプションをスクロールしま す。 Resolution 4K30 2.7K60 Middle High Quallty...
  • Seite 123 指を画面の上部からスワイプすると、 画面をすばやくオフにすること、 またはショートカッ トメニューで電源を切ることができます。 画面を再びオンにするには、 シャッターボタンを 押し、 または指を左から右までスワイプします。 画面上の現在の撮影モード部分をタップして、 ビデオまたは写真のショートカッ トメニュ ーに入ります。 モードアイコンをタップすると、 別の撮影モードに切り替えることができま す。 Video Photo Video Photo Loop Normal Burst TimeLapse Normal TimeLapse Record Long Self-Time Wifi SlowMotion FastMotion Wifi Exposure フロントスクリーンとタッチスクリーンを切り替える モードボタンを押し続けると、 フロントスクリーンとタッチスクリーンカメラビューが切り 替わります。 ビデオ録画中には、 画面を切り替えることはできません。 注 : 以下の手順はタッチスクリーンにのみ適用され、 フロントスクリーンでは機能しませ ん。...
  • Seite 124 はじめに AKASO Brave 7 LEへようこそ。 ビデオや写真を保存するには、 別売のmicroSDカード一 枚を準備するが必要です。 MICROSDカード 次の要件を満たすブランド名のメモリカードを使用してください : • microSD, microSDHC or microSDXC • Class 10またはUHS-I定格 • 最大容量64GB (FAT32) ご注意 : 1. MicroSDカードを使用する前に、 カメラでフォーマッ トする必要があります。 また、 microSDカードの良好状態に保つために、 定期的に再フォーマッ トすることをおすす めします。 しかし、 再フォーマッ トはSDカードに保存したデータ (ビデオや写真など) を 全て削除しますので、 早目にバックアップしてください。...
  • Seite 125 モード一覧 5つのモードがあり : ビデオ、 写真、 再生、 ビデオ設定、 写真設定 ビデオモード 本体が起動すると、 ビデオモードが表示されます。 ビデオモードには、 シャッターボタンを押すと、 ビデオの録画を開始します。 もう一度シャ ッターボタンを押すと録画を停止します。 画面上のズームアイコンをタップして、 ズームレ ベルを調整できます。 ご注 : 防水ケースに入っている場合、 カメラは音声を記録しません。 写真モード カメラーを起動して、 「 モード」 ボタンを押し、 または画面でスワイプして、 写真モードに切 り替えます。 写真モードには、 シャッターボタンを押すと、 写真を撮ります。 画面上のズームアイコンを タップして、 ズームレベルを調整できます。 再生モード 画面の再生を直接タップすると、 再生モードに入ることができます。 または、 カメラーを起 動して、...
  • Seite 126 BRAVE 7 LEのカスタマイズ ビデオショートカッ トメニュー 1. 通常のビデオ 初期設定は通常のビデオです。 2. ループレコード: 1 分/3 分/5 分 初期設定は1 分です。 ループ録画とは SDカードの容量がいっぱいになった際、 自動的に古いファイルから順番 に上書きして録画する機能です。 ( 大事なデータは随時パソコンなどにバックアップをし てください。 ) 例えば、 ループ録画の設定が 「1分」 の場合、 カメラは1分の長さのビデオクリップを作成 します。 カメラがより多くのメモリを必要とすると、 1分クリップは削除されます。 3. タイムラプス タイムラプス : 1秒/ 3秒/ 5秒/ 10秒/ 30秒/ 60秒...
  • Seite 127 写真のショートカッ トメニュー 1. シングル写真 初期設定はシングル写真です。 2. 連写写真 : 3枚/7枚/15枚/30枚 初期設定は3枚です。 バーストモードでは、 複数の写真が連続してキャプチャされるため、 動きの速いアクティ ビティのキャプチャに最適です。 3. タイムラプス タイムラプス : 3秒/5秒/10秒/30秒/60秒 時間経過時間 : 無制限/5分/10分/15分/20分/30分/60分 初期設定は3秒と無制限です。 タイムラプス写真は、 指定された間隔で一連の写真をキャプチャします。 このモードを使 用してアクティビティの写真をキャプチャし、 後で最適なものを選択します。 4. セルフタイム : 遅延2秒/遅延5秒/遅延10秒 初期設定は遅延2秒です。 セルフタイムモードでは、 シャッターを押してからシャッターが切れるまでの間に遅延が 生じます。 5. 長時間露光 : 1秒/2秒/5秒/8秒/30秒/60秒 初期設定は1秒です。...
  • Seite 128 2. ビデオ録画 : オフ/オン 初期設定はオンです。 3. 画像安定化 : オフ/オン 初期設定はオフです。 カメラが内蔵している加速度計がカメラの動きを捉え、 それとビデオのコンテンツをシン クする。 映像を記録するとき、 カメラが動いたぶんを逆方向に補正します。 特にサイクリン グ、 モーターサイクリング、 ハンドヘルドなどの場合に。 ご注 : ビデオ解像度が1080P@120fps/720P@240fps/720P@120fpsの場合、 画像安定化 をアクティブにすることはできません。 4. ビデオ品質 : 高/中/低 初期設定は中です。 5. 風切り音低減 : オフ/オン 初期設定はオフです。 風ノイズ低減をオンにすると、 ノイズを許容レベルまで下げることができます。 6. 自動ローライト : オフ/オン 初期設定はオフです。...
  • Seite 129 8. メータリング : センター/マルチ 初期設定はマルチです。 測光モードは、 カメラが露出を決定する方法を指します。 9. 日付スタンプ : オフ/日付/日付と時刻 初期設定は日付と時刻です。 日付スタンプをオンにすると、 このカメラは撮影したビデオや写真に日付スタンプを追加 します。 写真の設定 1. 写真の画素 : 20MP/16MP/14MP/10MP/8MP/5MP/2MP 初期設定は20MPです。 2. 画質 : 高/中/低 初期設定は高です。 3. ISO: 自動/100/200/400/800/1600/3200 初期設定は自動です。 ISOを使用すると、 カメラの光とイメージ ノイズに対する感度の範囲を設定できます。 ISO設定は、 明るさとその結果生じるイメージ ノイズのバランスを取ります。 イメージ ノ イズとは、 画像上の粒度を意味します。 低光量時は、...
  • Seite 130 6. 日付スタンプ : オフ/日付/日付と時刻 初期設定は日付と時刻です。 日付スタンプをオンにすると、 このカメラは撮影したビデオや写真に日付スタンプを追加 します。 カメラ設定 1. サウンド : シャッター/起動/ビープ/音量 この設定では、 これらの効果音のオンとオフを切り替えたり、 カメラの音量を調整したり できます。 2. 角度 : スーパーワイド/ワイド/ミディアム/ナロー 初期設定はスーパーワイドです。 角度とは、 カメラのレンズを通してシーンの程度 (度数で測定) をキャプチャすることを指 します。 超広角はシーンの最大量をキャプチャし、 狭角は最小をキャプチャします。 3. ダイビングモード : オフ/オン 初期設定はオフです。 ダイビングモードをオンにすると、 水中シーンでの赤色光の不足を補うことができます。 ダイビングモードは、 熱帯および青い海で使用するように設計されており、 10~80フィー トでの使用に最適化されています。 4.
  • Seite 131 6. 運転モード : オフ/オン 初期設定はオフです。 運転モード中、 カメラを車のシガーライターに接続する場合、 車を起動すると、 カメラが 自動的にオンになり、 車を停止するとカメラがオフになります。 7. 逆さま : オフ/オン 初期設定はオフです。 この設定は、 ビデオまたは写真の向きを決定し、 フッテージの上下逆転を防ぎます。 8. スクリーンセーバー : オフ/1分/3分/5分 初期設定は1分です。 スクリーンセーバーはカメラを起動した後間に操作しなかった場合、 自動的にディスプレ イをオフにして、 バッテリー寿命を延長する機能があります。 ディスプレイを再開するには、 任意のボタンを押すことまたはカメラの画面をタップすれ ばいいです。 9. 自動電源オフ : オフ/1分/3分/5分 初期設定は3分です。 自動電源オフは、 時間段に非アクティブ状態が続いた場合、 カメラの電源をオフにして、 バッテリー寿命を節約するのに役立ちます。 10.
  • Seite 132 14. カードのフォーマッ ト: Yes/No 初期設定はNoです。 MicroSDカードを良い状態に保つには、 定期的に再フォーマッ トしてください。 また、 MicroSDカードの良好状態に保つために、 定期的に再フォーマッ トすることをおすすめし ます。 しかし、 再フォーマッ トはSDカードに保存したデータ (ビデオや写真など) を全て削 除しますので、 早目にバックアップしてください。 15. システム : 初期リセッ ト/システム情報/カード情報 このメニューでカメラのシステム情報を確認できます。 初期リセッ ト : Yes/No 初期設定はNoです。 このオプションは、 すべての設定をデフォルト値にリセッ トします。 システム情報 : カメラのモデルとファームウェアのバージョンを確認できます。 カード情報 : MicroSDカードのカード容量と残り容量を確認できます。 注...
  • Seite 133 トールしてください。 AKASO GOアプリをインストールしたスマートフォンやタブレッ トが遠距離でカメラリモ ートを制御できます。 カメラコントロール、 ライブプレビュー、 再生、 ダウンロード、 設定などの機能を含めます。 1. カメラの電源を入れ、 電源ボタンを押してWifiをオンにします。 カメラの画面には Wifi名とパスワードが表示されます。 2. Wifi 「 Brave 7 LE」 を接続して、 スマートフォンのWLAN設定でパスワードを入力します。 3. AKASO GOアプリを開き、 右上の 「+」 アイコンをタップします。 「Brave 7 LE」 を追加し て、 「 ライブプレビュー」 をクリックします。 4. カメラがAKASO GOアプリに接続されます。...
  • Seite 134 コンテンツを再生する カメラ、 コンピューター、 テレビ、 スマートフォン、 タブレッ トでコンテンツを再生できます。 コンピュータや互換性のあるテレビなどのデバイスにmicroSDカードを直接挿入して、 コンテンツを再生することもできます。 この方式では、 再生解像度はデバイスの解像度と その解像度を再生する機能に依存します。 ご注 : コンピューターでビデオや写真を再生するには、 予め、 これらのファイルをコンピュ ーターに転送する必要があります。 転送すると、 新しいコンテンツ用にMicroSDカードの スペースも解放されます。 Brave 7 LEでファイルを表示する カメラの電源を入れ、 画面左側の再生ボタンをタップして再生モードに入ります。 再生モードで、 指を画面上でスワイプしてビデオまたは写真ファイルを見ます。...
  • Seite 135 MicroSDカードをコンピューターのUSBポートに挿入してから、 ファイルエクスプローラ でファイルをコンピュータに転送したり、 選択したファイルを削除したり します。 コンテンツをスマートフォンにオフロードする 1. AKASO GOアプリを開き、 カメラをアプリに接続します。 2. 再生アイコンをタップして、 すべてのビデオと写真をチェックします。 3. ダウンロードしたい写真やビデオを選択して、 右上隅にあるその他アイコンをタップし て、 [削除]を選択します。 ご注意 : 1. ビデオや写真をiPhoneまたはiPadにオフロードできない場合は、 設定 → プライバシ ー → 写真 → 「AKASO GO」 → 「読み取りと書き込み」 のステップより操作してくださ い。 2. iPhoneとiPadでは、 アプリを介して4Kと2.7Kのビデオをダウンロードすることができま せん。 この操作を実現するために、 カードリーダーをご使用ください。...
  • Seite 136 カメラのメンテナンス カメラのパフォーマンスを最大限に引き出すには、 次のガイドラインに従ってください。 1. 最高のオーディオパフォーマンスを得るには、 カメラを振ること、 或いはマイクに息を 吹きかける方法によってマイク穴のホコリを予め取り除いてください。 2. レンズをきれいにするには、 柔らかく糸くずの出ない布でレンズを拭いてください。 レンズの周りに異物を入れないでください。 3. 指でレンズに触れないでください。 4. 内部の部品に損傷を与える可能性がありますので、 カメラを落下や衝撃から離してく ださい。 5. 損傷しないように、 カメラを高温や強い日光から離してください。 バッテリー寿命の最大化 記録中にバッテリーが0%に達すると、 カメラはファイルを保存して電源を切ります。 バッテリー寿命を最大化するには、 可能な場合は次のガイドラインに従ってください。 • ワイヤレス接続をオフにする • より低いフレームレートと解像度でビデオをキャプチャする • スクリーンセーバー設定を使用する バッテリーの保管と取り扱い カメラには、 バッテリーなどの敏感なコンポーネントが含まれています。 カメラを非常に 低温や高温の環境に置かないでください。 低温や高温の状態では、 一時的にバッテリー の寿命が短くなったり、 正常に動作しなくなったりする可能性があります。 カメラの表面ま たは内部に結露が発生する可能性があるため、...
  • Seite 137 • カメラを不正に改造することは製品の安全性、 規制への準拠、 パフォーマンスに大幅に 影響して、 保証も無効になりますから、 そうしないでください。 警告 : カメラやバッテリーを落としたり、 分解したり、 開いたり、 押しつぶしたり、 曲げたり、 変形させたり、 穴を開けたり、 細断したり、 電子レンジで焼却したり、 焼却したり、 塗装した り しないでください。 カメラのバッテリー開口部に異物を入れないでください。 カメラま たはバッテリーが損傷している場合 (例えば、 亀裂、 穴があいたり、 水で損傷したり した場 合) は使用しないでください。 分解またはバッテリーに穴を開けると、 爆発や火災の原因 となることがあります。 リモート 写真ボタン ビデオボタン 防滴のみで、 防水ではありません。 ビデオ...
  • Seite 138 写真 写真をキャプチャするには、 カメラを写真モードで確認します。 写真を撮る : 写真ボタンを押して、 カメラからカメラのシャッター音が鳴ります。 カメラをマウントする カメラをヘルメッ ト、 ギア、 装備に取り付けます。 開いた 閉じる 押す ご注意 : を押して、 防水ストリップの間に 間がないことを確認してください防水ケース。...
  • Seite 140 お問い合わせ AKASO製品について何かご不明な点がございましたら、 遠慮なくお問い合わせください。 至急 (24H以内) に対応しております。 Eメール: cs@akasotech.com 公式サイト : www.akasotech.com...

Inhaltsverzeichnis