Inhaltsverzeichnis
Werbung
Quicklinks
Werbung
Inhaltsverzeichnis

Verwandte Anleitungen für Acoustic Signature TA-7000

Inhaltszusammenfassung für Acoustic Signature TA-7000
- Seite 1 PICK-UP ARM / TONARM INSTRUCTION MANUAL BEDIENUNGSANLEITUNG TA-7000...
-
Seite 2: Warranty
Dank für Ihr Vertrauen in unser Pro- the tonearm TA-7000. With the purchase of dukt, den Tonarm TA-7000. Mit dem Kauf die- your tonearm you acquired a precision instru- ses Tonarms haben Sie ein Präzisionsinstrument ment for the playback of records. -
Seite 3: Getting Started
Setup Aufbau Parts Teile Adjustment template (3 parts) Einstellschablone, 3-teilig TA-7000 tonearm TA-7000 Tonarm Counterweight Gegengewicht Screws Schraubensatz Toolset Werkzeugsatz Additional weight Aufsatzgewicht Cable (not shown) Kabel (nicht dargestellt) Manual (not shown) Bedienungsanleitung (nicht dargestellt) Getting started Zu Beginn Please switch off all components of your system... -
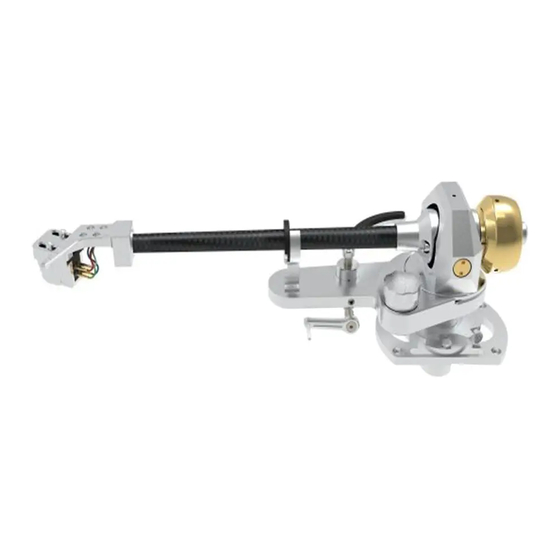
Seite 4: Parts Identification
Parts identification Teilebenennung Counterweight Gegengewicht Azimut screw Azimut Schraube Arm rest Arm lift Armablage Cartridge locking screws (2x) Halteschrauben für Tonabnehmer Headshell lift heben Audio cables VTA locking screw Kabel für Tonabnehmer Klemmschraube VTA-Verstellung Anti-skating knob Cartridge not included Anti-Skating-Knopf Base mount (SME) Tonabnehmer nicht im Lieferumfang Basis (SME) -
Seite 5: Tonarm-Montageplatte Vorbereiten
Tonearm mounting Tonarm-Montage Preparing the arm mounting board Tonarm-Montageplatte vorbereiten To mount the TA-7000 tonearm with the Rega- Zur Montage des TA-7000 mit der Rega-Basis type base mount your turntable needs to have a benötigt ihr Plattenspieler ein 24mm Durch-... -
Seite 6: Tonarm Einbauen
Fitting the tonearm Tonarm einbauen Take the provided either 3x M3x20 countersunk Nehmen Sie entweder die beigelegten 3x M3- screws or 4x pan head screws M3x12 and insert Senkschrauben oder 4x M3x12 Zylinderkopf- them into the marked appropriate holes of the schrauben und stecken Sie diese in die entspre- mounting flange (see picture above). -
Seite 7: Tonabnehmer Einbauen
Mounting the cartridge Tonabnehmer einbauen Note: before mounting the cartridge Hinweis: bitte achten Sie vor Montage des Ton- please make sure that the stylus abnehmers darauf, dass der Nadelschutz richtig protection cover is in position aufgesetzt ist. Headshell Cartridge locking screws Halteschrauben für Tonabnehmer Color code for cartridge wire: Farbcode für Tonabnehmer-Kabel:... - Seite 8 After adjusting the VTF please tighten at least Klemmen Sie nach dem Einstellen der VTF das one the 3 screws in the counterweight. Gegengewicht mit mind. einer der 3 radialen Schrauben. For heavy cartridges you can mount the enclosed Für schwere Tonabnehmer können Sie das beilie- additional weight onto the normal counterweight.
-
Seite 9: Tonabnehmer Einstellen
Adjusting the cartridge Tonabnehmer einstellen Assembling the template Einstellschablone zusammenbauen This is done by using the provided adjustment Die Einstellung erfolgt mit der beigelegten Ein- template. Take the 3 parts of the template (tem- stellschablone. Fügen Sie die 3 Teile der Schab- plate, arm, centering) and assemble it, as shown lone (Schablone, Arm, Zentrierstift) gemäß... - Seite 10 Adjusting the angle and position Einstellen des Winkels und Abstands Lift down the cartridge and place the diamond tip Senken Sie den Tonabnehmer auf die Schablone of the cartridge on the reference point of the ad- ab und platzieren Sie die Nadelspitze auf den justment template and make sure that the edges Referenzpunkt der Schablone.
- Seite 11 Connecting the tonearm Tonarm anschliessen Phillips screw Kreuzschraube Looking from the bottom of your TA-7000 you Wenn Sie von unten auf Ihren TA-7000 schauen, can see the 5 pin plug and its alignment. The erkennen Sie den 5 poligen Einbaustecker und connector has a small Phillips screw on its cylin- seine Ausrichtung.
-
Seite 12: Technical Data
Technical data TA-7000 Technische Daten Feature Value / Wert Merkmal Cartridge balance weight 4 g – 16 g Justierbares Tonabnehmergewicht Null point - inner radius 66 mm / 2,6 in Innerer Nullpunkt - Radius Null point - outer radius 121 mm / 4,78 in Äusserer Nullpunkt - Radius...