Elkron EIR200 Bedienungsanleitung
Haustierunempfindlicher pir außenbewegungsmelder
Inhaltsverzeichnis
Verfügbare Sprachen
Verfügbare Sprachen
Quicklinks
DETECTEUR DE MOUVEMENT EXTERIEUR AVEC IMMUNITE AU
GB
The EIR, a battery operated outdoor PIR detector, allows economical and
effortless outdoor installation whilst providing exceptional detection capabilities.
The built-in Two Lens & Sensors with detection sensitivity eliminates the chance
of false alarms caused by small animals, cars, or other outdoor disturbances that
brings the conveniences for easy operation. Automatic-adjusted Sensitivity
Control of background temperature ensures excellent performance regardless of
changes in its environment or outside interference. In addition, the adjustable
Detection Range gives the effective match for every installation environment, that
provides a peace of mind living-style and yet protecting your premises and be-
loved ones all year round.
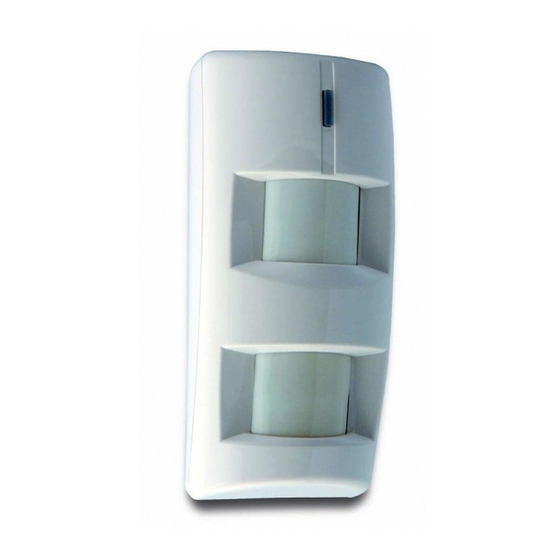
IDENTIFYING THE PARTS
The EIR consists of a two-part design made up of a cover and a base. The cover contains all the
electronics and optics and the base provides a mean of fixing. The base has knockouts to allow
mounting either on a flat surface or in a corner location by the provided Rotation bracket.
FRONT VIEW
Test Button aka LED indicator
It is the Test button as well as the LED indicator. As a Test button, it is used for testing the radio
performance and for learning purposes. As a LED indicator, it is used to indicate the system status.
– To enter Test mode: Press once in Normal mode. The LED will light up for two seconds
whenever a movement is detected.
– To enable Tilt Switch: Press & hold for 8 sec when Tamper Switch is pressed. The LED will flash
for 5 times, indicating Tilt Switch enabled.
Dual Lens
Battery Compartment (It uses two 3.6V AA lithium batteries).
Tamper Switch (The EIR is protected against any attempt to open the lid).
Tilt Switches (They are to protect against unauthorized EIR removal, sabotage, or unsteady installation).
DIP Switch Block (Contains 8 DIP Switches to set the function & detection sensitivity levels)
Bracket Arm
Rotating Bracket
OUTDOOR PET-IMMUNE PIR MOTION SENSOR (EIR200)
ANIMAUX DOMESTIQUES (EIR200)
HAUSTIERUNEMPFINDLICHER PIR
AUßENBEWEGUNGSMELDER (EIR200)
INSIDE VIEW
+
1/20
DS80IR2C-001A
LBT80631
Inhaltsverzeichnis

Verwandte Anleitungen für Elkron EIR200


Inhaltszusammenfassung für Elkron EIR200
-
Seite 13: Kennzeichnen Der Teile
Der batteriebetriebene Bewegungsmelder EIR200 für den Außenbereich, erlaubt eine kostengünstige und unaufwändige Außeninstallation und weist gleichzeitig herausragende Meldefähigkeiten auf. Die eingebauten Doppellinsen und Sensoren mit Meldeempfindlichkeit beseitigen die Wahrscheinlichkeit von Fehlalarmen, die von kleinen Tieren, Autos oder anderen Störungen ausgelöst werden. Dies bringt den Komfort für einen einfachen Betrieb mit sich. -
Seite 14: Led-Anzeige
LED ANZEIGE Im normalen Betriebsmodus bleibt die LED Anzeige ausgeschaltet, außer: • Wenn der EIR einen niedrigen Batteriestatus hat; jedes Mal, wenn er eine erfasste Bewegung überträgt, leuchtet die LED für ungefähr zwei Sekunden auf. • Wenn der Deckel geöffnet ist und der Saboatgekontakt beschädigt ist oder der DIP-Schalter schräg liegt, leuchtet die LED für zwei Sekunden auf, um anzuzeigen, dass das “Tamper”... -
Seite 15: Überwachungssignal
ÜBERWACHUNGSSIGNAL • Nach der Installation überträgt der EIR automatisch und regelmäßig Überwachungssignale an die Zentrale, in zufälligen Intervallen von 30 bis 50 Minuten. • Wenn die Zentrale das Signal vom EIR während der voreingestellten Zeitspanne nicht erhalten hat, zeigt die Zentrale auf dem Display an, dass dieser bestimmte EIR ein Signalverlust-Problem hat. •... -
Seite 16: Starten - Den Eir In Der Zentrale Programmieren
STARTEN – DEN EIR IN DER ZENTRALE PROGRAMMIEREN • Lösen Sie die Befestigungsschraube und entfernen Sie das Gehäuseoberteil. • Stellen Sie den Schalter, der die Empfindlichkeit regelt, je nach Ihren Bedürfnissen ein, wie es in der DIP Schalter Positionstabelle angezeigt wird. •... - Seite 17 1) Durchstoßen Sie die entsprechenden vorgestanzten Lochflächen an der Basis. Bei der Befestigung an Oberflächen benutzen Sie die vorgestanzten Lochflächen „A“ Bei der Befestigung in Ecken benutzen Sie die vorgestanzten Lochflächen „C“. 2) Bohren Sie zwei Löcher auf der flachen Oberfläche oder vier Löcher in die Oberfläche der Ecke, indem Sie die Löcher der Basis als Vorlage nutzen.
- Seite 18 5) Befestigen Sie den EIR am Aufhänger der Befestigunghalterung. 6) Justieren Sie den Erfassungswinkel, indem Sie den Befestigungsarm an einem der oberen Löcher der Befestigungshalterung befestigen und fixieren Sie die obere Schraube wie abgebildet. Drehbefestigung Befestigungsarm Obere Schraube Schritt 4: Betätigen Sie die Test-Taste einmal, um in den Testmodus zu gelangen. Gehen Sie den geschützten Bereich ab, um sicherzustellen, dass die Erfassungsreichweite angemessen ist.
-
Seite 19: Empfehlungen Für Die Installation
EMPFEHLUNGEN FÜR DIE INSTALLATION Es wird empfohlen den EIR an folgenden Stellen zu installieren: • 2,3 m über Bodenhöhe für die beste Erfassung. • Der Erfassungsbereich liegt zwischen 1 m und 11 m. • Die Betriebstemperatur liegt zwischen - 10°C und 50°C. •...