Herunterladen Inhalt Inhalt Diese Seite drucken
AmazonBasics G5W Handbuch

AmazonBasics G5W Handbuch

Kabellose trackball-maus

Werbung

Verfügbare Sprachen
  • DE

Verfügbare Sprachen

  • DEUTSCH, seite 21
Wireless Trackball Mouse
Souris à Boule sans Fil
Funkmaus mit Trackball
Mouse senza Fili con Sfera di Controllo
Ratón Inalámbrico Con Bola De Seguimiento
Draadloze Trackball Muis
ワイヤレス トラッ クボールマウス
B07G28NF3L

Werbung

Inhaltsverzeichnis
loading

Inhaltszusammenfassung für AmazonBasics G5W

  • Seite 1 Wireless Trackball Mouse Souris à Boule sans Fil Funkmaus mit Trackball Mouse senza Fili con Sfera di Controllo Ratón Inalámbrico Con Bola De Seguimiento Draadloze Trackball Muis ワイヤレス トラッ クボールマウス B07G28NF3L...
  • Seite 2 English ..........3 Français ......... 12 Deutsch .......... 21 Italiano ........... 30 Español .......... 39 Nederlands ........48 日本語 ..........57...
  • Seite 3 Welcome Guide • English Contents: Before getting started, ensure the package contains the following components: Track ball DPI button / LED indicator Backward Nano receiver Forward Connect button Left button ON/OFF switch Scroll wheel Battery cover Right button...
  • Seite 4: Important Safeguards

    IMPORTANT SAFEGUARDS Read these instructions carefully and retain them for future use. If this product is passed to a third party, then these instructions must be included. When using electrical appliances, basic safety precautions should always be followed to reduce the risk of fire, electric shock, and/ or injury to persons including the following: •...
  • Seite 5 Setup Installing the Battery • Remove the battery cover (K). • Insert the battery correctly with regard to polarity (+ and –) marked on the battery and the product. • Place the cover back over the battery compartment. Replace the battery, when the LED indicator (G) NOTICE blinks for 10 seconds.
  • Seite 6 • Plug the nano receiver into the USB port on your computer. • Set the ON/OFF switch (J) on the bottom side of the mouse to ON. • The LED indicator (G) flashes steadily when the product is in pairing mode and stops blinking when it is successfully paired with the receiver.
  • Seite 7: Cleaning And Maintenance

    Forward button (C) • Press this button to view the next page in your Internet browser. Backward button (B) • Press this button to view the previous page in your Internet browser. Left button (D) • Left click function according to your computer system settings. Right button (F) •...
  • Seite 8 Cleaning • Clean the battery contacts and also those of the product prior to battery installation. • To clean, wipe with a soft, slightly moist cloth. • Dry the product after cleaning. • Never use corrosive detergents, wire brushes, abrasive scourers, metal or sharp utensils to clean the product.
  • Seite 9 2. Changes or modifications not expressly approved by the party responsible for compliance could void the user’s authority to operate the equipment. FCC Interference Statement This equipment has been tested and found to comply with the limits for a Class B digital device, pursuant to part 15 of the FCC Rules.
  • Seite 10: Simplified Eu Declaration Of Conformity

    Simplified EU Declaration of Conformity • Hereby, Amazon EU Sarl declares that the radio equipment type B07G28NF3L is in compliance with Directive 2014/53/EU. • The full text of the EU declaration of conformity is available at the following internet address: https://www.amazon.co.uk/ amazon_private_brand_EU_compliance Disposal The Waste Electrical and Electronic Equipment (WEEE)
  • Seite 11: Warranty Information

    Feedback and Help Love it? Hate it? Let us know with a customer review. AmazonBasics is committed to delivering customer-driven products that live up to your high standards. We encourage you to write a review sharing your experiences with the product.
  • Seite 12 Guide de Bienvenue • Français Contenu : Avant de commencer, veuillez vous assurer que l’emballage contient les composants suivants : Boule de commande Bouton DPI / voyant LED Précédent Nano-récepteur Suivant Bouton Connect Bouton de gauche Commutateur ON/OFF Molette de défilement Couvercle des piles Bouton de droite...
  • Seite 13: Mesures De Sécurité Importantes

    MESURES DE SÉCURITÉ IMPORTANTES Veuillez lire attentivement les présentes instructions et les conserver afin de pouvoir vous y référer ultérieurement. En cas de cession de ce produit à un tiers, le présent manuel d’utilisation doit également lui être remis. Lorsque vous utilisez des appareils électriques, vous devez toujours prendre des mesures de sécurité...
  • Seite 14 Risque d’étouffement ! Conservez tous les DANGER matériaux d’emballage hors de la portée des enfants. Ces matériaux constituent une source de danger potentiel, par ex. étouffement. Installation Installation de la pile • Retirez le couvercle des piles (K). • Insérez la pile correctement en respectant la polarité (+ et –) figurant sur la pile et sur le produit.
  • Seite 15 Couplage • Retirez le couvercle des piles (K), puis retirez le nano- récepteur (H). • Branchez le nano-récepteur sur un port USB de votre ordinateur. • Positionnez le commutateur ON/OFF (J) situé sur le côté inférieur de la souris sur ON. •...
  • Seite 16 Utilisation Boule de commande (A) • Faites rouler la boule de commande pour déplacer le curseur sur l’écran de l’ordinateur. Bouton DPI / voyant LED (G) • Le voyant LED clignote en continu : La souris est en cours de couplage. Le voyant LED s’éteint une fois le couplage réalisé...
  • Seite 17: Nettoyage Et Entretien

    Bouton de droite (F) • Fonction de clic droit en fonction des paramètres du système de votre ordinateur. Molette de défilement (E) • Faites tourner la molette de défilement pour faire défiler l’écran de l’ordinateur vers le haut/le bas. Bouton Connect (I) •...
  • Seite 18: Déclaration Ue De Conformité Simplifiée

    Entretien • Rangez le produit dans un endroit frais et sec, hors de la portée des enfants et des animaux domestiques, de préférence dans son emballage d’origine. • Évitez toute vibration et tout choc. Déclaration Réglementaire de l’IC • Cet appareil est conforme aux normes RSS d’Industrie Canada. Son utilisation est soumise aux deux conditions suivantes : (1) Cet appareil ne doit pas provoquer d’interférences, et (2) Cet appareil doit accepter toutes les interférences...
  • Seite 19: Mise Au Rebut Des Batteries

    Mise Au Rebut La directive relative aux déchets d’équipements électriques et électroniques (DEEE) vise à réduire au minimum l’impact des produits électriques et électroniques sur l’environnement, en augmentant la réutilisation et le recyclage et en réduisant la quantité de DEEE mis en décharge. Le symbole figurant sur ce produit ou sur son emballage signifie que ce produit doit être mis au rebut séparément des ordures ménagères ordinaires en fin de vie.
  • Seite 20: Informations Sur La Garantie

    Vos Avis et Aide Vous l’adorez ? Vous le détestez ? Faites-le nous savoir en laissant un commentaire. AmazonBasics s’engage à vous offrir des produits axés sur les besoins de la clientèle et répondant à vos normes élevées. Nous vous encourageons à rédiger un commentaire visant à...
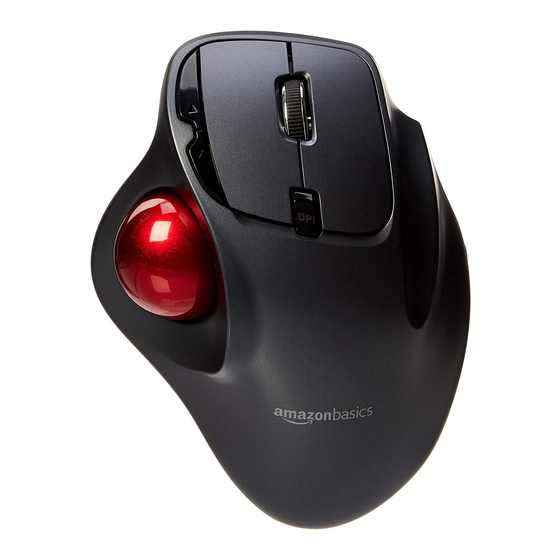
  • Seite 21 Bedienungsanleitung • Deutsch Inhalt: Bevor Sie beginnen, prüfen Sie, ob die Verpackung die folgenden Teile enthält: Trackball DPI-Taste/LED-Anzeige Rückwärts Nano-Empfänger Vorwärts Verbindungs-Taste Linke Taste ON-/OFF-Schalter (ein/aus) Scrollrad Batteriefachabdeckung Rechte Taste...
  • Seite 22: Wichtige Sicherheitshinweise

    WICHTIGE SICHERHEITSHINWEISE Lesen Sie diese Anweisungen sorgfältig durch und bewahren Sie sie zur künftigen Verwendung auf. Wenn dieses Produkt an Dritte weitergegeben wird, muss diese Gebrauchsanweisung beigefügt werden. Bei der Verwendung von Elektrogeräten sollten immer grundlegende Sicherheitsmaßnahmen befolgt werden, um die Gefahr von Feuer, Stromschlag und/oder Verletzungen zu reduzieren, einschließlich der folgenden: •...
  • Seite 23: Einrichten

    Erstickungsgefahr! Halten Sie GEFAHR Verpackungsmaterialien von Kindern fern – solche Materialien stellen Gefahrensituationen für Kinder, u.a. durch Erstickung, dar. Einrichten Batterie einsetzen • Entfernen Sie die Batteriefachabdeckung (K). • Legen Sie die Batterie korrekt unter Beachtung der Polaritätsmarkierungen (+ und –) ein, die auf der Batterie und am Produkt markiert sind.
  • Seite 24 Kopplung • Entfernen Sie die Batteriefachabdeckung (K) und nehmen Sie den Nano-Empfänger (H) heraus. • Schließen Sie den Nano-Empfänger an den USB-Port Ihres Computers an. • Stellen Sie den Ein-/Ausschalter (J) an der Unterseite der Maus auf ON (ein). • Die LED-Anzeige (G) blinkt während des Kopplungsmodus stetig und hört auf zu blinken, wenn das Produkt erfolgreich mit dem Empfänger gekoppelt wurde.
  • Seite 25: Betrieb

    Betrieb Trackball (A) • Drehen Sie den Trackball, um den Cursor am Computer- Bildschirm zu bewegen. DPI-Taste/LED-Anzeige (G) • Die LED-Anzeige blinkt stetig: Die Maus wird gekoppelt. Nach erfolgreichen Kopplung schaltet sich die LED-Anzeige aus. • Die LED-Anzeige blinkt 10 Sekunden lang: Warnung bei niedrigem Batteriestand.
  • Seite 26: Reinigung Und Pflege

    Linke Taste (D) • Linksklick-Funktion entsprechend den Systemeinstellungen Ihres Computers. Rechte Taste (F) • Rechtsklick-Funktion entsprechend den Systemeinstellungen Ihres Computers. Scrollrad (E) • Drehen Sie das Scrollrad, um am Computer-Bildschirm auf/ab zu scrollen. Verbindungs-Taste (I) • Drücken Sie diese Taste, um die Maus mit dem Empfänger (H) zu koppeln.
  • Seite 27: Vereinfachte Eu-Konformitätserklärung

    Reinigung • Reinigen Sie vor dem Einlegen der Batterie die Batteriekontakte und die Kontakte des Produkts. • Verwenden Sie zur Reinigung ein weiches, leicht angefeuchtetes Tuch. • Trocknen Sie das Produkt nach der Reinigung. • Verwenden Sie keine ätzenden Reinigungsmittel, Drahtbürsten, Scheuermittel, Metall oder scharfe Materialien, um das Produkt zu reinigen.
  • Seite 28: Entsorgung Des Akkus

    Entsorgung Die Richtlinie über Elektro- und Elektronik-Altgeräte zielt darauf ab, die Auswirkungen von elektrischen und elektronischen Waren auf die Umwelt zu minimieren, durch Steigerung der Wiederverwendung und des Recyclings sowie durch Reduktion der Anzahl an Elektro- und Elektronik-Altgeräten, die auf Mülldeponien landen. Das Symbol auf dem Produkt oder der Verpackung weist darauf hin, dass das Produkt am Ende seiner Nutzungsdauer separat vom normalen Hausmüll...
  • Seite 29: Technische Daten

    Gefällt es Ihnen? Gefällt es Ihnen nicht? Dann bewerten Sie das Produkt auf unserer Webseite! AmazonBasics setzt sich für die Bereitstellung kundenorientierter Produkte ein, um Ihre hohen Qualitätsstandards zu erfüllen. Bitte schreiben Sie eine Rezension, in der Sie Ihre Erfahrungen mit dem Produkt teilen.
  • Seite 30 Guida di Benvenuto • Italiano Contenuto: Prima di iniziare, assicurarsi che la confezione contenga i seguenti componenti: Pulsante DPI / indicatore Trackball Indietro Nano ricevitore Avanti Pulsante Connetti Pulsante sinistro Interruttore ON/OFF Rotella di scorrimento Coperchio della batteria Pulsante destro...
  • Seite 31: Avvertenze Sulla Batteria

    AVVISI DI SICUREZZA IMPORTANTI Leggere attentamente le istruzioni e conservarle per utilizzo futuro. In caso di cessione del prodotto a terzi, accludere parimenti questo manuale utente. Quando si utilizzano apparecchi elettrici, è necessario seguire sempre le precauzioni di sicurezza di base per ridurre il rischio di incendi, scosse elettriche e / o lesioni a persone tra cui: •...
  • Seite 32 Rischio di soffocamento! Tenere qualsiasi PERICOLO materiale d’imballaggio lontano dai bambini: questi materiali sono una potenziale sorgente di pericolo, come il soffocamento. Installazione Installazione della batteria • Rimuovere il coperchio della batteria (K). • Inserire la batteria in modo corretto, in accordo alla polarità (+ e –) indicata sulla stessa e sul prodotto.
  • Seite 33 Associazione • Rimuovere il coperchio della batteria (K) ed estrarre il nano ricevitore (H). • Inserire il nano ricevitore nella porta USB del computer. • Posizionare l’interruttore ON/OFF (J) sul lato inferiore del mouse su ON. • L’indicatore LED (G) lampeggia costantemente quando il prodotto è...
  • Seite 34 Funzionamento Trackball (A) • Ruotare la trackball per spostare il cursore sullo schermo del computer. Pulsante DPI / indicatore LED (G) • L’indicatore LED lampeggia costantemente: Il mouse è in fase di associazione. Al termine dell’associazione, l’indicatore LED si spegne. •...
  • Seite 35: Pulizia E Manutenzione

    Pulsante destro (F) • Funzione di clic destro del mouse in base alle impostazioni di sistema del computer. Rotella di scorrimento (E) • Ruotare la rotella per scorrere su/giù sullo schermo del computer. Pulsante Connetti (I) • Premere questo pulsante per associare il mouse al ricevitore (H).
  • Seite 36: Dichiarazione Di Conformità Ue Semplificata

    Manutenzione • Conservare in un luogo fresco e asciutto, idealmente nella confezione originale, fuori dalla portata di bambini e animali domestici. • Evitare vibrazioni e urti. Dichiarazione di Conformità UE Semplificata • Il fabbricante, Amazon EU Sarl, dichiara che il tipo di apparecchiatura radio B07G28NF3L è...
  • Seite 37: Smaltimento Della Batteria

    dei rifiuti di apparecchiature elettriche ed elettroniche, l’ufficio municipale locale o il servizio di smaltimento dei rifiuti domestici. Smaltimento Della Batteria Non smaltire le batterie usate insieme ai normali rifiuti domestici. Portarle in un luogo di smaltimento/raccolta appropriato. Specifiche Tensione/tipo di batteria: 1x 1,5 V AA Potenza di Trasmissione: 1 mW...
  • Seite 38: Informazioni Di Garanzia

    Feedback e Aiuto Ti piace? Oppure no? Faccelo sapere scrivendo la tua recensione. AmazonBasics si impegna a distribuire prodotti orientati al cliente che siano all’altezza degli standard più elevati. Pertanto, invitiamo i clienti a scrivere una recensione per condividere le proprie esperienze con il prodotto.
  • Seite 39 Guía de Bienvenida • Español Contenido: Antes de comenzar, compruebe que el embalaje incluye los siguientes componentes: Botón de DPI/indicador Bola de seguimiento Retroceder Nanoreceptor Avanzar Botón Connect Interruptor de encendido/ Botón izquierdo apagado Rueda de Tapa de la batería desplazamiento Botón derecho...
  • Seite 40: Consejos De Seguridad Importantes

    CONSEJOS DE SEGURIDAD IMPORTANTES Lea estas instrucciones atentamente y guárdelas para futuras consultas. Si transfiere el producto a una tercera persona, debe incluir también este manual de instrucciones. Al usar aparatos eléctricos, siempre deben tomarse unas precauciones de seguridad básicas para reducir el riesgo de incendio, de descarga eléctrica y/o de daños personales incluyendo las siguientes: •...
  • Seite 41 ¡Riesgo de asfixia! Mantenga los materiales de PELIGRO embalaje alejados de los niños; estos materiales son peligro potencial (p. ej. asfixia). Instalación Instalación de la batería • Extraiga la tapa de la batería(K). • Inserte la batería correctamente según la polaridad (+ y –) marcada en la batería y en el producto.
  • Seite 42 Sincronización • Extraiga la tapa de la batería (K) y el nanoreceptor (H). • Conecte el nanoreceptor a un puerto USB del ordenador. • Ajuste el botón ON/OFF (J) de la parte inferior del ratón a ON. • El indicador LED (G) parpadea constantemente cuando está en el modo de vinculación y deja de parpadear cuando se ha emparejado correctamente con el receptor.
  • Seite 43 Botón de DPI/indicador LED (G) • El indicador LED parpadea continuamente: El ratón está emparejado. El indicador LED se apaga después de haberse emparejado correctamente. • El indicador LED parpadea durante 10 segundos: Advertencia de batería baja. • El indicador LED también indica el ajuste DPI que se está utilizando.
  • Seite 44: Limpieza Y Mantenimiento

    Botón Connect (I) • Presione este botón para emparejar el ratón con el receptor (H). Interruptor ON/OFF (J) • Utilice el interruptor ON/OFF para encender/apagar el ratón. Limpieza y Mantenimiento Apague el producto antes de limpiarlo. AVISO No sumerja las piezas eléctricas del producto AVISO en agua u otros líquidos.
  • Seite 45: Declaración Ue De Conformidad Simplificada

    Declaración UE de Conformidad Simplificada • Por la presente, Amazon EU Sarl declara que el tipo de equipo radioeléctrico B07G28NF3L es conforme con la Directiva 2014/53/UE. • El texto completo de la declaración UE de conformidad está disponible en la dirección Internet siguiente: https://www. amazon.es/marca_privada_de_amazon_EU_cumpimiento Eliminación El objetivo de la Directiva sobre residuos de aparatos...
  • Seite 46: Eliminación De La Batería

    Eliminación de la Batería Nunca deseche las baterías usadas en los residuos domésticos. Llévelas a un lugar de recogida/eliminación adecuado. Especificaciones Tensión/tipo de batería: 1x 1,5 V AA Potencia de transmisión: 1 mW Banda de frecuencia: 2,4 GHz Compatibilidad del sistema Windows 7/8/10 operativo: Dimensiones del producto...
  • Seite 47: Información Sobre La Garantía

    Comentarios y Ayuda ¿Le encanta? ¿No le gusta nada? Escriba una opinión como cliente. En AmazonBasics nos comprometemos a proveer productos pensados para satisfacer a nuestros clientes y que estén a la altura de sus elevados estándares de calidad. Le animamos a que escriba una opinión sobre su experiencia con el producto.
  • Seite 48 Welkomstgids • Nederlands Inhoud: Controleer, voordat u aan de slag gaat, of het pakket de volgende zaken bevat: DPI-knop / Led- Trackball controlelampje Achteruit Nano-ontvanger Vooruit Verbindingsknop Linker knop AAN/UIT-schakelaar Scrollwiel Batterijdeksel Rechter knop...
  • Seite 49: Belangrijke Voorzorgsmaatregelen

    BELANGRIJKE VOORZORGSMAATREGELEN Lees deze instructies grondig door en bewaar ze voor latere referentie. Doe bij overdracht van dit product aan derden deze gebruiksaanwijzing erbij. Volg altijd de basisvoorschriften inzake veiligheid wanneer u elektrische apparaten gebruikt, dit om het risico op brand, elektrische schok en letsel aan personen te beperken, waaronder de volgende: •...
  • Seite 50 Verstikkingsgevaar! Houd alle GEVAAR verpakkingsmateriaal uit de buurt van kinderen - dit materiaal kan gevaar opleveren, bijv. verstikking. Instellen De batterij installeren • Verwijder het batterijdeksel (K). • Installeer de batterij volgens de juiste polariteit (+ en -) zoals aangegeven op de batterij en het product. •...
  • Seite 51 Koppelen • Verwijder het batterijdeksel (K) en haal de nano-ontvanger (H) uit. • Sluit de nano-ontvanger aan op een USB-poort van uw computer. • Stel de AAN/UIT-schakelaar (J) aan de onderkant van de muis in op ON (aan). • Het led-controlelampje (G) knippert tijdens het koppelen en stopt met knipperen zodra het product aan de ontvanger is gekoppeld.
  • Seite 52 Werking Trackball (A) • Draai de trackball om de cursor over het computerscherm te laten bewegen. DPI-knop / Led-controlelampje (G) • Het led-controlelampje knippert: De muis is bezig met koppelen. Het led-controlelampje dooft wanneer de koppeling is gemaakt. • Het led-controlelampje knippert 10 seconden: Waarschuwing voor lege batterij.
  • Seite 53: Reiniging En Onderhoud

    Rechter knop (F) • Voert rechter klikhandelingen uit afhankelijk van de instellingen van uw computersysteem. Scrollwiel (E) • Draai het scrollwiel om omhoog/omlaag op het computerscherm te scrollen. Verbindingsknop (I) • Druk op deze knop om de muis met de ontvanger (H) te koppelen.
  • Seite 54: Vereenvoudigde Euconformiteitsverklaring

    Onderhoud • Berg het product op in een koele, droge ruimte, en uit de buurt van kinderen en huisdieren, bij voorkeur in de originele verpakking. • Vermijd trillingen en stoten. Vereenvoudigde EU- conformiteitsverklaring • Amazon EU Sarl verklaart hierbij dat de radioapparatuur van het type B07G28NF3L in overeenstemming is met Richtlijn 2014/53/EU.
  • Seite 55: Verwijdering Van De Accu

    Verwijdering Van de Accu Gooi gebruikte batterijen nooit weg met uw huisvuil. Lever deze in bij een geschikt inzamelpunt. Specificaties Spanning/batterijtype: 1x 1,5 V AA Zendvermogen: 1 mW Frequentieband: 2,4 GHz OS-compatibiliteit: Windows 7/8/10 Productafmetingen (B x H x D): ca.100 x 47 x 135 mm Nettogewicht product: ca.
  • Seite 56: Garantie-Informatie

    Vind je het leuk? Vind je het niet leuk? Beoordeel het product dan op onze website! AmazonBasics is toegewijd aan het leveren van klantgerichte producten die voldoen aan uw hoge standaarden. Wij moedigen u aan om een review te schrijven waarin u uw ervaringen met het product deelt.
  • Seite 57 ウェルカムガイド • 日本語 内容: スタートする前に、 パッケージに以下のものが含まれてい ることを必ず確認し て ください: DPI ボタン / LED イン トラックボール ジケーター 戻す Nano レシーバー 送る コネク トボタン 左ボタン オン/オフスイ ッチ スクロールホイール バッテリーカバー 右ボタン...
  • Seite 58 安全に関する重要なお知らせ このお知らせをよ く読み、 今後のため常に注意深く 保存し て ください。 本製品を第3者にゆずる際は、 必ずこの取扱説明書をつけておゆずり ください。 電気製品をお使いになる際には、 火事、 感電や怪我を防ぐた め、 以下を含む基本的な安全予防策を講じて ください。 • 取扱説明書をしっかりお読みください。 • この製品は意図された使用以外にはお使いにならないで ください。 電池に関する注意 • 消耗した電池は即、 装置から取り外し、 正しい方法で破 棄し て ください。 • 電池はお子様の手の届かない所において ください。 • 電池を火の中に捨てないでください。 • 緊急用の目的でない限り、 長期間製品を使用しない場合 は電池を抜いて ください。 • 電池が液漏れし ている場合は肌や目との接触を避けて く ださい。...
  • Seite 59 窒息のリスクあり ! 包装材料はお子様の手 危険 の届かない所に置いて ください - これらの 材料は、 例えば窒息のような、 潜在的な危険 の原因となり得ます。 セッ ト アップ 電池を入れる • バッテリーカバー (K) を外します。 • 電池を、 電池および製品に表示されている極 (+とー) を 正し く 合せて入れます。 • バッテリーカバーをバッテリー収納部にかぶせます。 注意 LED インジケーター (G) が10 秒間点滅した ら、 電池を交換し て ください。...
  • Seite 60 ペアリング • バッテリーカバー (K) を外し、 Nano レシーバー (H) を取 り出します。 • Nano レシーバーをお手持ちのコンピューターの USB ポ ートに差し込みます。 • マウスの側面にあるON/OFFスイ ッチ (J) をNOの位置に セッ トします。 • 製品がペアリングモードになるとキーボードの LED イン ジケーター (G) が点滅し、 レシーバーとのペアリングがう まくいく と点滅をやめます。 注 意 レシーバーには自動ペアリング機能がつい ています。 マウスとレシーバーとの間のコネク ションがうまく行かないか邪魔が入った場合 は以下の手順に従って ください。...
  • Seite 61 • Nano レシーバーをコンピューターの USB ポートから抜 き取り、 再び挿入する。 マウス底にあるコネク トボタン (I) を押す。 • 10 秒経っても製品が作動しない場合は、 再びペアリング を行って ください。 操作 トラックボール (A) • コンピューター画面上のカーソルを動かすにはボールをま わします。 DPI ボタン / LED インジケーター (G) • LED インジケーターが点灯を続けます。 マウスがペアリングを行っています。 ペアリングが無事終了す ると LED インジケーターは消えます。 • LED インジケーターが10 秒間点滅します。 バッテリー電圧低下警告。...
  • Seite 62 「送る」 ボタン (C) • インターネッ ト ブラウザの次のページを見たいときにこのボ タンを押します。 「戻る」 ボタン (B) • インターネッ ト ブラウザの前のページを見たいときにこのボ タンを押します。 「左」 ボタン (D) • 左クリックはお手持ちのコンピューターのシステム設定に 従って機能します。 「右」 ボタン (F) • 右クリックはお手持ちのコンピューターのシステム設定に 従って機能します。 スクロールホイール (E) • コンピューター画面を上/下にスクロールするにはスクロー ルホイールを回転させます。 コネクト (接続) ボタン (I) • マウスとレシーバー (H) のペアリングにはこのボタンを押 します。...
  • Seite 63 掃除およびメンテナンス 注意 掃除する前に製品の電源を切って くださ い。 注意 掃除の際には製品の部品を水またはその他 の液体に浸すことはおやめください。 製品を 流水にさらすことは絶対におやめください。 掃除 • 電池を入れる前に電池の電極と製品のそれをきれいにし て ください。 • きれいにするには柔らかい、 少し湿らせた布で拭いて くだ さい。 • 洗浄後は製品を乾かし て ください。 • 本製品の洗浄には腐食性の洗剤、 ワイヤーブラシ、 研磨 剤たわし、 金属や尖った器具は使用しないでください。 メンテナンス • 乾燥した涼しい場所で、 お子様やペッ トの手の届かない 場所に、 できれば元々のパッケージの中に入れて保管し て ください。 • 振動や衝撃は避けて ください。...
  • Seite 64 電池の破棄 電池は家庭ゴミと一緒に捨てないでください。 電池は 適当な破棄収集場所にお持ちください。 規格 電圧/電池のタイプ: 1x 1.5 V AA 送信電力: 1 mW 周波数帯域: 2.4 GHz OS 互換性: Windows 7/8/10 製品寸法 (幅 x 高 x 深) : 約 100 x 47 x 135 mm 製品の正味重量: 約 114 g...
  • Seite 65 保証について この製品の保証書のコピーを入手するには: amazon.jp/AmazonBasics/Warranty +81 (0) 120-899-276 フィードバックとサポート 気に入っていただけましたか?お気に召しませんでしたか? カ スタマーレビューでお知らせく ださい。 Amazonベーシック は、 皆様の高い水準に答えるこ とのできる よ うな消費者志向型の製品をお届けするのを旨と し ています。 この製品についてのレビューで製品についてのご意見をお聞 かせく ださい。 amazon.jp/review/review-your-purchases# amazon.jp/gp/help/customer/contact-us...
  • Seite 66 MADE IN CHINA FABRIQUÉ EN CHINE HERGESTELLT IN CHINA PRODOTTO IN CINA HECHO EN CHINA GEMAAKT IN CHINA 中国製 V6-11/20...

Diese Anleitung auch für:

B07g28nf3l

Inhaltsverzeichnis