Herunterladen Inhalt Inhalt Diese Seite drucken

Werbung

Verfügbare Sprachen

Verfügbare Sprachen

Bedienungsanleitung
Mode d'Emploi
Instruction Manual
Remote Control
404022

Werbung

Inhaltsverzeichnis
loading

Inhaltszusammenfassung für Muller-Licht tint 404022

  • Seite 1 Bedienungsanleitung Mode d‘Emploi Instruction Manual Remote Control 404022...
  • Seite 2 Control your lights simply via remote control. Seite 3 page 29 page 53 DEUTSCH FRANÇAIS ENGLISH...
  • Seite 3 Sehr geehrte Kundin, sehr geehrter Kunde! Diese Bedienungsanleitung ent- hält wichtige Informationen zur Inbetriebnahme und Verwendung. Lesen Sie die Bedienungsanleitung, insbe- sondere die Sicherheitshinweise, sorgfältig durch, bevor Sie das Produkt verwenden. Die Nichtbeachtung dieser Bedienungsan- leitung kann zu Schäden an den Produkten führen.
  • Seite 4: Inhaltsverzeichnis

    INHALT Zeichenerklärung � � � � � � � � � � � � � � � � � � � � � � � � � � � � � � 5 Bestimmungsgemäßer Gebrauch � � � � � � � � � � � � � � � 5 Sicherheitshinweise �...
  • Seite 5: Zeichenerklärung

    ZEICHENERkLäRUNG Die folgenden Symbole und Signalwörter werden in dieser Bedienungsanleitung, auf der tint-Fernbedienung oder auf der Verpackung verwendet. WARNUNG! Dieses Signalsymbol/-wort bezeichnet eine Gefährdung mit einem mittleren Risikograd, die, wenn sie nicht vermieden wird, den Tod oder eine schwere Verletzung zur Folge haben kann.
  • Seite 6: Sicherheitshinweise

    SICHERHEITSHINWEISE HINWEIS! • Dieser Artikel kann von Kindern ab 8 Jahren und dar- über sowie von Personen mit verringerten physischen, sensorischen oder mentalen Fähigkeiten oder Mangel an Erfahrung und Wissen benutzt werden, wenn sie be- aufsichtigt oder bezüglich des sicheren Gebrauchs des Artikels unterwiesen wurden und die daraus resultieren- den Gefahren verstehen.
  • Seite 7: Lieferumfang

    oder einen gleichwertigen Batterietyp. Beachten Sie die „Technischen Daten“. • Batterien dürfen nicht geladen, mit anderen Mitteln reak- tiviert, auseinandergenommen, ins Feuer geworfen oder kurzgeschlossen werden. Ansonsten besteht erhöhte Explosions- und Auslaufgefahr, außerdem können Gase entweichen! • Vermeiden Sie Kontakt der Batterieflüssigkeit mit Haut, Augen und Schleimhäuten.
  • Seite 8: Auf Einen Blick

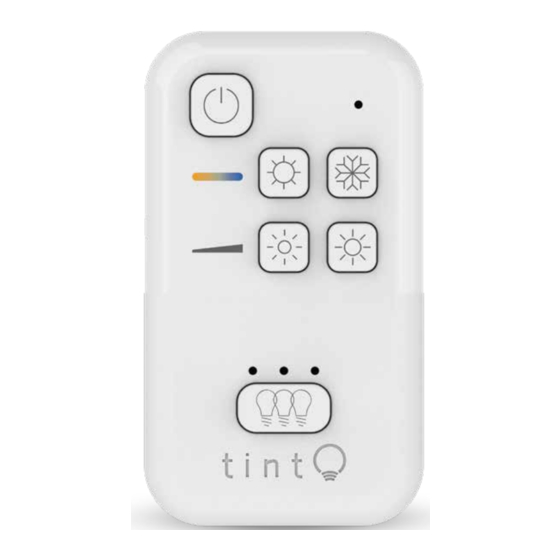
    AUF EINEN BLICk 1 Standby-Taste 2 Resonanzanzeige 3 Weißsteuerung 4 Helligkeitssteuerung 5 Gruppenanzeige „3 Leuchtdioden“ 6 Gruppentaste DEUTSCH...
  • Seite 9 7 Reset-Taste 8 Batteriefach für 1 Batterie (CR 2450 / 3 V) AUF EINEN BLICk...
  • Seite 10: Inbetriebnahme

    INBETRIEBNAHME Batterien einlegen 1. Öffnen Sie das Batteriefach auf der Rückseite der tint-Fernbedienung. 2. Legen Sie eine Batterie des Typs CR 2450 / 3 V so ein, wie auf dem Boden des Batteriefachs abgebildet. Beachten Sie die richtige Polarität der Batterien (+/-). 3.
  • Seite 11: Wandhalterung Aufkleben

    Wandhalterung aufkleben 1. Ziehen Sie die Schutzfolie von den beiden Klebepads. 2. Drücken Sie die Halterung mit etwas Kraft auf den sauberen, trockenen und staubfreien Untergrund. Wandhalterung anschrauben Wandhalterung anschrauben HINWEIS! Vergewissern Sie sich, dass sich keine Rohre oder Leitun- gen an der Bohrstelle befinden.
  • Seite 12: Grundfunktionen

    GRUNDFUNkTIONEN Die „tint white“-Fernbedienung wurde zum Steuern von „tint dimming“ und „tint white/white+ambiance“-Leuchtmit- teln und -Leuchten konzipiert. Selbstverständlich können auch weitere tint-Produkte, zum Beispiel „tint white+color“, mit dieser Fernbedienung gesteuert werden, allerdings können nur die folgenden Funktionen gesteuert werden. Eine Steuerung der Farben bei farbigen tint-Produkten ist nicht möglich.
  • Seite 13: Weißton Einstellen

    Ein- /Ausschalten Drücken Sie die Standby-Taste, um die tint-Produkte ein- und wieder auszuschalten. Die Memory-Funktion merkt sich den letzten „Beleuchtungszustand“ und startet damit beim nächsten Einschalten automatisch. Weißton einstellen Durch kurzes Drücken wählen Sie fest hinterlegte Weiß- ton-Einstellungen: warmweiß, neutralweiß und kaltweiß. Durch langes Drücken stellen Sie den gewünschten Weißton stufenlos selbst ein und kommen bis in den Super-Warmweiß-Bereich (nur bei „white+color“- und „whi-...
  • Seite 14: Gruppenfunktionen

    GRUPPENFUNkTIONEN Das ist eine Gruppe Durch das Zuordnen der Leuchtmittel zu verschiedenen Gruppen können Sie mit einem Tastendruck mehrere tint-Produkte gleichzeitig bedienen. Das ist z.B. praktisch, wenn Sie in einem Raum mehrere „Beleuchtungssituatio- nen“ haben. Beispiel: • Ein Arbeitsplatz, der hell beleuchtet sein soll. •...
  • Seite 15 • Eine Gruppe kann erweitert oder verkleinert werden und es können auch tint-Produkte von einer Gruppe zu einer anderen Gruppe verschoben werden. • Ein einzelnes tint-Produkt kann ebenfalls eine Gruppe darstellen. • Mit der tint-Fernbedienung können Sie maximal 4 Grup- pen steuern, wobei die vierte Gruppe die Zusammenfas- sung der anderen drei Gruppen darstellt.
  • Seite 16: Neues Tint-Produkt Einbinden

    Neues tint-Produkt einbinden Achten Sie beim Kauf neuer Produkte auf deren technische Spezifikationen. Wir empfehlen tint-Produkte der Firma Müller-Licht. Bei der Verwendung von Produkten anderer Hersteller ist nicht sichergestellt, dass alle Funktionen unterstützt werden bzw. einwandfrei funktionieren. 1. Schalten Sie das tint-Produkt ein, bzw. drehen Sie das tint-Leuchtmittel in die Fassung.
  • Seite 17 (mittlere Leuchtdiode = Gruppe 2 etc.). Nach ca. 10 Sekunden wird das neue tint-Produkt zu der ausgewähl- ten Gruppe hinzugefügt und die Resonanzanzeige hört auf zu blinken. Warten Sie diese Zeit ab und drücken Sie in dieser Zeit keine Taste. Danach ist der Vorgang ab- geschlossen und Sie können die erweiterte Gruppe wie gewohnt bedienen.
  • Seite 18 Ein tint-Produkt aus einer Gruppe in eine andere Gruppe einbinden 1. Schalten Sie ggf. die tint-Produkte mit der tint-Fernbe- dienung aus (Standby). 2. Wählen Sie über die Gruppentaste die Gruppe aus, die Sie ändern möchten. (Möchten Sie z.B. aus der Gruppe 2 ein tint-Produkt zur Gruppe 1 hinzufügen, drücken Sie so oft die Gruppen- taste, bis die mittlere Leuchte oberhalb der Gruppentaste leuchtet.)
  • Seite 19: Reset

    RESET Reset des tint-Produktes/Kopplungsmodus Ein Reset des tint-Produktes ist nur im Ausnahmefall erfor- derlich, z.B. wenn die Fernbedienung zurückgesetzt werden musste, oder wenn Sie die tint-Produkte in ein Smart Home Gateway einbinden möchten. Hinweis: Alle Einstellungen (z. B. die Verknüpfung zur Fernbedienung) werden zurückgesetzt.
  • Seite 20: Reset Der Tint-Fernbedienung

    Reset der tint-Fernbedienung Ein Reset ist nur im Ausnahmefall erforderlich, z.B. wenn die tint-Produkte auch nach dem Entfernen und Wiedereinlegen der Batterien nicht mehr auf die tint-Fernbedienung reagieren. HINWEIS! Bei einem Reset gehen alle vordefinierten Gruppenein- stellungen verloren und Sie müssen danach tint-Fernbe- dienung und auch die tint-Produkte wieder miteinander verbinden.
  • Seite 21 Smart Home Ready - Einbindung in ein Zigbee-Gateway In der Regel lässt sich ein tint-Produkt nur mit einer Fern- bedienung bzw. einem Smart Home System verbinden. In einige Smart Home Systeme mit Zigbee lässt sich auch die tint-Fernbedienung einbinden, sodass die tint-Pro- dukte anschließend parallel per Fernbedienung oder Smart Home App bzw.
  • Seite 22: Fehlersuch-Tabelle

    FEHLERSUCH-TABELLE Problem Mögliche Ursache Keine Funktion. • Die Batterien in der tint-Fern- bedienung sind leer und müs- sen gewechselt werden. • Die tint-Produkte selbst sind ausgeschaltet oder die Netz- stecker sind nicht eingesteckt. • Sie haben über die Gruppen- taste eine falsche bzw. gar keine Gruppe ausgewählt.
  • Seite 23 Problem Mögliche Ursache Das tint-Produkt hat Stellen Sie sicher, in welcher sich in die falsche Gruppe sich das tint-Produkt Gruppe eingebunden. befindet. Gehen Sie vor wie in „tint-Produkt aus einer Gruppe in eine andere Gruppe einbinden“ beschrieben. Das tint-Produkt lässt Bitte prüfen Sie, ob sich das sich nicht in ein frem- tint-Produkt im Kopplungsmodus...
  • Seite 24 Problem Mögliche Ursache Die Standby-Taste muss • Wenn die tint-Produkte vorher mehrfach gedrückt über den Lichtschalter aus- werden. geschaltet wurden, muss sich die tint-Fernbedienung neu synchronisieren. • Sie haben Teile des Systems über einen Lichtschalter ab- geschaltet. Die tint-Fernbedie- nung synchronisiert sich neu. In welcher Gruppe Durch einfaches Ein- und Aus- befindet sich mein...
  • Seite 25: Technische Daten

    TECHNISCHE DATEN Frequenzband des drahtlosen RF-Modus: ....2405-2480,0 MHz Maximale Sendeleistung: ....< 20 mW Funkreichweite (Freifeld): .
  • Seite 26: Reinigung Und Entsorgung

    REINIGUNG UND ENTSORGUNG Konformitätserklärung Hiermit erklärt Müller-Licht International GmbH, dass der Funkanlagentyp „Müller-Licht tint“ der Richtlinie 2014/53/EU entspricht. Der vollständige Text der EU-Konformitätserklä- rung ist unter der folgenden Internetadresse ver- fügbar: www.mueller-licht.de/tint. Reinigung Reinigen Sie die Fernbedienung nur mit einem tro- ckenen Tuch.
  • Seite 27 Entnehmen Sie vor der Entsorgung die Batterie aus dem Gerät und entsorgen Sie diese separat. Batterien und Akkus gehören nicht in den Haus- müll. Jeder Verbraucher ist gesetzlich verpflichtet, Batterien und Akkus bei einer Sammelstelle seiner Gemeinde, seines Stadtteils oder im Handel abzugeben.
  • Seite 28 Control your lights simply via remote control.
  • Seite 29 Chère cliente, cher client ! Ce mode d’emploi contient des informations importantes concer- nant la mise en service et l‘utilisa- tion. Avant l‘utilisation de la télécommande, veuillez lire soigneusement le mode d’em- ploi, en particulier les consignes de sécu- rité. Le non-respect de ce mode d’emploi peut entraîner de graves blessures et endommager le produit.
  • Seite 30 MENU Légende � � � � � � � � � � � � � � � � � � � � � � � � � � � � � � � � � � � � � 31 Utilisation conforme �...
  • Seite 31: Légende

    LÉGENDE Les symboles et remarques suivants sont utilisés dans ce mode d’emploi, sur la télécommande tint ou sur l‘embal- lage. AVERTISSEMENT! Ce symbole/mot de signalisation désigne un danger de degré moyen qui, s’il n’est pas écarté, peut conduire à des blessures graves voire mortelles.
  • Seite 32: Consignes De Sécurité

    CONSIGNES DE SÉCURITÉ AVIS! • Le présent article peut être utilisé par des enfants à partir de 8 ans, ainsi que par des personnes présentant des capacités physiques, sensorielles ou mentales dimi- nuées, ou un manque d’expérience et de connaissances si elles sont sous surveillance ou ont été...
  • Seite 33: Contenu Du Produit

    • Les piles ne peuvent pas être chargées, réactivées avec d‘autres moyens, démantelées, jetées dans le feu ou être mises en court-circuit. Sans quoi, risque accru d‘explo- sion et d‘écoulement, des gaz peuvent en outre s‘échap- per ! • Évitez tout contact du fluide de la pile avec la peau, les yeux et les muqueuses.
  • Seite 34: Télécommande Tint

    TÉLÉCOMMANDE TINT 1 Touche de mise en veille 2 Affi chage de la résonance 3 Contrôle du blanc 4 Contrôle de la luminosité 5 Affi chage du groupe (3 voyants lumineux) 6 Touche du groupe FRANÇAIS...
  • Seite 35 7 Touche de remise à zéro 8 Compartiment pour 1 pile (CR 2450 / 3 V) TÉLÉCOMMANDE TINT...
  • Seite 36: Mise En Service

    MISE EN SERVICE Insérer les piles 1. Ouvrez le compartiment pour piles au dos de la télécommande tint. 2. Insérez la pile de type CR 2450 / 3 V comme l‘indique l‘illustration figurant sur le fond du compartiment pour piles. Respectez la polarité correcte de la pile (+/-). 3.
  • Seite 37 Collage du support mural 1. Tirez sur le film de protection des deux patins adhésifs. 2. Appuyez sur le support en faisant légèrement pression sur le socle propre, sec et exempt de poussières. 3. Vissage du support mural Vissage du support mural AVIS! Assurez-vous que l’emplacement prévu ne comporte ni tuyaux, ni conduites.
  • Seite 38: Fonctions De Base

    FONCTIONS DE BASE La télécommande « tint white » a été conçue pour com- mander les éclairages et lampes « tint dimming » et « tint white/white+ambiance ». D’autres produits tint comme par exemple « tint white+color » peuvent évidemment être éga- lement commandés avec cette télécommande, mais seules les fonctions suivantes peuvent toutefois être exécutées.
  • Seite 39 Activation/désactivation Appuyez sur la touche de veille pour activer et désactiver les produits tint. La fonction Mémoire mémorise le dernier « état de l‘éclairage » et démarre automatiquement à l’acti- vation suivante. Réglage du ton de blanc Par une pression courte, sélectionnez des paramètres de ton de blanc définis : blanc chaud, blanc neutre et blanc froid.
  • Seite 40: Fonctions Du Groupe

    FONCTIONS DU GROUPE Il s’agit d‘un groupe Les produits tint du kit de démarrage figurent au départ dans le premier groupe. Ainsi, d’une pression sur un bouton, vous pouvez commander plusieurs produits tint simultanément. Ce dispositif est pratique, par exemple, si plusieurs «...
  • Seite 41 • Un groupe peut être élargi ou réduit, et les produits tint peuvent également être déplacées d‘un groupe à l‘autre. • Un seul produit tint peut aussi constituer un groupe. • La télécommande tint permet de contrôler jusqu’à 4 groupes, le quatrième groupe représentant l’ensemble des trois autres.
  • Seite 42 Raccordement d‘un nouveau produit tint Au moment d’acheter de nouveaux produits, faites attention à leurs caractéristiques techniques. Nous recommandons d’opter pour les produits tint de la société Müller-Licht. Si vous utilisez des produits d‘autres fabricants, rien ne garantit que toutes les fonctions seront prises en charge ou fonctionneront correctement.
  • Seite 43 Après environ 10 secondes, le nouveau produit tint est ajouté au groupe sélectionné et l‘affichage de résonance cesse de clignoter. Patientez pendant ce délai et n‘ap- puyez sur aucune touche. Le processus est alors terminé et vous pouvez utiliser le groupe étendu comme à...
  • Seite 44 Raccordement d‘un produit tint d’un groupe avec un autre groupe 1. Éteignez au besoin les produits tint au moyen de la télé- commande tint (veille). 2. Au moyen de la touche du groupe, sélectionnez le groupe que vous souhaitez modifier. (Par exemple, si vous souhaitez ajouter un produit tint du groupe 2 au groupe 1, appuyez de manière répétée sur la touche du groupe jusqu‘à...
  • Seite 45: Réinitialisation

    RÉINITIALISATION Réinitialisation du produit tint Une réinitialisation n‘est nécessaire que dans des cas exceptionnels, par exemple, si la télécommande a dû être réinitialisée. 1. Activez et désactivez le produit tint 5 fois (notez les ins- tructions respectives). 2. Réactivez le produit tint. Un changement de couleur débute à...
  • Seite 46 la section « Raccordement d‘un nouveau produit tint ». Chaque produit tint est intégré individuellement l‘un après l‘autre. Si par exemple trois produits tint appar- tiennent au groupe, vous devez répéter le processus « Raccordement d‘un nouveau produit tint » 3 fois. Intégration dans une passerelle Zigbee En général, un produit tint peut uniquement être raccordé...
  • Seite 47: Tableau De Recherche Des Erreurs

    TABLEAU DE RECHERCHE DES ERREURS Problème Origine possible Sans fonction. • La pile de la télécommande tint est déchargée et doit être remplacée. • Les produits tint sont désac- tivés ou la prise secteur n’est pas branchée. • Au moyen de la touche du groupe, vous avez sélectionné...
  • Seite 48 Problème Origine possible Vous voulez intégrer un Éteignez le produit tint déjà nouveau produit tint. connecté ou éloignez-vous Cependant, celui qui est quelque peu du produit déjà déjà intégré clignote. connecté. Le produit tint a été Vérifiez le groupe dans lequel le intégré...
  • Seite 49 Problème Origine possible La touche de mise en • Si les produits tint ont été au- veille doit être action- paravant éteints au moyen de le née plusieurs fois. interrupteur, la télécommande tint doit se resynchroniser. • Vous avez arrêté certaines par- ties du système au moyen d‘un interrupteur.
  • Seite 50: Données Techniques

    DONNÉES TECHNIQUES Bande de fréquence du module RF sans fil : ....2405-2480,0 MHz Puissance de transmission maximale : . . .< 20 mW Portée de radio (champ libre) : .
  • Seite 51: Nettoyage Et Élimination

    NETTOyAGE ET ÉLIMINATION Déclaration de conformité La société Müller-Licht International GmbH déclare par la présente que le type d‘installation radio « Müller-Licht tint » est conforme à la directive 2014/53/UE. Le texte complet de la déclaration de conformité UE est disponible à l’adresse Internet suivante : www.mueller-licht.de/tint Nettoyage Nettoyez la télécommande avec un chiffon sec.
  • Seite 52 Avant d‘éliminer l‘appareil, retirez-en la pile et éliminez celle-ci séparément. Les piles et piles rechargeables ne peuvent pas être éliminées en tant qu‘ordures ménagères. Chaque consommateur est tenu de déposer les piles et piles rechargeables auprès d‘un point de collecte de sa municipalité, de son quartier ou dans le commerce.
  • Seite 53 Dear customers! This user manual contains im- portant information on start-up and use. Before using the remote control, please read through the user man- ual carefully. This particularly applies for the safety notes. Failure to follow this user manual may result in severe injury or dam- age the product.
  • Seite 54 CONTENT Explanation of symbols ..... 55 Intended use ......55 Safety information .
  • Seite 55: Explanation Of Symbols

    ExPLANATION OF SyMBOLS The following symbols and signal words are used in this user manual, on the lamps or on the packaging. WARNING! This signal symbol/word designates a hazard with moderate degree of risk which may lead to death or severe injury if not avoided.
  • Seite 56: Safety Information

    SAFETy INFORMATION NOTICE! • This item may be used by children over the age of 8 and persons with reduced physical, sensory or mental abilities or lack of experience and knowledge if they have been supervised or instructed in the safe use of the item and understand the resulting dangers.
  • Seite 57: Included With The Item

    • Avoid exposing the skin, eyes and mucous membranes to battery fluid. In case of contact, rinse the affected areas immediately with plenty of clean water and consult a doctor immediately. ATTENTION! • Remove the battery from the remote control when it is drained or if you are not using the item for a long time.
  • Seite 58: At A Glance

    AT A GLANCE 1 Standby button 2 Feedback display 3 White control 4 Brightness control 5 Group display (3 LEDs) 6 Group button ENGLISH...
  • Seite 59 7 Reset button 8 Battery compartment (CR 2450 / 3 V) AT A GLANCE...
  • Seite 60: Setup

    SETUP Inserting the batteries 1. Open the battery compartment at the rear of the tint remote control. 2. Insert 1 CR 2450 / 3 V battery as shown on the bottom of the battery compartment. Ensure the correct polarity of the battery (+/-).
  • Seite 61: Mounting The Wall Bracket

    Mounting the wall bracket 1. Remove the protective film from both sticky pads. 2. Press the bracket with some force against a clean, dry and dust-free surface. Screwing in the wall bracket NOTICE! Make sure there are no pipes or wires in the wall where you intend to drill.
  • Seite 62: Basic Functions

    BASIC FUNCTIONS The „tint white” remote control was designed to control „tint dimming“ and „tint white/white+ambiance” lamps and light- ing fixtures. Of course, other tint products, for example “tint white+color” can also be controlled with this remote control, however it only controls the functions listed below. It is not possible to control the colors for colored tint products.
  • Seite 63: Switching On/Off

    Switching on/off Press the standby button to switch the tint products on and off again. The memory function will store the last “illumina- tion state” and will start again automatically the next time the tint product is switched on. Set white tone Short-press to select permanently stored white tone set- tings: warm white, neutral white and cold white.
  • Seite 64: Group Functions

    GROUP FUNCTIONS This is a group The tint products in the starter set are in the first group to begin with. This allows you to control several tint products with only one button. This is useful if you have more than one ‘lighting situation’...
  • Seite 65 • You can use the tint remote control to control a maximum of 4 groups, whereby the fourth group is a combination of the other three groups. • Think beforehand about which tint products you want to group together and try to make the groups logical and comprehensible.
  • Seite 66 applicable. If this does not occur, switch the tint product off and on again 6 times. 2. Press the group button repeatedly until all the LEDs above the group button light up. 3. Hold the tint remote control very close (< 5 cm) to the new tint product.
  • Seite 67 Remove a tint product from the tint remote control 1. Switch the tint product off (i.e. to standby) with the tint remote control if necessary. 2. Select the group you would like to change using the group button. 3. Hold down the group button for approx. 5 seconds. The feedback display will blink red/green.
  • Seite 68: Reset

    The tint product will blink in the order in which they are stored in the tint remote control. 5. Hold down the group button again until the selected tint product starts to blink again. The group display for group 1 will also light up. 6.
  • Seite 69 Resetting the tint remote control A reset is only necessary in exceptional cases, for example if the tint products do not respond to the tint remote control even after removing and reinserting the batteries. NOTICE! Resetting the remote control will delete all pre-defined group settings and you will have to connect the tint remote control and the tint products again afterwards.
  • Seite 70: Troubleshooting

    TROUBLESHOOTING Problem Possible causes tint product is not • The batteries in the tint remote working. control are dead and must be replaced. • The tint product itself is switched off or the mains plug is not plugged in. • You have selected the wrong group, or have not selected a group, using the group button.
  • Seite 71 Problem Possible causes The tint product has Find out for sure which group the been added to the tint product is in. Proceed as de- wrong group. scribed in “Add a tint product from one group into another group”. I cannot add a tint prod- Please check whether the tint uct to a new system.
  • Seite 72: Wireless Specifications

    Problem Possible causes I have to press the • If the tint product has previ- standby button several ously been switched off using times. the light switch, the tint remote control will have to resynchro- nize. • You have switched off parts of the system using a light switch.
  • Seite 73: Cleaning And Disposal

    CLEANING AND DISPOSAL Declaration of Conformity Hereby Müller-Licht International GmbH declares that the radio equipment type „Müller-Licht tint“ complies with the directive 2014/53 / EU. The full text of the EU Declaration of Conformi- ty is available at the following Internet address: www.mueller-licht.de/tint Cleaning Clean the remote control only with a dry cloth.
  • Seite 74 Before disposal, remove the battery from the device and dispose of it separately. Batteries and rechargeable batteries should not be disposed of with household waste. Every consumer is legally obliged to hand over batteries and rechargeable batteries to a collection point in his/ her municipality, district or to a retailer.
  • Seite 75 Discover the whole world of tint. www.mueller-licht.de/tint...
  • Seite 76 www.mueller-licht.de/tint MÜLLER-LICHT International GmbH Goebelstraße 61/63 28865 Lilienthal Germany www.mueller-licht.de 00800 - 44003311 404022_tint-FB-BDA_005...

Inhaltsverzeichnis