Herunterladen Inhalt Inhalt Diese Seite drucken

Werbung

Verfügbare Sprachen

Verfügbare Sprachen

s o s m a r t . s o s i m p l e .
Control your lights
simply via
remote control.
WHITE
404011
BEDIENUNGSANLEITUNG ab Seite 2
MODE D'EMPLOI à partir de la page 17
INSTRUCTION MANUAL from page 33
REMOTE CONTROL
BLACK
404010

Werbung

Inhaltsverzeichnis
loading

Inhaltszusammenfassung für Muller-Licht tint

  • Seite 1 s o s m a r t . s o s i m p l e . BLACK Control your lights 404010 simply via remote control. WHITE 404011 REMOTE CONTROL BEDIENUNGSANLEITUNG ab Seite 2 MODE D‘EMPLOI à partir de la page 17 INSTRUCTION MANUAL from page 33...
  • Seite 2: Bestimmungsgemäßer Gebrauch

    • Kinder dürfen nicht mit dem Artikel spielen. • Batterien können bei Verschlucken lebensgefährlich sein. Bewahren Sie die Batterien und die tint-Fernbedienung deshalb für Kleinkinder unerreichbar auf. Wurde die Batterie verschluckt, muss sofort medizinische Hilfe in An- spruch genommen werden.
  • Seite 3 VORSICHT vor Sachschäden • Nehmen Sie die Batterien aus der tint-Fernbedienung heraus, wenn diese verbraucht ist oder wenn Sie den Artikel länger nicht benutzen. So vermeiden Sie Schäden, die durch Auslaufen entstehen können. • Setzen Sie die Batterien keinen extremen Bedingungen aus, indem Sie diese z.
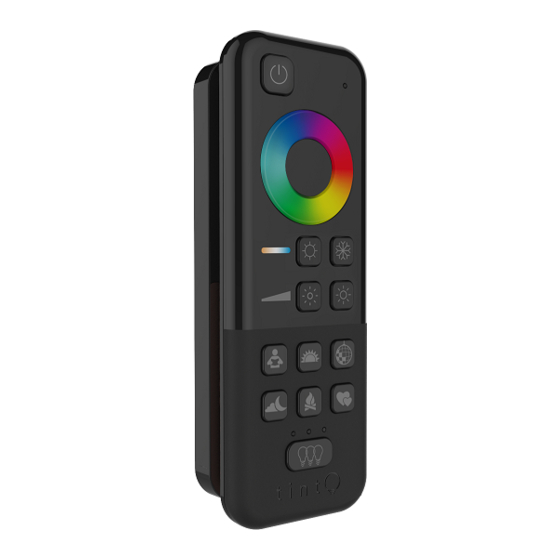
  • Seite 4 1 Standby-Taste 2 Resonanzanzeige 3 Farbsteuerung 4 Weißsteuerung 5 Helligkeits- steuerung 6 Szenen-Taste 8 Szenen-Taste „Arbeitslicht“ „Party“ 11 Szenen-Taste 9 Szenen-Taste „Romantik“ „Nachtlicht“ 10 Szenen-Taste 7 Szenen-Taste „Lagerfeuer“ „Sonnenuntergang“ 12 Gruppenanzeige 13 Gruppentaste „3 Leuchtdioden“ tint-REMOTE CONTROL ANLEITUNG...
  • Seite 5 2. Legen Sie 2 Batterien des Typs LR03 (AAA) / 1,5 V so ein, wie auf dem Boden des Batteriefachs abgebildet. Beachten Sie die richtige Polarität der Batterien (+/-). 3. Schieben Sie die Batteriefach-Abdeckung wieder zu. tint-REMOTE CONTROL ANLEITUNG...
  • Seite 6 Wandhalterung nutzen (optional) Die zum Lieferumfang gehörende Wandhalterung können Sie für die sichere Lagerung der tint-Fernbedienung nutzen. Ein Magnet in der Halterung hält dabei die tint- Fernbedienung sicher auf der Halterung. Die Halterung kann mit Klebestreifen oder mit Schrauben und ggf. Dübeln auf ihrem Untergrund montiert werden.
  • Seite 7 Super-Warmweiß-Bereich (nur bei „white+color“ Leucht- mitteln, die diese Funktion unterstützen). Helligkeit einstellen Durch kurzes Drücken stellen Sie fest hinterlegte Hellig- keitsstufen ein: 100%, 80%, 50%, 20%, 10% und 5%. Durch langes Drücken stellen Sie die gewünschte Helligkeitsstufe stufenlos selbst ein. tint-REMOTE CONTROL ANLEITUNG...
  • Seite 8 Szene „Romantik“: Ein beständiger Wechsel der Farben rot, rosa und violett. Hinweis: Wenn Sie ein tint-Leuchtmittel white verwenden, dass lediglich weißes Licht bietet, stehen die Farblicht-Funktionen nicht zur Verfügung. Nur die tint „white+color“ Leuchtmittel unterstützen alle Szenen. tint-REMOTE CONTROL ANLEITUNG...
  • Seite 9: Gruppenfunktionen

    Leuchtmittel von einer Gruppe zu einer anderen Gruppe verschoben werden. • Ein einzelnes Leuchtmittel kann ebenfalls eine Gruppe darstellen. • Mit der tint-Fernbedienung können Sie maximal 4 Gruppen steuern, wobei die vierte Gruppe die Zusammenfassung der anderen drei Gruppen darstellt.
  • Seite 10: Neues Leuchtmittel Einbinden

    Die Resonanzanzeige blinkt zunächst gleichmäßig rot, danach fängt sie an schneller zu blinken. Dies zeigt an, dass die tint-Fernbedienung ein Signal gefunden hat. Das neue Leuchtmittel blinkt daraufhin 3x und zeigt an, dass es mit der tint- Fernbedienung verbunden wurde.
  • Seite 11 Ein Leuchtmittel aus einer Gruppe entfernen 1. Schalten Sie ggf. die Leuchtmittel mit der tint-Fernbedienung aus (Standby). 2. Wählen Sie über die Gruppentaste die Gruppe aus, die Sie ändern möchten. 3. Halten Sie die Gruppentaste ca. 5 Sekunden gedrückt.
  • Seite 12 2. Drücken Sie mit einem spitzen Gegenstand oder mithilfe der Batteriefachabdeckung, auf die Reset-Taste auf der Rückseite. 3. Gehen Sie danach vor, wie im Abschnitt „Reset des tint-Leuchtmittels“ und nachfol- gend wie im Abschnitt „Neues Leuchtmittel einbinden“ beschrieben. Jedes Leuchtmittel wird dabei einzeln und nacheinander eingebunden. Gehören z.B.
  • Seite 13: Fehlersuchtabelle

    1. Schalten Sie das tint-Leuchtmittel in einem regelmäßigen Intervall von ca. einer Sekunde 5x ein und aus. 2. Schalten Sie das tint-Leuchtmittel wieder ein. Es startet nun ein Farbdurchlauf. Der gewünschte Reset ist erfolgt und Sie können das tint-Leuchtmittel wie gewohnt in Ihre Fernbedienung oder anderweitige Zigbee-Systeme einbinden.
  • Seite 14 Die Standby-Taste muss mehrfach Wenn die Leuchtmittel vorher über den gedrückt werden. Lichtschalter ausgeschaltet wurden, muss sich die tint-Fernbedienung neu synchronisieren. Sie haben Teile des Systems über einen Lichtschalter abgeschaltet. Die tint- Fernbedienung synchronisiert sich neu. In welcher Gruppe befindet sich mein...
  • Seite 15: Konformitätserklärung

    Relative Luftfeuchtigkeit: 5–95% (keine Kondensation) Smart Home Ready: Die tint Produkte von MÜLLER-LICHT sind steuerbar über den aktuellsten Zigbee Funkstandard 3.0 und kompatibel mit zahlreichen Lichtsteuerungs- systemen wie zum Beispiel Philips Hue (ohne Hue Entertainment und ohne HomeKit-Integration), Osram Lightify, dem Sprachassistenten von Amazon (über Amazon Echo Plus)*, und vielen weiteren.
  • Seite 16 Sammelbehälter geben. Allgemeines Recyclingsymbol. Weiterführende Informationen finden Sie unter: www.mueller-licht.de/recycle/ Grüner Punkt Sicherheitshinweise Diese Lampe keiner Feuchtigkeit oder Nässe aussetzen Diese Lampe nicht in Reflektorgehäusen verwenden Diese Lampe nicht in geschlossenen Leuchten verwenden Nicht dimmbar über konventionelle Dimmer tint-REMOTE CONTROL ANLEITUNG...
  • Seite 17: Utilisation Conforme

    • N‘utilisez pas l‘article s‘il est endommagé. • Évitez le contact de l‘article avec de l‘eau ou d‘autres liquides. • Les ampoules peuvent être réglées au moyen de la télécommande tint livrée ou d‘autres appareils de commande utilisant Zigbee. Ne pas utiliser de variateur conventionnel.
  • Seite 18 Risque accru d‘écoulement ! • Si nécessaire, nettoyez les contacts des piles et de l‘appareil avant leur insertion. Portée de l‘offre • Télécommande tint avec support mural • Matériel de montage • 2 piles LR03 (AAA)/1,5 V • Mode d‘emploi...
  • Seite 19 Télécommande tint 2 Affichage de la 1 Touche de résonance mise en veille 3 Commande de la couleur 4 Commande du blanc 5 Commande de la luminosité 6 Touche de la 8 Touche de la scène « Éclairage de scène « Fête »...
  • Seite 20: Mise En Service

    Utiliser le support mural (en option) Vous pouvez utiliser le support mural fourni pour ranger la télécom- mande tint en toute sécurité. Un aimant intégré au support maintient la télécommande tint bien en place sur le support. Le support peut être monté avec des bandes adhésives ou des vis, et au besoin des chevilles sur son socle.
  • Seite 21 La télécommande tint est une télécommande radio. • Vous n’avez pas besoin de « viser » les ampoules avec la télécommande tint pour les commander. • La télécommande tint pénètre également au travers de matériaux durs, tels que murs, portes et fenêtres.
  • Seite 22: Fonctions De Base

    Réglage de la luminosité Par une pression courte, réglez des niveaux de luminosité définis : 100 %, 80 %, 50 %, 20 %, 10 % et 5 %. Par une pression longue, réglez vous-même le niveau de luminosité souhaité. tint-REMOTE CONTROL MODE D‘EMPLOI...
  • Seite 23 Scène « Romantique » : Alternance constante des couleurs rouge, rose et violette. Si vous utilisez une ampoule tint white qui ne fournit que de la lumière blanche, les fonctions d‘éclairage couleur ne sont pas disponibles. tint-REMOTE CONTROL...
  • Seite 24 • Un groupe peut être élargi ou réduit, et les ampoules peuvent également être déplacées d‘un groupe à l‘autre. • Une seule ampoule peut aussi constituer un groupe. • La télécommande tint permet de contrôler jusqu’à 4 groupes, le quatrième groupe représentant l’ensemble des trois autres. tint-REMOTE CONTROL...
  • Seite 25 • Si vous utilisez une ampoule tint white qui ne fournit que de la lumière blanche, les fonctions d‘éclairage couleur ne sont pas disponibles. L‘ampoule s‘arrête.
  • Seite 26 3. Appuyez de manière répétée sur la touche du groupe jusqu‘à ce que tous les voyants situés au-dessus de la touche du groupe s‘allument. 4. Maintenez la télécommande tint tout près (< 5 cm) de la nouvelle ampoule. 5. Maintenez la touche du groupe enfoncée jusqu‘à ce que l’ampoule commence à...
  • Seite 27 Raccordement de l’ampoule d’un groupe avec un autre groupe 1. Éteignez au besoin les ampoules au moyen de la télécommande tint (veille). 2. Au moyen de la touche du groupe, sélectionnez le groupe que vous souhaitez modi- fier. (Par exemple, si vous souhaitez ajouter une ampoule du groupe 2 au groupe 1, ap- puyez de manière répétée sur la touche du groupe jusqu‘à...
  • Seite 28 2. Au moyen d’un objet pointu ou du couvercle du compartiment à piles, appuyez sur la touche de réinitialisation à l‘arrière. 3. Procédez comme le décrit la section « Réinitialisation de l‘ampoule tint », puis selon la description présente dans la section « Raccordement d‘une nouvelle ampoule ».
  • Seite 29 Tableau de recherche des erreurs Problème Cause possible Sans fonction. Les piles de la télécommande tint sont déchargées et doivent être remplacées. Les ampoules sont désactivées ou la prise secteur n’est pas branchée. Au moyen de la touche du groupe, vous avez sélectionné...
  • Seite 30 La touche de veille doit être actionnée Si les ampoules ont été auparavant éteintes plusieurs fois. au moyen de l’interrupteur, la télécomman- de tint doit se resynchroniser. Vous avez arrêté certaines parties du système au moyen d‘un interrupteur. La télécommande tint se resynchronise.
  • Seite 31 „Réinitialisation de l‘ampoule tint“. Déclaration de conformité La société Müller-Licht International GmbH déclare par la présente que le type d‘installation radio « Müller-Licht tint » est conforme à la directive 2014/53/UE. Le texte complet de la déclaration de conformité UE est disponible à...
  • Seite 32 Consignes de sécurité Ne pas exposer cette lampe à l‘humidité ou à l’eau Ne pas utiliser cette lampe dans les boîtiers de réflecteur Ne pas utiliser cette lampe dans les luminaires fermés Régulation impossible par le variateur conventionnel tint-REMOTE CONTROL MODE D‘EMPLOI...
  • Seite 33: Intended Use

    • Avoid exposing the item to water or other liquids. • The bulbs can be adjusted using the supplied tint remote control or other control de- vices that use the Zigbee standard. They cannot be used with a conventional dimmer.
  • Seite 34 Increased risk of leakage! • If necessary, clean the battery and device contacts before inserting them. Included with the item • tint remote control with wall bracket • Assembly material • 2 batteries LR03 (AAA) / 1.5 V •...
  • Seite 35 1 Standby 2 Feedback display button 3 Colour control 4 White control 5 Brightness control 6 “Working light” 8 “Party” scene button scene button 11 “Romantic” 9 “Night lights” scene button scene button 10 “Campfire” 7 “Sunset”...
  • Seite 36 3. Close the battery compartment cover again. Using the wall bracket (optional) You can use the wall bracket (supplied) to store the tint remote control safely. A magnet in the bracket will hold the tint remote control safely in the bracket.
  • Seite 37: Operation

    The tint remote control is a radio remote control. • You do not need to “aim” at the bulbs with the tint remote control to operate them. • The tint remote control will also penetrate solid materials such as walls, doors and windows.
  • Seite 38: Basic Functions

    “Sunset” scene: Starts at warm-white light (50%) and then dims further after 15 minutes. After another 10 minutes, the light switches off. “Party” scene: Starts a bright and constantly changing sequence of colours. “Night light” scene: Warm-white light dimmed to 5%. tint-REMOTE CONTROL INSTRUCTION MANUAL...
  • Seite 39 • An individual bulb could also be a group all on its own. • You can use the tint remote control to control a maximum of 4 groups, whereby the fourth group is a combination of the other three groups.
  • Seite 40 • If you are using a white tint bulb that only emits white light, the coloured light features will not be available. The bulb will be switched off. 1. Unplug the lamp at the mains, remove the old bulb and screw the new tint bulb into the socket.
  • Seite 41 This means that the tint remote control has found a signal. The new bulb will then blink 3 times and show that it has connected to the tint remote control. Keep holding down the group button until the bulb blinks again one time, which shows that it has been assigned to default group(=group 1).
  • Seite 42 1. Switch the tint bulb on and off 5 times 2. Switch the tint bulb on again. It will now begin to cycle through its colours. The reset has occurred as desired and you can now use the tint bulb as normal using your remote control or other Zigbee system.
  • Seite 43: Troubleshooting

    Troubleshooting Problem Possible causes Bulb is not working. The batteries in the tint remote control are dead and must be replaced. The bulb itself is switched off or the mains plug is not plugged in. You have selected the wrong group, or have not selected a group, using the group button.
  • Seite 44 5-95% (no condensation) Smart Home Ready The tint products produced by MÜLLER-LICHT can be controlled using the latest Zigbee radio standard 3.0 and are compatible with a range of light control systems, such as Philips Hue (without Hue Entertainment and HomeKit), Osram Lightify, Amazon’s voice assistant (with Amazon Echo Plus), and many more.
  • Seite 45: Safety Instructions

    General recycling symbol Further information can be found under: www.mueller-licht.de/recycle/ Green Dot Safety Instructions Do not expose this lamp to moisture Do not use this lamp in reflector housings Do not use this lamp in closed luminaires Not dimmable by conventional dimmers tint-REMOTE CONTROL INSTRUCTION MANUAL...
  • Seite 46 404010 tint remote control Zigbee 45x25 3.0 black 404011 tint remote control Zigbee 45x25 3.0 white 404013 2x LED bulb white+color & tint 1800-6500 + 60x120 remote control color 404015 LED bulb dimming 2700 60x120 incl. mobile switch Energieeffizienzklasse A+ (Spektrum A++ - E) • dimmbar nur mit Fernbedienung • Box-Verpackung • 25.000 h Lebensdauer Catégories d’efficacité...
  • Seite 47 Discover the whole world of tint... 404013 ... www.mueller-licht.de/tint 404010 404011 404005 404015 404006 404000 404019 404001 404008 tint-REMOTE CONTROL ANLEITUNG...
  • Seite 48 MÜLLER-LICHT International GmbH Goebelstr. 61/63 D-28865 Lilienthal Tel. +800 44003311 service@mueller-licht.de 404010-011_tint-FB-BDA_009.pdf tint-REMOTE CONTROL INSTRUCTION MANUAL...

Inhaltsverzeichnis