Werbung
Verfügbare Sprachen
Verfügbare Sprachen
Werbung
Inhaltsverzeichnis

Verwandte Anleitungen für A.HABERKORN Cara Plus L


Inhaltszusammenfassung für A.HABERKORN Cara Plus L
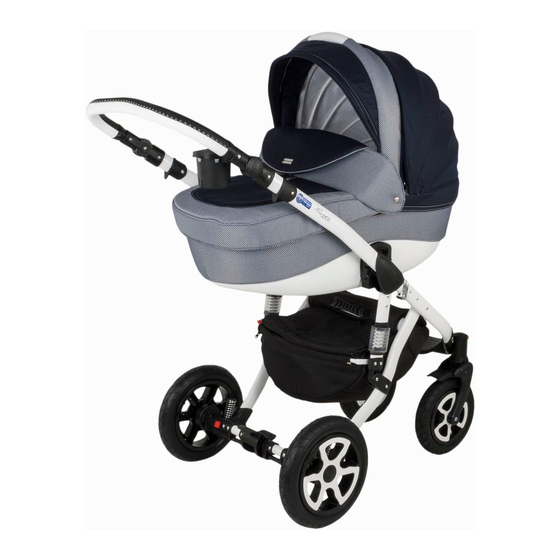
- Seite 8 sitzen kann. Der Einsatz einer zusätzlichen Matratze ist untersagt. WICHTIG: WICHTIG - DIESE BEDIENUNGSANLEITUNG 1. Man darf den Kinderwagen nicht benutzen, wenn BITTE FÜR SPÄTERE ANWENDUNG seine Bestandteile beschädigt sind. AUFBEWAHREN 2. Vor der Montage vergewissern Sie sich, ob das DER UNIVERSALKINDERWAGEN IST FÜR KINDER Produkt und all seine Bestandteile funktionsfähig sind.
- Seite 9 zusammen mit dem Hüftgurt. WICHTIG! Bevor Sie das Gestell zusammenklappen, WARNUNG: Stellen Sie den Kinderwagen, wenn sich bauen sie die Gondel/den Kinderwagenaufsatz ab und darin das Kind befindet, auf einer geneigten Fläche lösen Sie die Sperre der vorderen Schwenkräder. nicht ab, selbst wenn die Bremsvorrichtung betätigt wurde.
- Seite 10 Um die Räder für die Geradefahrt zu blockieren, man an den Haken an beiden Seiten der Gondel drücken Sie die Sperrklinke am oberen Ende der greifen, die sich dort befindenden länglichen Knöpfe Steckverbindung des Rades. Um die Blockierung zu gedrückt halten und die Gondel nach oben ziehen lösen, heben Sie die Sperrklinke hoch (Abb.
- Seite 11 richtig montiert wurde und an beiden Seiten des einzudrücken und aus den Steckverbindungen Kinderwagens eingerastet ist. herauszuziehen (Abb. 25). Das Verdeck besitzt einen WICHTIG! Klappen Sie das Gestell nicht zusammen, Griff, der zum Tragen dient, und einen nach innen wenn darauf der Kinderwagenaufsatz angebracht ist. zusammenklappbaren Sonnenschutz.
- Seite 12 beiden Seiten des Sitzteiles eingeschoben werden stellen Sie sicher, dass der Adapter an dem Gestell (Abb. 35). Um den Sicherheitsbügel abzunehmen, des Kinderwagens richtig montiert wurde. sollen Knöpfe an den Enden des Sicherheitsbügels WICHTIG! Der Kinderautositz ist für Kinder mit einem eingedrückt werden und der Bügel soll zu sich Höchstgewicht von 11 kg bestimmt.
- Seite 13 werden, werden innerhalb von bis zu 21 Tagen, gerechnet ab dem Tag, an dem der Verkäufer die beanstandete Ware in den jeweiligen Betrieb liefert, behoben. 5. Die Garantiezeit wird um die Reparaturzeit verlängert. 6. Über die Reparaturweise entscheidet der Garantiegeber. 7.
-
Seite 14: Cleaning And Maintenance
in working order; if they are damaged, the product should not be used. 3. While folding and unfolding of the pram make sure that the child stays at a safe distance. IMPORTANT - KEEP THESE INSTRUCTIONS FOR 4. While performing the adjustment operations, pay FUTURE USE. - Seite 15 Do not tumble dry. axle of the pram. Release the push button and pull the Do not iron. pivot in order to make sure that it is mounted/locked Do not dry clean. correctly. Press the push button in the middle of the - The pram upholstery can be cleaned with a wet wheel rim and while holding it, place the wheel onto the sponge or cloth, using a delicate laundry detergent.
- Seite 16 The pram is provided with the cushioning spring, The carry cot is equipped with the permanently fixed whose hardness can be adjusted by means of a canopy. In order to change its position, press the push special switch (fig. 13). buttons on both sides of the canopy at the same time and select the required angle (fig.
- Seite 17 CAUTION! While adjusting the sport seat backrest, mount it by inserting its hitches into the slots intended pay particular attention to the hands and head of the for this purpose on both sides of the sport seat (fig. 33). child. In order to remove the barrier, press the red push buttons located under its slots and take it out (fig.
-
Seite 18: Guarantee Terms
resulting from the non-compliance of the goods with MOUNTING AND DISMOUNTING OF THE CAR the agreement. SEAT ADAPTERS M O D E L : PA J E R O , J O G G E R , C H A M P I O N , THE GUARANTEE DOES NOT COVER: CHAMPION DELUXE, BARLETTA - the natural wear related to operation. - Seite 19 3. Durante el plegado y el desplegado de la silla asegúrese de que el niño se mantenga a una distancia segura. 4. Durante los procesos de regulación fíjese si los elementos móviles de la silla están en contacto con el IMPORTANTE - GUARDAR ESTAS INSTRUCCIONES cuerpo del niño.
- Seite 20 ADVERTENCIA: La carga máxima de la cestilla portaobjetos botón central de la llanta y extraer la rueda manteniéndo el es de 2 kg. botón pulsado. ¡ADVERTENCIA! Antes de empezar a usar el cochecito LIMPIEZA Y CONSERVACIÓN asegúrese de que ambas ruedas están montadas Lavar a mano en agua fría.
- Seite 21 FRENO DE ESTACIONAMIENTO. ubicado debajo del capazo del lado de la capota. Para M O D E LO: PA J E RO, J O G G E R, YO R K, C H A M P I O N, levantar el respaldo presione y gire el mecanismo hacia la CHAMPION DELUXE, BARLETTA, GALACTIC izquierda.
- Seite 22 enganches ubicados a ambos lados del chasis y a ambos lados del reposapiés y colócalo a la altura deseada continuación empujarlos hacia el eje trasero, hasta oír un (fig.30). clic (fig. 21a). Para quitar el asiento hay que presionar los botones rojos APOYABRAZOS de los enganches ubicados a ambos lados del chasis y MODELO: PAJERO, BARLETTA...
- Seite 23 CESTILLA CONDICIONES DE LA GARANTÍA M O D E LO: PA J E RO, J O G G E R, YO R K, C H A M P I O N, 1. P.P.H. “ADAMEX” concede la garantía para la silla CHAMPION DELUXE, BARLETTA, GALACTIC comprada durante el periodo de 12 meses desde la fecha Para montar la cestilla hay que fijarlacon una cremallera en...
- Seite 24 4. În timpul executării activităţilor de reglare trebuie să fiţi atenţi dacă elementele mobile nu au contact cu corpul copilului. 5. În timpul fiecărei opriri, scoaterii sau punerii copilul în IMPORTANT – PĂSTRAŢI ACESTE INSTRUCŢIUNII cărucior neapărat trebuie să folosiţi sistemul de frânare. PENTRU UTILIZAREA VIITOARE.
- Seite 25 Nu spălaţi la uscat. fost montată şi blocată corect. Activităţile repetaţi-le la - Tapiţeria căruciorului pot fi curăţată cu un burete umed sau cealaltă roată. Pentru a demonta roata din spate, trebuie să o cârpă, folosind un detergent delicat. apăsaţi butonul roşu pe axa din spate a căruciorului şi - Nu trebuie să...
- Seite 26 CHAMPION DELUXE, BARLETTA, GALACTIC CHAMPION DELUXE, BARLETTA, GALACTIC Căruciorul este accesibil cu roţi umflate. Presiunea Landoul este echipat în husă, pe care o montăm cu ajutorul maximală a presiunii în roţi este de 0,5 atmosfere. capselor de la husă la capsele de pe copertină (fig. 18). MONTAREA ŞI DEMONTAREA LANDOULUI MONTAREA ŞI DEMONTAREA SCAUNULUI PENTRU ATENŢIE!: Înainte de a începe utilizarea căruciorului...
- Seite 27 MODEL: YORK FOLIE DE PROTECŢIE ÎMPOTRIVA PLOI ŞI PLASA Copertina este montată pe şasiul scaunului definitiv. ÎMPOTRIVA ŢÂNŢARILOR MODEL: PAJERO, JOGGER, YORK, CHAMPION DELUXE, REGULAREA COPERTINEI SCAUNULUI BARLETTA, GALACTIC MODEL: PAJERO, JOGGER, CHAMPION, CHAMPION Căruciorul este echipat în folie de protecţie împotriva ploi, DELUXE, BARLETTA, GALACTIC care se plasează...
- Seite 28 HUSA ŞI COPERTINA SCAUNULUI AUTO Scaunul este echipat în copertină şi husă, care sunt montate cu ajutorul fermoarelor şi capselor (fig. 47, 48). REGLAREA MÂNERULUI SCAUNULUI AUTO Reglarea o facem apăsând butoanele roşii de pe ambele părţi ale scaunului, apoi mutând mânerul în poziţia dorită (fig.
- Seite 29 повредени, продуктът не трябва да се използва. 3. Когато сглобявате и разглобявате количката уверете се, че детето се намира на безопасно разстояние от нея. 4. По време на регулиращи действия обърнете ВАЖНО – ЗАПАЗЕТЕ НАСТОЯЩАТА ИНСТРУКЦИЯ ЗА внимание, дали подвижните елементи на количката не ПОЛЗВАНЕ...
-
Seite 30: Почистване И Поддръжка
на опаковката на недостъпно за детето място, за да СГЛОБЯВАНЕ И РАЗГЛОБЯВАНЕ НА ЗАДАНИТЕ избегнете задушаване. КОЛЕЛА ПРЕДУПРЕЖДЕНИЕ: Максималното натоварване на За да монтирате задните колела, натиснете металния коша под количката е 2 кг. бутон, намиращ се по средата на джантата (фиг. 7, 8), поставете... - Seite 31 За да блокирате колелата против завиване, натиснете намиращи се в гнездата червени бутони, намиращи се от лостта, който се намира на върха на гнездото. За да двете страни на рамката и повдигнете гондолата нагоре деблокирате колелата, повдигнете лоста нагоре (фиг. (фиг.
- Seite 32 МОДЕЛ: JOGGER, CHAMPION, CHAMPION DELUXE CHAMPION DELUXE, BARLETTA, GALACTIC За да монтирате седалката върху рамката на количката, Седалката е оборудвана с покривало, което се монтира поставете захващащите елементи на седалката в към сенника с помощта на закопчалки, разположени от гнездата от двете страни на рамката, докато чуете двете...
-
Seite 33: Гаранционни Условия
може да бъде поставен както върху гондолата, така и двете му страни и да дръпнете столчето нагоре (фиг.46). върху лятната седалка. В комплекта има и отделна ВНИМАНИЕ! Преди употреба на количката уверете се, мрежа против насекоми за гондолата, която се че...