Werbung
Quicklinks
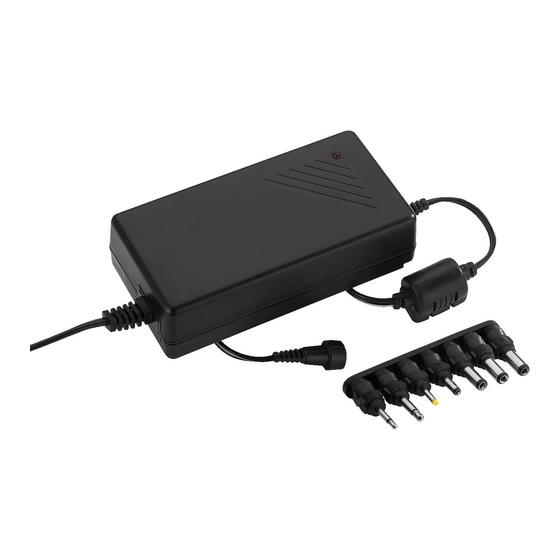
Schaltnetzgerät
D
A
CH
Bitte lesen Sie diese Anleitung vor dem Betrieb gründ-
lich durch und heben Sie sie für ein späteres Nachlesen
auf.
1 Einsatzmöglichkeiten
Dieses Schaltnetzgerät mit umschaltbarer Ausgangs-
spannung dient zur Gleichstromversorgung von elek -
trischen Kleinspannungsgeräten (z. B. tragbarer CD-
Player, Notebook). Das Gerät ist kurzschlussfest und
gegen Überlast und Überhitzung geschützt.
2 Hinweise für den sicheren Gebrauch
Das Gerät entspricht allen relevanten Richtlinien der EU
und ist deshalb mit
gekennzeichnet.
WARNUNG Das Gerät wird mit lebensgefährlicher
Netzspannung versorgt. Nehmen Sie
deshalb nie selbst Eingriffe am Gerät vor.
Durch unsachgemäßes Vorgehen be steht
die Gefahr eines elektrischen Schlages.
G
Verwenden Sie das Gerät nur im Innenbereich. Schüt-
zen Sie es vor Tropf- und Spritzwasser, hoher Luft-
feuchtigkeit und Hitze (zulässiger Einsatztemperatur-
bereich 0 – 40 °C).
G
Stellen Sie keine mit Flüssigkeit gefüllten Gefäße,
z. B. Trinkglas, auf das Gerät.
G
Nehmen Sie das Netzgerät nicht in Betrieb bzw. zie-
hen Sie sofort den Netzstecker aus der Steckdose:
1. wenn sichtbare Schäden am Gerät oder am Netz-
kabel vorhanden sind,
2. wenn nach einem Sturz oder Ähnlichem der Ver-
dacht auf einen Defekt besteht,
Switch Mode Power Supply Unit
GB
Please read these operating instructions carefully prior
to operating the unit and keep them for later reference.
1 Applications
This switch mode power supply unit with switchable out-
put voltage serves for direct current supply of electric
low-voltage units (e. g. portable CD player, notebook).
The unit is short circuit-proof and protected against
overload and overheating.
2 Safety Notes
This unit corresponds to all relevant directives of the EU
and is therefore marked with
.
WARNING
The unit uses dangerous mains voltage.
Leave servicing to skilled personnel only.
Inexpert handling or modification of the
unit may result in electric shock.
G
The unit is suitable for indoor use only. Protect it
against dripping water and splash water, high air
humidity, and heat (admissible ambient temperature
range 0 – 40 °C).
G
Do not place any vessels filled with liquid, e. g. drink-
ing glasses, on the unit.
G
Do not operate the power supply unit or immediately
disconnect it from the mains socket
1. if there is visible damage to the unit or the mains
cable,
2. if a defect might have occurred after the unit was
dropped or suffered a similar accident,
3. if malfunctions occur.
In any case the unit must be repaired by skilled per-
sonnel.
Pluspol an der Spitze/am Innenkontakt
G
Positive pole at the tip/at the inner contact
PSS-5000
3. wenn Funktionsstörungen auftreten.
Lassen Sie das Gerät in jedem Fall in einer Fach-
werkstatt reparieren.
G
Ein beschädigtes Netzkabel darf nur durch den Her-
steller oder durch eine autorisierte Fachwerkstatt er -
setzt werden.
G
Ziehen Sie den Netzstecker nie am Kabel aus der
Steckdose, fassen Sie immer am Stecker an.
G
Verwenden Sie zum Reinigen nur ein trockenes, wei-
ches Tuch, niemals Wasser oder Chemikalien.
G
Wird das Gerät zweckentfremdet, nicht richtig an ge-
schlossen, überlastet oder nicht fachgerecht repariert,
kann keine Haftung für daraus resultierende Sach-
oder Personenschäden und keine Garantie für das
Gerät übernommen werden.
Soll das Gerät endgültig aus dem Betrieb
genommen werden, übergeben Sie es zur
umweltgerechten Entsorgung einem örtlichen
Recyclingbetrieb.
3 Inbetriebnahme
1) Die benötigte Betriebsspannung für das Kleinspan-
nungsgerät einstellen: Mit dem beiliegenden Einstell-
schlüssel den gelben Spannungswahlschalter auf
den erforderlichen Spannungswert drehen.
Die Stromaufnahme des Kleinspannungsgeräts
darf den Ausgangsstrom des Netzgeräts für den ein-
gestellten Spannungswert (siehe Technische Daten)
nicht überschreiten.
2) Aus den beiliegenden 7 Adaptersteckern den für das
Kleinspannungsgerät passenden auswählen und in
die Kupplung des Netzgerätkabels stecken. Dabei
G
A damaged mains cable must only be replaced by the
manufacturer or by authorized, skilled personnel.
G
Never pull the mains cable to disconnect the mains
plug from the mains socket, always seize the plug.
G
For cleaning only use a dry, soft cloth; never use
chemicals or water.
G
No guarantee claims for the unit and no liability for any
resulting personal damage or material damage will be
accepted if the unit is used for other purposes than
orig inally intended, if it is not correctly connected, if it
is overloaded, or not repaired in an expert way.
G
Important for U. K. Customers!
The wires in this mains lead are coloured in accord -
ance with the following code:
blue = neutral, brown = live
As the colours of the wires in the mains lead of this
appliance may not correspond with the coloured
mark ings identifying the terminals in your plug, pro-
ceed as follows:
1. The wire which is coloured blue must be connected
to the terminal in the plug which is marked with the
letter N or coloured black.
2. The wire which is coloured brown must be con-
nected to the terminal which is marked with the let-
ter L or coloured red.
If the unit is to be put out of operation defini-
tively, take it to a local recycling plant for a dis-
posal which is not harmful to the environment.
3 Operation
1) Adjust the required operating voltage for the low-volt -
age unit: Use the supplied adjusting key to set the
yellow voltage selector switch to the required voltage
®
MONACOR INTERNATIONAL GmbH & Co. KG • Zum Falsch 36 • 28307 Bremen • Germany
Copyright
by MONACOR INTERNATIONAL. All rights reserved.
©
Bestell-Nr. 27.1840
unbedingt die für das Kleinspannungsgerät erforder-
liche Polarität beachten. Zum Bestimmen der Pola-
rität die Kupplung im mer so drehen, dass die Pfeile
von Kupplung und Stecker aufeinander zeigen (siehe
Abbildungen unten).
3) Das Netzgerät über den Adapterstecker mit dem
Stromversorgungsanschluss des Kleinspannungs-
geräts verbinden.
4) Zuletzt den Netzstecker des Netzgeräts in eine
Steck dose (100 – 240 V~, 50/60 Hz) stecken. Die
rote LED leuchtet im Betrieb.
Auch wenn das angeschlossene Gerät ausgeschaltet
ist, verbraucht das Netzgerät einen geringen Strom. Da -
rum sollte sein Netzstecker aus der Steckdose gezogen
werden, wenn es längere Zeit nicht gebraucht wird.
4 Technische Daten
Stromversorgung: . . . 100 – 240 V~, 50/60 Hz, 60 VA
Ausgangsspannungen: 6/7,5/9/12/13,5/15 V
Ausgangsstrom: . . . . . 5 A (bei 6/7,5/9/12 V ) bzw.
Maße, Gewicht: . . . . . 70 × 37 × 140 mm, 480 g
Adapterstecker
2 Klinkenstecker: . . ∅ 2,5 mm (A) und 3,5 mm (B)
5 Hohlstecker: . . . . ∅ Außen-/Innenmaß in mm:
Änderungen vorbehalten.
value. The current consumption of the low-voltage
unit must not exceed the output current of the power
supply unit for the voltage value adjusted (see table
in the specifications).
2) Select the matching plug for the low-voltage unit from
the 7 adapter plugs supplied and connect it to the in -
line jack of the cable of the power supply unit. In any
case observe the required polarity for the low-volt -
age unit. To determine the polarity, always turn the
inline jack in such a way that the arrows of inline jack
and plug face each other (see figures below).
3) Connect the power supply unit via the adapter plug to
the power supply connection of the low-voltage unit.
4) Finally connect the mains plug of the power supply
unit to a mains socket (100 – 240 V~, 50/60 Hz). The
red LED is illuminated during operation.
Even with the unit connected switched off, the power
supply unit has a low current consumption. Therefore, it
is recommended to disconnect it from the mains socket
if it is not used for a longer period.
4 Specifications
Power supply: . . . . . . 100 – 240 V~, 50/60 Hz, 60 VA
Output voltages: . . . . . 6/7.5/9/12/13.5/15 V
Output current: . . . . . . 5 A (at 6/7.5/9/12 V ) or
Dimensions, weight: . . 70 × 37 × 140 mm, 480 g
Adapter plugs
2 plugs: . . . . . . . . . ∅ 2.5 mm (A) and 3.5 mm (B)
5 hollow plugs: . . . . ∅ ext./int. in mm: 2.35/0.75 (S),
Subject to technical modification.
Minuspol an der Spitze/am Innenkontakt
3,8 A (bei 13,5/15 V )
2,35/0,75 (S), 3,5/1,35 (H),
5,0/2,1 (D), 5,5/2,1 (E),
5,5/2,5 (G)
3.8 A (at 13.5/15 V )
3.5/1.35 (H), 5.0/2.1 (D),
5.5/2.1 (E), 5.5/2.5 (G)
G
Negative pole at the tip/at the inner contact
A-0269.99.02.05.2011
Werbung

Verwandte Anleitungen für Monacor Accessories PSS-5000


Inhaltszusammenfassung für Monacor Accessories PSS-5000
- Seite 1 Positive pole at the tip/at the inner contact Minuspol an der Spitze/am Innenkontakt Negative pole at the tip/at the inner contact ® MONACOR INTERNATIONAL GmbH & Co. KG • Zum Falsch 36 • 28307 Bremen • Germany Copyright by MONACOR INTERNATIONAL. All rights reserved. A-0269.99.02.05.2011...
- Seite 2 Pôle moins à la pointe / au contact intérieur Polo negativo alla punta /al contatto interno ® MONACOR INTERNATIONAL GmbH & Co. KG • Zum Falsch 36 • 28307 Bremen • Germany Copyright by MONACOR INTERNATIONAL. All rights reserved. A-0269.99.02.05.2011...
- Seite 3 Styk dodatni na czubku/wewnętrzny Polo negativo a la punta/al contacto interior Styk ujemny na czubku/wewnętrzny ® MONACOR INTERNATIONAL GmbH & Co. KG • Zum Falsch 36 • 28307 Bremen • Germany Copyright by MONACOR INTERNATIONAL. All rights reserved. A-0269.99.02.05.2011 ©...