Inhaltsverzeichnis
Werbung
Verfügbare Sprachen
Verfügbare Sprachen
Quicklinks
Quick Start Guide
Anker Innovations Limited. All rights reserved. Eufy Security and Eufy
Security Logo are trademarks of Anker Innovations Limited, registered in the
Floodlight Camera
United States and other countries. All other trademarks are the property of
their respective owners.
Model: T8420
51005001891 V01
Werbung
Kapitel
Inhaltsverzeichnis

Verwandte Anleitungen für eufy Security T8420


Inhaltszusammenfassung für eufy Security T8420
- Seite 1 Quick Start Guide Anker Innovations Limited. All rights reserved. Eufy Security and Eufy Security Logo are trademarks of Anker Innovations Limited, registered in the Floodlight Camera United States and other countries. All other trademarks are the property of their respective owners.
-
Seite 2: Inhaltsverzeichnis
Table of Contents Safety Instructions What's in the Box Getting Started Installing the Junction Box Mounting Floodlight Camera Adjusting Floodlight Camera Restoring Power Using the Floodlight Camera on the Eufy Security App 10 NOTICE... -
Seite 3: Safety Instructions
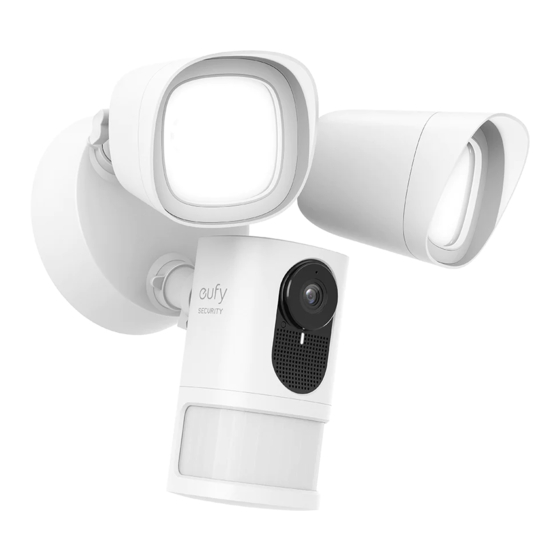
* The motion sensor is more sensitive to movements across the camera field of view than movements towards or away from the sensor. We highly recommend you install the floodlight camera on the side wall. Floodlight Camera Junction Box Installation Hook (T8420) Central Screw Central Screw Cap Plate Screws 01 EN EN 02... -
Seite 4: Installing The Junction Box
Installing the Junction Box On the side wall: 1. Remov Increased Increased detection detection range range for horizontal for vertical movement movement up to 33ft (10m) up to 26ft (8m) Move towards or leave vertically Move horizontally On the front wall: Detection range Detection range for vertical... - Seite 5 3. Install the junction box: 4. Unscrew the bolt with a flat-head screwdriver. Connect the Neutral (blue) / Ground (green / green and yellow) / Live (brown) wire to the Neutral / • Orientate the two mounting holes vertically to ensure stable mounting. Ground / Live wire connector in the junction box respectively.
-
Seite 6: Mounting Floodlight Camera
Mounting Floodlight Camera Connect Wires 1. Connect Ground wire from the Floodlight Camera to the Ground wire from Hang Floodlight Camera the wire connector in the junction box. 2. Connect the Live / Neutral wire from the Floodlight Camera to the Live / Hang Floodlight Camera on the junction box with the hook provided. -
Seite 7: Adjusting Floodlight Camera
Security App 3. Cover the central screw with the central screw cap to prevent it from rusting. 1. Download the Eufy Security app from the App Store (iOS devices) or Google Play (Android devices). 2. Sign up for a Eufy Security account. Follow the onscreen instructions to connect Floodlight Camera to your Wi-Fi network. -
Seite 8: Notice
NOTICE For troubleshooting, check the Help section in the Eufy Security app. FCC Statement Refer to the app for information on the various LED status indications. This device complies with Part 15 of the FCC Rules. Operation is subject to the following two conditions: (1) this device may not cause harmful interference, and (2) this device must accept any interference received, including interference that may cause undesired operation. -
Seite 9: Declaration Of Conformity
Wi-Fi Operating Frequency Range:2412~2472MHz for EU; afin de vous conformer aux exigences en matière d'exposition RF. Wifi Max Output Power:18.98dBm(ERIP) FCC ID:2AOKB-T8420 IC:23451-T8420 This product is designed and manufactured with high quality materials Anker Innovations Limited and components, which can be recycled and reused. -
Seite 10: Sicherheitsinformationen
Installieren der Anschlussdose zwischen -20 °C und 50 °C. Im Lieferumfang Montage der Überwachungskamera mit Scheinwerfer Anpassen der Überwachungskamera mit Scheinwerfer Wiederherstellen der Stromverbindung Verwenden der Überwachungskamera mit über die eufy Security-App Scheinwerfer Überwachungskamera Anschlussdose Montagehaken mit Scheinwerfer (T8420) Zentralschraube... -
Seite 11: Erste Schritte
Erste Schritte An der Seitenwand: 1. Trennen Sie die Stromversorgung über den Hauptschalter.Schalten Sie das Licht ein/aus, um sicherzustellen, dass die Stromversorgung ordnungsgemäß getrennt wurde. Erweiterter Erweiterter Detektionsbereich Detektionsbereich für vertikale für horizontale Bewegungen von Bewegungen von bis zu 6 m bis zu 10 m In die Richtung bewegen oder vertikal belassen... -
Seite 12: Installieren Der Anschlussdose
Installieren der Anschlussdose 3. Installieren der Anschlussdose: • Richten Sie die beiden Befestigungslöcher vertikal aus, um eine stabile 1. Entfernen Sie die in der folgenden Abbildung dargestellten Gummistopfen. Montage sicherzustellen. • Bohren Sie bei Holzwänden KEINE Löcher vor.Verwenden Sie die mitgelieferten Schrauben, um die Anschlussdose an der Wand anzubringen. -
Seite 13: Montage Der Überwachungskamera Mit Scheinwerfer
Montage der Überwachungskamera mit 4. Lösen Sie die Schraube mit einem Schlitzschraubendreher. Verbinden Sie den Neutralleiter (blau)/den Schutzleiter (grün/ Scheinwerfer grün-gelb)/die Phase (braun) mit den entsprechenden Anschlüssen der Anschlussdose.Befestigen Sie sie gründlich, um zu verhindern, dass sie sich lösen. Aufhängen der Überwachungskamera mit Scheinwerfer Neutral Hängen Sie die Überwachungskamera mit Scheinwerfer unter Verwendung... -
Seite 14: Anschließen Der Drähte
Anschließen der Drähte Anbringen der Überwachungskamera mit Scheinwerfer an der Anschlussdose 1. Verbinden Sie den Schutzleiter der Überwachungskamera mit Scheinwerfer mit dem Schutzleiter des Anschlusses in der Anschlussdose. 1. Richten Sie das Loch an der Anschlussdose an der Öffnung in der Überwachungskamera mit Scheinwerfer aus. -
Seite 15: Anpassen Der Überwachungskamera Mit Scheinwerfer
Statusanzeigen finden Sie in der App. Hauptschalter, bevor Sie ihre Verkabelung überprüfen. Verwenden der Überwachungskamera mit Scheinwerfer über die eufy Security-App 1. Laden Sie die eufy Security-App aus dem App Store (iOS-Geräte) oder bei Google Play (Android) herunter. 25 DE DE 26... -
Seite 16: Instrucciones De Seguridad
Ajuste de la cámara con focos Restablecimiento de la alimentación Uso de la cámara con focos con la aplicación eufy Security Cámara con focos Caja de conexiones Gancho de instalación (T8420) Tornillo central Tapa del tornillo central Tornillos de la placa ES 28... -
Seite 17: Primeros Pasos
Primeros pasos En la pared lateral: 1. Desconecte el disyuntor de la vivienda.Encienda y apague las luces para asegurarse de que la electricidad de la vivienda se ha desconectado correctamente. Mayor alcance de Mayor alcance de detección para el detección para el movimiento vertical movimiento horizontal de hasta 8 m... -
Seite 18: Instalación De La Caja De Conexiones
Instalación de la caja de conexiones 3. Instale la caja de conexiones: • Oriente los dos agujeros de montaje verticalmente para garantizar que 1. Retire los tapones de goma indicados en la siguiente ilustración. el montaje sea estable. • NO perfore orificios para los tornillos en paredes de madera.Utilice los tornillos suministrados para fijar la caja de conexiones a la pared. -
Seite 19: Montaje De La Cámara Con Focos
Montaje de la cámara con focos 4. Afloje el tornillo con un destornillador de cabeza plana. Conecte los cables neutro (azul)/ de tierra (verde/verde y amarillo)/energizado (marrón) al conector Cuelgue la cámara con focos: neutro/de tierra/energizado de la caja de conexiones respectivamente.Fije los cables adecuadamente para evitar que se caigan. - Seite 20 Conecte los cables: Montaje de la cámara con focos en la caja de conexiones 1. Conecte el cable de tierra de la cámara con focos al cable de tierra del conector de tierra de la caja de conexiones. 1. Alinee el orificio de la caja de conexiones con el orificio de la cámara con focos.
-
Seite 21: Ajuste De La Cámara Con Focos
Uso de la cámara con focos con la aplicación eufy Security 1. Descargue la aplicación Eufy Security desde la App Store (dispositivos iOS) o Google Play (dispositivos Android). 37 ES... -
Seite 22: Consignes De Sécurité
Montage de la caméra Floodlight Ajustement de la caméra Floodlight Restaurer l'électricité Utilisation de la caméra Floodlight avec l'application eufy Security Caméra Floodlight Boîte de jonction Crochet d'installation (T8420) Vis centrale Capuchon de la vis centrale Vis de la plaque FR 40... -
Seite 23: Premiers Pas
Premiers pas Sur le mur latéral : 1. Coupez l'alimentation au niveau du disjoncteur de votre maison.Allumez/ éteignez les lumières pour vous assurer que l'électricité de votre maison est correctement coupée. Plage de détection Plage de détection accrue pour accrue pour le mouvement le mouvement vertical jusqu'à... -
Seite 24: Installation De La Boîte De Jonction
Installation de la boîte de jonction 3. Installer la boîte de jonction : • Orientez les deux trous de montage verticalement pour garantir un 1. Retirez les bouchons en caoutchouc indiqués dans l'illustration ci-dessous. montage stable. • Sur les murs en bois, ne pré-percez PAS de trous.Utilisez les vis fournies pour fixer la boîte de jonction au mur. -
Seite 25: Montage De La Caméra Floodlight
Montage de la caméra Floodlight 4. Dévissez le boulon de fixation avec un tournevis à tête plate. Connectez respectivement les fils neutre (bleu)/ de terre (vert/vert et jaune)/sous tension (marron) au connecteur neutre/ Accrocher la caméra Floodlight de terre/sous tension de la boîte de jonction.Fixez bien les câbles pour éviter qu'ils ne tombent. - Seite 26 Connecter les fils Monter la caméra Floodlight sur la boîte de jonction 1. Connectez le fil de terre de la caméra Floodlight au fil de terre du connecteur de fils de la boîte de jonction. 1. Alignez le trou de la boîte de jonction avec l'ouverture sur la caméra Floodlight.
-
Seite 27: Ajustement De La Caméra Floodlight
Ajustement de la caméra Floodlight 2. Inscrivez-vous à un compte eufy Security.Suivez les instructions à l'écran pour connecter la caméra Floodlight à votre réseau Wi-Fi.Vous pouvez désormais consulter le flux en direct dans l'application eufy Security. 1. Une fois l’installation terminée, desserrez les vis d'ajustement de la caméra et du projecteur pour ajuster la position de la caméra et de la lumière aux... -
Seite 28: Informazioni Sulla Sicurezza
Montaggio della telecamera a faro Regolare la telecamera a faro Ripristinare l’alimentazione Telecamera a faro Scatola di giunzione Gancio di installazione Utilizzo della telecamera a faro sull’app Eufy Security 61 (T8420) Vite centrale Tappo della vite centrale Viti della piastra IT 52... -
Seite 29: Per Iniziare
Per iniziare Sulla parete laterale: 1. Spegnere l’interruttore dell’abitazione.Accendere/Spegnere le luci per assicurarsi che l’alimentazione dell’abitazione sia correttamente spenta. Aumento della Plage de détection portata di accrue pour rilevamento le mouvement per movimento horizontal jusqu'à verticale fino a 8 m 10 m (33 po) Spostare in direzione o lasciare in verticale... - Seite 30 Installazione della scatola di giunzione 3. Installazione della scatola di giunzione: • Orientare i due fori di montaggio in verticale per garantire un 1. Rimuovere i tappi di gomma indicati nell’illustrazione seguente. montaggio stabile. • Su pareti di legno, NON preforare.Utilizzare le viti fornite per fissare la scatola di giunzione alla parete.
- Seite 31 Montaggio della telecamera a faro 4. Svitare il bullone con un cacciavite a testa piatta. Collegare il cavo neutro (blu)/terra (verde/verde e giallo)/sotto tensione (marrone) al connettore neutro/terra/sotto tensione nella scatola di Appendere la telecamera a faro giunzione, rispettivamente.Fissare saldamente i fili per evitare cadute. Appendere la videocamera a faro sulla scatola di giunzione con il gancio in dotazione.
- Seite 32 Collegare i cavi Montare la telecamera a faro sulla scatola di giunzione. 1. Collegare il cavo di terra dalla telecamera a faro al cavo di terra dal connettore dei cavi nella scatola di giunzione. 1. Allineare il foro sulla scatola di giunzione con l’apertura nella telecamera a faro.
- Seite 33 Se la telecamera a faro non è accesa, spegnere l’interruttore automatico prima di controllarne il cablaggio. Utilizzo della telecamera a faro sull’app Eufy Security 1. Scaricare l’app Eufy Security dall’App Store (dispositivi iOS) o da Google Play (dispositivi Android). 61 IT IT 62...
-
Seite 34: Veiligheidsinstructies
Wat zit er in de doos? De aansluitdoos installeren De camera met schijnwerpers monteren De camera met schijnwerpers afstellen De stroom opnieuw inschakelen De camera met schijnwerpers gebruiken in de Eufy Camera met Aansluitdoos Installatiehaak schijnwerpers Security-app (T8420) Centrale schroef Centrale schroefdop Plaatschroeven NL 64... -
Seite 35: Aan De Slag
Aan de slag Op de zijwand: 1. Schakel de stroom uit bij de stroomonderbreker in uw huis.Schakel het licht in/uit om te controleren of de elektriciteit in uw huis correct is uitgeschakeld. Verhoogd Verhoogd detectiebereik detectiebereik voor verticale voor horizontale bewegingen tot 8 m bewegingen tot 10 m Verticaal in de richting van of weg... -
Seite 36: De Aansluitdoos Installeren
De aansluitdoos installeren 3. De aansluitdoos installeren: • Plaats de twee montagegaten verticaal om een stabiele montage te 1. Verwijder de rubberen pluggen zoals aangegeven in de onderstaande waarborgen. afbeelding. • Boor GEEN gaten voor op houten muren.Gebruik de meegeleverde schroeven om de aansluitdoos op de muur te bevestigen. -
Seite 37: De Camera Met Schijnwerpers Monteren
De camera met schijnwerpers monteren 4. Schroef de bout los met een platte schroevendraaier. Sluit de nuldraad (blauw) / aardedraad (groen / groen en geel) / fasedraad (bruin) aan op De camera met schijnwerpers ophangen respectievelijk de aansluitpunten voor de nuldraad / aardedraad / fasedraad in de aansluitdoos.Zet de draden stevig vast om te voorkomen Hang de camera met schijnwerpers met de meegeleverde haak aan de dat ze losraken. - Seite 38 De draden aansluiten Bevestig de camera met schijnwerpers aan de aansluitdoos 1. Sluit de aardedraad van de camera met schijnwerpers aan op het aansluitpunt voor de aardedraad in de aansluitdoos. 1. Lijn het gat op de aansluitdoos uit met de opening in de camera met schijnwerpers.
-
Seite 39: De Camera Met Schijnwerpers Afstellen
De camera met schijnwerpers afstellen 2. Meld u aan voor een eufy Security-account.Volg de instructies op het scherm om de camera met schijnwerpers te verbinden met uw wifi-netwerk.U kunt nu de livestream bekijken in de eufy Security-app. 1. Nadat de installatie is voltooid, draait u de stelschroeven op de camera... -
Seite 40: Instruções De Segurança
Conteúdo da embalagem Instalar a caixa de ligação Instalar a Câmara de holofote Ajustar a Câmara de holofote Repor a energia Utilizar a Câmara de holofote na aplicação Eufy Security Câmara de holofote Caixa de ligação Gancho de instalação (T8420) - Seite 41 Começar Na parede lateral: 1. Corte a alimentação do disjuntor na sua habitação.Ligue/desligue as luzes para se certificar de que a eletricidade na sua habitação está realmente cortada. Increased Increased detection detection range range for horizontal for vertical movement movement up to 33ft (10m) up to 26ft (8m) Move towards or leave vertically...
- Seite 42 Instalar a caixa de ligação 3. Instalar a caixa de ligação: • Oriente os dois orifícios de instalação verticalmente para garantir uma 1. Remova as fichas de borracha indicadas na ilustração abaixo. instalação estável. • Em paredes de madeira, NÃO perfure orifícios previamente.Utilize os parafusos fornecidos para fixar a caixa de ligação à...
- Seite 43 Instalar a Câmara de holofote 4. Desaperte o parafuso com uma chave de parafusos de ponta plana. Ligue o fio Neutro (azul) / Terra (verde / verde e amarelo) / Sob tensão (castanho) ao conetor Pendurar a Câmara de holofote Neutro / Terra / Sob tensão respetivamente na caixa de ligação.Fixe bem os fios para evitar que algum caia.
- Seite 44 Ligar fios Instalar a Câmara de holofote na Caixa de ligação 1. Ligue o fio Terra da Câmara de holofote ao fio Terra do conetor de fios na 1. Alinhe o orifício na caixa de ligação com a abertura na Câmara de holofote. caixa de ligação.
- Seite 45 Ajustar a Câmara de holofote 2. Crie uma conta Eufy Security.Siga as instruções no ecrã para ligar a Câmara de holofote à sua rede Wi-Fi.Em seguida, já pode ver a transmissão em direto na aplicação Eufy Security. 1. Depois da instalação estar concluída, desaperte os parafusos de ajuste na câmara e no holofote para ajustar a posição da câmara e do holofote nos...
- Seite 46 الحائط الجانبي.يوصى بشدة استخدام الطريقة الثانية للحصول على تغطية مثالية *.لألضواء الكاشفة والكاميرا .* مستشعر الحركة أكثر حساسية للحركات عبر مجال رؤية الكاميرا من الحركات تجاه المستشعر أو بعي د ً ا عنه Floodlight كاميرا صندوق التوصيل خطاف التثبيت )T8420( مسمار مركزي غطاء مسمار مركزي مسامير اللوحة AR 88...
- Seite 47 :على الحائط الجانبي تثبيت صندوق التوصيل .انزع المقابس المطاطية الموضحة في الرسم التوضيحي أدناه نطاق اكتشاف نطاق اكتشاف متزايد متزايد للحركة للحركة األفقية يصل الرأسية يصل إلى إلى 33 قدم 01 متر 62 قد م ًا 8 متر التحرّ ك نحوه أو بعي د ًا عنه رأس ي ًا التحرّ...
- Seite 48 :تثبيت صندوق التوصيل .قم بفك المسامير باستخدام مفك ذو رأس مسطحة / )قم بتوصيل السلك المحايد (األزرق .قم بتوجيه الفتحتين المتالصقتين عمود ي ًا لضمان تثبيت مستقر األرضي (األخضر / األخضر واألصفر) / الكهربي (البني) بالموصل ال تقم بحفر الثقوب مسب ق ً ا على الجدران الخشبية.استخدم المسامير المرفقة .السلكي...
- Seite 49 Floodlight تركيب كاميرا توصيل األسالك Floodlight تعليق كاميرا بالسلك األرضي منFloodlight قم بتوصيل السلك األرضي من كاميرا . في صندوق التوصيل بالخطاف ال م ُرفقFloodlight تعليق كاميرا .الموصل السلكي في صندوق التوصيل بالسلك الكهربيFloodlight قم بتوصيل السلك الكهربي / المحايد من كاميرا ./ المحايد...
- Seite 50 .Floodlight قاطع الدائرة الكهربائية قبل التح ق ّ ق من سلك كاميرا Eufy Security في تطبيقFloodlight استخدام كاميرا (لألجهزة التي تعملApp Store منEufy Security يمكنك تنزيل تطبيق .قم بتغطية المسمار المركزي بغطاء المسمار المركزي لمنعه من الصدأ...
-
Seite 51: Customer Service
Customer Service .Eufy Security الستكشاف األخطاء وإصالحها، تح ق ّ ق من قسم المساعدة في تطبيق .LED الرجوع إلى التطبيق للحصول على معلومات حول مختلف حاالت مؤشرات Kundenservice | Servicio de atención al cliente Service client Servizio clienti | Klantenservice •... - Seite 52 Customer Support: support@eufylife.com Anker Innovations Limited Room 1318-19, Hollywood Plaza, 610 Nathan Road, Mongkok, Kowloon, Hong Kong 99 AR...