Herunterladen Inhalt Inhalt Diese Seite drucken

Werbung

Verfügbare Sprachen
  • DE

Verfügbare Sprachen

  • DEUTSCH, seite 1
10034936
Follower
Fahrradanhänger
Bicycle Trailer
Remorque de vélo
Remolque de bicicletas
Rimorchio da bici

Werbung

Inhaltsverzeichnis
loading

Inhaltszusammenfassung für Klarfit Follower

  • Seite 1 10034936 Follower Fahrradanhänger Bicycle Trailer Remorque de vélo Remolque de bicicletas Rimorchio da bici...
  • Seite 3: Technische Daten

    Sehr geehrter Kunde, wir gratulieren Ihnen zum Erwerb Ihres Gerätes. Lesen Sie die folgenden Hinweise sorgfältig durch und befolgen Sie diese, um möglichen Schäden vorzubeugen. Für Schäden, die durch Missachtung der Hinweise und unsachgemäßen Gebrauch entstehen, übernehmen wir keine Haftung. Scannen Sie den folgenden QR-Code, um Zugriff auf die aktuellste Bedienungsanleitung und weitere Informationen rund um das Produkt zu erhalten.
  • Seite 4: Sicherheitshinweise

    SICHERHEITSHINWEISE • Der Anhänger sollte nicht mit mehr als 35 kg beladen werden. • Der Anhänger darf nicht benutzt werden, um Personen damit zu befördern. • Führen Sie keine technischen Modifikationen am Gerät durch. Dies kann zu Gefahren im Straßenverkehr führen und die Herstellergarantie erlischt. •...
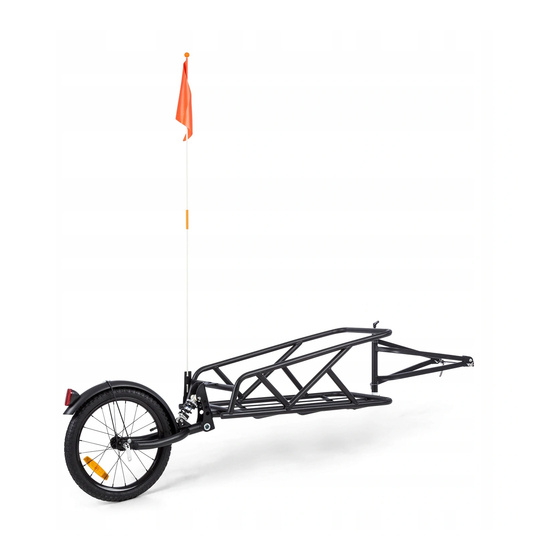
  • Seite 5: Zusammenbau

    ZUSAMMENBAU Schritt 1: Schutzblech und Gabel Bauen Sie Schutzblech und Gabel zusammen. Schritt 2: Laufrad Befestigen Sie das Laufrad mit dem Schnellspanner an der Gabel. Schritt 3: Laderahmen Verbinden Sie den Laderahmen und die Gabel mit der Verbindungsmutter.
  • Seite 6 Schritt 4: Dämpfer Installieren Sie den Dämpfer am Laderahmen. Schritt 5: Fahrradhalterung Entfernen Sie die Schraube an der Fahrradhalterung und entnehmen Sie die Spindel. Setzen Sie die Befestigen Sie Fahrradhalterung an zum Schluss die den Laderahmen an, Sicherheitsfahne am setzen Sie die Spindel Laderahmen.
  • Seite 7 Hinterradadapter Im Lieferumfang Optional enthalten Befestigung des Fahrradanhängers an einem Fahrrad ohne Schnellspanner Lösen Sie die Schraube Setzen Sie den Schieben Sie den am Hinterrad. Fahrradanhänger auf Sicherheitsverschluss die Achse. in Pfeilrichtung nach unten. Der Anhänger ist nun Setzen Sie zum Schluss die sicher befestigt.
  • Seite 8: Wichtige Hinweise Zur Befestigung Und Benutzung

    WICHTIGE HINWEISE ZUR BEFESTIGUNG UND BENUTZUNG Hinweis: Die Verbindung zwischen Fahrrad und Anhänger ist der wichtigste Schritt im Montageprozess. Vergewissern Sie sich, dass der Anhänger sicher mit dem Fahrrad verbunden ist. Wenn sich die Anhängerkupplung nicht sicher an Ihrem Fahrrad befestigen oder anziehen lässt, verwenden Sie sie nicht.
  • Seite 9: Technical Data

    Dear Customer, Congratulations on purchasing this device. Please read the following instructions carefully and follow them to prevent possible damages. We assume no liability for damage caused by disregard of the instructions and improper use. Scan the QR code to get access to the latest user manual and more product information.
  • Seite 10: Safety Instructions

    SAFETY INSTRUCTIONS • The trailer should not be loaded with more than 35 kg. • The trailer must not be used to carry persons. • Do not make any technical modifications to the equipment. This may result in road hazards and void the manufacturer‘s warranty. •...
  • Seite 11 ASSEMBLY Step 1: Mudguard and fork Assemble the mudguard and fork. Step 2: Wheel Attach the wheel to the fork using the quick release. Step 3: Loading frame Connect the loading frame and fork with the connecting nut.
  • Seite 12 Step 4: Damper Install the damper on the loading frame. Step 5: Bicycle holder Remove the screw from the bicycle holder and remove the spindle. Place the bicycle holder Finally, attach the on the loading frame, safety flag to the reinsert the spindle and loading frame.
  • Seite 13 Rear wheel adapter Included in delivery Optional Attachment of the bicycle trailer to a bicycle without quick-release Loosen the screw on Place the bicycle trailer Slide the safety catch the rear wheel. on the axle. down in the direction of the arrow.
  • Seite 14 IMPORTANT NOTES ON FASTENING AND USE Note: The connection between bicycle and trailer is the most important step in the assembly process. Make sure that the trailer is securely attached to the bicycle. If the trailer hitch cannot be securely attached or tightened to your bicycle, do not use it.
  • Seite 15 Estimado cliente: Le felicitamos por la adquisición de este producto. Lea atentamente el siguiente manual y siga cuidadosamente las instrucciones de uso con el fin de evitar posibles daños. La empresa no se responsabiliza de los daños ocasionados por un uso indebido del producto o por haber desatendido las indicaciones de seguridad.
  • Seite 16: Instrucciones De Seguridad

    INSTRUCCIONES DE SEGURIDAD • El remolque no debe ser cargado con más de 35 kg. • El remolque no debe utilizarse para transportar personas. • No haga ninguna modificación técnica en el dispositivo. Esto puede provocar peligros en el tráfico rodado y anula la garantía del fabricante. •...
  • Seite 17 MONTAJE Paso 1: Guardabarros y horquilla Monta el guardabarros y la horquilla Paso 2: Impulsor Ata la rueda a la horquilla con el cierre rápido. Paso 3: Marco de carga Conecte el marco de carga y la horquilla con la tuerca de conexión.
  • Seite 18 Paso 4: Amortiguador Instale el amortiguador en el marco de carga. Paso 5: Portabicicletas Retira el tornillo del soporte de la bicicleta y quita el eje. Coloque el soporte de Por último, coloque la la bicicleta en el marco bandera de seguridad de carga, reinserte el en el marco de carga.
  • Seite 19 Adaptador trasero Incluido en la entrega Opcional Fijar el remolque de la bicicleta a una bicicleta sin liberación rápida Afloja el tornillo de la Coloca el remolque de Deslice el cierre de rueda trasera. la bicicleta en el eje. seguridad hacia abajo en la dirección de la flecha.
  • Seite 20 INSTRUCCIONES IMPORTANTES PARA EL MONTAJE Y EL USO Nota: La conexión entre la bicicleta y el remolque es el paso más importante en el proceso de montaje. Asegúrese de que el remolque está conectado de forma segura a la bicicleta. Si el gancho de remolque no puede ser fijado o apretado con seguridad a su bicicleta, no lo utilice.
  • Seite 21: Fiche Technique

    Chère cliente, cher client, Toutes nos félicitations pour l’acquisition de ce nouvel appareil. Veuillez lire attentivement et respecter les instructions de ce mode d’emploi afin d’éviter d’éventuels dommages. Le fabricant ne saurait être tenu pour responsable des dommages dus au non-respect des consignes de sécurité...
  • Seite 22: Consignes De Sécurité

    CONSIGNES DE SÉCURITÉ • La remorque ne doit porter plus de 35 kg. • La remorque ne doit pas être utilisée pour transporter des personnes. • N‘effectuez aucune modification technique sur l‘appareil. Cela peut entraîner des risques dans la circulation et annule la garantie du fabricant. •...
  • Seite 23 ASSEMBLAGE Étape 1: garde-boue et fourche Assemblez le garde-boue et la fourche. Étape 2 : roue libre Fixez la roue à la fourche avec le blocage rapide. Étape 3: cadre de chargement Reliez le cadre de chargement et la fourche avec l‘écrou de connexion.
  • Seite 24 Étape 4: amortisseurs Installez l‘amortisseur sur le cadre. Étape 5: fixation au vélo Retirez la vis du support de vélo et retirez l‘axe. Placez le support de Enfin, attachez le vélo sur le cadre de drapeau de sécurité au chargement, remettez cadre de chargement.
  • Seite 25 Adaptateur pour roue arrière Fourni dans le livraison En option Fixation de la remorque à vélo à un vélo sans déverrouillage rapide Desserrez l'écrou de la Placez la remorque à Poussez le verrou de roue arrière. vélo sur l'essieu. sécurité vers le bas dans le sens de la flèche.
  • Seite 26 REMARQUES IMPORTANTES POUR LE MONTAGE ET L’UTILISATION Remarque : La connexion entre le vélo et la remorque est l’étape la plus importante du processus de montage. Assurez-vous que la remorque est correctement attachée au vélo. Si l’attelage n‘est pas serré fermement sur votre vélo, ne l’utilisez pas.
  • Seite 27 Gentile cliente, La ringraziamo per aver acquistato il dispositivo. La preghiamo di leggere attentamente le seguenti istruzioni per l’uso e di seguirle per evitare possibili danni tecnici. Non ci assumiamo alcuna responsabilità per danni scaturiti da una mancata osservazione delle avvertenze di sicurezza e da un uso improprio del dispositivo.
  • Seite 28: Avvertenze Di Sicurezza

    AVVERTENZE DI SICUREZZA • Il rimorchio è adatto a un carico massimo di 35 kg. • Il rimorchio non deve essere utilizzato per trasportare persone. • Non apportare modifiche tecniche al dispositivo, poiché può comportare pericoli e la perdita di validità della garanzia. •...
  • Seite 29 ASSEMBLAGGIO Passo 1: parafango e forcella Montare il parafango e la forcella. Passo 2: ruota Agganciare la ruota alla forcella con lo sgancio rapido. Passo 3: telaio di sostegno Fissare il telaio di sostegno alla forcella con il dado di collegamento.
  • Seite 30 Passo 4: ammortizzatore Montare l’ammortizzatore al telaio di sostegno. Passo 5: supporto per bici Togliere la vite dal supporto e rimuovere il mandrino. Attaccare il supporto Dopodiché applicare al telaio di sostegno, la bandiera di reinserire il mandrino e segnalazione al telaio di stringerlo.
  • Seite 31 Adattatore ruota posteriore Incluso nella Opzionale confezione Come fissare il rimorchio a una bici senza sgancio rapido Allentare la vite sulla Posizionare il rimorchio Spingere la chiusura di ruota posteriore. sull’asse. sicurezza verso il basso seguendo la direzione della freccia. Il rimorchio è...
  • Seite 32 AVVERTENZE IMPORTANTI RIGUARDANTI IL FISSAGGIO E L’UTILIZZO Nota: il collegamento tra bici e rimorchio è il passaggio più importante del processo di montaggio. Assicurarsi che il rimorchio sia ben collegato alla bici. Se il giunto non si lascia fissare o stringere saldamente alla bici, non utilizzarlo.

Diese Anleitung auch für:

10034936

Inhaltsverzeichnis