Yealink SIP-T58A Schnellstartanleitung
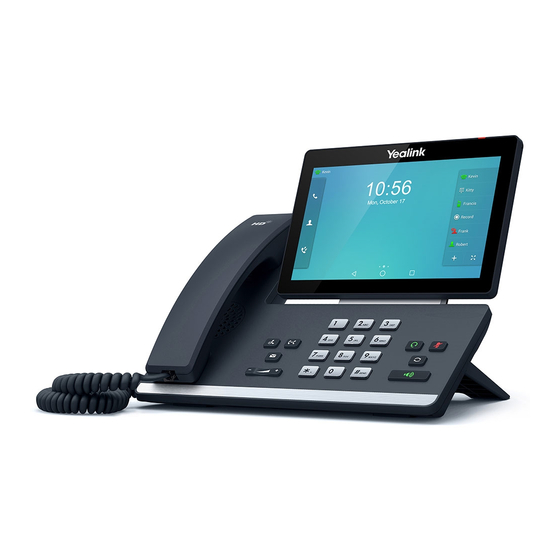
Smart business phone
Vorschau ausblenden
Andere Handbücher für SIP-T58A:
- Bedienungsanleitung (2 Seiten) ,
- Schnellstartanleitung (61 Seiten)

Verwandte Anleitungen für Yealink SIP-T58A


Inhaltszusammenfassung für Yealink SIP-T58A
- Seite 1 Smart Business Phone SIP-T58A with camera & SIP-T58A SIP-T58A with camera English | Deutsch | Español | Français Quick Start Guide (V84.10) www.yealink.com Applies to firmware version 58.84.0.1 or later.
- Seite 3 Table of Contents English ............1 Deutsch............15 Español............29 Français ............43...
-
Seite 5: Package Contents
Adjust Camera Angle Note: The camera can only be connected to the USB port on the top of the phone. And the IP phone only supports the Yealink original USB camera CAM50. 2. Attach the stand and adjust the angle of the touch screen, as shown below: PUSH D... - Seite 6 The USB port (on the rear of the phone) can also be used to connect color-screen expansion module EXP50, USB headset or DECT dongle kit DD10K. For more information on how to use EXP50, refer to Yealink EXP50 User Guide. For more information on how to use USB headset, refer to the documentation from the manufacturer.
- Seite 7 IEEE 802.3af compliant PoE Hub/Switch Note: The IP phone should be used with Yealink original power adapter (5V/2A) only. The use of the third-party power adapter may cause the damage to the phone. 7. Connect to the network, as shown below: You have two options for network connection.
- Seite 8 Hardware Component Instructions D C 5 V P C I n t e r n e t Item Item Item TRANSFER Key Hookswitch Camera Camera Lens Power Indicator LED HOLD Key MESSAGE Key Camera Indicator LED Touch Screen Shutter Switch HEADSET Key Volume Key Keypad...
- Seite 9 Startup After the IP phone is connected to the network and supplied with power, it automatically begins the initialization process. Welcome After startup, the phone is ready for use. You can configure the phone via web user interface or phone user interface. nitializing...
-
Seite 10: Using Your Phone
Register status icons on the touch screen: (Gray) Register Failed (Green) Registered (Green and Flashing) Registering Note: Check with your system administrator if any error appears during the registration process or a specific configuration is required for your registration. Configuring via phone user interface Network Settings: 1. - Seite 11 Using the Touch Screen By default, the IP phone supports three idle screens. The home screen displays as below: Status Bar Phone Dialer Digital Clock Widget Directory Tap to add DSS keys. History Android Keys Screen Indicator To navigate the touch screen: Swipe left or right to switch among different idle screens.
- Seite 12 Entering and Updating Data To use onscreen keyboard: 1. Tap the input field, the onscreen keyboard will display on the touch screen: Tap to backspace. Label automatically to identify the context-sensitive features. Tap Next to go to next field. Tap Done to confirm the settings.
- Seite 13 Ending a Video/Voice Call Using the handset: Hang up the handset or tap the End Call soft key. Using the speakerphone: Press or tap the End Call soft key. Using the headset: Tap the End Call soft key. Redial Press to enter the Placed Calls list, and then tap the desired entry.
- Seite 14 Call Conference 1. Tap the Conference soft key during an active call. The call is placed on hold. 2. Enter the number of the second party, and then press or tap Conference. 3. Tap the Conference soft key again when the second party answers. All parties are now joined in the conference. 4.
-
Seite 15: Safety Instructions
We are not liable for damage or loss resulting from the use of this product, or for any claim from a third party. We are not liable for problems with Yealink device arising from the use of this product; we are not liable for financial damages, lost profits, claims from third parties, etc., arising from the use of this product. - Seite 16 2. Connect it to another wall outlet. The usage environment is out of operating temperature range. 1. Use in the operating temperature range. The cable between the unit and the Yealink device is connected incorrectly. 1. Connect the cable correctly. You cannot connect the cable properly.
-
Seite 17: Declaration Of Conformity
YEALINK (XIAMEN) NETWORK TECHNOLOGY CO.,LTD WWW.YEALINK.COM Declaration of Conformity Date of Issue: 2019-07-20 We: YEALINK (XIAMEN) NETWORK TECHNOLOGY CO., LTD, Address: 309, 3rd Floor, No.16, Yun Ding North Road, Huli District, Xiamen City, Fujian, P.R.C Declare that the product Type: Smart Business Phone... - Seite 18 Yealink is a global leading provider of enterprise communication and collaboration solutions, offering video conferencing service to worldwide enterprises. Focusing on research and development, Yealink also insists on innovation and creation. With the outstanding technical patents of cloud computing, audio, video and image processing technology, Yealink has built up a panoramic collaboration solution of audio and video conferencing by merging its cloud services with a series of endpoints products.
-
Seite 19: Verpackungsinhalt
(optional) Hinweis: Die Yealink USB-Kamera CAM50 ist ein optionales Zubehörteil für das IP-Telefon SIP-T58A. Wir empfehlen Ihnen, nur durch Yealink bereitgestellte oder zugelassene Zubehörteile zu verwenden. Die Verwendung von nicht zugelassenem Drittanbieter-Zubehör kann zu verminderter Leistungsfähigkeit führen. Installation des Telefons 1. - Seite 20 USB-Headset oder ein DECT Dongle Kit DD10K anzuschließen. Weitere Informationen zur Nutzung des EXP50 finden Sie in der EXP50-Bedienungsanleitung von Yealink. Schauen Sie für weiterführende Informationen zur Nutzung des USB-Headsets in den Dokumenten des jeweiligen Herstellers nach. Weitere Informationen zur Nutzung des DD10K finden Sie in Ihrer...
- Seite 21 IEEE 802.3af-konformer PoE-Netzwerk-Switch Hinweis: Das IP-Telefon darf nur mit dem originalen Netzadapter (5 V/2 A) von Yealink betrieben werden. Durch die Verwendung von Drittanbieter-Netzadaptern kann das Telefon beschädigt werden. 7. Schließen Sie das Netzwerk wie nachfolgend dargestellt an: Für den Anschluss an das Netzwerk haben Sie zwei Möglichkeiten, zwischen denen Sie je nach gegebener Büroumwelt auswählen können.
-
Seite 22: Bezeichnungen Der Hardwarekomponenten
Bezeichnungen der Hardwarekomponenten D C 5 V P C I n t e r n e t Beschreibung Beschreibung Beschreibung TRANSFER-Taste Gabelschalter Kameraobjektiv Betriebsanzeige-LED HOLD-Taste Nachrichtentaste Kamera-LED-Anzeige Touchscreen Blendenschalter HEADSET-Taste Lautstärketaste Numerische Tastatur Stummtaste USB-2.0-Anschluss Wahlwiederholung Lautsprecher Lautsprechertaste Telefonhörer-Aufhänger... - Seite 23 Startvorgang Wenn das IP-Telefon mit einem Netzwerk verbunden ist und auch mit Strom versorgt wird, dann beginnt Welcome automatisch der Startvorgang. Nach diesem Startvorgang ist das Telefon betriebsbereit. Sie können nun das Telefon nitializing... Please wait entweder über die Web-Benutzerschnittstelle oder die Telefon-Benutzerschnittstelle konfigurieren.
- Seite 24 Icons für die Anzeige des Registrierungsstatus auf dem Touchscreen: (Grau) Registrierung fehlgeschlagen (Grün) Registriert (Blinkt grün) Registrierung im Gang Hinweis: Wenden Sie sich an Ihren Systemadministrator, falls während der Registrierung ein Fehler auftritt oder für Ihre Registrierung eine bestimmte Konfiguration benötigt wird. Konfiguration via Benutzerschnittstelle des Telefons Netzwerkeinstellungen: 1.
- Seite 25 Verwendung des Touchscreens Standardmäßig unterstützt das IP-Telefon drei Ruhebildschirme. Nachstehende Abbildung zeigt den Startbildschirm: Statusbalken Telefon-Wählhilfe Digitaluhr-Widget Verzeichnis Tippen Sie an, um Direktruftasten hinzuzufügen. Verlauf Android-Tasten Bildschirmanzeiger Bewegen im Touchscreen: Streichen Sie nach links oder rechts, um zwischen den verschiedenen Ruhebildschirmen umzuschalten. ...
-
Seite 26: Grundlegende Anruffunktionen
Daten eingeben und aktualisieren Verwendung der Bildschirmtastatur: 1. Wenn Sie auf das Eingabefeld tippen, dann wird auf dem Touchscreen eine Bildschirmtastatur eingeblendet: Rücktaste. Automatische Bezeichnung für kontextsensitive Funktionen. Tippen Sie auf Weiter, um zum nächsten Feld zu wechseln. Tippen Sie auf Fertig, um die Einstellungen zu bestätigen. ... - Seite 27 Beenden eines Video-/Sprachanrufs Mit dem Hörer: Legen Sie den Hörer auf oder tippen Sie auf die Bildschirmtaste Auflegen. Mit Freisprecheinrichtung: Drücken Sie die Taste oder die Bildschirmtaste Auflegen. Mit Headset: Tippen Sie auf den Softkey Auflegen. Wiederwahl Drücken Sie , um die Anrufliste Getätigte Anrufe zu öffnen, und tippen Sie dann auf den gewünschten Eintrag. ...
-
Seite 28: Benutzereinstellungen Für Ihr Telefon
Telefonkonferenz 1. Drücken Sie während eines aktiven Anrufs auf den Softkey Konferenz, so wird der Anruf gehalten. 2. Geben Sie die Nummer eines Teilnehmers ein und drücken Sie anschließend entweder auf oder tippen Sie auf Konferenz. 3. Tippen Sie erneut auf den Softkey Konferenz ,wenn der Teilnehmer den Anruf angenommen hat. Dieser nimmt nun am Konferenzgespräch teil. -
Seite 29: Ausführungshinweise Für Die Produkte Von Yealink Mit Akku
Systemumgebung verwendet wird. Wir sind weder für Schäden oder Verluste haftbar, die aus der Verwendung dieses Produkts entstehen, noch für Ansprüche eines Dritten. Wir sind nicht haftbar für Probleme mit dem Yealink Gerät, die aus der Verwendung dieses Produkts entstehen. Wir sind nicht haftbar für finanzielle Schäden, Gewinnverluste, Ansprüche Dritter etc., die aufgrund der Verwendung dieses Produkts entstehen. - Seite 30 Die Umgebungstemperatur liegt oberhalb des Betriebstemperaturbereichs. 1. Verwenden Sie die Einheit innerhalb des Betriebstemperaturbereichs. Das Kabel zwischen der Einheit und dem Yealink Gerät ist nicht richtig angeschlossen. 1. Schließen Sie das Kabel richtig an. Das Kabel lässt sich nicht richtig anschließen.
-
Seite 31: Konformitätserklärung
Adresse: 309, 3rd Floor, No.16, Yun Ding North Road, Huli District, Xiamen City, Fujian, P.R.C Erklären hiermit, dass das Produkt Typ: Intelligentes Business-Telefon Modell: SIP-T58A mit Kamera, SIP-T58A die grundlegenden Anforderungen und anderen relevanten Bestimmungen der folgenden EG-Richtlinie erfüllt Richtlinie: RED-Direktive 1999/5/EG, RED 2014/53/EU Konformität... - Seite 32 Yealink ist ein weltweit führender Hersteller von Enterprise Communication and Collaboration Solutions, der weltweit operierenden Unternehmen Video-Konferenz-Services bietet. Fokussiert auf Forschung und Entwicklung zeichnet sich Yealink durch Innovationen und Kreativität aus. Mit den herausragenden technischen Patenten in den Bereichen Cloud Computing, Audio, Video und Bildverarbeitungstechnologie hat Yealink eine umfassende Collaboration Solution für Audio- und Video-Konferenzen geschaffen, indem es seine Cloud Services mit einer Serie von Endpunkt-...
-
Seite 33: Contenido Del Embalaje
Nota: La cámara USB CAM50 es un accesorio opcional para el teléfono IP SIP-T58A. Utilice siempre accesorios proporcionados o aprobados por Yealink. El uso de accesorios no homologados puede causar un mal funcionamiento del equipo. Montaje del teléfono 1. Inserte la CC como se muestra a continuación:... - Seite 34 El Puerto USB (en la parte trasera) del terminal se puede usar para conectar el módulo de expansión EXP50, auriculares USB o el adaptador DECT DD10K. Para obtener más información sobre cómo usar auriculares USB, consulte la documentación del. Per ulteriori informazioni sulle modalità di utilizzo di DD10K, consultare la guida per l’utente di telefoni aziendali smart di Yealink.
- Seite 35 I n t e r n e t Nota: Si va a conectar un PC a su teléfono, le recomendamos que use el cable Ethernet provisto por Yealink. b) Conectarlo a la red inalámbrica: 1) Deslice hacia abajo desde la parte superior de la pantalla para acceder al centro de control.
- Seite 36 Instrucciones para los componentes de hardware Ñ D C 5 V P C I n t e r n e t Objeto Objeto Objeto Tecla de TRANSFER Conmutador de conexión Cámara Lente de la cámara LED indicador de alimentación Tecla HOLD Tecla de MENSAJE LED indicador de cámara Pantalla táctil...
-
Seite 37: Puesta En Funcionamiento
Puesta en funcionamiento Tras haber conectado el teléfono IP a la red y haberlo conectado a la fuente de alimentación, este se inicializará Welcome automáticamente. Una vez encendido, el teléfono estará listo para su uso. Puede configurar el teléfono Eliminate this nitializing... - Seite 38 Iconos del estado del registro en la pantalla táctil: (Gris) Error de registro (Verde) Registrada (Verde y parpadeando) Registrando Nota: Compruebe con el administrador de su sistema si aparece algún error durante el proceso de registro o si se requiere una configuración específica para registrarse.
- Seite 39 Uso de la pantalla táctil Por defecto, el teléfono IP es compatible con tres pantallas en suspensión. La pantalla de inicio se muestra a continuación: Barra de estado Marcador Widget de reloj digital telefónico Directorio Pulsar para añadir teclas DSS. Historial Botones Android Indicador de pantalla...
- Seite 40 Introducir y subir datos Para usar el teclado en pantalla: 1. Pulse en el campo de entrada y el teclado en pantalla aparecerá en la pantalla táctil: Toque para retroceder. Etiquetar automáticamente para identificar las características sensitivas de contexto. Pulse Siguiente para ir al campo siguiente. ...
- Seite 41 Finalizar una llamada de voz/vídeo Utilización del auricular: Cuelgue el auricular o toque la tecla de función FinLlam. Utilización del altavoz: Pulse o toque la tecla de función FinLlam. Utilización de los cascos: Pulse la tecla programable FinLlam. Rellamada Pulse para entrar en la lista LlamsRealiz y a continuación toque la entrada deseada.
- Seite 42 Llamada en conferencia 1. Pulse la tecla programable Conferencia durante una llamada activa. La llamada se pondrá en espera. 2. Introduzca el número del segundo participante y luego presione o pulse Conferencia. 3. Pulse la tecla programable Conferencia una vez más cuando el segundo participante conteste. Todos los participantes están ahora integrados a la conferencia.
- Seite 43 No somos responsables por daños o pérdidas resultantes del uso de este producto, o por cualquier reclamo de un tercero. No nos hacemos responsables de los problemas con el dispositivo Yealink que surjan del uso de este producto;...
- Seite 44 Ñ 1. Asegúrese de que la temperatura del entorno está dentro de los límites permitidos. El cable entre la unidad y el dispositivo de Yealink no está conectado correctamente. 1. Conecte el cable correctamente. El cable no se puede conectar correctamente.
-
Seite 45: Declaración De Conformidad
Dirección: 309, 3rd Floor, No.16, Yun Ding North Road, Huli District, Xiamen City, Fujian, P.R.C Declara que el producto: Clase de equipo: Teléfono smart empresarial Marca: Yealink Modelo: SIP-T58A con Cámara, SIP-T58A cumple con los requisitos esenciales y cualesquiera otras disposiciones aplicables o exigibles de las directivas : Directiva R&TTE 1999/5/EC, RED 2014/53/EU... - Seite 46 Como uno de los mejores proveedores en más de 140 países y regiones, incluidos los EE. UU., El Reino Unido y Australia, Yealink ocupa el número 1 en la cuota del mercado global de los envíos de teléfonos SIP.
- Seite 47 (en option) démarrage rapide Remarque : La camera USB Yealink CAM50 est un accessoire optionnel pour le téléphone SIP-T58A. Nous vous recommandons d’utiliser uniquement des accessoires fournis ou approuvés par Yealink. L’utilisation d’accessoires tiers est susceptible de réduire les performances de l’appareil.
- Seite 48 EXP50, le casque USB ou le dongle DECT DD10K. Pour plus d’informations sur l’usage de l’EXP50, consultez le Manuel de l’utilisateur d’utilisateur du EXP50 de Yealink. Pour plus d’informations sur l’usage du casque USB, consultez la documentation du fabricant. Pour plus d'informations sur l'utilisation du DD10K, consultez le guide de l'utilisateur du...
- Seite 49 I n t e r n e t Remarque : Si vous connectez un PC à votre téléphone, nous vous conseillons d’utiliser le câble Ethernet fourni par Yealink. b) Connexion sans fil au réseau : 1) Balayez l’ é cran de haut en bas pour ouvrir le centre de contrôle.
- Seite 50 Instructions concernant les composants matériels D C 5 V P C I n t e r n e t Élément Élément Élément Touche de TRANSFER Crochet commutateur Caméra Lentille caméra Indicateur d’alimentation LED Touche HOLD Touche MESSAGE Témoin lumineux LED caméra Écran tactile Interrupteur obturateur Touche CASQUE...
- Seite 51 Démarrage Une fois que le téléphone IP est connecté au réseau et est alimenté en courant, la procédure d’initialisation démarre Welcome automatiquement. Après le démarrage, le téléphone est prêt à l’utilisation. Vous pouvez configurer le téléphone via nitializing... Please wait l’interface utilisateur web ou l’interface utilisateur du téléphone.
- Seite 52 Enregistrer les icônes de statut sur l’écran tactile : (Vert clignotant) Enregistrement (Gris) Échec de l’enregistrement (Vert) Enregistré en cours Remarque : Vérifiez auprès de votre administrateur de système si une erreur apparaît pendant la procédure d’enregistrement ou si une configuration spécifique est requise pour votre enregistrement.
- Seite 53 Utilisation de l’écran tactile Par défaut, le téléphone IP prend en charge trois écrans de veille. L’écran d’accueil s’affiche comme illustré ci-dessous : Barre d’état Numéroteur Horloge numérique téléphonique Répertoire Appuyer pour ajouter des touches DSS. Historique Touches Android Indicateur d’écran Pour parcourir l’écran tactile : Balayez l’écran vers la gauche ou la droite pour basculer entre les différents écrans de veille.
-
Seite 54: Fonctions D'appel De Base
Introduction et mise à jour des données Pour utiliser le clavier virtuel: 1. Touchez la zone de saisie et l’écran virtuel s’affichera sur l’écran tactile : Appuyez pour revenir en arrière. Touche de fonction adaptée au contexte. Appuyez sur Suiv. pour passer au champ suivant. ... - Seite 55 Terminer un appel vidéo/audio Utiliser le combiné : Raccrochez le combiné ou appuyez sur la touche programmable Fin appel. Utiliser le haut-parleur : Appuyez sur ou sur la touche programmable Fin appel. Utiliser le casque : Appuyez sur la touche programmable Fin appel. Recomposer Appuyez sur pour accéder à...
- Seite 56 Conférence téléphonique 1. Appuyez sur la touche de fonction Conférence pendant un appel actif. L’appel est mis en attente. 2. Saisissez le numéro du second participant, puis appuyez sur ou sur Conférence. 3. Appuyez à nouveau sur la touche de fonction Conférence lorsque le second interlocuteur répond. Tous les interlocuteurs sont maintenant connectés à...
- Seite 57 Nous ne sommes pas responsables des dommages ou pertes découlant de l’utilisation de ce produit ou de toute réclamation d’un tiers. Nous ne sommes pas responsables des problèmes avec les appareils Yealink découlant de l’utilisation de ce produit. Nous ne sommes pas responsables pour les dommages financiers, pertes de profits, réclamations de tiers, etc.
- Seite 58 L’environnement d’utilisation est hors de la plage de températures de fonctionnement. 1. Utilisez l’appareil dans sa plage de températures de fonctionnement. Le câble entre l’appareil et le dispositif Yealink est mal branché. 1. Branchez le câble correctement. Vous ne pouvez pas brancher le câble correctement.
-
Seite 59: Déclaration De Conformité
Adresse : 309, 3rd Floor, No.16, Yun Ding North Road, Huli District, Xiamen City, Fujian, P.R.C Déclarons que le produit Type : Téléphone professionnel intelligent Modèle : SIP-T58A con Cámara, SIP-T58A répond aux exigences essentielles et autres dispositions pertinentes conformément à la directive CE suivante Directive : Directive R&TTE 1999/5/CE, RED 2014/53/EU... - Seite 60 Yealink a construit une solution de collaboration en conférence audio et vidéo en alliant services cloud et produits à la pointe de la technologie. En tant que leader dans plus de 140 pays incluant les Etat-Unis, le Royaume-Uni et l’Australie, Yealink se hisse au premier rang sur le marché...