Herunterladen Diese Seite drucken
Bresser MicroSet 40x-1024x Bedienungsanleitung
Vorschau ausblenden Andere Handbücher für MicroSet 40x-1024x:

Werbung

Verfügbare Sprachen
  • DE

Verfügbare Sprachen

  • DEUTSCH, seite 4
Downloaded from
www.Manualslib.com
manuals search engine
MicroSet 40x-1024x
Bedienungsanleitung
DE
Operating Instructions
GB
Mode d'emploi
FR
Handleiding
NL
Istruzioni per l'uso
IT
Instrucciones de uso
ES
Manual de utilização
PT
Art. No. 88-55002

Werbung

loading

Inhaltszusammenfassung für Bresser MicroSet 40x-1024x

  • Seite 1 MicroSet 40x-1024x Art. No. 88-55002 Bedienungsanleitung Operating Instructions Mode d’emploi Handleiding Istruzioni per l’uso Instrucciones de uso Manual de utilização Downloaded from www.Manualslib.com manuals search engine...
  • Seite 2 Bedienungsanleitung ........4 ACHTUNG! Beinhaltet funktionale scharfkantige Operating Instructions ....... 10 Ecken und Punkte! Kleine Teile, Mode d’emploi ..........16 Erstickungsgefahr. Nicht für Kinder unter 3 Jahren geeignet. Handleiding ..........22 WARNING! Istruzioni per l’uso ........28 Contains functional sharp edges and Instrucciones de uso ........
  • Seite 3 Fig. 1 Fig. 6 1& 1& 2& Downloaded from www.Manualslib.com manuals search engine...
  • Seite 4 GEFAHR für Ihr Kind! BRAND-/EXPLOSIONSGEFAHR! HINWEISE zur Reinigung Für die Arbeit mit diesem Gerät werden Setzen Sie das Gerät keinen hohen Trennen Sie das Gerät vor der häufi g scharfkantige und spitze Hilfs- Temperaturen aus. Benutzen Sie nur Reinigung von der Stromquelle mittel eingesetzt.
  • Seite 5 Entsorgung erhalten Sie einstimmung mit den anwendbaren Richtlinien und entsprechenden Normen ist beim kommunalen Entsorgungsdienstleister oder Umweltamt. von der Bresser GmbH erstellt worden. Diese kann auf Anfrage jederzeit eingesehen wer- Werfen Sie Elektrogeräte nicht in den den. Hausmüll! Gemäß der Europäischen Richtlinie 2002/96/EG über Elektro- und Elektronik-...
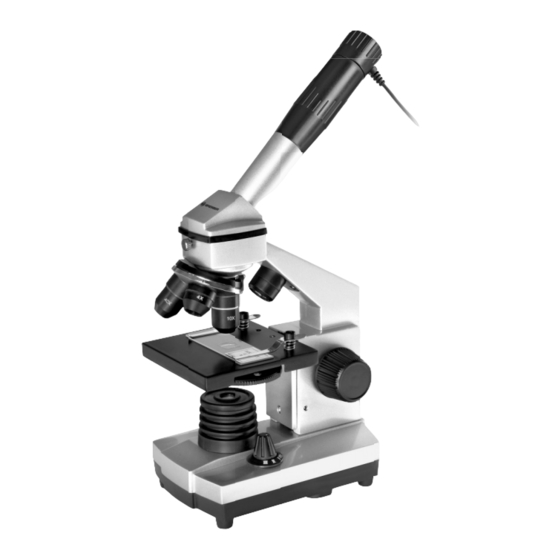
  • Seite 6 Aus diesen Teilen besteht dein Mikroskop 26 Pipette Wählst du die… 27 Transportkoffer 1 10x WF Okular I, so kommt das Licht nur von unten (Durch- 2 16x WF Okular Wo mikroskopiere ich? licht). 3 Barlowlinse Bevor Du das Mikroskop aufbaust, achte dar- II, so scheint das Licht nur von oben (Auf- 4 Fach für optionales Zubehör auf, dass der Tisch, Schrank oder worauf Du...
  • Seite 7 Wie beobachte ich das Präparat? Vergrößerung auf nahezu das Doppelte ge- Wie stelle ich mein Mikroskop richtig Nachdem Du das Mikroskop mit der passen- steigert werden. ein? den Beleuchtung aufgebaut und eingestellt Wenn Du noch höhere Vergrößerungen Zu erst löse die Schraube (Abb. 1, 7) und hast, gelten folgende Grundsätze: möchtest, setze das Okular 16x (Abb.
  • Seite 8 Betrachtest Du undurchsichtige (opake) Ob- Wie stelle ich dünne Präparatschnitte Wie stelle ich mein eigenes Präparat her? jekte (z. B. kleinere Tiere, Pfl anzenteile, Stei- her? Abb. 7 Abb. 8 ne, Münzen usw.) mit diesem Mikroskop, so Bitte nur unter Aufsicht Deiner Eltern oder an- fällt das Licht auf den zu betrachtenden Ge- derer Erwachsener durchführen.
  • Seite 9: Fehlerbehebung

    HINWEIS: hinaus seine optische Qualität und so seinen Achten Sie darauf, dass das Smartphone Wert. nicht von der Halterung rutschen kann. Bei Beschädigungen durch ein herabgefal- lenes Smartphone übernimmt die Bresser GmbH keine Haftung! Downloaded from www.Manualslib.com manuals search engine...
  • Seite 10 RISK to your child. FIRE-/ DANGER OF EXPLOSION! TIPS on cleaning Aids with sharp edges and tips are so- Do not expose the device to high tem- Remove the device from it’s ener- metimes used with this device. Please peratures. Use only the mains adapter gy source before cleaning (remove store the device and all of its accessories and supplied or those battery types recommen-...
  • Seite 11 DISPOSAL EC Declaration of Conformity Dispose of the packaging material/s as legally required. Consult the local au- Bresser GmbH has issued a ‘Decla- thority on the matter if necessary. ration of Conformity’ in accordance with applicable guidelines and corresponding Do not dispose of electrical equipment standards.
  • Seite 12 Here are the parts of your microscope 25 Tweezers I, the light only comes from below (transmit- (Fig. 1-6): 26 Pipette ted light). 27 Carrying Case II, the light only comes from above (refl ected 1 10x WF Eyepiece light). 2 16x WF Eyepiece How do I use my microscope? III, both lamps shine light on the specimen.
  • Seite 13 How do I adjust my microscope correctly? with the adequate illumination and adjusted it nifi cation, insert the 16x eyepiece (Fig. 1, 2) First, loosen the screw (Fig. 1, 7) and turn the correctly, the following basic rules are to be and turn the objective nosepiece (Fig.
  • Seite 14 In order to If you want to keep the object in place on the out of the holder. Bresser GmbH assumes get the best results, we need some wax or slide permanently, use the gum media.
  • Seite 15 Troubleshooting Make sure your microscope has a long service life. Clean the lens (objective and eyepiece) only Error Solution with the cloth supplied or some other soft lint- No recognizable • Turn on light free cloth (e.g.microfi bre). Do not press hard image •...
  • Seite 16 DANGER pour votre enfant ! DANGER D’INCENDIE/D’EXPLOSION ! REMARQUES concernant le nettoyage Le travail avec cet appareil entraîne N’exposez pas l’appareil à de fortes Avant de procéder au nettoyage de souvent l’utilisation d’accessoires températures. Utilisez uniquement l’appareil, séparez-le de la source pointus et à...
  • Seite 17 ÉLIMINATION Déclaration de conformité CE Éliminez les matériaux d’emballage selon le type de produit. Pour plus Bresser GmbH a émis une « déclarati- d’informations concernant l’élimination on de conformité » conformément aux lignes directrices applicables et aux normes conforme, contactez le prestataire communal d’élimination des déchets ou bien l’offi...
  • Seite 18 Voici les pièces de ton microscope 22 Support pour Smartphone sus. (Ce que tu veux observer sous le micros- (Illustr. 1-6): 23 Appareil à coupe cope est désigné par Objet ou Préparation.) 24 Accessoires bruts des crevettes Tu peux utiliser chaque lampe séparément, 1 Oculaire 10x WF 25 Pincette mais également ensemble.
  • Seite 19 lustr. 1,5) et qu’elle ne soit pas retirée (Illustr. ment plus élevé, en retirant lentement la len- unicellulaire) sont plus faciles à reconnaître tille de Barlow (Illustr. 1, 3) des supports de dans leurs composants. l’oculaire (Illustr. 1, 5). Si la lentille de Barlow Comment dois-je observer la préparation ? retirée entièrement et rapidement, le Comment régler correctement mon...
  • Seite 20 éclairage décide si tu peux voir quelque Tu peux en apprendre plus sur ce procédé Comment effectuer ma propre chose ou pas ! dans les paragraphes suivants. préparation ? Fig. 7 Fig. 8 Si tu observes des objets non transparents Comment fabriquer des tranches de pré- (opaques) (par ex.
  • Seite 21 Nettoie les lentilles (oculaires et/ou objectifs) l‘oculaire du microscope. Bresser GmbH décline toute responsabilité uniquement avec le chiffon à lentilles ci-joint pour tout dommage causé en cas de chute ou bien avec un autre chiffon doux et non Les ventouses doivent être propres et exem-...
  • Seite 22 GEVAAR voor uw kind! BRAND-/EXPLOSIEGEVAAR! TIPS voor het schoonmaken Bij het werken met dit apparaat wor- Stel het apparaat niet bloot aan hoge Ontkoppel het apparaat vóór het den vaak scherpe en puntige hulpmid- temperaturen. Gebruik uitsluitend de schoonmaken van de stroombron delen gebruikt.
  • Seite 23 Bresser GmbH afgegeven. Deze kan elk moment op aanvraag worden Gooi elektrische apparaten niet weg ingezien. met het huisvuil!
  • Seite 24 Je microscoop bestaat uit de volgende 24 Garnalenbroedtank Kies je voor… onderdelen (afb.1-6): 25 Pincet 26 Pipet dan komt het licht van onderen (doorlicht). 1 10x WF oculair 27 Transportkoffer dan schijnt het licht alleen van boven 2 16x WF oculair (oplicht).
  • Seite 25 Begin elke observatie met de laagste vergro- (centreren) en het beeld scherp te stellen (fo- Let op: ting. cusseren). Niet bij elk preparaat is de hoogste vergro- tingsfactor ook de beste! Breng de microscooptafel (afb. 1, 11) hele- Hoe hoger de ingestelde vergrotingsfactor, maal naar beneden.
  • Seite 26 Zorg ervoor dat de smartphone niet kan gemaakt. Voor een goed resultaat hebben we doeld. Gebruik het op dezelfde manier als de wegglijden uit de houder. Bresser GmbH wat was of parafi ne nodig. Neem hiervoor ge- druppel water. Als je dus wilt dat het voorwerp aanvaardt geen aansprakelijkheid voor even- woon een kaars.
  • Seite 27 Storingen oplossen Om zo lang mogelijk plezier van je microscoop te hebben… Reinig de lenzen (oculairglazen en/of objec- Fout Oplossing tiefglazen) uitsluitend met het meegeleverde Geen beeld te zien • Doe het licht aan lenspoetsdoekje of met een andere zachte en •...
  • Seite 28 PERICOLO per i bambini! contatto con le sostanze consultare immedia- Non esporre l‘apparecchio a temperature su- Nell’utilizzo del presente apparecchio tamente un medico e mostrargli le sostanze. periori ai 60°C! si ricorre spesso all‘uso di strumenti ausiliari appuntiti o dotati di spigoli taglienti. PERICOLO DI INNESCO DI INCENDI/ AVVERTENZE per la pulizia Conservare quindi l’apparecchio, gli accesso-...
  • Seite 29 SMALTIMENTO Dichiarazione di conformità CE Smaltire i materiali di imballaggio dopo averli suddivisi. Per informazioni sul Bresser GmbH ha redatto una “di- corretto smaltimento, si prega di rivolgersi chiarazione di conformità” in linea con le disposizioni applicabili e le rispettive all‘azienda municipale che si occupa dello...
  • Seite 30 Il tuo microscopio comprende le 23 Microtomo “preparato“ in microscopia si intende l’ogget- seguenti parti (fi g. 1-6): 24 Schiuditoio per gamberetti to che vuoi osservare, detto anche “oggetto“.) 25 Pinzetta Puoi utilizzare una sola delle due lampade e 1 Oculare a largo campo WF 10x 26 Pipetta anche tutte due insieme.
  • Seite 31 I fi ltri colorati servono per osservare prepara- Barlow non sia solle- Successivamente, guarda attraverso l‘oculare Fig. 2 ti di colore molto chiaro o trasparente. Puoi vata (fi g. 2), ma che (fi g. 1,1) e gira con cautela la ruota della mes- scegliere uno dei diversi colori.
  • Seite 32 Quale illuminazione è la migliore per per loro natura, trasparenti. Altri oggetti, inve- Come posso realizzare i miei preparati? quale preparato? ce, devono essere preparati nel modo giusto. Fig. 7 Fig. 8 Con questo microscopio, cosiddetto “a luce Ciò signifi ca che li dobbiamo rendere traspa- rifl...
  • Seite 33 è possibile. Prendere lo smartphone con cautela il supporto dopo l’uso. NOTA: Assicurarsi che lo smartphone non può scivolare fuori dal supporto. Bresser GmbH non si assume alcuna responsabilità per eventuali danni causati da uno smartphone caduto. Downloaded from www.Manualslib.com...
  • Seite 34 ¡PELIGRO para su hijo! ¡PELIGRO DE INCENDIO/EXPLOSIÓN! INDICACIONES sobre la limpieza A menudo, para trabajar con este apa- No exponga el aparato a temperaturas Antes de limpiarlo, retire el aparato rato es necesario utilizar instrumentos elevadas. Utilice exclusivamente el de la fuente de alimentación eléc- cortantes o puntiagudos.
  • Seite 35 ELIMINACIÓN Declaración de conformidad Elimine los materiales de embalaje separándolos según su clase. Puede Bresser GmbH ha emitido una “De- obtener información sobre la eliminación re- claración de conformidad” de acuer- do con las directrices y normas correspon- glamentaria de desechos en su proveedor de servicios de eliminación de desechos munici-...
  • Seite 36 Éstas son las partes de tu microscopio 24 Instalación para la cría de gambas o «preparación».) Puedes usar cada lámpara (Fig. 1-6): 25 Pinza por separado, pero también las dos al mismo 26 Pipeta tiempo. Para ello hay una rueda de selección 1 Ocular 10x WF 27 Maletín de transporte (Fig.
  • Seite 37 de los objetos incoloros o transparentes (p. introduzca completamente en el soporte del Ahora puedes aplicar un aumento mayor ex- ej. gránulos de almidón, protozoos). ocular (Fig. 1, 5) y no quede nada fuera (Fig. trayendo lentamente la lente de Barlow (Fig. 1, 3) del soporte del ocular (Fig.
  • Seite 38 La imagen del respectivo objeto de obser- manual, corte fi no) para analizarlas a conti- ¿Cómo puedo elaborar mi propia vación se «transporta» a través de la luz. Por nuación. Puedes encontrar más información preparación? consiguiente, ¡una iluminación correcta de- al respecto en los siguientes párrafos.
  • Seite 39 ¡Coja el Smartphone del soporte después de su uso! NOTA: Asegúrese de que el smartphone no puede salirse del soporte. ¡Bresser GmbH no se responsabilizará de los daños que sufra su Smartphone por una caída! Downloaded from www.Manualslib.com...
  • Seite 40 PERIGO para crianças! RISCO DE INCÊNDIO/EXPLOSÃO! INDICAÇÕES sobre a limpeza Para trabalhar com este aparelho são Nunca sujeite o aparelho a altas tem- Antes de limpar a fonte de corrente, utilizados meios auxiliares pontiagu- peraturas. Utilize apenas a fonte de ali- desligue o aparelho (retirar a fi...
  • Seite 41 ELIMINAÇÃO Declaração de conformidade CE Separe os materiais da embalagem. Pode obter mais informações sobre a Foi criada pela Bresser GmbH uma reciclagem correcta nos serviços municipais “Declaração de conformidade“ de acordo com as directivas e respectivas nor- ou na agência do meio ambiente.
  • Seite 42 Estes são os componentes do teu 24 Incubadora de camarões ou as duas em conjunto. Para esse efeito microscópio (fi g. 1-6): 25 Pinça existe a roda selectora (fi g. 1, 14). Esta pos- 26 Pipeta sui três números: I, II e III. 1 Ocular WF 10x WF 27 Mala de transporte 2 Ocular WF 16x...
  • Seite 43 para fora (fi g. 2). te barlow estiver quase totalmente extraída, zoários) são muito mais fáceis de reconhecer Como observo o preparado? a ampliação pode ser aumentada para quase pelos seus componentes. Depois de teres equipado e ajustado o mi- o dobro.
  • Seite 44 Se observares objectos opacos (p. ex. pe- Como preparo cortes fi nos de Como fabrico o meu próprio preparado? quenos animais, partes de plantas, pedras, preparado? Fig. 7 Fig. 8 moedas, etc.) com este microscópio, a luz Realiza a preparação com a ajuda dos teus incide no objecto a ser observado.
  • Seite 45 Remover o suporte do Smartphone após o uso! NOTA: Verifi que se o smartphone não pode sair do suporte. Bresser GmbH não se responsa- biliza por danos sofridos por uma queda do seu smartphone! Downloaded from www.Manualslib.com...
  • Seite 46 BRESSER GmbH Gutenbergstr. 2 DE-46414 Rhede Germany www.bresser-junior.de Downloaded from www.Manualslib.com manuals search engine...