Inhaltsverzeichnis
Werbung
Verfügbare Sprachen
Verfügbare Sprachen
Quicklinks
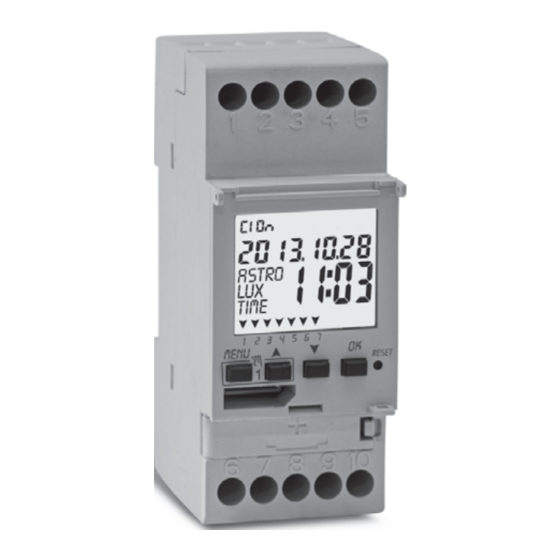
INTERRUTTORE ORARIO ASTRONOMICO CREPUSCOLARE
IT
Settimanale - Programmazione a menu - Display retroilluminato
modello a 1 canale modello a 2 canali
ASTRONOMICAL TWILIGHT TIME SWITCH
EN
Weekly - Menu-
1-channel model 2-channel mode
ASTRONOMISCHE PROGRAMMSCHALTUHR MIT DÄMMERUNGSFUNKTION
DE
Wochenprogrammierung - Menüprogrammierung - Display mit Hintergrundbeleuchtung
Einkanal-Modell Zweikan l -Modell
PE -
DEIONN0
60 06/15
Downloaded from
www.Manualslib.com
-
driven
programming - Backlit display
-
s
-
ä e
manuals search engine
l
ASTRO
Istruzioni per l'installazione e l'uso
Instruction for Installation and use
Anleitung für Installation,
Programmierung und Verwendung
LUX
TIME
Werbung
Kapitel
Inhaltsverzeichnis

Verwandte Anleitungen für Perry Electric ASTRO

Inhaltszusammenfassung für Perry Electric ASTRO
- Seite 1 - Backlit display 1-channel model 2-channel mode ASTRONOMISCHE PROGRAMMSCHALTUHR MIT DÄMMERUNGSFUNKTION Wochenprogrammierung - Menüprogrammierung - Display mit Hintergrundbeleuchtung Einkanal-Modell Zweikan l -Modell ä e ASTRO TIME Istruzioni per l’installazione e l’uso Instruction for Installation and use Anleitung für Installation, Programmierung und Verwendung...
- Seite 2 Gentile Cliente, La ringraziamo per aver scelto un nostro prodotto. ITALIANO Avvertenze, istruzioni per l’installazione, programmazione e modo di impiego: pag. 3 Dear Customer, thank you for choosing our product. ENGLISH pag. 34 Warnings, i nstructions to install, program and use the device Sehr geehrter Kunde, wir danken Ihnen für den Kauf dieses Produktes.
- Seite 3 1- Descrizione dell’apparecchio pag. 4 pag. 4 pag. 21 istruzioni di installazione ed uso e conservarle per future 1.1) Caratteristiche funzionali 4.1.4.a) Combinazione di programmi ASTRO/TIME pag. 5 1.2) 1° inserimento batteria consultazioni. pag. 21 4.1.4.b) Combinazione di programmi TIME/ASTRO pag.
- Seite 4 • Funzionamento crepuscolare 0..1000 LUX. • Possibilità di inserimento di 1 o più programmi «Ferie» (sospensione dei programmi Astro - Lux - Time - forzatura crepuscolare in corso) da un minimo di 1 giorno a un massimo di 12 mesi.
- Seite 5 1.2) 1° INSERIMENTO BATTERIA Aprire lo sportellino batteria verso sx e inserire la batteria nell’apposita sede con il polo positivo rivolto verso l’alto Chiudere bene lo sportellino porta batteria verso dx Collegare e attivare l'alimentazione di rete 230V (vedere paragrafo 1.4) Procedere ad impostare i dati richiesti come descritto nel capitolo 2 - PRIMA ACCENSIONE.
-
Seite 6: Caratteristiche Tecniche
1.4) Collegamenti elettrici 1.3) Caratteristiche tecniche Tensione alimentazione 230 V c.a. +/- 10% Frequenza 50 Hz sonda Grado di protezione IP20 crepuscolare Tipo di uscita Relè a contatto in scambio libero da potenziale; Lunghezza massima dei cavi per il collegamento della sonda crepuscolare: contatto N.A. - Seite 7 Icona “ Blocco Tastiera ” Time Icona periodo ora legale (commutazione estiva) per programmi Astro e Lux Icona periodo ora solare (commutazione invernale) 1 2 3 4 5 6 7 Campo giorno della settimana Segnalazione di impostazione programmi Orari...
-
Seite 8: Schermata Principale
2 secondi o permanente (vedere capitolo 7). impostare per canale 1 per canale 2 Premere il tasto Con la funzione ASTRO e/o Sonda crepuscolare attivate, è possibile visualizzare consecutivamente: in menu programmi, - Orario TRAMONTO / Orario ALBA per la data odierna... -
Seite 9: Prima Accensione
2 - PRIMA ACCENSIONE (scelta della lingua, inserimento anno, mese, giorno, ora e minuti correnti, impostazione ora legale/solare) L’apparecchio viene fornito con le impostazioni di default. Dopo aver inserito la batteria (vedere paragrafo 1.2), e collegato l’alimentazione elettrica, l’apparecchio esegue un reset del display (lamp-test), quindi procedere come segue: Per selezionare/impostare i dati premere i tasti premere il tasto per confermare e passare al campo successivo. - Seite 10 (Abilitazione sonda crepuscolare). Se si conferma ASTRO OFF, sarà possibile successivamente inserire le coordinate astronomiche in due modi: - al primo inserimento di un programma ASTRO (vedere paragrafo 4.1.1); - entrando nel menu OPZIONI > IMPOSTAZIONI > ASTRO/SET (vedere paragrafo 8.2).
-
Seite 11: Inserimento Delle Coordinate Astronomiche
2.1) Inserimento delle coordinate astronomiche (attivazione ASTRO) Per il corretto funzionamento dei programmi ASTRO, è indispensabile inserire alcune informazioni (PARAMETRI ASTRONOMICI) che permettono al dispositivo di identificare l’area geografica dove esso verrà installato. ASTRO display dell’interruttore digitale visualizza la scritta... - Seite 12 2.2) Abilitazione sonda crepuscolare (possibile solo con sonda crepuscolare esterna installata e collegata in modo corretto al dispositivo digitale alimentato dalla tensione di rete 230V~) SONDA display dell’interruttore digitale visualizza la scritta , con i tasti selezionare •Il Confermare con Viene visualizzato il valore di LUX letto in tempo reale dalla sonda ( ATTUALE •...
- Seite 13 - Numero programmi liberi - Scelta n° di programma - Scelta canale (solo bicanale) - Scelta del giorno - Scelta tipo di programma (ASTRO o LUX o TIME) (accensione) inserimento dati secondo il tipo di programma scelto Procedura per selezionare il...
- Seite 14 Il/i relè di uscita saranno attivati secondo le priorità stabilite. IMPORTANTE: tutti i programmi (ASTRO-LUX-TIME) inseriti risultano contemporaneamente attivi indipendentemente dalla loro posizione; nel caso di sovrapposizione dei comandi sulla stessa uscita, essa viene o resta attivata se almeno un programma la sta comandando (OR LOGICO).
- Seite 15 Per circa 2 secondi viene visualizzato il numero di programmi liberi, quindi si visualizza lampeggiante il primo programma . Se a sinistra del programma non appare nessuna scritta (ASTRO, LUX, TIME) significa che il programma è libero. 2. Selezionare il programma desiderato con i tasti .
- Seite 16 Il programma inizia al tramonto (ASTRO ON) e termina all’alba astronomica del giorno successivo (ASTRO OFF). L'orario di tramonto e alba viene calcolato considerando il tipo di crepuscolo 'Ufficiale' e corrisponde allo Zenith di 90°50' La corrispondenza con l'effettivo orario di alba e tramonto di uno specifico luogo dipende anche da variazioni atmosferiche, altitudine e orografia del luogo, per cui è...
- Seite 17 4.1.2) Tipo di programma LUX / LUX (crepuscolare) Nota: questo programma può essere attivato se la sonda è collegata e attivata. Dopo aver scelto il n° del programma, il canale (solo modello bicanale), il giorno come da procedura al paragrafo 4.1. 1.
- Seite 18 Questo tipo di forzatura, è utile ad esempio, per far attivare/disattivare il canale come un normale dispositivo crepuscolare. - Tipo di forzatura crepuscolare PARZIALE: nota: la scelta della forzatura crepuscolare PARZIALE sarà possibile solo se la procedura ASTRO è stata preventivamente impostata (vedere paragrafo 2.1). Il periodo notturno viene calcolato in base alle coordinate astronomiche.
- Seite 19 Confermare Importante: la scelta della forzatura crepuscolare PARZIALE sarà possibile solo se la procedura ASTRO è stata preventivamente impostata (vedere paragrafo 2.1). 7. Il display mostra per pochi secondi la scritta OKAY e ritorna a visualizzare la schermata di impostazione forzatura LUX, sarà...
- Seite 20 Dopo aver scelto il n° del programma, il canale (solo modello bi-canale), il giorno come da procedura al paragrafo 4.1: ON ( 1.Alla richiesta di scelta del tipo di programma di default viene proposto il tipo ASTRO), TIME con i tasti...
- Seite 21 - programmi « combinati»: ASTRO / TIME - TIME / ASTRO - TIME / LUX - LUX / TIME - ASTRO / LUX - LUX / ASTRO Per inserire un programma combinato desiderato seguire la stessa procedura descritta dal paragrafo 4.1.
- Seite 22 NOTA: se durante la condizione d'inizio programma (ASTRO ON) si verifica anche la condizione di spegnimento (LUX OFF), cioè quantità di luce superiore alla soglia impostata, il programma avrà una durata di circa 1 minuto. Il programma ripartirà nuovamente quando vi sarà la condizione di oscuramento, per terminare definitivamente all'alba del giorno successivo quando la luminosità...
- Seite 23 4.3) Copiare un programma Per copiare un programma memorizzato (ASTRO / LUX / TIME / COMBINATI) su altri giorni operare come segue: Se vi trovate già in menu programmi con visualizzato il programma salvato da copiare procedere dal punto 3.
- Seite 24 5 - Menu programmi «FERIE» Questo menu permette di creare, verificare, modificare e cancellare programmi «FERIE». I programmi ferie permettono di impostare differenti periodi, nel corso dell'anno, di sospensione dei programmi on/off abbinati al canale 1 e/o 2 (mod. bicanale), ad esempio per chiusura estiva e natalizia di un ufficio pubblico o commerciale.
- Seite 25 6. Con i tasti scegliere il mese di termine della sospensione (ON) dei programmi (il numero del mese lampeggia). Confermare con 7. Con i tasti scegliere il giorno di termine della sospensione (ON) dei programmi (il numero del giorno lampeggia). Confermare con Attenzione: se le date impostate per OFF e ON sono identiche, premendo il display visualizza per alcuni secondi...
- Seite 26 6 - Cancellare un programma (menu «CANC PRG») MENU PROG 1. Premere il tasto si accede al primo menu ( CANC PRG SET 2. Con i tasti selezionare il menu Confermare con CANC PRG SING 3. Il display visualizza la schermata per cancellare un schermata principale CANC PRG ALL...
- Seite 27 7 - Menu «MANUALE» Questo menu permette di forzare manualmente lo stato dell’uscita/e (mod. bi- Modo Simbolo Canale- Funzione forzatura forzatura canale) indipendentemente dai programmi attivi. Tipicamente utilizzato per display Condizione testare o per effettuare la manutenzione del carico collegato. Nessuna forzatura sul canale, gestione auto dal programma in corso.
- Seite 28 8 - Menu «OPZIONI» Da questo menu è possibile: - Scelta lingua - Impostazione ASTRO/TIME - Manutenzione - Contaore - Luce LED (retroilluminazione) schermata principale - Garanzia - Info - Chiave EMD ( solo con chiave inserita vedere paragrafo 8.8...
- Seite 29 5. Al termine della modifica o visualizzazione dei dati, all’ultima confermare con il display OKAY visualizza per alcuni secondi e successivamente la schermata relativa alle impostazioni ASTRO TIME . modificate MENU 6. Per uscire dal menu e tornare alla videata iniziale, premere due volte il tasto 8.3) MANUTENZIONE (MANUTEN) Questa funzione consente di impostare, per ciascun canale, un periodo di funzionamento in ON, trascorso il quale l’interruttore digitale segnala la necessità...
- Seite 30 8.3.a) Gestione intervento di Manutenzione - Al raggiungimento delle ore di funzionamento impostate per uno o entrambi i canali (modello MANUTEN bicanale), sulla videata principale apparirà, con ripetizione ciclica, la scritta alternata alla DATA attuale (esempio in figura a lato: canale 1 in Manutenzione). - In questa condizione è...
- Seite 31 8.5) RETROILLUMINAZIONE (Luce Led) Questa funzione consente di impostare la retroilluminazione del display in tre modalità: Temporizzata = accesa per 6 secondi dall’ultima pressione di un tasto. Fisso ON = sempre accesa (defaut) Fisso OFF = sempre spenta LUCE LED 1.
- Seite 32 8.7) INFO Questa funzione consente di visualizzare informazioni relative alla versione del software installato sul prodotto. INFO 1. Dal sottomenu confermare con 2. Si visualizzano le informazioni relative alla versione del software. MENU 3. Per uscire dal menu e tornare alla videata iniziale, premere tre volte il tasto Nota: s e sulla schermata iniziale appare il simbolo di attenzione , entrando in questo sottomenu si...
- Seite 33 8.8.a) Esclusione della Memoria EMD MENU Per escludere la memoria EMD e tornare alla schermata iniziale, premere tre volte il tasto Se desiderato, estrarre la memoria EMD dalla sede. 8.8.b) Accedere alla Memoria EMD Per accedere nuovamente alla memoria EMD (con la memoria EMD inserita nella sede) MENU PROG...
-
Seite 34: Inhaltsverzeichnis
53 •Important: the installation, electrical connection and 1.4) Electrical connections pag. 37 4.2) Vi sualizing or modifying an ASTRO LUX commissioning of devices and equipment must be or TIME program already saved pag. 53 pag. 38 1.5) Disp y performed by qualified personnel and in compliance 4.3) Copying a program... -
Seite 35: Accessories
(suspension of programs for a preset period of time). • Twilight operation 0..1000 LUX. • Possibility of entering 1 or more «Holiday programs», (suspension of Astro - Lux - Time programs twilight override in progress) from a minimum of 1 day to a maximum of 12 months. -
Seite 36: First Battery Insertion Pag
1.2) FIRST BATTERY INSERTION Open the battery door to the left and insert the battery into its housing with the positive side facing up lose the battery compartment door properly to the right Connect and activate the 230V power mains (see paragraph 1.4). Set the required data as described in Chapter 2 - FIRST START-UP . -
Seite 37: Electrical Connections
1.3) Technical specifications 1.4) Electrical connections Supply voltage 230 V c.a. +/- 10% Frequency 50 Hz twilight Protection rating IP20 sensor Output type Potential-free changeover contact relay; Maximum cable length to connect the N.O. contact 50 m twilight sensor: = 16(10)A / 250V~ Zero Crossing N.C. -
Seite 38: La Pag
“ Keypad lock ” icon Time Summer time period icon (summer changeover) and/or for Astro and Lux programs Winter time period icon (winter changeover) 1 2 3 4 5 6 7 Day of the week field... -
Seite 39: 1) Specific Key Functions Pag
2 seconds for channel 1 for channel 2 Press the key With the ASTRO function and/or Twilight sensor activated you can view the following consecutively: in the Programs menu, SUNSET / SUNRISE Time as at today... -
Seite 40: First Start-Up
2 - FIRST START-UP (language selection, entry of current year, month, day, hour and minutes, summer/winter time setting) The unit is supplied with default settings. After inserting the battery (see paragraph 1.2) and connecting the power supply, the unit resets the display (lamp-test) and then proceed as follows: Select/set the data by pressing the keys and press the OK key to confirm and move on to the next field. - Seite 41 OK OKAY appears and it moves on to the next item (Enabling the twilight sensor). If ASTRO OFF is confirmed, the astronomical coordinates can then be entered in two ways: - when an ASTRO program is first entered (see paragraph 4 1.1) - entering the OPTION >...
-
Seite 42: Entering Astronomical Coordinates Pag
2.1) Inserting the astronomical coordinates (ASTRO activation) for the ASTRO programs to work properly it is important for some information to be entered (ASTRONOMICAL PARAMETERS), which allow the device to identify the geographic area where it will be installed. The display of the digital switch shows... -
Seite 43: Enabling The Twilight Sensor Pag
2.2) Enabling the twilight sensor (this is only possible with the outdoor twilight sensor installed and connected properly to the digital device powered by 230V~ mains voltage SENSOR L SENSOR L ON T he display of the digital switch shows ;... -
Seite 44: Menu And Programming Pag
- Selection of no. of programs - Selection of channel (only dual-channel) - Selection of day - Selection of the (ASTRO or LUX or TIME) type of program (start-up) data entry according to the type of program selected - Selection of the... -
Seite 45: Forcing And Program Priority Pag
The output relay/s will be activated according to the set priorities. IMPORTANT: all programs (ASTRO-LUX-TIME) entered are simultaneously active regardless of their position; in the case of overlapping commands on the same output, this is activated or remains so if at least one program is commanding it (OR LOGIC). -
Seite 46: Prog» Menu (Programs) Pag
The number of free programs will be displayed for about 2 seconds, then the first program will appear flashing. If no text (ASTRO, LUX, TIME) appears on the left of the program it means that the program is free. 2. Select the desired program using the keys. -
Seite 47: 1) «Astro» Program Type Pag
The program begins at sunset (ASTRO ON) and ends at astronomical sunrise the next day (ASTRO OFF). The time of sunrise and sunset is calculated by considering the type of "Official" twilight and corresponds with the Zenith at 90°50'. -
Seite 48: 2) «Lux» Program Type Pag
4.1.2) LUX/LUX type of program (twilight) Note: this program can be activated if the sensor is connected and activated. After having selected the program number, the channel (only for the dual-channel model) and the day as described in the procedure in paragraph 4.1. 1. -
Seite 49: A) Forcing Twilight (Lux) Total / Partial Pag
This type of override is useful, for example, to enable/disable the channel as a normal twilight device. Type of PARTIAL twilight override: note: PARTIAL twilight override can only be selected if the ASTRO procedure has been previously set (see paragraph 2.1). Night time is calculated based on the astronomical coordinates. -
Seite 50: B) Disable Twilight (Lux) Override Pag
Confirm with Important: PARTIAL twilight override can only be selected if the ASTRO procedure has been previously set (see paragraph 2.1). 7. The display returns to the LUX override set-up screen and you can also set the other channel (only for the... - Seite 51 After having selected the program number, the channel (only for the dual-channel model) and the day as described in the procedure in paragraph 4.1: 1. On the request to select the type of program (ASTRO is suggested by default), select TIME with the keys. Confirm with 2.
- Seite 52 4.1.4.a) Combination of ASTRO / TIME Combination of ASTRO / TIME programs You can set the programs that start at astronomical sunset (ASTRO ON) and end at a fixed time (TIME OFF). NOTE: when creating the ASTRO / TIME program, 23:59 is suggested as TIME OFF (editable) on the selected day.
- Seite 53 NOTE: if during program start-up (ASTRO ON), switch-off also occurs (LUX OFF), i.e. the amount of light is higher than the set threshold, the program will last about 1 minute. The program will start again when dimming occurs and will terminate at sunrise the next day when the brightness will be higher than the threshold set in the program.
-
Seite 54: Copying A Program
4.3) Copying a program Copy a saved program ASTRO/ LUX / TIME / COMBINED) on other days of the week, as follows: If you are already in the programs menu and the saved program to load is displayed, proceed from point 3. -
Seite 55: Program Menu
5 - «HOLIDAY» program menu This menu allows you to create, test, modify and delete the «HOLIDAY» programs. The holiday programs allow you to set different periods during the year when to suspend the on/off programs combined with channel 1 and/or 2 (dual-channel mod.), example for Christmas and summer shutdown of a public or sales department. - Seite 56 6. Use the keys to select the month when program suspension is to be terminated (ON) (the number of the month flashes). Confirm with 7. Use the keys to select the day when program suspension is to be terminated (ON) (the number of the day flashes).
- Seite 57 6 - Deleting a program («ERASE PG» menu) MENU PROG SET 1. Press the key to access the first menu ( ERASE PG SET 2. Use the keys to select the menu. Confirm with ERASE PG SING 3. The display shows the screen to delete a single main screen ERASE PG ALL...
-
Seite 58: Activating An Override
7 - «OVERRIDE» menu This menu allows you to manually force the status of the outputs/s (dual- Override Display Channel- Override function mode channel mod.) regardless of the active programs. Generally used to test or symbol Condition perform maintenance of the connected load. No override on the channel, auto program-controlled... -
Seite 59: Option Menu
8 - «OPTION» menu The following is possible from this menu: - Language selection - ASTRO / TIME setting - Maintenance - Hour counter - LED light (backlighting) main screen - Warranty - Info - EM key (only with key inserted, see paragraph 8.8) - Seite 60 »). OKAY 5. When you finish editing or viewing the data, confirm with appears on the ASTRO TIME SET display for a few seconds followed by the modified settings. MENU 6. Exit and return to the home screen by pressing the key twice.
-
Seite 61: Hour Counter
8.3.a) Managing a maintenance operation - Once the operating hours set for one or both channels (dual-channel model) are reached, MAINTEN will appear on the main screen in cyclic repetition alternating with the current DATE (example in the figure at the side: channel 1 in Maintenance). - In this condition you can override the status of the outputs (from the MANUAL menu) and manage the maintenance intervention. - Seite 62 8.5) BACKLIGHTING This function allows you to set the display backlighting in three modes: Timed = on for 6 seconds after a key is pressed. Fixed ON = always on (default) Fixed OFF = always off BACHLIT 1. From the sub-menu confirm with 2.
-
Seite 63: Info
8.7) INFO This feature allows you to view information about the version of software installed on the product. INFO SET 1. From the sub-menu confirm with 2. Information about the version of software is displayed. MENU 3. Exit and return to the home screen by pressing the key three times . -
Seite 64: A) Exclusion Of The Emd
8.8.a) Exclusion of the EMD MENU Press the key three times to exclude the EMD and return to the home screen. If desired, remove the EMD from its slot. 8.8.b) Accessing the EMD Access the EMD once again as follows (with the EMD inserted in its slot) main screen MENU... -
Seite 65: Informationen Und Hinweise Zur Sicherheit
4.1.4.f) Kombination der Programme LUX/ASTRO S. 84 •Wichtig: die Installation, der elektrische Anschluss 1.4) Elektrische Anschlüsse S. 68 4.2) Anzeige oder Änderung eines ASTRO-, und die Inbetriebnahme der Vorrichtungen und Geräte 1.5) Dispaly S. 69 LUX- oder TIME-Programms S. 84 sind von qualifiziertem Personal, in Übereinstimmung... -
Seite 66: 1-Beschreibung Des Geräts
Sie stellen die endgültige Lösung für die Steuerung der Lasten auf Grundlage von Zeit und auch der angeschlossenen Last im Nulldurchgang erhöht. Lichtstärkeund/odereinerKombinationvonbeidendar.SievereineneineASTRONOMISCHE • Steckplatz für externen Speicherschlüssel für das Ausführen und Laden der Programmen Astro, ZEITSCHALTUHR,einenDÄMMERUNGSSCHALTERundeineZEITSCHALTUHRineinem Lux und Time mit der Möglichkeit, nur die Urlaubsprogramme herunterzuladen/zu laden. -
Seite 67: Die Erste Einfügung Der Batterie
1.2) Die erste Einfügung der Batterie Die Batterieabdeckung nach links öffnen und die Batterie in ihren Sitz einlegen, dabei darauf achten, dass der Plus-Pol nach oben zeigt Die Batterieabdeckung sorgfältig nach rechts schließen Die 230V-Netzversorgung anschließen oder aktivieren (siehe Absatz 1.4). Anschließend die geforderten Daten eingeben, wie in Kapitel 2 - ERSTE INBETRIEBNAHME erklärt. -
Seite 68: Technische Daten
1.3) Technische Daten 1.4) Elektrische Anschlüsse Betriebsspannung 230 V c.a. +/- 10% Frequenz 50 Hz Dämmerungssonde Schutzart IP20 Ausgangstyp Potenzialfreier Wechslerkontakt; Maximale Länge der Kabel zum Anschluss NO Kontakt 50 m der Dämmerungssonde: = 16(10)A / 250V~ Nulldurchgang N Kontakt = 16(2)A / 250V~ 1 2 3 4 5 Betriebstemperatur... -
Seite 69: Dispaly
Wartung der verbundenen Last Symbol Tastensperre “ ” Time Symbol Sommerzeit (Einstellung Sommerbetrieb) und/oder und/oder für Programme Astro und Lux Symbol Winterzeit (Einstellung Winterbetrieb) 1 2 3 4 5 6 7 Feld Wochentag Anzeige Zeitprogramme eingestellt (TIME) Anzeige Dämmerungsprogramme eingestellt... -
Seite 70: 1) Besondere Tastenfunktionen
2 Sekunden permanenten Zwangssteuerungen, siehe Kapitel 7. aufgerufen für Kanal 1 für Kanal 2 Taste wiederholt drücken Sind die Funktionen ASTRO und /oder Dämmerungssonde aktiviert, kann folgendes in dieser Reihenfolge angezeigt werden: Im Programm-Menü, - Uhrzeit SONNENUNTERGANG / Uhrzeit SONNENAUFGANG für l ö... -
Seite 71: Erste Inbetriebnahme
2 - ERSTE INBETRIEBNAHME (Wahl der Sprache, Einstellung von Jahr, Monat, Tag, Stunde und Minuten, Einstellung Sommerzeit/Winterzeit) Das Gerät wird mit den werkseitig konfigurierten Einstellungen geliefert. Nach dem Einlegen der Batterie (siehe Absatz 1.2) und dem Anschluss an die Stromversorgung führt das Gerät ein Reset des Displays durch (Lamp-Test). Anschließend wie folgt vorgehen Zur Auswahl/Einstellung der Daten die Tasten anschließend die Taste OK zur Bestätigung und zum Übergang auf das nächste Feld drücken. - Seite 72 Punkt übergegangen (Aktivierung der Dämmerungssonde). Wird ASTRO OFF bestätigt, so können die astronomischen Koordinaten zu einem späteren Zeitpunkt auf zwei Arten eingegeben werden: - bei der ersten Eingabe eines ASTRO Programms (siehe Absatz 4.1.1);...
-
Seite 73: Eingabe Der Astronomischen Koordinaten
2.1) Eingabe der astronomischen Koordinaten (Aktivierung von ASTRO) Für den einwandfreien Betrieb der ASTRO-Programme müssen einige Informationen eingegeben werden (ASTRONOMISCHE PARAMETER),mitderenHilfedasGerätdasgeografischeGebiet,indemesinstalliertwird,identifizierenkann. ASTRO Am Display der digitalen Schaltuhr wird angezeigt: mit den Pfeiltasten auswählen. • bestätigen. Nun können die astronomischen Koordinaten eingegeben werden Hierfür müssen die Längen- und Breitengrade... -
Seite 74: Aktivierung Der Dämmerungssonde
2.2) Aktivierung der Dämmerungssonde (nur mit einer externen Dämmerungssonde möglich, die korrekt installiert und an das, mit einer 230V- Versorgungsspannung gespeiste digitale Gerät angeschlossen ist). PROBE OFF PROBE auswählen , angezeigt; mit den Tasten •Am Display der Schaltuhr wird bestätigen. Der in Echtzeit von der Sonde gelesene LUX-Wert wird angezeigt ( JETZIG Mit bestätigen. -
Seite 75: Menü Und Programmierung
- Wahl des Kanals (nur für Zweikanal-Modelle) - Wahl des Tages - Wahl des Programmtyps (ASTRO oder LUX oder TIME) (Aktivierung) Eingabe der Daten auf Grundlage des gewählten Programms - Wahl des Programmtyps (ASTRO oder LUX oder TIME) OFF Vorgehensweise für die Auswahl (Deaktivierung) desgewünschtenMenüs: Eingabe der Daten auf Grundlage des gewählten Programms... -
Seite 76: Priorität Für Zwangssteuerung Und Programme
Das/die Ausgangsrelais werden auf Grundlage der festgelegten Prioritäten aktiviert. WICHTIG: alle eingegebenen Programme (ASTRO-LUX-TIME) sind gleichzeitig aktiv, unabhängig von ihrer Position ollte es zu einer Überschneidung der Befehle am selben Ausgang kommen, so wird oder bleibt dieser aktiviert, wenn er zumindest von einem Programm gesteuert wird (OR-LOGIK). -
Seite 77: 4- Menü «Prog» (Programme)
Die Anzahl der freien Programme wird etwa 2 Sekunden lang angezeigt, dann wird das erste Programm blinkend angezeigt. Wenn links von dem Programm keine Schrift vorhanden ist (ASTRO, LUX, TIME), so bedeutet dies, dass das Programm frei ist. 2. Das gewünschte Programm mit den Tasten . -
Seite 78: 1) Programmtyp «Astro
: Sonnenauf- und Sonnenuntergang werden auf Grundlage der eingegebenen Koordinaten und der Ortszeit mit einem astronomischen Algorithmus berechnet. Das Programm beginnt bei Sonnenaufgang (ASTRO ON) und endet mit dem astronomischen Sonnenuntergang des darauf folgenden Tages (ASTRO OFF). Die Uhrzeit für Sonnenauf- und Sonnenuntergang wird unter Berücksichtigung des "offiziellen" Dämmerungstyps berechnet und entspricht dem Zenit von 90°50'. -
Seite 79: 2) Programmtyp «Lux
4.1.2) Programmtyp «LUX/LUX» (Dämmerungsfunktion) Anmerkung: dieses Programm kann nur ausgeführt werden, wenn die Sonde angeschlossen und aktiviert ist. Programm ummer, Kanal (nur für Zweikanal-Modell) und Tag, wie in Abs. 4.1 beschrieben, auswählen. 1. Bei der Frage nach der Auswahl des Programmtyps , mit den Tasten . -
Seite 80: A) Zwangssteuerung Der Dämmerungsfunktion (Lux)
- PARTIELLE Zwangssteuerung der Dämmerungsfunktion: Anmerkung: die Wahl der PARTIELLEN Zwangssteuerung der Dämmerungsfunktion ist nur dann möglich, wenn zuvor das Programm ASTRO eingestellt wurde (siehe Absatz 2.1). Die Dauer der Nacht wird auf Grundlage der astronomischen Koordinaten berechnet. In der Nacht wird die partielle Zwangssteuerung der Dämmerungsfunktion deaktiviert, so dass die normale Durchführung eventuell laufender Programme ermöglicht wird. -
Seite 81: Deaktivierung Der Zwangssteuerung ) Der Dämmerungsfunktion
Mit bestätigen Anmerkung: die Wahl der PARTIELLEN Zwangssteuerung der Dämmerungsfunktion ist nur dann möglich, wenn zuvor das Programm ASTRO eingestellt wurde (siehe Absatz 2.1). 7. Das Display zeigt für einigen Sekunden das Wort OKAY und kehrt zum Bildschirm für die Einstellung der LUX-Zwangssteuerungen zurück, nun kann auch der andere Kanal eingestellt werden (nur für Zweikanal-... -
Seite 82: 3) Programmtyp «Time
Ermöglicht die Aktivierung (Stunde ON) und Deaktivierung (Stunde OFF) einer Last innerhalb einer festgelegten Zeitspanne. Programmnummer, Kanal (nur für Zweikanal-Modelle) und Tag, wie in Abs. 4.1 beschrieben, auswählen und anschließend 1. Bei der Frage nach der Auswahl des Programmtyps (standardmäßig wird der Programmtyp ASTRO vorgeschlagen), mit den Pfeiltasten TIME auswählen. -
Seite 83: 4) Kombination Der Programme Astro-Lux-Time
- « Kombinierte Programme»: ASTRO / TIME - TIME / ASTRO - TIME / LUX - LUX / TIME - ASTRO / LUX - LUX / ASTRO zur Einstellung des gewünschten kombinierten Programms den in Absatz 4.1. beschriebenen Vorgang befolgen 4.1.4.a) Kombination der Programme ASTRO / TIME... -
Seite 84: D) Kombination Der Programme Time/Lux
4.1.4.f) Kombination der Programme LUX/ASTRO Es ist möglich, Programme einzustellen, die mit dem von der Dämmerungssonde erfassten Sonnenuntergang starten (LUX ON) und mit dem Sonnenaufgang des darauf folgenden Tages enden (ASTRO OFF). 4.2) Anzeige oder Änderung eines bereits gespeicherten Programms (ASTRO / LUX / TIME) Ein bereits gespeichertes Programm kann folgendermaßen angezeigt oder geändert werden (oder wie bereits in Abs. -
Seite 85: Kopieren Eines Programms
4.3) Kopieren eines Programms Zum Übertragen eines gespeicherten Programms ( ASTRO / LUX / TIME / KOMBINIERT) auf andere Tage der Woche folgendermaßen vorgehen: Wenn Sie bereits im Menü Programme sind und das gespeicherte Programm, das kopiert werden soll, angezeigt ist den Vorgang ab Punkt 3 ausführen. -
Seite 86: Menü «Ferien
5 - Menü «FERIEN» Mit diesem Menü können «URLAUBS-Programme» erstellt, überprüft, geändert und gelöscht werden. MitdenUrlaubsprogrammenkönnenverschiedeneZeitspannenimJahreingestellt werden, in den die, dem Kanale1 und/oder 2 (Zweikanal-Modelle) zugewiesenen Programme on/off ausgesetzt werden können, zum Beispiel während der Sommer-oderWeihnachtspauseeinesöffentlichenoderkommerziellenBüros. Hauptbildschirm 5.1) Erstellen eines neuen FERIEN - Programms MENU PROG SET 1. -
Seite 87: Anzeige Oder Änderung Eines Bereits Gespeicherten Urlaubs-Programms
6. Mit den Tasten den Monat für das Ende der Programmaussetzung ( ) auswählen (die Zahl für den entsprechenden Monat blinkt). Mit bestätigen. 7. MitdenTasten denTagfürdasEndederProgrammaussetzung(ON)auswählen (dieZahlfürdenentsprechendenTagblinkt).Mit bestätigen. Achtung: wenn die für O und O eingegebenen Daten identisch sind, wird nach Drücken der Taste am Bildschirm einige Sekunden lang die Meldung angezeigt. -
Seite 88: Löschen Eines Programms
«LOESCH P» 6 - Löschen eines Programms (Menü PROG SET 1. Die Taste MENU drücken, das erste Menü ( ) wird aufgerufen LOESCH P 2. Mit den Tasten ( ) das Menü auswählen. OK b estätigen. LOESCH P EINZ 3. Am Display wird der Bildschirm zum Löschen Hauptbildschirm eines einzelnen Programms angezeigt. -
Seite 89: Menü «Manuell
7 - Menü «MANUELL» Dieses Menü ermöglicht die manuelle Zwangssteuerung des Ausgangs/der Ausgänge Display Zwangssteuerungs- Kanal- Zwangssteuerungs-Funktion modus (Zweikanal-Modell), unabhängig von den aktivierten Programmen. Typischerweise Symbol Status wirdesfüreinePrüfungoderzurWartungderangeschlossenenLasteingesetzt. Keine Zwangssteuerung, der Kanal wird auto programmgesteuert Aktivieren einer Zwangssteuerung c1 On PROG SET 1. -
Seite 90: Menü «Optionen
8 - Menü «OPTIONEN» Dieses Menü hat folgende Funktionen: - Wahl der Sprache - Einstellung ASTRO/TIME - Wartung - Stundenzähler - LED-Leuchte (Hintergrundbeleuchtung) Hauptbildschirm - Garantie - Info -Schlüssel ( nur mit eingesetztem Schlüssel siehe Absatz 8.8) MENU PROG SET 1. -
Seite 91: Einstellungen (Setup)
ASTRO TIME auswählen. Mit bestätigen. 3.Wird ASTRO SET gewählt so ist es möglich, die astronomische Funktion zu aktivieren/deaktivieren und die Koordinaten einzugeben und/oder zu ändern. Wie in Absatz 2.1 beschrieben vorgehen. 4. Wird TIME SET gewählt, so können folgende Daten geändert werden: aktuelles Jahr, Monat, Tag, Stunde, Minuten sowie Sommer-/Winterzeit (wie in Kapitel 2 - «Erste Inbetriebnahme»... -
Seite 92: A) Verwaltung Des Wartungseingriffs
8.3.a) Verwaltung des Wartungseingriffs - Bei Erreichen der für einen oder beide Kanäle (Zweikanal-Modell) eingestellten Betriebsstundenzahl wird auf dem Hauptbildschirm mit regelmäßigen Wiederholungen die Meldung WARTUNG abwechselnd mit dem aktuellen DATUMangezeigt(BeispielinnebenstehenderAbbildung:Kanal1inWartung). - Unter dieser Bedingung kann der Status der Ausgänge (vom Menü MANUELL aus) zwangsgesteuert und der Wartungseingriffverwaltetwerden. -
Seite 93: Hintergrundbeleuchtung
8.5) HINTERGRUNDBELEUCHTUNG (Beleucht) Mit dieser Funktion kann die Hintergrundbeleuchtung des Displays eingestellt werden. Es stehen drei Möglichkeiten zu Auswahl: Zeitsteuerung = bleibt 6 Sekunden lang nach dem letzten Tastendruck eingeschaltet. Fix ON = immer eingeschaltet (werkseitige Einstellung) Fix OFF = immer ausgeschaltet BELEUCHT 1. -
Seite 94: Info
8.7) INFO Mit dieser Funktion können Informationen in Bezug auf die im Gerät installierte Software-Version angezeigt werden. INFO 1. Vom Untermenü aus mit bestätigen. 2. Die Informationen in Bezug auf die Software-Version werden angezeigt. MENU 3. Zum Verlassen des Menüs und zur Rückkehr zum Hauptbildschirm die Taste 3 Mal drücken. -
Seite 95: A) Ausschluss Des Emd-Speichers
8.8 a) Ausschluss des EMD-Speichers Zum Ausschluss des EMD-Speichers und zur Rückkehr zum Hauptbildschirm die Taste MENU 3 Mal drücken. Wenn gewünscht, den EMD-Speicherschlüssel abziehen. 8.8.b) Zugriff auf den EMD-Speicher Um erneut auf den EMD-Speicher (mit eingesetztem EMD-Speicherschlüssel) zugreifen zu können: 1. - Seite 96 Downloaded from www.Manualslib.com manuals search engine...