Herunterladen Inhalt Inhalt Diese Seite drucken

Werbung

Verfügbare Sprachen
  • DE

Verfügbare Sprachen

  • DEUTSCH, seite 22
T12
FR
GB
IT
DE
ES
MANUAL DE INSTRUCCIONES Y MANTENIMIENTO
T
REUIL
'
MANUEL D
INSTRUCTIONS ET D
H
AND WINCH
USER AND MAINTENANCE MANUAL
A
RGANO
MANUALE DI ISTRUZIONI E DI MANUTENZIONE
S
EILWINDE
B
-
EDIENUNGS
UND
T
ORNO A
Réf. / Art. Nr. :
PRTRM1000 / 560106
PRTRM2000 / 560216
T25
M
ANUEL
'
UTILISATION
M
ANUALE
W
ARTUNGSANLEITUNG
M
ANO

Werbung

Inhaltsverzeichnis
loading

Inhaltszusammenfassung für Ribimex Ribitech PRTRM1000

  • Seite 1 REUIL ANUEL ’ ’ MANUEL D INSTRUCTIONS ET D UTILISATION AND WINCH USER AND MAINTENANCE MANUAL RGANO ANUALE MANUALE DI ISTRUZIONI E DI MANUTENZIONE EILWINDE EDIENUNGS ARTUNGSANLEITUNG ORNO A MANUAL DE INSTRUCCIONES Y MANTENIMIENTO Réf. / Art. Nr. : PRTRM1000 / 560106 PRTRM2000 / 560216...
  • Seite 2 AVERTISSEMENT: Lire et assimiler ce manuel avant d’assembler ou d’utiliser ce produit. Une utilisation incorrecte du produit pourrait causer de graves blessures et des dommages. Conserver ce manuel pour pouvoir le consulter ultérieurement. WARNING: Carefully read this instruction manual before operating this appliance. Incorrect operation may cause injury and/or damages.
  • Seite 3: Caractéristiques

    I. Nomenclature III. Consignes de sécurité V. Utilisation II. Caractéristiques techniques IV. Mise en route VI. Entretien et Entreposage I. NOMENCLATURE 1. Crochet 2. Câble 3. Roue crantée 4. Manivelle 5. Arbre (axe) 6. Base 7. Cliquet Fig.1a (T12) Fig.1b (T25) II.
  • Seite 4 3.1- Lire toutes les instructions avant d’utiliser ce produit 1. Garder l'aire de travail propre et dégagée - Des aires de travail encombrées sont source d’accidents. 2. Tenir compte de l'environnement de l'aire de travail - Ne pas exposer le produit à la pluie. - Ne pas utiliser le produit dans des endroits humides ou mouillés.
  • Seite 5 10. Faites réparer le produit - Lorsque des réparations sont effectuées, seules des pièces de rechange identiques doivent être utilisées, afin d'éviter tout danger à l'utilisateur. - Faire réparer l'outil par du personnel qualifié - Il convient que les réparations soient effectuées uniquement par du personnel qualifié, en utilisant des pièces détachées d'origine ;...
  • Seite 6: Mise En Route

    - N'accrochez pas deux crochets sur le châssis du treuil. Ils doivent être accrochés au châssis du véhicule. - Dans la mesure où la plus grande force de traction se produit dans la couche de spires la plus interne du treuil, il est conseillé de dérouler le plus de câble possible pour les charges importantes (rappelez-vous de laisser au moins 3 spires sur le tambour).
  • Seite 7 4.2- Cliquet (voir 7 fig.1) Le cliquet (7) peut être positionné dans 3 positions : Pour T12 Pour T25 sur axe 1 ou 2 - En haut: Placer le cliquet en position haute pour Placer le cliquet en position haute libérer (dérouler) le câble.
  • Seite 8: Entretien Et Entreposage

    4. Remettre le cliquet en position d’enroulement (voir 4.2) 5. L’opérateur/utilisateur doit tirer la charge doucement. Le câble doit être tendu et ne doit pas présenter de mou lorsque la charge est tirée. 6. Re-enrouler le câble à l’aide de la manivelle. 5.4- AVERTISSEMENT : 1.
  • Seite 9 remplacez-les si elles sont détériorés ou présentent des signes de fatigue ou d’usure. 3. Faites remplacer les pièces détériorées ou usées par un centre d'assistance agréé. 4. Vérifiez périodiquement les écrous et revissez-les à fond si besoin est. 6.2- Entreposage il est recommandé...
  • Seite 10: Parts List

    I. Parts List III. Safety Instructions V. Operation II. Characteristics IV. Getting Started VI. Maintenance and Storage I. PARTS LIST 1. Hook 2. Cable 3. Rim 4. Crank 5. Axis bolt 6. Base 7. Ratchet switch Fig.1a (T12) Fig.1b (T25) II.
  • Seite 11 3.1- Read all instructions before operating the product. 1. Keep the work area clean and free - Cluttered areas invite accidents. 2. Observe work area environment conditions - Do not expose the product to rain. - Do not use in damp or wet locations. - Ensure that work area environment is kept well lit (sunlight or artificial lighting).
  • Seite 12 any danger for the user. 11. Product maintenance - Keep the product properly maintained and clean for a better and safer performance. - Follow the instructions for lubricating and changing the accessories, - Inspect all moving parts and mounting bolts and nuts prior to use. Tighten if necessary. - Keep handles dry, clean and free from oil and grease.
  • Seite 13: Getting Started

    Apply blocks to wheels if the vehicle is on an incline 3.3- About the cable - Before starting, make sure that the steel cable is correctly wound around the drum and the pitch is equal to the cable diameter. - Make sure the cable is in good condition and is attached properly. - Do not use the winch if the cable is worn, frayed.
  • Seite 14: Operation

    4.3- Installing the crank handle (Fig.2) a- insert metal plate [a] on bolt axis b- insert handle [b] on bolt axis c- Tighten with nut [c] (provided) Fig.2a (for T12) Fig.2b (for T25) V. OPERATION CHECK THE WINCH CAREFULLY BEFORE STARTING AND RUNNING IT 5.1- Intended use - The winch shown in this operation manual is solely for pulling uses on vehicles and hauling boats and not for professional and/or industrial applications.
  • Seite 15: Maintenance And Storage

    5.5- Pulling capacity 1. The winch has a capacity of 540 kg (T12) or 1080 Kg (T25). Applying this measurement to practical applications, the winch can be used to pull the following: (R) Rolling load - a wheeled moving vehicle of up to 540 kg (T12) or 1100Kg (T25) (M) Marine load - a water borne craft of up to 450 kg (T12) or 1000Kg (T25).
  • Seite 16: Elenco Componenti

    I. Elenco componenti III. Istruzioni di sicurezza V. Funzionamento II. Caratteristiche IV. Per iniziare VI. Pulizia e conservazione I. ELENCO COMPONENTI 1. Gancio 2. Cavo acciaio 3. Girante dentato 4. Manovella 5. Albero (asse) 6. Piastra di montaggio 7. Dente d’arresto Fig.1a (T12) Fig.1b (T25) II.
  • Seite 17 3.1- Leggere tutte le istruzioni prima di utilizzare l'apparecchio 1. Mantenere l'area di lavoro pulita e libera - Le aree da lavoro in disordine possono causare incidenti. 2. Osservare le condizioni dell'area di lavoro - Non esporre il prodotto alla pioggia. - Non utilizzare il prodotto in luoghi umidi o bagnati - Mantenere l'area di lavoro ben illuminata (luce naturale o artificiale sufficiente).
  • Seite 18 - Fare riparare l'attrezzo da personale qualificato - Occorre che le riparazioni siano effettuate soltanto da personale qualificato, utilizzando pezzi di ricambio originali; differentemente, può risultare un pericolo per l'utente. 11. Manutenzione dell'utensile - Mantenere l'utensile affilato e pulito per una migliore prestazione in tutta sicurezza. - Seguire le istruzioni per quanto riguarda la lubrificazione e il cambio degli accessori.
  • Seite 19: Per Iniziare

    Se il veicolo è in discesa, mettere dei blocchi aile ruote. 3.3- Informazioni sul cavo - Prima di iniziare il lavoro, verificare che il cavo d’acciaio sia avvolto correttamente sul rocchetto con un passo uguale al diametro del cavo. - Assicurarsi che il cavo sia in buone condizioni e sia correttamente attaccato. - Non utilizzare il verricello se il cavo è...
  • Seite 20 4.3- Installare la Manovella (fig.2) a- inserire la placca di metallo [a] sull'asse b- inserire la maniglia [b] sull'asse c- Serrare con il dado [c] (in dotazione) Fig.2a (for T12) Fig.2b (for T25) V. UTILIZZO DEL VERRICELLO PRIMA DI INIZIARE AD OPERARE CON IL VERRICELLO CONTROLLARLO ATTENTAMENTE 5.1- Uso destinato: - il verricello illustrato in questo manuale istruzioni è...
  • Seite 21: Manutenzione E Magazzinaggio

    5.5- Capacita di trazione 1. Il verricello ha una capacità pari a 540kg (T12) o 1100Kg (T25).. Utilizzando questa misura per applicazioni pratiche è possibile utilizzare il verricello per muovere quanto di seguito indicato: - Mantenere in movimento veicoli con ruote fino a 540kg (T12) o 1100Kg (R) Rotolamento (T25)..
  • Seite 22: Liste Der Einzelteile

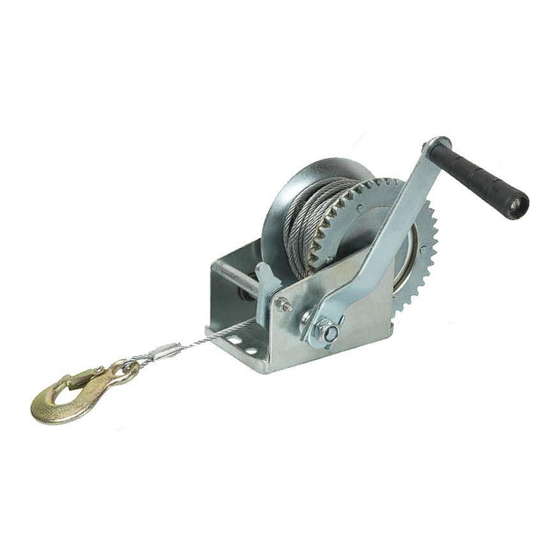
    I. Liste der Einzelteile III. Sicherheitsanweisungen V. Inbetriebnahme II. Technische Daten IV. So geht's los VI. Wartung und Lagerung I. LISTE DER EINZELTEILE 1. Haken 2. Stahlseil 3. Felge 4. Handkurbel 5. Wellenachse 6. Aufspannplatte 7. Ratsche Fig.1a (T12) Fig.1b (T25) II.
  • Seite 23 3.1- Vor gebrauch des gerätes alle anweisungen lesen. 1. Halten Sie die Arbeitsumgebung ordentlich und sauber - Eine unordentliche Arbeitsumgebung kann zu Verletzungen führen. 2. Achten Sie auf die Arbeitsbedingungen in Ihrer Arbeitsumgebung - Das Gerät nicht Regen aussetzen. - Nicht in feuchter oder nasser Umgebung verwenden. - Die Arbeitsumgebung muss gut beleuchtet sein (Tageslicht oder ausreichende künstliche Beleuchtung).
  • Seite 24 qualifizierten Fachmann repariert oder ausgetauscht werden. - Das Gerät nicht verwenden, wenn die Fernbedienung sich nicht korrekt ein- und ausschalten lässt. Fernbedienung von einem autorisierten Kundendienst reparieren oder ersetzen lassen 10. Reparatur - Wenn an dem Gerät Reparaturen durchgeführt werden, sollten Sie nur identische Ersatzteile verwenden, um die Gefahr von Personenschäden zu vermeiden.
  • Seite 25 Schlinge oder Kette in der passenden Stärke. Überwachen Sie das Gerät während der Benutzung. Halten Sie genügend Sicherheitsabstand, wenn Sie ein Fahrzeug einsetzen. Ziehen Sie zuerst nur ein kurzes Stück, um sicherzustellen, dass das Seil nicht nur an einer Seite zieht.
  • Seite 26: So Geht's Los

    IV. SO GEHT'S LOS 4,1-Montage der Seilwinde Die Seilwinde kann vorübergehend mit einem Anhänger montiert werden, Ball durch die Aufspannplatte (6). Setzen Sie die ratsche auf der Mittelstellung und am Kabel ziehen, bis die Löcher auf der Aufspannplatte (6) sichtbar sind. Stellen Sie die Aufspannplatte der Winde auf einer festen, ebenen Oberfläche.
  • Seite 27 Achten Sie auf das Geräusch des Gerätes während der Benutzung. Es ist wichtig, dass Sie den Unterschied erkennen zwischen einem leichten, gleichmäßigen Zug, einem schweren Zug und einem Zug bei verschobener oder verrutschter Ladung. Inbetriebnahme: 1. Fahrzeug auskuppeln. Handbremse anziehen. Räder festkeilen, um zu verhindern, dass das Fahrzeug wegrollt.
  • Seite 28: Wartung Und Lagerung

    Maximale Rollgewicht-Tragfähigkeit bei Gefälle P = Gewicht I = Neigungswinkel VI. WARTUNG UND LAGERUNG 6.1- Wartung der seilwinde 1. Befolgen Sie regelmäßig die Anweisungen zum Schmieren des Gerätes Seil und Haken regelmäßig mit leichtem Schmierfett schmieren. Den Antrieb alle 6 Monate schmieren. Lösen Sie dazu den Kupplungsknopf und nehmen Sie das linke vom rechten Gehäuse ab.
  • Seite 29: Lista De Piezas

    I. Lista de piezas III. Instrucciones de seguridad V. Funcionamiento II. Características IV. Procedimientos iniciales VI. Mantenimiento y almacenamiento I. LISTA DE PIEZAS 1. Gancho 2. Cable 3. Rueda dentada 4. Manivela 5. Arbol (axis) 6. Placa de montaje 7. Trinquete Fig.1a (T12) Fig.1b (T25) II.
  • Seite 30 3.1- Lea todas las instrucciones antes de utilizar el producto 1. Mantener el área de trabajo limpia y libre - Las áreas de trabajo en desorden pueden provocar accidentes. 2. Respetar las condiciones del área de trabajo - No exponer el producto a la lluvia. - No utilizar el producto en sitios húmedos o mojados.
  • Seite 31 - Cuando se efectúan reparaciones, utilizar exclusivamente piezas de recambio idénticas en modo de evitar peligros para el usuario. - Todas las reparaciones deben realizarse por un agente de servicio o técnico cualificado - Conviene que las reparaciones sean efectuadas solamente por personas cualificadas, utilizando piezas de recambio de origen;...
  • Seite 32: Procedimientos Iniciales

    aconsejable desenrollar cuanto más cable posible para cargas pesadas (acordarse de dejar un mínimo de 3 espiras en el tambor). Si esto no resulta posible, utilizar una polea y un doble cable. Un enrollado uniforme y bien tenso evita que el cable se enrede y pellizque cuando se aplica una carga.
  • Seite 33 4.2- Trinquete (7) Modelo T12 Modelo T25 - Posicion Coloque el trinquete en posicion alta para Coloque el trinquete en posicion alta alta: liberar (desenrollar) el cable. para tirar (enrollar) el cable. - Posicion Coloque le trinquete en posicion central Coloque le trinquete en posicion central: para desenganchar el trinquete y permitir...
  • Seite 34: Mantenimiento Y Almacenamiento

    cuando la carga se tira. 6. Enrollar el cable con la manivella. 5.4- ADVERTENCIA: 1. No utilizar el cabrestante en vehículos con la marcha embragada o con el freno en “P” porque podría dañar la transmisión del vehículo. Bloquear el vehiculo. 2.
  • Seite 35 4. Controlar periódicamente las tuercas y fijarlas si resultan aflojadas 6.2- Almacenamiento Limpiar el producto antes de guardarlo. Almacenar el producto en un lugar seco, cerrado y fuera del alcance de los niños.

Diese Anleitung auch für:

Ribitech prtrm2000

Inhaltsverzeichnis