Inhaltsverzeichnis
Werbung
© 2012 Thermaltake Technology Co., Ltd. All Rights Reserved. 2012.08
All other registered trademarks belong to their respective companies.
Tested To Comply
With FCC Standards
FOR HOME OR OFFICE USE
www.thermaltake.com
Overseer RX-I
Overseer RX-I
User's Manual
Benutzerhandbuch
Mode d'emploi
Manual del usuario
Manuale dell'utente
Manual do Utilizador
安裝說明書
用戶手冊
ユーザーズマニュアル
Руководство пользователя
kullanıcı elkitabı
(EEE Yönetmeliğine Uygundur)
คู ่ ม ื อ การใช้
VN7000 Series
Werbung
Inhaltsverzeichnis

Verwandte Anleitungen für Thermaltake VN7000 Serie


Inhaltszusammenfassung für Thermaltake VN7000 Serie
- Seite 1 Manuale dell’utente Manual do Utilizador 安裝說明書 用戶手冊 ユーザーズマニュアル Руководство пользователя © 2012 Thermaltake Technology Co., Ltd. All Rights Reserved. 2012.08 All other registered trademarks belong to their respective companies. www.thermaltake.com kullanıcı elkitabı (EEE Yönetmeliğine Uygundur) Tested To Comply With FCC Standards คู...
-
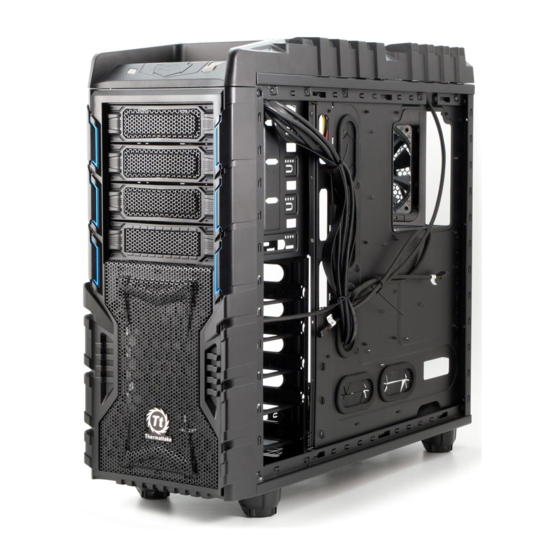
Seite 2: Chapter 1. Product Introduction
Power USB 3.0 Connection 21-26 6#32 Stand-off Motherboard 6#32 Screw 3.5"HDD Audio Connection 21-26 6#32 Screw Top Fan Chapter 4. Other Buzzer Motherboard alarm Thermaltake Power Supply Series (Optional) 8-pin Extension Cable Power Connector Extension Cable 3pin to 4pin adapter... -
Seite 3: Warning And Notice
Warning and Notice CPU Cooler Height Limitation VGA ( Add- on card) Length Limitation Atenção!! - Limite de altura para o dissipador do CPU: O limite de altura para o dissipador do CPU é 177 mm (7 polegadas). - Limite de comprimento para VGA (placa gráfica): O limite de comprimento para VGA (placa gráfica) é... -
Seite 4: Side Panel Disassembly
Side Panel Disassembly PSU Installation English / English / 繁體中文 / 繁體中文 Remove the screws on the back of the chassis, Place the power supply in proper location and 將電源供應器放在正確的位置,並用螺絲固定 移除機殼後方螺絲,將側窗打開 。 and open the side panel. secure it with screws. 鎖上。... -
Seite 5: Motherboard Installation
Motherboard Installation 5.25" Device Installation English / 繁體中文 / 1.Lay down the chassis. 1. 將機殼平放。 English / 2.Install the motherboard in proper location and 2. 將主機板放置在合適的位置並用零件包中之螺 1. Pull out the front panel. secure it with screws. 絲固定。 2. Remove the 5.25” drive bay cover. 3. - Seite 6 External 3.5” Device Installation Português/ Русский / 1. Puxe o painel dianteiro para fora. 1. Снимите переднюю панель. 2. Remova a cobertura da baía da unidade de 5,25”. 2. Снимите крышку 5,25 - дюймового отсека. 3. Remova a tampa de metal da baía da unidade de 5,25”. 3.
-
Seite 7: " & 2.5" Hdd Installation
3.5” & 2.5” HDD Installation Português/ Русский / 1. Снимите переднюю панель. 1. Puxe o painel dianteiro para fora. 2. Снимите крышку 3,5 - дюймового отсека. 2. Remova a cobertura da baía da unidade de 3,5”. 3. Снимите металлическую крышку 3,5- дюймового 3. -
Seite 8: Hdd Docking Station
HDD Docking Station 繁體中文 / Türkçe / 1. 將硬碟托盤取出 1. HDD tepsisini dışarı çekin. 2. 將2.5”或3.5”硬碟放置在硬碟托盤上,用螺絲固 2. 2,5” veya 3,5” sabit disk sürücüsünü 定硬碟 tepsinin üzerine yerleştirin ve vidalarla 3. 將硬碟托盤放回硬碟磁架中 sabitleyin. 3. HDD tepsisini HDD kafesine geri yerleştirin. English / 简体中文... - Seite 9 Français / Português/ La station d’accueil verticale de disque dur est intégrée pour permettre le transfert ultra rapide (jusqu’à 6,0 O topo da ranhura da Estação base do disco rígido está integrado para permitir uma transferência ultra rápida Gbits/s) de données volumineuses vers un disque dur SATA sans devoir utiliser un boîtier de stockage (até...
- Seite 10 日本語 / Türkçe / ドッキングスロットが組み込まれているため、外部保管エンクロージャを使わずに、大きな Üst HDD Bağlantı yuvası, büyük miktarlarda verilerin dış depolama kasası kullanma zorunluluğu olmadan bir 上部HDD SATA sabit diskine ultra hızlı aktarımını (en fazla 6,0 Gb/s) sağlamak için yerleşik olarak tasarlanmıştır. データを SATA ハードディスクに6.0 Gbps の高速で転送することができます。適切に作動するように、 Sorunsuz çalışma için lütfen aşağıdaki ayarların doğruluğundan emin olun: 次の設定を正しく行っていることを確認してください。...
-
Seite 11: Pci Slot Usage
PCI Slot Usage Keyboard & Mouse Security Lock Usage English / 繁體中文 1.Remove screw from PCI slot bracket and take off the PCI 1.鬆開PCI插槽後方的螺絲,並將PCI金屬卡條移除。 English / 繁體中文 / slot bracket. 2.插入PCI裝置於PCI插槽中。 Place the keyboard or mouse cables through the 將鍵盤或滑鼠纜線穿過「鍵盤和滑鼠安全鎖」,然後用 2.Insert the PCI device into PCI slot. -
Seite 12: 240Mm Radiator Installation
240mm Radiator Installation Leads Installation Leads Installation Guide Case LED Connection / On the front of the case, you can find some LEDs and switch leads. Please consult your user manual of your motherboard manufacturer, then connect these leads to the panel header on the motherboard. USB 2.0 Connection / Please consult your motherboard manual to find out the section of “USB connection”. - Seite 13 Guide d'installation des fils Guida di installazione dei contatti Connexion des voyants du boîtier / Sur la face avant du boîtier, vous trouverez plusieurs voyants et les fils des Connessione del LED del case / Nella parte anteriore del case, sono presenti alcuni contatti per interruttori e LED. boutons.
- Seite 14 線材安裝說明 リード線の取り付けガイド リード線の取り付けガイド 機殼LED連接方式 / 在機殼前方的面板後面,可以找到一些LED與開關線材(POWER Switch….),請參考主機板使用說明書, ケース LED の接続 ケース LED の接続 / ケース前面には、LEDとスイッチリード線があります。 マザーボードメーカーのユーザーマニュアル 並將機殼上的線材正確地連接到主機板上,這些線材通常都會印有標籤在上面,如果沒有的話,請找出機殼前方面板上線材原 を参照し、これらのリード線をマザーボードのパネルヘッダに接続してください。 本的位置以知道正確的來源。 USB 2.0 の接続 USB 2.0 の接続 / マザーボードのマニュアルを参照して、「USB接続」のセクションを探します。 USB 2.0 連接 / 請參考主機板使用手冊找出主機板上的USB連接孔位 USB 3.0 の接続 / USB 3.0 連接 / 1.
- Seite 15 Quality From Within คู ่ ม ื อ การติ ด ตั ้ ง สายไฟ Every power supply units from Thermaltake should pass a very strict quality control before sent to การเชื ่ อ มต่ อ ไฟ LED ของเคส / ที ่ ด ้ า นหน้ า ของเคส คุ ณ จะเห็ น ไฟ LED และสายไฟของสวิ ต ซ์...
- Seite 16 Note:...