Herunterladen Inhalt Inhalt Diese Seite drucken

Werbung

Verfügbare Sprachen
  • DE

Verfügbare Sprachen

  • DEUTSCH, seite 1
Freshboxx
Luftkühler
Air Cooler
Rafraîchisseur d'air
Refrigerador de aire
Raffreddatore d'aria
10034629
10034630

Werbung

Inhaltsverzeichnis
loading

Inhaltszusammenfassung für oneConcept Freshboxx

  • Seite 1 Freshboxx Luftkühler Air Cooler Rafraîchisseur d‘air Refrigerador de aire Raffreddatore d’aria 10034629 10034630...
  • Seite 3: Inhaltsverzeichnis

    Sehr geehrter Kunde, wir gratulieren Ihnen zum Erwerb Ihres Gerätes. Lesen Sie die folgenden Hinweise sorgfältig durch und befolgen Sie diese, um möglichen Schäden vorzubeugen. Für Schäden, die durch Missachtung der Hinweise und unsachgemäßen Gebrauch entstehen, übernehmen wir keine Haftung. Scannen Sie den QR-Code, um Zugriff auf die aktuellste Bedienungsanleitung und weitere Informationen rund um das Produkt zu erhalten.
  • Seite 4: Sicherheitshinweise

    SICHERHEITSHINWEISE • Prüfen Sie vor der Benutzung die Spannung auf der Geräteplakette. Schließen Sie das Gerät nur an Steckdosen an, die der Spannung des Geräts entsprechen. • Halten Sie das Kabel fern von heißen Oberflächen und scharfkantigen Gegenständen. • Verlegen Sie das Kabel nicht unter einem Teppich und decken Sie es auch nicht mit anderen Gegenständen oder Stoffen ab.
  • Seite 5 • Wickeln Sie das Kabel vor dem Gebrauch komplett ab. • Achten Sie darauf, dass das Gerät gerade steht. • Während des Betriebs befeuchtet das Gerät die Umgebungsluft. Vermeiden Sie jedoch zu hohe Luftfeuchtigkeit. Wir empfehlen Ihnen eine Luftfeuchtigkeit zwischen 40-50 %. Zu hohe Luftfeuchtigkeit kann zu Schimmel oder gesundheitlichen Problemen führen.
  • Seite 6: Geräteübersicht

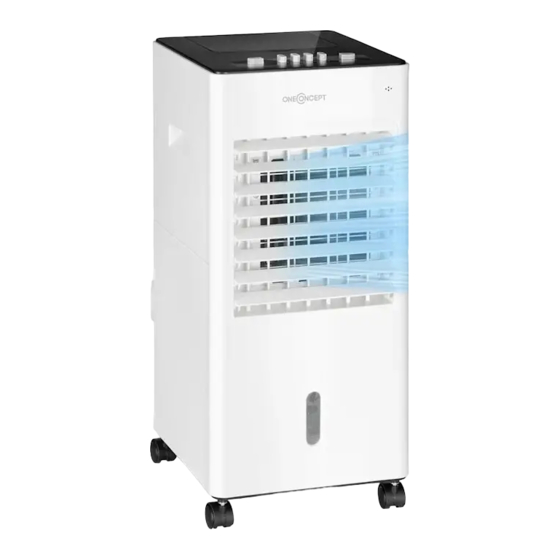
    GERÄTEÜBERSICHT A Bedienfeld G Staubfilter B Gehäusefront H Kabelaufwicklung C Lamellen Wassertank D Wasserstandsanzeige kleiner Knauf E Rollen K Filter Rückseite Kühlbox...
  • Seite 7: Benutzung

    BENUTZUNG Das Gerät muss auf einer ebenen und stabilen Fläche stehen. Wenn das Gerät schräg steht kann das Gerät beschädigt werden. Möchten Sie mehr Kühlung, geben Sie Eiswürfel in den oberen Schacht, wie in dem Bild unten beschrieben. 1. Kleinen Drehknopf um 180 Grad drehen.
  • Seite 8 • Sie können den Wassertank vollständig herausziehen, das Wasser wechseln oder den Wassertank reinigen. Tasten im Bedienfeld Taste Funktion Ventilator auf niedriger Stufe starten. mittlere Stufe HIGH hohe Stufe SWING automatische Schwenkbewegung (horizontal) Gerät ausschalten Zum vollständigen Ausschalten, die Taste OFF drücken und den Netzstecker ziehen.
  • Seite 9: Wartung Und Reinigung

    WARTUNG UND REINIGUNG Filterwechsel 1. Die staubdichte Halterung herausziehen. 2. Die Drehhalterungen für den Filter nach außen drehen. 3. Den Filter herausnehmen. Reinigung WARNUNG Stromschlaggefahr Ziehen Sie immer den Netzstecker aus der Steckdose und lassen Sie das Gebläse vor der Reinigung außer Betrieb. Tauchen Sie das Gerät nicht in Wasser.
  • Seite 10: Hinweise Zur Entsorgung

    ausgetauscht wird. • Wenn das Gerät nicht in Gebrauch ist, vergewissern Sie sich, dass es aus der Steckdose gezogen ist, dass das Wasser gründlich abgelassen wird und dass es zur späteren Verwendung wieder in die Originalverpackung zurückgebracht wird. • Versuchen Sie im Falle von Fehlfunktionen oder Zweifeln nicht, den Lüfter selbst zu reparieren, da dies zu Brandgefahr oder Stromschlag führen kann.
  • Seite 11: Technical Data

    Dear Customer,, Congratulations on purchasing this equipment. Please read this manual carefully and take care of the following hints to avoid damages. Any failure caused by ignoring the items and cautions mentioned in the instruction manual is not covered by our warranty and any liability. Scanthe QR code to get access to the latest user manual and other information about the product CONTENTS...
  • Seite 12: Safety Instructions

    SAFETY INSTRUCTIONS • Connect to a main power supplier of 220-240V~ 50-60 Hz only. • Keep the appliance and cable away from sources of heat, sharp objects or anything that may cause damage. • Do not place the cord under carpets. Do not cover the cord with small clothes, shirts or other similar elements.
  • Seite 13 during use. • When in operation, evaporative coolers moisturize the ambient air. Over- humidification of residential rooms should be avoided. Recommendation: 40–50  % relative humidity. (Excessive humidity of the air can damage the home and cause health problems.) • The appliance may only be set up on water- and moisture-proof flooring materials (spilling some drops of water is unavoidable when the content of the tank is changed).
  • Seite 14: Product Overview

    PRODUCT OVERVIEW A Control panel G Dust-proof bracket B B-Front board H Cord bobbin C Louver frame Water tank D Water indicate window Small knob E Castor wheel K Filter Rear boardStaubfilter Ice crystals box...
  • Seite 15: Operation

    OPERATION When using the appliance, make sure that it is on a flat and stable surface. Damage may occur if it is placed on an incline or decline. If you need cooler more, add ice block into upper water slot, see following image. 1.
  • Seite 16 Buttons on the control panel Button Function Press the button LOW to start the fan on low speed. Medium speed HIGH High speed. SWING Automatic horizontal swing. Switch the unit off. To completely shut the unit off, turn all the controls to OFF, and remove plug from the socket-outlet.
  • Seite 17: Maintenance And Cleaning

    MAINTENANCE AND CLEANING Changing the filter 1. Pull out the dust-proof bracket 2. Rotate the filter knobs outwards like up photo 3. Take up the honeycomb filter . Cleaning WARNUNG Danger of electric shock Always remove the plug from the socket-outlet and allow the fan blower to stop acting before cleaning it.
  • Seite 18: Disposal Considerations

    box for storage until later use. • In case of malfunction or doubt, do not try to repair the fan yourself, it may result in a fire hazard or electric shock. DISPOSAL CONSIDERATIONS According to the European waste regulation 2012/19/EU this symbol on the product or on its packaging indicates that this product may not be treated as household waste.
  • Seite 19: Fiche Technique

    Chère cliente, cher client, Toutes nos félicitations pour l’acquisition de ce nouvel appareil. Veuillez lire attentivement et respecter les instructions de ce mode d’emploi afin d’éviter d’éventuels dommages. Nous ne saurions être tenus pour responsables des dommages dus au non-respect des consignes et à la mauvaise utilisation de l’appareil.
  • Seite 20: Consignes De Sécurité

    CONSIGNES DE SÉCURITÉ • Vérifiez la tension indiquée sur la plaque signalétique avant utilisation. Connectez l'appareil uniquement aux prises correspondant à la tension de l'appareil. • Maintenez le câble à l’écart des surfaces chaudes et des objets coupants. • Ne faites pas passer le câble sous une moquette et ne le recouvrez pas d’objets ou de tissus.
  • Seite 21 • Veillez à ce que l'appareil soit bien droit. • Pendant le fonctionnement, l'appareil humidifie l'air ambiant. Évitez toutefois une humidité trop élevée. Nous recommandons une humidité comprise entre 40 et 50 %. Une humidité excessive peut provoquer des moisissures ou des problèmes de santé. •...
  • Seite 22: Aperçu De L'appareil

    APERÇU DE L'APPAREIL A Panneau de commande G Filtre à poussière B Façade de l'appareil H Enroulement du câble C Lamelles Réservoir d'eau D Indicateur de niveau d'eau Petit bouton E Roulettes K Filtre Dos de l'appareil Glacière...
  • Seite 23: Utilisation

    UTILISATION L'appareil doit être placé sur une surface plane et stable. Si l'appareil est incliné, cela peut l'endommager. Si vous souhaitez plus de refroidissement, ajoutez des glaçons dans la glacière du haut comme décrit dans l'image ci- dessous 1. Tournez le petit bouton à 180 degrés.
  • Seite 24 ouvrant le couvercle du réservoir d'eau. • Vous pouvez extraire complètement le réservoir d'eau, changer l'eau ou nettoyer le réservoir. Touches du panneau de commande Touche Fonction Démarre le ventilateur à vitesse faible. Vitesse moyenne HIGH Vitesse rapide SWING Oscillation automatique (horizontale) Pour éteindre l'appareil Pour éteindre complètement l'appareil, appuyez sur la touche OFF et retirez la fiche.
  • Seite 25: Maintenance Et Nettoyage

    MAINTENANCE ET NETTOYAGE Remplacement du filtre 1. Retirez le support anti-poussière. 2. Tournez les supports pivotants du filtre vers l'extérieur. 3. Retirez le filtre. Nettoyage MISE EN GARDE Risque d'électrocution Débranchez toujours le cordon d'alimentation de la prise et arrêtez le ventilateur avant le nettoyage. Ne pas plonger l'appareil dans l'eau.
  • Seite 26: Informations Sur Le Recyclage

    • Lorsque l'appareil n'est pas utilisé, assurez-vous qu'il est débranché, que l'eau est bien vidangée et qu'il est rangé dans son emballage d'origine en attendant la prochaine utilisation. • En cas de dysfonctionnement ou de doute, n'essayez pas de réparer le ventilateur vous-même, cela pourrait provoquer un incendie ou un choc électrique.
  • Seite 27: Datos Técnicos

    Estimado cliente: Le felicitamos por la adquisición de este producto. Lea atentamente el siguiente manual y siga cuidadosamente las instrucciones de uso con el fin de evitar posibles daños. La empresa no se responsabiliza de los daños ocasionados por un uso indebido del producto o por haber desatendido las indicaciones de seguridad.
  • Seite 28: Indicaciones De Seguridad

    INDICACIONES DE SEGURIDAD • Antes de utilizar el aparato, compruebe la tensión en la placa técnica del mismo. Conecte el aparato solamente a tomas de corriente que se adecuen a la tensión del mismo. • Mantenga alejado el cable de superficies calientes y objetos puntiagudos. •...
  • Seite 29 panno. • Cambiare l’acqua nel serbatoio al massimo dopo 3 giorni. • Desenrolle el cable completamente antes de utilizar el aparato. • Asegúrese de que el aparato esté recto. • Durante el funcionamiento, el aparato humedece el aire. Por ello, evite una humedad demasiado elevada.
  • Seite 30: Descripción Del Aparato

    DESCRIPCIÓN DEL APARATO A Panel de control H Compartimento para enrollar el cable B Parte delantera de la carcasa Depósito de agua C Lamas Tirador pequeño D Indicador del nivel de agua K Filtro E Ruedas Acumulador de frío Parte trasera G Filtro antipolvo...
  • Seite 31 UTILIZACIÓN El aparato debe estar colocado sobre una superficie plana y estable. Si el aparato se pone en posición oblicua, puede averiarse. Si desea más frío, añada hielos a la cubitera en el recipiente superior como se describe en la imagen. 1.
  • Seite 32 • Puede extraer completamente el depósito de agua, cambiar el agua o limpiar el depósito. Botones del panel de control Tecla Función Iniciar ventilador a nivel bajo. Nivel medio HIGH Nivel alto SWING movimiento oscilante automático (horizontal) Apagar aparato Para apagar el aparato completamente, pulse el botón OFF y desenchúfelo.
  • Seite 33: Mantenimiento Y Limpieza

    MANTENIMIENTO Y LIMPIEZA Cambio de filtro 1. Extraiga el soporte antipolvo. 2. Tire hacia fuera de los soportes giratorios del filtro. 3. Extraiga el filtro. Limpieza ADVERTENCIA Riesgo de descarga eléctrica Desconecte siempre el enchufe de la toma de corriente y ponga fuera de servicio el ventilador antes de limpiarlo.
  • Seite 34: Retirada Del Aparato

    se haya drenado toda el agua y de almacenarlo en su embalaje original para utilizarlo en un futuro. • En caso de averías o problemas de funcionamiento, no intente reparar el aparato usted mismo, pues puede suponer peligro de incendio o descarga eléctrica.
  • Seite 35: Dati Tecnici

    Gentile Cliente, La ringraziamo per aver acquistato il dispositivo. La preghiamo di leggere attentamente le seguenti istruzioni per l’uso e di seguirle per evitare possibili danni tecnici. Non ci assumiamo alcuna responsabilità per danni scaturiti da una mancata osservazione delle avvertenze di sicurezza e da un uso improprio del dispositivo.
  • Seite 36: Avvertenze Di Sicurezza

    AVVERTENZE DI SICUREZZA • Controllare la tensione sulla targhetta del dispositivo prima dell’utilizzo. Collegare il dispositivo solo a prese elettriche con tensione corrispondente. • Tenere il cavo lontano da superfici bollenti e oggetti taglienti. • Non far passare il cavo sotto a tappeti e non coprirlo con altri oggetti o tessuti.
  • Seite 37 Evitare tuttavia un’umidità dell’aria eccessivamente elevata. Consigliamo un livello tra 40 e 50%. Un’umidità dell’aria eccessivamente elevata può causare muffa o problemi di salute. • Posizionare il dispositivo solo su fondi resistenti a bagnato ed elevata umidità. Può capitare che nell’inserire o togliere il serbatoio dell’acqua cada qualche goccia.
  • Seite 38: Descrizione Del Dispositivo

    DESCRIZIONE DEL DISPOSITIVO A Pannello di controllo H Avvolgicavo B Lato frontale dell’alloggiamento Serbatoio dell’acqua C Lamelle Manopola piccola D Indicazione del livello dell’acqua K Filtro E Rotelle Refrigeratore Lato posteriore G Filtro antipolvere...
  • Seite 39 UTILIZZO Il dispositivo deve essere posizionato su una superficie piana e stabile. Se il dispositivo è storto può danneggiarsi. Se si desidera un raffreddamento maggiore, mettere dei cubetti di ghiaccio nel vano superiore, come mostrato in immagine. 1. Ruotare la manopola di 180°. 2 Togliere il serbatoio.
  • Seite 40 • Il serbatoio può essere tolto del tutto per aggiungere acqua o per pulirlo. Tasti sul pannello di controllo Tasto Funzione Avviare la ventola al livello più basso Livello medio HIGH Livello alto SWING Oscillazione automatica (orizzontale) Spegnere il dispositivo Per spegnere del tutto il dispositivo, premere OFF e staccare la spina.
  • Seite 41: Manutenzione E Pulizia

    MANUTENZIONE E PULIZIA Sostituire il filtro 1. Staccare il supporto resistente alla polvere. 2. Ruotare verso l’esterno il supporto per il filtro. 3. Togliere il filtro. Pulizia AVVERTENZA Pericolo di folgorazione Staccare sempre la spina dalla presa elettrica e assicurarsi che la ventola sia spenta prima della pulizia.
  • Seite 42: Smaltimento

    tutta l’acqua sia stata scaricata e rimetterlo nell’imballaggio originale fino al prossimo utilizzo. • In caso di malfunzionamento o dubbi, non cercare di riparare il dispositivo in modo autonomo, altrimenti si corre il rischio di incendi e folgorazioni. SMALTIMENTO Se sul prodotto è presente la figura a sinistra (il bido- ne dei rifiuti con le ruote), si applica la direttiva euro- pea 2012/19/UE.

Inhaltsverzeichnis