Herunterladen Inhalt Inhalt Diese Seite drucken

Werbung

Verfügbare Sprachen
  • DE

Verfügbare Sprachen

Support mural
Wall mount bracket
Support mural
Soporte de pared
INCLIN'TV 32'' - 75''
Wandhalterung
Muurbeugel
INCLIN'TV 32''-75''
Notice d'utilisation
Pour vous aider à bien vivre votre achat
Manual de instrucciones
Notice d'utilisation
Para ayudarle a disfrutar de su compra
Pour vous aider à bien vivre votre achat
Handleiding
Om u te helpen zo veel mogelijk te
genieten van uw aankoop
Operating instructions
To help you make the most of your purchase
Bedienungsanleitung
Damit Sie an Ihrem Gerät lange Freude haben

Werbung

Inhaltsverzeichnis
loading

Inhaltszusammenfassung für BOULANGER Essentiel B INCLIN'TV

  • Seite 1 Support mural Wall mount bracket Support mural Soporte de pared INCLIN'TV 32’’ - 75’’ Wandhalterung Muurbeugel INCLIN'TV 32’’-75’’ Notice d’utilisation Operating instructions Pour vous aider à bien vivre votre achat To help you make the most of your purchase Manual de instrucciones Bedienungsanleitung Notice d'utilisation Para ayudarle a disfrutar de su compra...
  • Seite 2: Votre Produit

    votre produit Outils nécessaires (non fournis) Contenu de la boîte Afin d’assurer une installation optimale, ce kit comprend diverses vis de différents diamètres et longueurs. Vérifiez qu’aucune pièce ne soit manquante ou défectueuse. Ne jamais monter de pièces défectueuses. 1 plaque murale avec niveau à bulle 1 kit de visserie •...
  • Seite 3: Consignes D'utilisation

    Caractéristiques techniques consignes d’utilisation AVANT L’INSTALLATION DE CE PRODUIT, IL EST IMPORTANT DE LIRE ET DE COMPRENDRE 100 x 100 400 x 200 PARFAITEMENT INSTRUCTIONS D’INSTALLATION AFIN D’ÉVITER BLESSURES 200 x 200 400 x 300 CORPORELLES ET LES DOMMAGES MATÉRIELS. GARDEZ CES INSTRUCTIONS D’INSTALLATION Normes VESA 200 x 300 400 x 400...
  • Seite 4: Installation De La Plaque Murale

    installation de la plaque murale installation des bras inclinables Recouvrez une surface stable et plane d’un chiffon doux. • Placez l'écran de votre appareil sur le chiffon doux. • Commencez par positionner le gabarit de perçage contre le mur en Localisez les points de montage filetés situés au dos de l’écran.
  • Seite 5: Assemblage Final

    assemblage final Pour finir l’installation de votre nouveau support, commencez par desserrer les molettes de réglage des deux bras inclinables. Présentez l’écran devant la plaque murale. Placez l’encoche haute des bras fixés au dos de l'écran dans la glissière supérieure de la plaque murale. Puis inclinez l'écran vers le bas. Possibilité...
  • Seite 6: Entretien Et Nettoyage

    entretien et nettoyage Veuillez vérifier que les vis soient correctement fixées tous les 2 mois. • Au moindre doute quant à l’installation, contactez votre installateur professionnel. • Une fois le téléviseur en place, il est possible de l’ôter de son support, en tirant simplement sur les deux languettes situées dans le prolongement des bras de fixation.
  • Seite 7: Your Product

    your product Necessary tools (not provided) Contents of the box To ensure optimal installation, this kit contains screws of different diameters and lengths. Check that no parts are missing or defective. Never assemble defective parts. 1 wall plate with spirit level 1 screw fixings kit •...
  • Seite 8 Technical features Operating instructions BEFORE INSTALLING THIS PRODUCT, IT IS IMPORTANT TO READ AND UNDERSTAND THE 100 x 100 400 x 200 INSTALLATION INSTRUCTIONS COMPLETELY IN ORDER TO AVOID PHYSICAL INJURIES AND 200 x 200 400 x 300 MATERIAL DAMAGE. KEEP THESE INSTALLATION INSTRUCTIONS IN A PLACE WHICH IS EASILY VESA standards 200 x 300 400 x 400...
  • Seite 9 installation of wall plate installation of tilting arms Cover a stable, flat surface with a soft cloth. • Place the screen of your appliance on the soft cloth. • Begin by positioning the drilling template against the wall using the Locate the threaded mount points on the back of the screen.
  • Seite 10: Final Assembly

    final assembly To finish installing your new bracket, begin by loosening the adjustment knobs on the two tilting arms. Present the screen to the wall plate. Place the top notch of the fixed arms on the back of the screen in the top runner of the wall plate.
  • Seite 11: Maintenance And Cleaning

    maintenance and cleaning Please check that the screws are correctly fixed every 2 months. • If you have the slightest doubt about the installation, contact your professional installer. • Once the TV is in place, it is possible to remove it from its bracket by simply pulling on the two cords at the end of the mount arms.
  • Seite 12 su producto Herramientas necesarias (no incluidas) Contenido de la caja Con el fin de garantizar una óptima instalación, este kit incluye tornillos de distintos diámetros y longitudes. Compruebe que no falte ninguna pieza y que todas las piezas estén libres de defectos.
  • Seite 13: Modo De Empleo

    Características técnicas modo de empleo ANTES DE LA INSTALACIÓN DEL PRODUCTO, ES IMPORTANTE LEER Y COMPRENDER A 100 x 100 400 x 200 LA PERFECCIÓN LAS INSTRUCCIONES DE INSTALACIÓN CON EL FIN DE EVITAR LESIONES 200 x 200 400 x 300 CORPORALES Y DAÑOS MATERIALES.
  • Seite 14 instalación de la placa de pared instalación de los brazos inclinables Recubra una superficie plana y estable con un paño suave. • Coloque la pantalla de su aparato sobre el paño. • En primer lugar, coloque la plantilla de perforación contra la pared Localice los puntos de montaje roscados situados en la parte posterior de la pantalla.
  • Seite 15: Montaje Final

    montaje final Para terminar de instalar su nuevo soporte, empiece aflojando las ruedas de regulación de los dos brazos inclinables. Ponga la pantalla delante de la placa de pared. Coloque la muesca superior de los brazos fijados a la parte posterior de la pantalla en la guía superior de la placa de pared. A continuación, incline la pantalla hacia abajo.
  • Seite 16: Limpieza Y Mantenimiento

    limpieza y mantenimiento Compruebe que los tornillos están bien prietos cada 2 meses. • Si tiene cualquier duda, por pequeña que sea, en relación con la instalación, póngase en contacto con • un instalador profesional. Una vez colocado el televisor, es posible quitarlo de su soporte tirando de las dos lengüetas situadas en la prolongación de los brazos de fijación.
  • Seite 17: Ihr Produkt

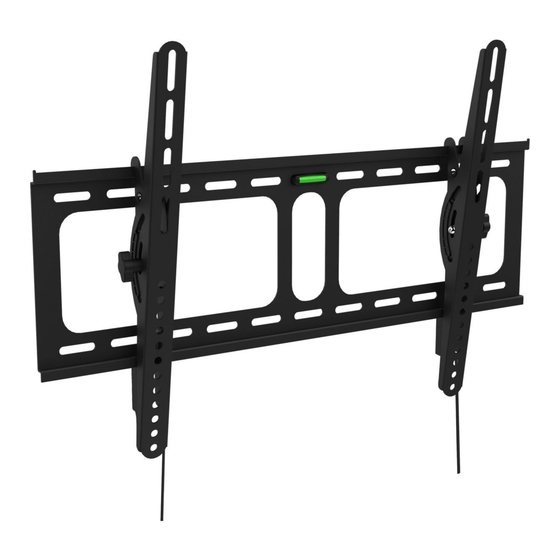
    Ihr Produkt Erforderliches Werkzeug (nicht im Lieferumfang enthalten) Inhalt Für eine optimale Installation enthält dieses Set verschiedene Schrauben in unterschiedlichen Durchmessern und Längen. Prüfen Sie, dass alle Teile vorhanden und in einwandfreiem Zustand sind. Montieren Sie niemals defekte Teile. 1 Wandplatte mit Wasserwaage 1 Schraubenset •...
  • Seite 18: Hinweise Zum Gebrauch

    Technische Angaben Hinweise zum Gebrauch LESEN SIE SICH VOR DER INSTALLATION DIESES PRODUKTS DIE MONTAGEANLEITUNG 100 x 100 400 x 200 AUFMERKSAM DURCH UND STELLEN SIE SICHER, DASS SIE DIESE GUT VERSTANDEN HABEN, 200 x 200 400 x 300 UM VERLETZUNGEN UND BESCHÄDIGUNGEN AM MATERIAL ZU VERHINDERN. BEWAHREN SIE VESA-Normen 200 x 300 400 x 400...
  • Seite 19: Installation Der Wandplatte

    Installation der Wandplatte Installation der kippbaren Arme Legen Sie ein weiches Tuch auf eine stabile und ebene Fläche. • Legen Sie den Bildschirm des Geräts auf das weiche Tuch. • Legen Sie zu Beginn die Bohrschablone mit Hilfe einer Wasserwaage Suchen Sie die Gewinde an den Befestigungsstellen auf der Rückseite des Bildschirms.
  • Seite 20 Endmontage Zum Schluss der Installation Ihrer neuen Wandhalterung lockern Sie zunächst die Stellrädchen der beiden kippbaren Arme. Halten Sie den Fernseher vor die Wandplatte. Platzieren Sie die hohe Nut der auf der Rückseite des Bildschirms befestigten Arme in die obere Schiene der Wandplatte. Kippen Sie dann den Bildschirm nach unten.
  • Seite 21: Wartung, Reinigung Und Pflege

    Wartung, Reinigung und Pflege Prüfen Sie alle zwei Monate, dass die Schrauben korrekt angezogen sind. • Bei Fragen zur Montage, Sie sich bitte mit einem Fachinstallateur in Verbindung. • Um den Fernseher wieder aus der Halterung zu entfernen, ziehen Sie einfach an den beiden Laschen in der Verlängerung der Befestigungsarme.
  • Seite 22 uw product Benodigd gereedschap (niet meegeleverd) Inhoud van de doos Voor een optimale installatie bevat deze set verschillende schroeven met verschillende diameters en lengtes. Controleer of er geen onderdelen ontbreken of defect zijn. Monteer nooit defecte onderdelen. 1 muurplaat met waterpas 1 set schroeven •...
  • Seite 23: Veiligheidsvoorschriften

    Technische kenmerken veiligheidsvoorschriften VOORDAT U DIT PRODUCT INSTALLEERT, IS HET BELANGRIJK DE INSTALLATIE-INSTRUCTIES TE 100 x 100 400 x 200 LEZEN EN TE BEGRIJPEN, OM PERSOONLIJK LETSEL EN MATERIËLE SCHADE TE VOORKOMEN. 200 x 200 400 x 300 BEWAAR DEZE HANDLEIDING IN EEN GEMAKKELIJKE TOEGANKELIJKE PLAATS VOOR VESA-standaarden 200 x 300 400 x 400...
  • Seite 24 installatie van de muurplaat installatie van de kantelbare armen Bedek een stabiel, vlak oppervlak met een zachte doek. • Plaats het scherm van uw apparaat op de zachte doek. • Plaats eerst met behulp van een waterpas de boormal tegen de Zoek op de achterkant van het scherm de met schroefdraad voorziene bevestigingspunten.
  • Seite 25 laatste installatiestap Om de installatie van de nieuwe beugel te voltooien, moet u eerst de instelschroeven op beide kantelbare armen losdraaien. Plaats het scherm voor de muurplaat. Plaats de bovenste inkeping van de armen die aan de achterkant van het scherm zijn bevestigd in de bovenste rail van de muurplaat. Kantel vervolgens het scherm naar beneden.
  • Seite 26: Onderhoud En Reiniging

    onderhoud en reiniging Controleer om de 2 maanden of de schroeven stevig vast zitten. • Neem contact op met uw professionele installateur bij de minste twijfel over de installatie. • Zodra de televisie op zijn plaats zit, kan deze van de beugel worden verwijderd door aan de twee lipjes in het verlengde van de bevestigingsarmen te trekken.
  • Seite 27 Support mural Wandhalterung Wall mount bracket Muurbeugel Soporte de pared INCLIN'TV 32’’-75’’ Support mural INCLIN'TV 32’’-75’’ INCLIN'TV 32’’ - 75’’ Testé dans nos laboratoires Protection de l’environnement In unseren Labors getestet Umweltschutz Ce symbole apposé sur le produit signifie qu’il s’agit d’un appareil dont le Garantie valide à...

Inhaltsverzeichnis