Herunterladen Inhalt Inhalt Diese Seite drucken
Inhaltsverzeichnis

Werbung

Verfügbare Sprachen
  • DE

Verfügbare Sprachen

  • DEUTSCH, seite 74
RW3 SERIES NOTEBOOK PC
USER'S MANUAL
E N G L I S H
May 2005

Werbung

Inhaltsverzeichnis
loading

Inhaltszusammenfassung für Advent RW3-Serie

  • Seite 1 RW3 SERIES NOTEBOOK PC USER'S MANUAL E N G L I S H May 2005...
  • Seite 2: Inhaltsverzeichnis

    CONTENTS BEFORE YOU START ..................... 5 Make sure you have everything ..................5 Familiarize yourself with the computer ................ 6 OPENING THE DISPLAY PANEL ................6 FRONT OVERVIEW ....................7 LEFT SIDE OVERVIEW ....................9 RIGHT SIDE OVERVIEW ..................10 BACK OVERVIEW .....................
  • Seite 3 TAKING CARE OF YOUR NOTEBOOK PC To prevent possible overheating of the computer's DO NOT press or touch the display panel. processor, make sure you don't block the open- ings provided for ventilation. DO NOT place on uneven or unstable work DO NOT use your notebook computer under surfaces.
  • Seite 4 Avoid sudden changes in temperature or humid- DO NOT expose the computer to rain or ity by keeping it away fromA/C and heating vents. moisture. DO NOT place near fire or other sources of heat. DO NOT tamper with the batteries. Keep them away from children.
  • Seite 5: Before You Start

    BEFORE YOU START Make sure you have everything When you receive your notebook PC, unpack it carefully, and check to make sure you have all the items listed below. For a pre-configured model you should have the following: • Notebook Computer •...
  • Seite 6: Familiarize Yourself With The Computer

    BEFORE YOU START Familiarize yourself with the computer OPENING THE DISPLAY PANEL The lid locks to the computer chassis automatically. To open, simply lift the lid up. When closing it, be sure not to slam it shut.
  • Seite 7: Front Overview

    BEFORE YOU START FRONT OVERVIEW The following is an overview of the front of the notebook. Display Panel Status Indicator Lights Suspend/Resume/ Quick Start Buttons Power On Button Keyboard TouchPad Pointing Device Stereo Speakers Stereo Speakers Display Panel The display panel is a color LCD panel with back lighting for the display of text and graphics. Keyboard A full-size keyboard with dedicated Windows keys.
  • Seite 8: Quick Start Buttons

    BEFORE YOU START Status Indicator Lights The Status indicator lights correspond to specific operating modes. These modes are: Power On/ Suspend Status, Battery Status, Hard Drive Activity, Wireless LAN Status, Scroll Lock, Caps Lock, and NumLock. TouchPad Pointing Device The TouchPad pointing device is a mouse-like cursor control with two buttons (left, right buttons).
  • Seite 9: Left Side Overview

    BEFORE YOU START LEFT SIDE OVERVIEW The following is a brief description of the left side of the notebook. IEEE 1394 Port USB Ports Microphone Jack Kensington Modem (RJ-11) Port Headphone Jack Lock Port Kensington Lock Port The Kensington lock slot allows you to secure your notebook to an immovable object through an optional security cable.
  • Seite 10: Right Side Overview

    BEFORE YOU START RIGHT SIDE OVERVIEW The following is a brief description of the right side of the notebook. Memory Card Reader LAN Port (RJ-45) Optical Drive Power Adapter Port USB Port Emergency Optical Drive Eject Button PC Card Slot Tray Release Optical Drive The Optical Drive allows you to play back a media discs, such as CDs and DVDs.
  • Seite 11: Back Overview

    BEFORE YOU START BACK OVERVIEW The following is an overview of the back of the notebook. External Monitor Port USB Ports USB Ports The USB ports allow you to connect Universal Serial Bus devices. They support v2.0 of the USB standard, which allows data exchange rates as high as 480 Mb/s.
  • Seite 12: Bottom Overview

    BEFORE YOU START BOTTOM OVERVIEW The following is an overview of the bottom of the notebook. Lithium Ion Battery Bay Wireless LAN Card Compartment Rating Label Fan Outlets Memory/HDD Compartment Fan Outlets These are open ports for the fan to dissipate heat from the computer's internal components. Do not block or place the computer in such a position that you inadvertently allow the outlets to become blocked.
  • Seite 13: Getting Started

    GETTING STARTED Power Sources Your computer has two types of power source: a Lithium ion battery or an AC adapter. CONNECTING THE POWER ADAPTERS The AC adapter provides power for operating your notebook PC and charging the battery. Connecting the AC Adapter 1.
  • Seite 14: Recharging The Battery

    GETTING STARTED RECHARGING THE BATTERY The Lithium ion battery is recharged internally using the AC adapter. To recharge the battery, make sure the battery is installed and the computer is connected to the AC. There is no “memory effect” in Lithium ion batteries; therefore you do not need to discharge the battery completely before recharging.
  • Seite 15: Starting Your Notebook

    GETTING STARTED Starting Your Notebook POWER ON Suspend/Resume/Power On Button The suspend/resume/power on switch is used to turn on your notebook from its off state. Once you have connected your AC adapter or charged the internal Lithium ion battery, you can power on your notebook by pressing the suspend/resume/on button located above the keyboard.
  • Seite 16: Status Indicators

    GETTING STARTED Status Indicators The Status indicator lights correspond to specific operating modes. These modes are: Power On/ Suspend Status, Battery Status, Hard Drive Activity, Wireless LAN Status, Scroll Lock, Caps Lock, and NumLock. Num Lock Hard Drive Activity Indicator Scroll Lock Power on/Suspend Quick Start Button...
  • Seite 17 GETTING STARTED Hard Drive Activity Indicator The Hard Drive Activity indicator tells you whether your internal hard drive is being accessed and, if so, how fast. Wireless LAN Activity Indicator The Wireless LAN Activity indicator tells you whether your computer is connected to a wireless network or not.
  • Seite 18: Using Function Keys

    GETTING STARTED Using Function Keys Your computer has 12 function keys, F1 through F12. The functions assigned to these keys differ for each application. You should refer to your software documentation to find out how these keys are used. The [FN] key provides extended functions for the notebook and is always used in conjunction with another key.
  • Seite 19: Using The Touchpad

    GETTING STARTED Using the TouchPad A TouchPad pointing device comes built into your computer. It is used to control the movement of the pointer to select items on your display panel. The TouchPad consists of a cursor control, a left and right button. The cursor control works the same way a mouse does, and moves the cursor around the display.
  • Seite 20: Memory Module Upgrade

    GETTING STARTED Memory Module Upgrade Your notebook PC comes with either 128MB or 256MB of high speed Synchronous Dynamic RAM (SDRAM) factory installed. To increase your notebook's memory capacity, you may install an additional memory upgrade module. The memory upgrade must be a dual-in-line (DIMM) SDRAM module.
  • Seite 21: Troubleshooting

    TROUBLESHOOTING Your notebook PC is sturdy and subject to few problems in the field. However, you may encoun- ter simple setup or operating problems that you can solve on the spot, or problems with periph- eral devices, that you can solve by replacing the device. The information in this section helps you isolate and resolve some of these straightforward problems and identify failures that require service.
  • Seite 22: Appendix

    APPENDIX Notebook Specifications Processor Intel ® Centrino Mobile Technology System Status LED Power on/Suspend, Battery Charging, HDD Access, Intel Dothan Processor 725 ~ 770 RF, Caps Lock, Scroll lock and Number Lock (Intel Dothan Processor 1.6GHz to 2.26GHz) Keyboard 86-key US/87-key EU/88-key JP with Windows Intel Celeron M processor 350~390 function keys (Intel Celeron M processor 1.30G to 1.70G)
  • Seite 23 Copyright-protected technology This product incorporates copyright protection technology that is protected by U.S. patents and other intellectual property rights. Use of this copyright protection technology must be autho- rized by Macrovision, and is intended for home and other limited viewing uses only unless otherwise authorized by Macrovision.
  • Seite 24 MEMO...
  • Seite 25 2005...
  • Seite 26 ........................................................................................................................................................................................................................................................................................................................................................................................................................................................................................................................................
  • Seite 29 • • • • • • • DVD/CD-RW DVD+/- RW •...
  • Seite 31 Windows...
  • Seite 32 Scroll Lock Caps Lock NumLock...
  • Seite 33 IEEE 1394 Kensington (RJ-11) Kensington Kensington (RJ-11) (RJ-11) IEEE 1394 1394 v2.0 480 Mb/s...
  • Seite 34 (RJ-45) Type II PC v2.0 480 Mb/s (RJ-45) 10/100/1000 Base-T RJ-45...
  • Seite 35 v2.0 480 Mb/s...
  • Seite 36 (WLAN) (WLAN)
  • Seite 39 (POST) BIOS (POST) ( P O S T )
  • Seite 40 Scroll Lock Caps Lock NumLock • • Save-to-Disk • • • •...
  • Seite 41 Caps Lock Num Lock Scroll Lock...
  • Seite 42 F1~F12 [FN] [FN+F1]: [FN] [F1] • • [FN+F2]: [FN] [F2] [FN+F3]: [FN] [F3] • [FN+F4]: [FN] [F4] • • [FN+F5]: [FN] [F5] • [FN+F6]: [FN] [F6] [FN+F7]: [FN] [F7] • [FN+F8]: [FN] [F8] • [FN+F9]: [FN] [F9] • • [FN+F10]: [FN] [F10] [FN+F11]:...
  • Seite 44 128MB 256MB (SDRAM) DIMM SDRAM (ESD)
  • Seite 45 • • • • • • • •...
  • Seite 46 Intel Centrino Mobile ® Intel Dothan 725 ~ 770 Caps Lock Scroll lock Number Lock (Intel Dothan 1.6GHz 2.26GHz) US/87- EU/88- Windows Intel Celeron M 350~390 (Intel Celeron M 1.30G 1.70G) uFC-PGA 1 AP1 400/533MHz FSB 2 QSB BIOS 512K BB Flash ROM Intel 915GM + ICH6-M Fn+F1 SO-DIMM...
  • Seite 47 Macrovision Macrovision...
  • Seite 48 MEMO...
  • Seite 49 NOTEBOOK SÉRIE RW MANUEL DE L’UTILISATEUR F R A N Ç A I S Mai 2005...
  • Seite 50 TABLE DES MATIÈRES AVANT DE COMMENCER ..................5 Vérifiez que vous avez tout .................... 5 Familiarisez-vous avec l’ordinateur ................6 OUVRIR LE PANNEAU D’AFFICHAGE ..............6 PRÉSENTATION DE LA FACE AVANT ................. 7 PRÉSENTATION DU CÔTÉ GAUCHE ................ 9 PRÉSENTATION DU CÔTÉ DROIT ................10 PRÉSENTATION DE LA FACE ARRIÈRE ..............
  • Seite 51 PRENDRE SOIN DE VOTRE NOTEBOOK Pour éviter toute surchauffe du processeur de NE PAS toucher ni appuyer sur le panneau d’affichage. l’ordinateur, faites attention à ne pas boucher les ouvertures prévues pour la ventilation. NE PAS le placer sur une surface de travail NE PAS utiliser votre notebook dans des condi- instable.
  • Seite 52 Eviter les changements soudains de température NE PAS exposer l’ordinateur à la pluie ou à ou d’humidité en le maintenant à l’écart d’orifices l’humidité. d’A/C et de chauffage. NE PAS placer près d’un feu ou autre source de NE PAS agir à la légère avec les batteries. Rangez- chaleur.
  • Seite 53: Avant De Commencer

    AVANT DE COMMENCER Vérifiez que vous avez tout Quand vous recevez votre notebook, déballez-le avec précaution, et vérifiez que vous avez tous les éléments mentionnés ci-dessous. Pour un modèle pré-configuré vous devez avoir ce qui suit: • Ordinateur Notebook • Batterie Lithium ion •...
  • Seite 54: Familiarisez-Vous Avec L'ordinateur

    AVANT DE COMMENCER Familiarisez-vous avec l’ordinateur OUVRIR LE PANNEAU D’AFFICHAGE Le couvercle se verrouille automatiquement au châssis de l’ordinateur. Pour ouvrir, soulevez simplement le couvercle. Quand vous le fermez, prenez soin de ne pas le claquer.
  • Seite 55: Présentation De La Face Avant

    AVANT DE COMMENCER PRÉSENTATION DE LA FACE AVANT Voici une présentation de la face avant du notebook. Panneau d’affichage Lampes témoin d’état Bouton Suspension/ Boutons de Démarrage Reprise/Marche Rapide Clavier Périphérique de pointage TouchPad Haut-parleurs stéréo Haut-parleurs stéréo Panneau d’affichage Le panneau d’affichage est un panneau LCD couleur avec rétroéclairage pour l’affichage du texte et des graphismes.
  • Seite 56 AVANT DE COMMENCER Lampes témoin d’état Les lampes témoin d’état correspondent à des modes de traitement spécifiques. Ces modes sont : Etat Marche/Suspension, Etat de la batterie, Activité du disque dur, Etat du LAN sans fil, ArrêtDéfil, VerrMaj, et VerrNum. Périphérique de pointage TouchPad Le périphérique de pointage TouchPad est un contrôle du curseur fonctionnant comme une souris avec deux boutons (boutons gauche et droit).
  • Seite 57: Présentation Du Côté Gauche

    AVANT DE COMMENCER PRÉSENTATION DU CÔTÉ GAUCHE Voici une brève description du côté gauche du notebook. Port IEEE 1394 Port USB Prise Microphone Port de verrouillage Port Modem (RJ-11) Prise casque Kensington Port de verrouillage Kensington Le connecteur du verrouillage Kensington vous permet d’attacher votre notebook à un objet inamovible à...
  • Seite 58: Présentation Du Côté Droit

    AVANT DE COMMENCER PRÉSENTATION DU CÔTÉ DROIT Voici une brève description du côté droit du notebook. Lecteur de carte mémoire Port LAN (RJ-45) Lecteur optique Port d’adaptateur Port USB Ouverture de Bouton d’éjection du lecteur optique d’alimentation Logement de carte PC secours du tiroir Lecteur optique...
  • Seite 59: Présentation De La Face Arrière

    AVANT DE COMMENCER PRÉSENTATION DE LA FACE ARRIÈRE Vous trouverez ci-dessous une présentation de la face arrière du notebook. Port du moniteur externe Ports USB Ports USB Les ports USB vous permettent de connecter des périphériques USB. Ils peuvent prendre en charge la version v2.0 du standard USB, offrant des vitesses d’échange de données allant jusqu’à...
  • Seite 60: Vue De Dessous

    AVANT DE COMMENCER VUE DE DESSOUS Voici une présentation de la partie inférieure du notebook. Baie de la batterie Lithium ion Compartiment de carte LAN sans fil Label de contrôle Orifices de ventilation du ventilateur Compartiment Mémoire/Disque dur Orifices de ventilation du ventilateur Ce sont des ouvertures permettant au ventilateur de dissiper la chaleur provenant des composants internes de l’ordinateur.
  • Seite 61: Mise En Route

    MISE EN ROUTE Sources d’alimentation Votre ordinateur possède deux sources d’alimentation : une batterie Lithium ion et un adaptateur CONNECTER L’ADAPTATEUR D’ALIMENTATION L’adaptateur CA fournit l’alimentation pour faire fonctionner votre notebook et recharger la batterie. Connexion de l’adaptateur CA 1. Branchez le câble de sortie CC à la prise d’alimentation CC de votre notebook. 2.
  • Seite 62: Recharger La Batterie

    MISE EN ROUTE RECHARGER LA BATTERIE La batterie Lithium ion est rechargée de façon interne à l’aide de l’adaptateur CA. Pour recharger la batterie, vérifiez que la batterie est installée et que l’ordinateur est connecté à l’alimentation Les batteries Lithium ion n’ont pas d’“effet mémoire”; vous n’avez donc pas à décharger entièrement la batterie avant de la recharger.
  • Seite 63: Démarrer Votre Notebook

    MISE EN ROUTE Démarrer votre Notebook MISE EN MARCHE Bouton Suspension/Reprise/Marche Le commutateur de suspension/reprise/marche est utilisé pour allumer votre notebook quand il est éteint. Une fois que vous avez connecté votre adaptateur CA ou rechargé la batterie Lithium ion interne, vous pouvez allumer votre notebook en appuyant sur le bouton suspension/reprise/ marche situé...
  • Seite 64: Témoins D'état

    MISE EN ROUTE Témoins d’état Les lampes témoin d’état correspondent à des modes de traitement spécifiques. Ces modes sont : Etat Marche/Suspension, Etat de la batterie, Etat du LAN sans fil, VerrMaj, VerrNum, et Activité du disque dur. VerrNum Témoin d’activité du disque dur ArrêtDéfil Indicateur de Marche/Suspension...
  • Seite 65 MISE EN ROUTE Témoin d’activité du disque dur Le témoin d’activité du disque dur vous indique si votre disque dur interne est en cours d’accès et, si c’est le cas, à quelle vitesse. Témoin d’activité de LAN sans fil Le témoin d’activité de LAN sans fil vous indique si votre ordinateur est connecté ou non à un réseau sans fil.
  • Seite 66: Utilisation Des Touches De Fonction

    MISE EN ROUTE Utilisation des touches de fonction Votre ordinateur possède 12 touches de fonction, F1 à F12. Les fonctions attribuées à ces touches diffèrent pour chaque application. Vous devez vous reporter à la documentation de votre logiciel pour découvrir comment ces touches sont utilisées. La touche [FN] offre des fonctions étendues pour le notebook et est toujours utilisée en conjointement avec une autre touche.
  • Seite 67: Utilisation Du Touchpad

    MISE EN ROUTE Utilisation du TouchPad Un dispositif de pointage TouchPad est intégré à votre ordinateur. Il est utilisé pour contrôler le mouvement du pointeur pour sélectionner les éléments sur votre panneau d’affichage. Le TouchPad est composé d’un contrôle du curseur, un bouton gauche et droit. Le contrôle du curseur fonctionne de la même façon que celui d’une souris, et déplace le curseur sur l’affichage.
  • Seite 68: Mise À Niveau Du Module Mémoire

    MISE EN ROUTE Mise à niveau du module mémoire Votre notebook est comporte 128Mo ou 256Mo de RAM Dynamique Synchrone à haute vitesse (SDRAM) installée en usine. Pour augmenter la capacité mémoire de votre notebook, vous pouvez installer un module mémoire supplémentaire. La mise à niveau de la mémoire doit être un module SDRAM double en ligne (DIMM).
  • Seite 69: Dépannage

    DÉPANNAGE Votre notebook est robuste et présente rarement de problèmes dans ce domaine. Cependant, vous pouvez rencontrer de simples problèmes de configuration ou d’utilisation que vous pouvez résoudre sur place, ou des problèmes avec des périphériques, que vous pouvez résoudre en remplaçant le périphérique.
  • Seite 70: Appendice

    APPENDICE Spécifications du Notebook Processeur Technologie Mobile Intel ® Centrino LED d’état système Allumé/Suspension, Chargement de la batterie, Accès Processeur Intel Dothan 725 ~ 770 au disque dur, RF, VerrMaj, ArrDéfil et VerrNum (Processeur Intel Dothan 1,6GHz à 2,26GHz) Clavier 86 touche US/87 touches EU/88 touches JP avec Processeur Intel Celeron M 350~390 touches de fonction de Windows...
  • Seite 71 Technologie protégée par Copyright Ce produit incorpore la technologie de protection par copyright qui est protégée par les brevets U.S. et autres droits de propriété intellectuelle. L’utilisation de cette technologie de protection par copyright doit être autorisée par Macrovision, et est destinée à des utilisations domestiques et autres visualisations limitées à...
  • Seite 72 MEMO...
  • Seite 73 NOTEBOOK-SERIE RW3 BENUTZERHANDBUCH D E U T S C H Mai 2005...
  • Seite 74 INHALT ZUM BEGINN ......................5 Überprüfen der Lieferung auf Vollständigkeit .............. 5 Lernen Sie das Notebook kennen ................. 6 ÖFFNEN DES BILDSCHIRMS ..................6 VORDERSEITE ......................7 LINKE SEITE ......................9 RECHTE SEITE ......................10 RÜCKSEITE ......................11 UNTERSEITE ......................12 ERSTE SCHRITTE ....................
  • Seite 75: Pflege Des Notebooks

    PFLEGE DES NOTEBOOKS Achten Sie darauf, dass die Lüftungsöffnungen Drücken Sie NICHT auf den Bildschirm. nicht verdeckt werden, um eine Überhitzung des Prozessors zu vermeiden. Legen Sie das Notebook NICHT auf unebene oder Verwenden Sie das Notebook NICHT bei wacklige Unterlagen. extremen Umgebungsbedingungen.
  • Seite 76: Sprühen Sie Kein Wasser Oder Andere

    Vermeiden Sie plötzliche Veränderungen von Setzen Sie das Notebook NICHT Regen und Temperatur und Luftfeuchtigkeit, und stellen Sie Feuchtigkeit aus. das Notebook nicht in die Nähe von Adaptern und Lüftungsöffnungen anderer Geräte. Stellen Sie das Notebook NICHT in der Nähe von Versuchen Sie NICHT, den Akku zu manipulieren.
  • Seite 77: Zum Beginn

    ZUM BEGINN Überprüfen der Lieferung auf Vollständigkeit Wenn Sie das Notebook erhalten haben, packen Sie es vorsichtig aus, und überprüfen Sie, ob alle nachfolgend aufgeführten Teile enthalten sind. Bei einem vorkonfigurierten Modell sollten die folgenden Teile dabei sein: • Notebook •...
  • Seite 78: Lernen Sie Das Notebook Kennen

    ZUM BEGINN Lernen Sie das Notebook kennen ÖFFNEN DES BILDSCHIRMS Der Notebookdeckel schließt automatisch. Heben Sie den Deckel zum Öffnen des Notebooks einfach hoch. Achten Sie beim Schließen darauf, dass der Deckel nicht zugeknallt wird.
  • Seite 79: Vorderseite

    ZUM BEGINN VORDERSEITE Hier sehen Sie eine Ansicht des Notebooks von vorne. Bildschirm Statusanzeigelampen Taste Ein/Aus/ Schnellstarttasten Suspend/ Wiederaufnahme Tastatur TouchPad- Zeigegerät Stereo-Lautsprecher Stereo-Lautsprecher Bildschirm Beim Bildschirm handelt es sich um einen LCD-Farbmonitor mit Hintergrundbeleuchtung. Auf ihm werden die Texte und Grafiken angezeigt. Tastatur Das Notebook hat eine Tastatur in Normalgröße und besitzt eine festgelegte Windows-Taste.
  • Seite 80: Touchpad-Zeigegerät

    ZUM BEGINN Statusanzeigelampen Die Statusanzeigelampen entsprechen den spezifischen Betriebsmodi. Das sind: Ein/Aus/Sus- pend-Status, Akkustatus, Festplattenaktivität, Wireless-LAN-Status, Scroll-Lock, CapsLock und NumLock. TouchPad-Zeigegerät Beim TouchPad handelt es sich um eine mausähnliche Einrichtung zur Steuerung des Cursors mit zwei Tasten (Links und Rechts). Taste Ein/Aus/Suspend/Wiederaufnahme Mit diesen Tasten wird das Notebook an- und ausgeschaltet bzw.
  • Seite 81: Linke Seite

    ZUM BEGINN LINKE SEITE Hier folgt eine kurze Beschreibung der linken Seite des Notebooks. IEEE-1394-Port USB-Port Mikrofonanschluss Öffnung für Modem-Port (RJ-11) Kopfhöreranschluss Kensington- Schloss Öffnung für Kensington-Schloss Mit Hilfe des Stahlkabels des Kensington-Schlosses können Sie das Notebook an einem festen Gegenstand befestigen und sichern.
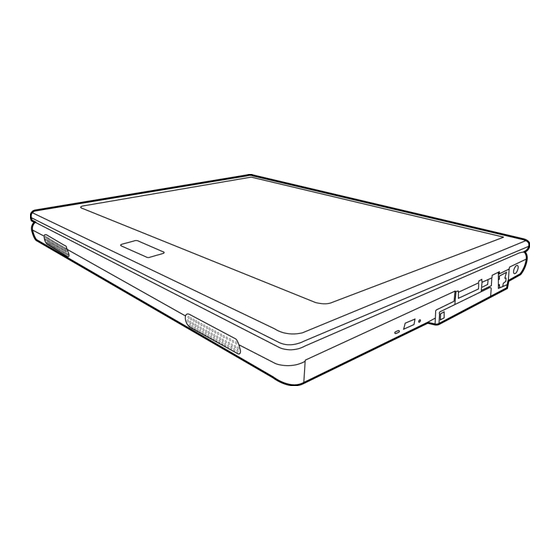
  • Seite 82: Rechte Seite

    ZUM BEGINN RECHTE SEITE Hier folgt eine kurze Beschreibung der rechten Seite des Notebooks. Speicherkartenleser LAN-Port (RJ-45) Optisches Laufwerk Netzadapteranschluss USB-Port Auswurftaste des optischen Laufwerks PC-Kartensteckplatz Notauswurföffnung Optisches Laufwerk Mit Hilfe des optischen Laufwerks können Sie Medien-Discs wie CDs und DVDs abspielen. Auswurftaste des optischen Laufwerks Drücken Sie auf die Auswurftaste des optischen Laufwerks, um das optische Laufwerk zu öffnen, wenn Sie eine DVD oder CD einlegen möchten.
  • Seite 83: Rückseite

    ZUM BEGINN RÜCKSEITE Hier sehen Sie eine Ansicht des Notebooks von hinten. Anschluss für externen Monitor USB-Ports USB-Ports An den USB-Port können USB-Geräte angeschlossen werden. Die Anschlüsse unterstützen den USB-Standard v2.0, der Datenaustauschraten von 480 Mb/s ermöglicht. Anschluss für externen Monitor An diesen Anschluss kann ein externer Monitor angeschlossen werden.
  • Seite 84: Unterseite

    ZUM BEGINN UNTERSEITE Hier sehen Sie eine Ansicht des Notebooks von unten. Fach für den Lithium-Ionen-Akku Wireless-LAN-Kartenfach Konfigurationsetikett Lüftungsöffnungen Fach für Speicher und Festplatte Lüftungsöffnungen Diese Lüftungsöffnungen dienen als Auslass für die heiße Luft, die der Lüfter zum Kühlen der Bauteile im Innern nach außen befördert.
  • Seite 85: Erste Schritte

    ERSTE SCHRITTE Stromversorgung Das Notebook kann auf zwei Arten mit Strom versorgt werden: mit einem Lithium-Ionen-Akku oder einem AC-Netzadapter, der an das Stromnetz angeschlossen wird. ANSCHLIESSEN DES NETZADAPTERS Der AC-Netzadapter versorgt das Notebook mit Strom und lädt gleichzeitig den Akku, wenn dieser sich im Notebook befindet.
  • Seite 86: Wiederaufladen Des Akkus

    ERSTE SCHRITTE WIEDERAUFLADEN DES AKKUS Der Lithium-Ionen-Akku wird im Gerät aufgeladen, wenn das Notebook an eine Netzsteckdose angeschlossen ist. Wenn Sie also den Akku aufladen möchten, muss sich dieser im Notebook befinden, und das Notebook muss an das Stromnetz angeschlossen sein. Bei Lithium-Ionen-Akkus tritt kein “Speichereffekt”...
  • Seite 87: Einschalten Des Notebooks

    ERSTE SCHRITTE Einschalten des Notebooks EINSCHALTEN Taste Ein/Aus/Suspend/Wiederaufnahme Ist das Notebook ausgeschaltet, müssen Sie auf die Taste Ein/Aus/Suspend/Wiederaufnahme drücken, um es einzuschalten. Das Notebook kann eingeschaltet werden, wenn es mit dem AC- Netzadapter an das Stromnetz angeschlossen oder über den internen Lithium-Ionen-Akku mit Strom versorgt wird.
  • Seite 88: Statusanzeigen

    ERSTE SCHRITTE Statusanzeigen Die Statusanzeigelampen entsprechen den spezifischen Betriebsmodi. Das sind: Ein/Aus/Sus- pend-Status, Akkustatus, Festplattenaktivität, Wireless-LAN-Status, Scroll-Lock, CapsLock und NumLock. Num-Lock-Anzeige Anzeige für Festplattenaktivität Scroll-Lock-Anzeige Ein/Aus/Suspend- Anzeige Schnellstarttasten Akkuanzeige Anzeige für LAN-Aktivität Anzeige der Feststelltaste Taste Ein/Aus/Suspend/Wiederaufnahme Ein/Aus/Suspend-Anzeige Die Ein/Aus-Anzeige leuchtet, wenn das System eingeschaltet ist. Die Anzeige kann sieben verschiedene Betriebsmodi des Notebooks anzeigen.
  • Seite 89: Num-Lock-Anzeige

    ERSTE SCHRITTE Anzeige für Festplattenaktivität An dieser Anzeige können Sie erkennen, ob und mit welcher Geschwindigkeit das System gerade auf die Festplatte zugreift. Anzeige für LAN-Aktivität An der Wireless-LAN-Anzeige können Sie erkennen, ob das Notebook an ein drahtloses Netzwerk angeschlossen ist. Anzeige der Feststelltaste An der Anzeige für die Feststelltaste können sie erkennen, ob die Feststellfunktion der Tastatur für die Verwendung von Großbuchstaben aktiviert ist.
  • Seite 90: Die Funktionstasten

    ERSTE SCHRITTE Die Funktionstasten Das Notebook verfügt über 12 Funktionstasten, Taste F1 bis F12. Je nach Programm sind die Funktionen, die diesen Tasten zugewiesen sind, unterschiedlich. In der Software-Dokumentation finden Sie die Funktionen der jeweiligen Tasten. Die Taste [FN] bietet dem Notebook zusätzliche Funktionen und wird immer zusammen mit einer anderen Taste gedrückt.
  • Seite 91: Benutzen Des Touchpads

    ERSTE SCHRITTE Benutzen des TouchPads Das TouchPad ist ein Zeigegerät, das in das Notebook integriert ist. Es kann zur Steuerung der Cursorbewegungen auf dem Bildschirm verwendet. Das TouchPad bestetht aus der Cursorsteuerung, einer linken und einer rechten Taste. Die Cursorsteuerung kann wie eine Maus den Cursor über den Bildschirm steuern. Sie müssen dazu die Fläche nur ganz leicht mit den Fingerspitzen berühren.
  • Seite 92: Aufrüsten Des Speichermoduls

    ERSTE SCHRITTE Aufrüsten des Speichermoduls Das Notebook ist werkseitig mit einem 128 oder 256 MB großen Hochgeschwindigkeits-SDRAM- Speicher (Synchronous Dynamic RAM) ausgestattet. Wenn Sie die Speicherkapazität des Note- books erhöhen möchten, können Sie ein zusätzliches Speichermodul installieren. Dafür müssen Sie ein DIMM-SDRAM-Modul verwenden. Entfernen Sie nur die Schrauben aus dem Speichermodulfach, die in dieser Beschreibung gezeigt werden.
  • Seite 93: Fehlerbehebung

    FEHLERBEHEBUNG Das Notebook ist sehr robust und sollte in dieser Hinsicht keinen Anlass zu Beschwerden geben. Es ist jedoch möglich, dass einfache Installations- und Betriebsprobleme auftreten, die Sie auf der Stelle beheben können. Es kann auch Probleme mit Peripheriegeräten geben, die behoben werden können, indem Sie das entsprechende Gerät austauschen.
  • Seite 94: Anhang

    ANHANG Technische Daten Prozessor Intel ® Centrino Mobile Technologie System Status LED Ein/Aus/Suspend, Akkuladevorgang, Festplattenzugriff, Intel Dothan Prozessor 1,60 bis 2,26 GHz RF, Caps-Lock, Scroll-Lock und Num-Lock (Intel Dothan Prozessor 725 bis 770) Keyboard 86 Tasten US/87 Tasten EU/88 Tasten JP mit Intel Celeron M Prozessor 350 bis 390 Windows-Funktionstasten (Intel Celeron M Prozessor 1,30 bis 1,70 G)
  • Seite 95 Urheberrechtlich geschützte Technologien Dieses Produkt enthält urheberrechtlich geschützte Technologien. Sie sind geschützt durch US- amerikanische Patente und andere Rechte an intellektuellem Eigentum. Die Verwendung dieser urheberrechtlich geschützten Technologie muss von Macrovision genehmigt sein, und sie darf nur für private und andere begrenzte Vorführzwecke verwendet werden. Die Verwendung für andere Zwecke bedarf der Genehmigung von Macrovision.
  • Seite 96 MEMO...
  • Seite 97 PC PORTÁTIL SERIE RW3 MANUAL DEL USUARIO E S P A Ñ O L Mayo 2005...
  • Seite 98 CONTENIDO ANTES DE COMENZAR ..................5 Asegúrese de tenerlo todo .................... 5 Familiarícese con el ordenador ..................6 ABRIR LA PANTALLA ....................6 VISTA PREVIA FRONTAL .................... 7 VISTA PREVIA DEL LATERAL IZQUIERDO ..............9 VISTA PREVIA DEL LATERAL DERECHO ..............10 VISTA PREVIA POSTERIOR ..................
  • Seite 99 CUIDADOS DE SU PC PORTÁTIL Para evitar el posible calentamiento del procesador NO presione ni toque la pantalla. del ordenador, asegúrese de no bloquear las aperturas de ventilación. NO lo coloque en superficies desiguales o NO utilice su ordenador portátil en condiciones inestables.
  • Seite 100 Evite cambios bruscos de temperatura o humedad NO exponga el ordenador a la lluvia o a la manteniéndolo alejado del aire acondicionado y humedad. calefactores. NO lo coloque cerca del fuego u otras fuentes de NO manipule las baterías. Manténgalas fuera del calor.
  • Seite 101: Antes De Comenzar

    ANTES DE COMENZAR Asegúrese de tenerlo todo Cuando reciba su PC portátil, retire el embalaje con cuidado y compruebe si tiene todos los artículos listados a continuación. Para un modelo preconfigurado debería tener lo siguiente: • Ordenador portátil • Batería de litio •...
  • Seite 102: Familiarícese Con El Ordenador

    ANTES DE COMENZAR Familiarícese con el ordenador ABRIR LA PANTALLA La tapa se cierra en el chasis del ordenador automáticamente. Para abrirla, simplemente levante la tapa. Cuando la cierre, asegúrese de no golpearla bruscamente.
  • Seite 103: Vista Previa Frontal

    ANTES DE COMENZAR VISTA PREVIA FRONTAL Esta es una vista previa de la parte frontal del portátil. Pantalla Luces indicadoras de estado Botón suspender/ Botones de inicio rápido reanudar/encender Teclado Dispositivo puntero TouchPad Altavoces estéreo Altavoces estéreo Pantalla La pantalla es una pantalla LCD de color con luz de fondo para la visualización de texto y gráficos. Teclado Teclado de tamaño completo con teclas exclusivas para Windows.
  • Seite 104 ANTES DE COMENZAR Luces indicadoras de estado Las luces indicadoras de estado corresponden a modos de operación específicos. Estos modos son: Estado encendido/suspendido, estado de la batería, actividad del disco duro, estado de la LAN inalámbrica, bloqueo de desplazamiento, bloqueo de mayúsculas y bloqueo numérico. Dispositivo puntero TouchPad El dispositivo puntero TouchPad es un control de cursor como un ratón con dos botones (izquierdo, derecho).
  • Seite 105: Vista Previa Del Lateral Izquierdo

    ANTES DE COMENZAR VISTA PREVIA DEL LATERAL IZQUIERDO A continuación se presenta una breve descripción del lateral izquierdo del portátil. Puerto IEEE 1394 Puerto USB Clavija de micrófono Puerto de Puerto del módem (RJ-11) Clavija de auriculares bloqueo Kensington Puerto de bloqueo Kensington La ranura de bloqueo Kensington le permite fijar su portátil a un objeto fijo a través de un cable de seguridad opcional Puerto del módem (RJ-11)
  • Seite 106: Vista Previa Del Lateral Derecho

    ANTES DE COMENZAR VISTA PREVIA DEL LATERAL DERECHO A continuación se presenta una breve descripción del lateral derecho del portátil. Memory Card Reader Puerto LAN (RJ-45) Unidad óptica Puerto del adaptador Puerto USB Expulsión de Botón de expulsión de la unidad óptica de alimentación Ranura de tarjeta PC emergencia...
  • Seite 107: Vista Previa Posterior

    ANTES DE COMENZAR VISTA PREVIA POSTERIOR Esta es una vista previa de la parte posterior del portátil. Puerto para monitor externo Puertos USB Puertos USB Los puertos USB le permiten conectar dispositivos de Bus Serie Universal (USB). Soportan la v2. 0 del estándar USB, que le permite tasas de intercambio de datos de hasta 480 Mb/s.
  • Seite 108: Vista Previa Inferior

    ANTES DE COMENZAR VISTA PREVIA INFERIOR Esta es una vista previa de la parte inferior del portátil. Bahía de batería de litio Compartimento de la tarjeta LAN inalámbrica Etiqueta de clasificación Salidas del ventilador Compartimento de memoria/HDD Salidas del ventilador Son puertos abiertos para que el ventilador disipe el calor de los componentes internos del ordenador.
  • Seite 109: Primeros Pasos

    PRIMEROS PASOS Fuentes de alimentación Su ordenador tiene dos tipos de fuente de alimentación: una batería de litio o un adaptador de CA. CONECTAR LOS ADAPTADORES DE ALIMENTACIÓN El adaptador de CA suministra alimentación para el funcionamiento de su PC portátil y para cargar la batería.
  • Seite 110: Cargar La Batería

    PRIMEROS PASOS CARGAR LA BATERÍA La batería de litio se recarga internamente con el adaptador de CA. Para recargar la batería, asegúrese de tenerla instalada y que el ordenador esté conectado a la CA. Las baterías de litio no tienen “efecto de memoria”; por lo tanto no necesitará descargar la batería por completo antes de volver a cargarla.
  • Seite 111: Iniciar Su Portátil

    PRIMEROS PASOS Iniciar su portátil ENCENDER Botón suspender/reanudar/encender El interruptor para suspender/reanudar/encender se utiliza para encender el portátil cuando está apagado. Cuando haya conectado su adaptador de CA o cargado la batería de litio interna, podrá encender su portátil pulsando el botón suspender/reanudar/encender situado sobre el teclado. Si necesita tomar un descanso largo, pulse el botón de nuevo para apagarlo.
  • Seite 112: Indicadores De Estado

    PRIMEROS PASOS Indicadores de estado Las luces indicadoras de estado corresponden a modos de operación específicos. Estos modos son: Estado encendido/suspendido, estado de la batería, actividad del disco duro, estado de la LAN inalámbrica, bloqueo de desplazamiento, bloqueo de mayúsculas y bloqueo numérico. Bloqueo numérico Indicador de actividad del disco duro Bloqueo de desplazamiento...
  • Seite 113 PRIMEROS PASOS Indicador de actividad del disco duro El indicador de actividad del disco duro informa si se está accediendo a la unidad de disco duro interna y, si es así, cómo de rápido. Indicador de actividad de la LAN inalámbrica El indicador de actividad de la LAN inalámbrica informa si el ordenador está...
  • Seite 114: Usar Las Teclas De Función

    PRIMEROS PASOS Usar las teclas de función Su ordenador tiene 12 teclas de función, F1 a F12. Las funciones asignadas a las teclas difieren dependiendo de cada aplicación. Deberá consultar la documentación de su software para averiguar cómo se usan estas teclas. La tecla [FN] ofrece funciones extendidas para el portátil y siempre se utiliza junto con otra tecla.
  • Seite 115: Usar El Touchpad

    PRIMEROS PASOS Usar el TouchPad Su ordenador lleva incorporado un dispositivo puntero TouchPad. Se utiliza para controlar el movimiento del puntero para seleccionar elementos en la pantalla. El TouchPad consiste en un control de cursor, un botón izquierdo y derecho. El control del cursor funciona del mismo modo que un ratón y mueve el cursor por la pantalla.
  • Seite 116: Ampliación Del Módulo De Memoria

    PRIMEROS PASOS Ampliación del módulo de memoria Su PC portátil viene con 128MB o 256MB de RAM dinámica (SDRAM) sincrónica de alta velocidad instalada de fábrica. Para aumentar la capacidad de memoria del portátil, puede instalar un módulo de ampliación de memoria. La ampliación de memoria debe ser un módulo SDRAM (DIMM) dual en línea.
  • Seite 117: Solución De Problemas

    SOLUCIÓN DE PROBLEMAS Su PC portátil es robusto y puede presentar pocos problemas. Sin embargo, puede encontrar problemas simples de configuración u operación que podrá resolver sobre la marcha o problemas con dispositivos periféricos que podrá resolver cambiando el dispositivo. La información en esta sección le ayuda a aislar y resolver algunos de estos sencillos problemas e identificar los fallos que necesitan reparación.
  • Seite 118: Apéndice

    APÉNDICE Especificaciones del portátil Procesador Intel ® Centrino Mobile Technology LED de estado del Encendido/suspendido, carga de batería, acceso Procesador Intel Dothan 725~770 sistema al HDD, RF, bloqueo de mayúsculas, bloqueo de (Procesador Intel Dothan 1,6GHz a 2,26GHz) desplazamiento y bloqueo numérico Procesador Intel Celeron M 350~390 Teclado 86 teclas US/87 teclas EU/88 teclas JP con teclas...
  • Seite 119 Tecnología protegida con Copyright (derechos de copia) “Este producto incorpora la tecnología de protección de derechos de copia protegida por las patentes de los EE.UU. y otros derechos de propiedad intelectual. El uso de esta tecnología de protección de derechos de copia debe ser autorizado por Macrovision y está limitado a uso exclusivo doméstico y otros usos de visualización limitados a menos que exista autorización previa de Macrovision.
  • Seite 120 MEMO...
  • Seite 121 PC PORTATILE SERIE RW3 MANUALE DELL’UTENTE I T A L I A N O Maggio 2005...
  • Seite 122 INDICE PER PRIMA COSA ....................5 Assicurarsi che tutti gli articoli siano presenti ............5 Familiarizzare con il computer ..................6 APERTURA DEL PANNELLO DELLO SCHERMO ............. 6 PANORAMICA FRONTALE ..................7 PANORAMICA LATO SINISTRO .................. 9 PANORAMICA DEL LATO DESTRO ................10 PANORAMICA POSTERIORE ...................
  • Seite 123 CURA DEL NOTEBOOK PC Per evitare un surriscaldamento possibile del NON premere sul o toccare il pannello del display. processore nel computer, assicurarsi che le aper- ture per la ventilazione non siano mai bloccati. NON posare sulle superficie irregolari o instabili. NON usare il notebook computer in condizioni rigide.
  • Seite 124 Sempre evitare cambi bruschi della temperatura NON esporre il computer alla pioggia o o dell’umidità tenendolo lontano dal A/C e dai all’umidità. fonti di calore. NON posizionare vicino al fuoco o altri fonti di NON manomettere la batteria. Tenerla fuori dalla calore.
  • Seite 125: Per Prima Cosa

    PER PRIMA COSA Assicurarsi che tutti gli articoli siano presenti Una volta ricevuto il computer portatile, estrarlo con cura dalla confezione e verificare che in essa siano contenuti tutti gli elementi sotto elencati. Nel caso di un modello preconfigurato, la confezione dovrebbe contenere quanto segue: •...
  • Seite 126: Familiarizzare Con Il Computer

    PER PRIMA COSA Familiarizzare con il computer APERTURA DEL PANNELLO DELLO SCHERMO La copertura superiore viene fissata al telaio del computer automaticamente. Per aprire, sollevare semplicemente la copertura. Al momento della chiusura, assicurarsi di non esercitare troppa forza.
  • Seite 127: Panoramica Frontale

    PER PRIMA COSA PANORAMICA FRONTALE Quanto segue rappresenta una panoramica della parte anteriore del computer portatile. Pannello dello schermo LED indicatori di stato Pulsante di Pulsanti di avvio rapido accensione/ ripristino/ sospensione Tastiera Dispositivo di puntamento TouchPad Diffusori stereo Diffusori stereo Pannello dello schermo Il pannello dello schermo è...
  • Seite 128 PER PRIMA COSA LED indicatori di stato I LED indicatori di stato corrispondono a modalità specifiche di funzionamento. Tali modalità sono: Stato di accensione/sospensione, Stato batteria, Attività disco rigido, Stato LAN senza fili, Blocco scorrimento, Bloc Maiusc e Bloc Num. Dispositivo di puntamento TouchPad Il dispositivo di puntamento TouchPad è...
  • Seite 129: Panoramica Lato Sinistro

    PER PRIMA COSA PANORAMICA LATO SINISTRO Quanto segue rappresenta una breve descrizione del lato sinistro del computer portatile. Porta IEEE 1394 Porta USB Presa microfono Porta per Porta modem (RJ-11) Presa Cuffie blocco Kensington Porta per blocco Kensington Lo slot per il sistema di bloccaggio Kensington consente di assicurare il computer portatile ad un oggetto inamovibile per mezzo di un cavo di sicurezza opzionale.
  • Seite 130: Panoramica Del Lato Destro

    PER PRIMA COSA PANORAMICA DEL LATO DESTRO Quanto segue rappresenta una breve descrizione del lato destro del computer portatile. Lettore di Memory Card Porta LAN (RJ-45) Unità ottica Porta trasformatore Porta USB Sistema di Pulsante Eject dell’unità ottica alimentazione Slot PC Card sblocco del vassoio Unità...
  • Seite 131: Panoramica Posteriore

    PER PRIMA COSA PANORAMICA POSTERIORE Quanto segue rappresenta una panoramica della parte posteriore del computer portatile. Porta monitor esterno Porte USB Porte USB Le porte USB consentono di collegare periferiche dotate di interfaccia USB. Le porte supportano lo standard USB v2.0, che consente velocità di scambio di dati fino a 480Mb/s. Porta monitor esterno La porta monitor consente il collegamento con un monitor esterno.
  • Seite 132: Panoramica Inferiore

    PER PRIMA COSA PANORAMICA INFERIORE Quanto segue rappresenta una panoramica della parte inferiore del computer portatile. Alloggiamento della batteria agli ioni di litio Compartimento scheda LAN senza fili Etichetta di configurazione Fessure di ventilazione Compartimento memoria/disco rigido Fessure di ventilazione Si tratta di fessure che consentono alla ventola di dissipare il calore dai componenti interni del computer.
  • Seite 133: Cominciamento

    COMINCIAMENTO Sorgenti di alimentazione Il computer può essere messo in servizio da due sorgenti di alimentazione: una batteria agli ioni di litio o un adattatore c.a. COLLEGAMENTO DEI TRASFORMATORI Il trasformatore c.a. fornisce alimentazione per il funzionamento del PC portatile e per la carica della batteria.
  • Seite 134: Ricarica Della Batteria

    PRIMEROS PASOS RICARICA DELLA BATTERIA La batteria agli ioni di litio viene ricaricata internamente per mezzo del trasformatore c.a. Per ricaricare la batteria, assicurarsi che la batteria sia installata e il computer sia collegato al trasformatore. Non vi è alcun “effetto memoria” nelle batterie agli ioni di litio, di conseguenza non è necessario scaricare completamente la batteria prima di eseguire la ricarica.
  • Seite 135: Avvio Del Computer

    PRIMEROS PASOS Avvio del computer ACCENSIONE Pulsante di accensione/ripristino/sospensione L’interruttore di accensione/ripristino/sospensione viene utilizzato per accendere il computer portatile. Una volta collegato il trasformatore c.a. o dopo aver caricato la batteria interna agli ioni di litio, è possibile accendere il computer premendo il pulsante di accensione/ripristino/sospensione situato sopra la tastiera.
  • Seite 136: Indicatori Di Stato

    PRIMEROS PASOS Indicatori di stato I LED indicatori di stato corrispondono a modalità specifiche di funzionamento. Tali modalità sono: Stato di accensione/sospensione, Stato batteria, Attività disco rigido, Stato LAN senza fili, Blocco scorrimento, Bloc Maiusc e Bloc Num. Blocco numerico LED indicatore attività...
  • Seite 137 PRIMEROS PASOS LED indicatore attività disco rigido L’indicatore dell’attività dell’unità disco rigido consente di capire quando l’unità interna disco rigido viene utilizzata dal sistema e con quale velocità. Indicatore attività LAN senza fili L’indicatore dell’attività LAN senza fili consente di visualizzare se il computer è collegato ad una rete senza fili o meno.
  • Seite 138: Uso Dei Tasti Funzione

    PRIMEROS PASOS Uso dei tasti funzione Il computer dispone di 12 tasti funzione, da F1 a F12. Le funzioni assegnate a tali tasti differiscono a seconda dell’applicazione. Fare riferimento alla documentazione del software per informazioni sull’uso di tali tasti. Il tasto [FN] offre funzioni estese per il computer portatile e viene sempre utilizzato insieme a un altro tasto.
  • Seite 139: Uso Del Dispositivo Touchpad

    PRIMEROS PASOS Uso del dispositivo TouchPad Il computer è dotato di un dispositivo di puntamento TouchPad incorporato. Viene utilizzato per controllare il movimento del puntatore per selezionare gli elementi sul pannello di visualizzazione. Il TouchPad consiste di un controllo cursore, un pulsante sinistro e destro. Il controllo del cursore funziona in modo analogo a un mouse e consente di spostare il cursore sullo schermo.
  • Seite 140: Aggiunta Di Moduli Di Memoria

    PRIMEROS PASOS Aggiunta di moduli di memoria Il PC portatile è dotato di memoria da 128MB o 256MB di SDRAM ad alta velocità installata in fabbrica. Per aumentare la capacità di memoria del computer, è possibile installare un modulo di aggiornamento memoria aggiuntivo.
  • Seite 141: Risoluzione Dei Problemi

    RISOLUZIONE DEI PROBLEMI Il PC portatile è robusto e non dovrebbe essere soggetto a particolari problemi. Tuttavia, è possibile che vengano sperimentati dei semplici problemi di impostazione o funzionamento che è possibile risolvere facilmente oppure problemi alle periferiche che è possibile risolvere sostituendo tali periferiche.
  • Seite 142: Appendice

    APPENDICE Specifiche del Notebook Processore Tecnologia mobile Intel ® Centrino Sistema Stato LED Accensione/sospensione, carica batteria, Accesso Processore Intel Dothan da 725 a 770 disco rigido, RF, Bloc maiusc, Blocco scorrimento (Processore Intel Dothan da 1,6GHz a 2,26GHz) e blocco numerico Processore Intel Celeron M 350~390 Tastiera 86-tasti US/87-tasti EU/88-tasti JP con tasti...
  • Seite 143 Tecnologia protetta da copyright Questo prodotto contiene tecnologia protetta da copyright, tutelata da brevetti statunitensi e da altri diritti di proprietà intellettuale. L’uso di tale tecnologia protetta da copyright deve essere autorizzato da Macrovision, ed è da intendersi per uso domestico o altri usi limitati in assenza di un’autorizzazione specifica da parte di Macrovision.
  • Seite 144 MEMO...

Inhaltsverzeichnis