Werbung
Verfügbare Sprachen
Verfügbare Sprachen
Quicklinks
INSTALLATION, OPERATION AND MAINTENANCE
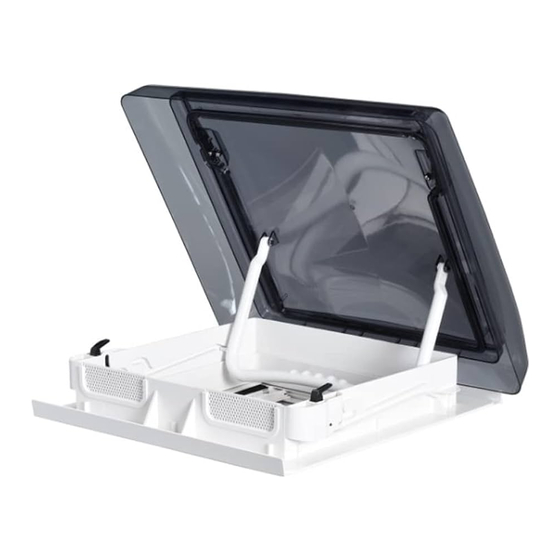
MAXXAIR
NOTE: Refer to Installation Instructions, Information and Operation Guides regarding the model you have
purchased.
The SKYMAXX ROOFLIGHT installs into a standard caravan roof opening of 400 mm x 400 mm
(15.75 in. x 15.75 in.).
To determine if your roof opening is correctly sized, simply remove the interior ceiling garnish trim ring of
your existing roof vent and measure the ceiling opening or verify the opening is large enough by sliding
the Rooflight interior ceiling flange into the opening.
The Rooflight is designed for a minimum roof thickness 23 mm to 60 mm maximum (0.90 inches to 2.36
inches).
The LED lighted Rooflight requires a minimum 12 Volt DC, 2 amp service. Confirm that the circuit you
intend to use will accommodate the additional load. Circuit must be fused and use appropriate gauge
stranded wire for electrical connections
NOTE: Wall Control for LED lights must be provided by installer.
NOTE: THE ROOFLIGHT MUST BE CLOSED PRIOR TO TRANSPORTING OR MOVING THE CARAVAN.
WARNING! TO REDUCE THE RISK OF FIRE, ELECTRIC SHOCK, OR INJURY TO PERSONS,
OBSERVE THE FOLLOWING:
a) Use this unit only in the manner intended by AIRXCEL, INC. If you have questions, contact the
manufacturer.
b) Before servicing or cleaning the unit, switch power off at service panel and lock the service
disconnecting means to prevent power from being switched on accidentally. When the service
disconnecting means cannot be locked, securely fasten a prominent warning device, such as a
tag, to the service panel.
CAUTION! FOR GENERAL VENTILATION USE ONLY. DO NOT USE TO EXHAUST HAZARDOUS
OR EXPLOSIVE MATERIALS OR VAPORS.
INSTRUCTIONS FOR
SKYMAXX 97500i & 97510i
®
READ AND SAVE THESE INSTRUCTIONS
.
P/N: 11B90014i
07-2019
Werbung

Inhaltszusammenfassung für Maxxair SKYMAXX 97500i
- Seite 1 INSTALLATION, OPERATION AND MAINTENANCE INSTRUCTIONS FOR MAXXAIR SKYMAXX 97500i & 97510i ® READ AND SAVE THESE INSTRUCTIONS NOTE: Refer to Installation Instructions, Information and Operation Guides regarding the model you have purchased. The SKYMAXX ROOFLIGHT installs into a standard caravan roof opening of 400 mm x 400 mm (15.75 in.
-
Seite 2: Installation Instructions
INSTALLATION INSTRUCTIONS STEP 1 SKYMAXX Model Roof Opening 00-97500i, 00-97510i 400 mm x 400 mm Refer to the above table for roof size opening. If you are replacing another type already installed, remove the old existing roof vent. Remove all old roof sealant for a minimum of 5 cm (2 inches) entirely around the roof opening. - Seite 3 NOTE: THE ROOFLIGHT MUST BE CLOSED PRIOR TO TRANSPORTING OR MOVING THE CARAVAN. USER SERVICING INSTRUCTIONS Cleaning of your MAXXAIR SKYMAXX ROOFLIGHT may be achieved with mild soap and water only. DO NOT USE ABRASIVE CLOTH ON ROOFLIGHT COVER. It is advisable when the Rooflight is open to keep the screen and/or shade covering the Rooflight opening.
- Seite 4 CAUTION! Disconnect main vehicle power before connecting 12 volt DC power to the MAXXAIR ROOFLIGHT! STEP 6 Insert the 12 volt DC power supply wires into the large diameter hole in the ceiling flange, allowing 4 to 6 inches of wire to hang out.
- Seite 5 Warranty does not include “Acts of God,” failure due to misuse, improper installation or accidental / incidental damages. Please call your AIRXCEL / MAXXAIR Distributor if you have any questions or need assistance. Please have your original sales receipt readily available. This limited warranty does not cover labor or any freight costs for the return of the product to or from AIRXCEL, INC.
- Seite 6 ® SKYMAXX INSTRUCTIONS D’INSTALLATION, MANUEL D’INFORMATION ET D’UTILISATION POUR LES LANTERNEAUX MAXXAIR SKYMAXX 97500i et 97510i LISEZ ET CONSERVEZ CES INSTRUCTIONS REMARQUE : consultez les manuels d’installation, d’information et d’utilisation du modèle que vous avez acheté. Le LANTERNEAU SKYMAXX se fixe dans une ouverture de toit de caravane standard de 400 mm x 400 mm (15,75 po.
-
Seite 7: Instructions D'installation
INSTRUCTIONS D’INSTALLATION ÉTAPE 1 Modèle de SKYMAXX Ouverture du toit 00-97500i, 00-97510i 400 mm x 400 mm Consultez le tableau ci-dessus pour connaître la taille de l’ouverture au plafond. Si vous remplacez un autre type de lanterneau déjà installé, déposez l’ancien évent de toiture qui s’y trouve. - Seite 8 REMARQUE : LE LANTERNEAU DOIT ÊTRE FERMÉ AVANT DE TRANSPORTER OU DE DÉPLACER LA CARAVANE. INSTRUCTIONS D’ENTRETIEN POUR L’UTILISATEUR Le nettoyage de votre LANTERNEAU MAXXAIR SKYMAXX s’effectue uniquement avec un savon doux et de l’eau. N’UTILISEZ PAS DE TISSU ABRASIF SUR LE COUVERCLE DU LANTERNEAU.
- Seite 9 MISE EN GARDE ! Débranchez le câble d’alimentation du véhicule principal avant de brancher l’alimentation à 12 V CC au LANTERNEAU MAXXAIR. ÉTAPE 6 Insérez les câbles d’alimentation à 12 V CC dans le large trou situé dans la bride de plafond, en laissant 4 à 6 po de câble pendre.
- Seite 10 Cette Garantie limitée n’inclut pas « les cas de force majeure », les défaillances causées par une mauvaise utilisation, une mauvaise installation ou les dommages accidentels/accessoires. Appelez votre Distributeur AIRXCEL / MAXXAIR si vous avez des questions ou si vous avez besoin d’assistance. Ayez toujours les originaux de vos factures de vente à...
- Seite 11 ® SKYMAXX DACHFENSTER ANLEITUNGEN FÜR DIE MONTAGE, INFORMATIONEN UND BEDIENUNGSANWEISUNG FÜR MAXXAIR SKYMAXX DACHFENSTER 97500i und 97510i DIESE ANWEISUNGEN MÜSSEN GELESEN UND AUFBEWAHRT WERDEN HINWEIS: Lesen Sie die Montageanleitungen, Informationen und die Bedienungsanleitung für das Modell, das Sie gekauft haben.
- Seite 12 INSTALLATIONSANLEITUNG SCHRITT 1 SKYMAXXr-Modell Dachöffnung 00-97500i, 00-97510i 400 mm x 400 mm Siehe obige Tabelle für die Größe der Dachöffnung. Entfernen Sie gegebenenfalls eine im Dach bereits vorhandene Entlüftungsvorrichtung. Entfernen Sie zumindest all jene Abdichtungen, die sich in einem Abstand von 5 cm (2 Zoll) um die Öffnung herum befinden.
- Seite 13 Dadurch wird sichergestellt, dass die Clips der Innenverkleidung in die Kanäle des Deckenflansches einrasten, um ihn zu verriegeln. Damit ist die Installation des MAXXAIR SKYMAXX DACHFENSTERS abgeschlossen. BETRIEB IHRES MAXXAIR SKYMAXX DACHFENSTERS Um das Dachfenster zur Belüftung zu öffnen, trennen Sie den Sichtschutz vom Sonnenschutz, indem Sie die Zugstangen in entgegengesetzte Richtungen bewegen.
- Seite 14 Innenseite der Inneneinheit gleiten und nicht eingeklemmt oder verhakt werden. Durch festes Drücken auf die Innenverkleidung befestigen. Dadurch wird sichergestellt, dass die Clips der Innenverkleidung in die Kanäle des Deckenflansches einrasten, um ihn zu verriegeln. Damit ist die Installation des MAXXAIR SKYMAXX Plus DACHFENSTERS abgeschlossen.
- Seite 15 Schäden. Sollten Sie Fragen haben oder Unterstützung benötigen, so kontaktieren Sie bitte Ihren AIRXCEL/MAXXAIR-Händler. Bitte halten Sie Ihre Original-Kaufbelege griffbereit. Diese begrenzte Garantie umfasst keine Arbeitskosten oder Frachtgebühren für Rücksendungen zu oder von AIRXCEL, INC. oder Kosten im Zusammenhang mit Installation, Ausbau oder Wiedereinbau des Produktes.
- Seite 16 INSTRUCCIONES DE INSTALACIÓN, GUÍA DE INFORMACIÓN Y GUÍA DE FUNCIONAMIENTO PARA CLARABOYA MAXXAIR SKYMAXX 97500i Y 97510i LEA Y GUARDE ESTAS INSTRUCCIONES NOTA: Consulte las Instrucciones de instalación, la Guía de información y la Guía de funcionamiento del modelo que ha adquirido.
-
Seite 17: Instrucciones De Instalación
INSTRUCCIONES DE INSTALACIÓN PASO 1 Modelo de SKYMAXX Abertura de techo 00-97500i, 00-97510i 400 mm x 400 mm Consulte la tabla anterior para conocer el tamaño de abertura de techo. Si va a reemplazar otro tipo de claraboya de techo ya instalada, retire la vieja. Retire todo el material de sellado viejo del techo que se encuentra en una periferia mínima de 5 cm (2 pulgadas) alrededor de la abertura. - Seite 18 NOTA: LA CLARABOYA DEBE ESTAR CERRADA ANTES DE TRANSPORTAR O MOVER LA CARAVANA. INSTRUCCIONES DE MANTENIMIENTO DEL USUARIO La limpieza de su CLARABOYA MAXXAIR SKYMAXX se puede realizar con solo con jabón suave y agua. NO UTILICE UN PAÑO ABRASIVO EN LA TAPA DE LA CLARABOYA.
- Seite 19 ¡PRECAUCIÓN! ¡Desconecte la energía principal del vehículo antes de conectar la energía de 12 V de CC a LA CLARABOYA MAXXAIR SKYMAXX! PASO 6 Inserte los cables de alimentación de 12 V de CC en el orificio de diámetro grande del marco de techo, dejando colgar de 4 a 6 pulgadas de cable.
- Seite 20 Llame a su distribuidor de AIRXCEL/MAXXAIR si tiene alguna pregunta o necesita asistencia. Tenga disponible su recibo de compra original. Esta garantía limitada no cubre mano de obra ni cargos de transporte por la devolución del producto hasta ni desde AIRXCEL, INC., ni los costes asociados con la instalación, retirada o reinstalación del producto.