
Verwandte Anleitungen für Hanhart LABOR 2


Inhaltszusammenfassung für Hanhart LABOR 2
- Seite 1 LABOR 2 Garantie & Bedienungsanleitung Guarantee & instructions for use Garantie & mode d‘emploi Garanzia & istruzioni per l‘uso...
- Seite 2 Hanhart-Garantie: 2 (zwei) Jahre Sollten sich innerhalb dieser Zeit Mängel ergeben, die auf Fabrikations- fehler oder schlechtes Material zurückzuführen sind, so wird unter Vor- lage dieses Garantie scheines kostenlose Instandsetzung oder Umtausch vorgenommen. Fehler infolge falscher Behandlung sowie Schäden, die durch ausgelaufene Batterien entstanden sind, sowie die Batterien selbst, fallen nicht unter die Garantie.
-
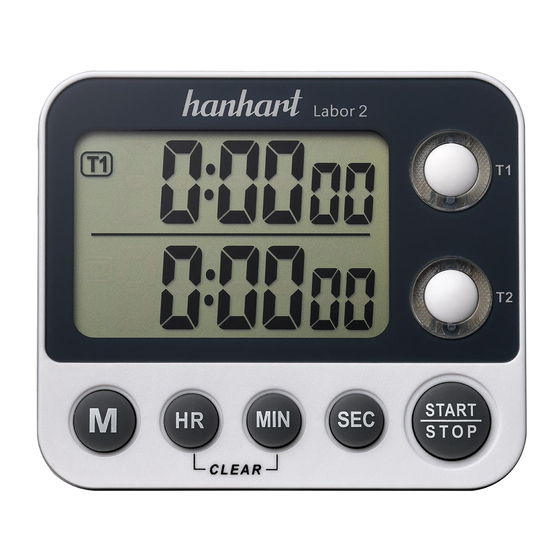
Seite 3: Übersicht Der Tasten
BEDIENUNGSANLEITUNG TIMER ANWEISUNGEN VERWENDUNG DER STOPPUHR ÜBERSICHT DER TASTEN Drücken Sie T1 oder T2, um zum gewünschten Timer zu wechseln. Auswahl Timer T1 Auswahl Timer T2 1 Drücken Sie die Tasten HR und MIN, um den Einstellen der gespeicherten Zeit Timer zu löschen, wenn der Timer angehalten Einstellen des Stundenwertes ist. - Seite 4 Sie können die Count-down-Zeit bis zu 99 Stunden 59 Stellen Sie wie folgt ein: Minuten 59 Sekunden einstellen. 1 Halten Sie bei angehaltenem Timer die M-Taste ge- drückt, bis der Wert blinkt. COUNT-DOWN STARTEN: 2 Drücken Sie die HR-Taste, um den Stundenwert zu Drücken Sie nach dem Einstellen der Count-down-Zeit erhöhen.
- Seite 5 BEFESTIGUNG DES TIMERS Sie können die Aufhängevorrichtung (Clip) verwenden, um sie an der Wand oder an anderen Orten aufzu- hängen. Das Produkt kann mit ausgeklapptem Fuß aufrecht auf dem Tisch stehen. Auf der Rückseite befinden sich zwei Magneten ,die an Metalloberflächen haften.
- Seite 6 USER‘S GUIDE TIMER INSTRUCTIONS USE THE STOPWATCH KEYS Press T1 or T2, to switch to the timer desired. Switch to timer T1 Switch to timer T2 1 Press button HR and MIN, to clear the timer when the Set/return to memory time timer is paused.
- Seite 7 flashing. 4 Press the SEC button to increase „second“ value, Press the START / STOP button again to pause count- press and hold to increase quickly.Press the HR and down, with the „▼“stop flashing. MIN buttons to clear the timer. Press the START / STOP button again to continue the 5 Press the M button to finish the default time setting.
- Seite 8 battery cover. 2 Remove the old battery, and put on a new battery according to the correct polarity direction. 3 Replace the battery cover. Consumers are legally required to dispose of batteries at suitable collection points, vending points or dispatch bays.
- Seite 9 GUIDE D’UTILISATION TIMER INSTRUCTIONS UTILISATION DU CHRONOMÈTRE BOUTONS Appuyez sur T1 ou T2 pour passer à la minuterie Passer au timer T1 souhaitée. Passer au timer T2 Régler/rertourner á memoire 1 Appuyez sur les touches HR et MIN pour régler le Régler valeur heur effacer la minuterie lorsque la minuterie est arrêtée.
- Seite 10 Vous pouvez régler le temps de compte à rebours Régler comme suit : jusqu‘à 99 heures 59 minutes 59 secondes. 1 Lorsque la minuterie est arrêtée, maintenez le M- jusqu‘à ce que la valeur clignote. COMMENCEZ LE COMPTE À REBOURS : 2 Appuyez sur la touche HR pour afficher la valeur des Après avoir réglé...
- Seite 11 MONTAGE DE LA MINUTERIE Vous pouvez utiliser le dispositif de suspension (clip) pour l‘accrocher au mur ou à d‘autres endroits. Le produit peut se tenir debout sur la table avec le pied déplié. Il y a deux aimants au dos du produit qui adhèrent aux surfaces métalliques.
-
Seite 12: Istruzioni Per L'uso
ISTRUZIONI PER L‘USO TIMER INSTRUCTIONS ISTRUZIONI DEL TIMER PANORAMICA DELLE CHIAVI Premere T1 o T2 per passare al timer desiderato. Selezione il timer T1 Selezione il T2 1 Premere i pulsanti HR e MIN per azzerare il timer, Impostazione del tempo memorizzato mentre che è... - Seite 13 premere il pulsante START/STOP per avviare il conto alla rapidamente il valore. rovescia quando „▼“ lampeggia. Premere nuovamen- 3 Premere il tasto MIN per aumentare il valore dei te START/STOP per fermare il conto alla rovescia con il minuti. Tenere premuto questo pulsante. tasto „▼“...
- Seite 14 Sul retro del prodotto ci sono due magneti che si attaccano alle superfici metalliche. CAMBIO BATTERIA Quando la batteria è scarica, il display diventa scuro o sfocato. Sostituire la batteria in questo caso. 1 Tenere il coperchio della batteria e premere nella direzione indicata, per aprire il coperchio del vano batterie.
- Seite 15 Hanhart 1882 GmbH Hauptstr. 33 I 78148 Gütenbach Germany www.hanhart.com...