Herunterladen Inhalt Inhalt Diese Seite drucken

Werbung

Verfügbare Sprachen
  • DE

Verfügbare Sprachen

  • DEUTSCH, seite 17
Gebruikershandleiding .......... 2-6
NL
Mode d'emploi ..................... 7-11
FR
User Guide.......................... 12-16
EN
Benutzerhandbuch ............ 17-21
DE
Guía Del Usuario ................ 22-26
ES
Manuale dell'utente ........... 27-31
IT

Werbung

Inhaltsverzeichnis
loading

Inhaltszusammenfassung für Atlantic NAVILINK H58

  • Seite 1: Inhaltsverzeichnis

    Gebruikershandleiding ..2-6 Mode d’emploi ..... 7-11 User Guide......12-16 Benutzerhandbuch .... 17-21 Guía Del Usuario ....22-26 Manuale dell’utente ... 27-31...
  • Seite 2: Bedieningspaneel

    GEBRUIKERSHANDLEIDING Omschrijving Een programmeerbare kamer- • Ergonomische gebruikersinterface met een ‘OK-toets’. thermostaat die zorgt voor • Groot LCD (Liquid Crystal Display)-scherm. een efficiënte regeling van • 7-dagen vrij programmeerbaar uw verwarmingssysteem: een verwarmingsprogramma: sluit aan bij uw levensstijl aangename temperatuur wanneer en zorgt voor maximale energiebesparing.
  • Seite 3 DE KAMERTHERMOSTAT INSTALLEREN In dit hoofdstuk leest u hoe u de kamerthermostaat in 2 eenvoudige stappen kunt installeren en inschakelen: STAP 1: De dag en tijd instellen De dag en tijd instellen: a. Druk eenmaal op de DAY-toets. De ‘dagweergave’ gaat knipperen. b.
  • Seite 4 DE KAMERTHERMOSTAT PROGRAMMEREN Het ingebouwde U kunt nu kiezen hoe u het programma verwarmingsprogramma voor de volgende dag wilt instellen: aanpassen f. i) Druk op de COPY DAY-toets om het programma van maandag te kopiëren naar Het ingebouwde dinsdag. Op het scherm worden alleen verwarmingsprogramma wijzigen: a.
  • Seite 5 DE KAMERTHERMOSTAT BEDIENEN De bedieningswijze kiezen De bijzondere functies gebruiken De kamerthermostaat beschikt over drie • VAKANTIE-functie bedieningswijzen: automatisch (AUTO), Met de vakantiefunctie kunt u een handmatig (MAN) of uit (OFF). Druk op de constante temperatuur instellen AUTO-, MAN- of OFF-toets om een bepaalde (standaard = 10°C) voor een bepaald bedieningswijze te selecteren.
  • Seite 6 PROBLEEMOPLOSSING VOOR DE KAMERTHERMOSTAT Probleem Mogelijke oorzaaak oplossing Op het scherm De Thermostaat ontvangt 1) De Thermostaat is niet op de verschijnt een wel voeding, maar geen correcte aansluitklemmen van knipperend informatie van het cv-toestel. het cv-toestel aangesloten symbool. Controleer of de bedrading op de OpenTherm aansluitklemmen van het cv-toestel is aangesloten.
  • Seite 7: Mode D'emploi

    MODE D’EMPLOI Description Caractéristiques Un thermostat d’ambiance • Interface ergonomique pour l’utilisateur . programmable destiné au contrôle • Grand écran à cristaux liquides. de votre installation de chauffage, • Programmation hebdomadaire vous permettant permettant ainsi d’obtenir une d’adapter le thermostat à votre rythme de vie tout température confortable lorsque vous en économisant au maximum l’énergie consommée.
  • Seite 8 PROGRAMMATION DU THERMOSTAT Cette section vous montre comment programmer et faire fonctionner votre thermostat en effectuant 2 opérations simples : ETAPE 1 : Programmation de l’heure et du jour Pour programmer le jour et l’heure : a. Appuyez une fois sur la touche DAY ; “l’indicateur du jour” commence alors à clignoter. b.
  • Seite 9 PROGRAMMATION DU THERMOSTAT Modification du Vous avez maintenant le choix quant à votre programme d’usine programmation de la journée suivante : f. i) Appuyez sur la touche COPY DAY pour copier Pour changer le programme d’usine le programme du lundi sur le mardi (l’indicateur a.
  • Seite 10: Sélection Du Mode De Fonctionnement

    FONCTIONNEMENT DE VOTRE THERMOSTAT Sélection du mode de fonctionnement Utilisation des fonctions spéciales Votre thermostat peut utiliser l’un des trois modes • Fonction VACANCES de fonctionnement suivants : Automatique, Cette fonction Vacances vous permet Manuel ou “Hors-gel”. Pour obtenir le mode de programmer une température de fonctionnement désiré, appuyez sur les constante (valeur par défaut =...
  • Seite 11 RECHERCHE DES CAUSES DE PANNES SUR LE THERMOSTAT Symptômes Causes possibles Solutions Le Thermostat est 1) Le Thermostat n’est pas branché Le symbole alimenté, mais ne reçoit aux bornes correctes de la clignotant apparait pas d’informations chaudière. Contrôlez si les fils sur l’afficheur en de la chaudière.
  • Seite 12: Controls Layout

    USER GUIDE Description Features This programmable Room • Ergonomic user interface featuring an ‘OK-button’. Thermostat is designed to • Large LCD (Liquid Crystal Display) Screen. control your heating system • 7-day heating program to match your lifestyle, efficiently, providing comfortable whilst maximising energy savings.
  • Seite 13 SETTING-UP THE THERMOSTAT This section shows you how to setup and run the thermostat in 2 simple steps: STEP 1: Setting the Day and Time To set the Day and Time: a. Press the DAY button once and the ‘day indicator’ will begin to flash. b.
  • Seite 14 PROGRAMMING THE THERMOSTAT Modifying the Heating Program flashing’ day indicator, which indicates the day copied and the ‘flashing’ target To change the heating program: day to copy the program to. To accept a. Press either of the PROGRAM this day press the green button.
  • Seite 15: Adjusting The Time

    OPERATING THE THERMOSTAT Choosing the Operating Mode to modify the set value. Note: This temperature override is cancelled at the The thermostat can operate in three different next programmed temperature change. modes: Automatic, Manual or Off. To set the operating mode press either of the AUTO, MAN or OFF buttons.
  • Seite 16 TROUBLESHOOTING THE THERMOSTAT Symptom Possible Cause Remedy The Thermostat receives 1) The Thermostat is not connected A flashing power supply from the to the correct terminals of the symbol appears on heating appliance, heating appliance. Check if the display within but no information.
  • Seite 17: Benutzerhandbuch

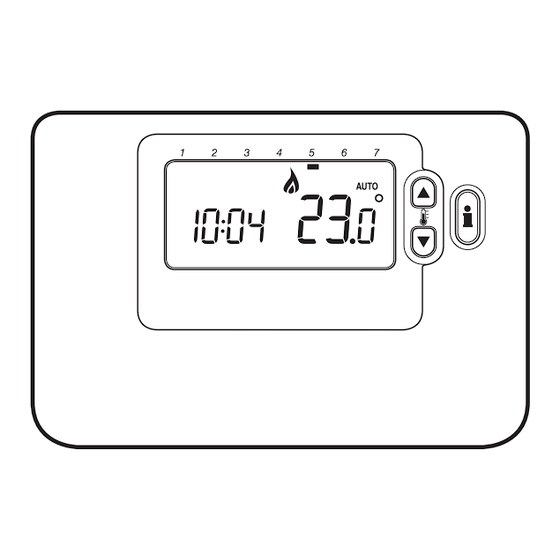
    BENUTZERHANDBUCH Beschreibung Ausstattungsmerkmale Ein programmierbarer Raum- • Ergonomische Benutzerschnittstelle mit „OK-Taste”. thermostat, der als wirksame Steuerung • Große LCD (Flüssigkristallanzeige). für Ihre Heizung entwickelt wurde • 7-Tage-Heizprogramm, das genau an Ihren und sorgt für eine gemütliche Wärme Lebensstil angepasst ist und dabei eine in Ihrem Zuhause und gleichzeitig größtmögliche Energieersparnis bewirkt.
  • Seite 18: Einstellen Des Raumthermostat

    EINSTELLEN DES RAUMTHERMOSTAT Dieser Abschnitt zeigt Ihnen in 2 einfachen Schritten, wie Sie den Raumthermostat einstellen und betreiben: SCHRITT 1: Einstellen von Tag und Uhrzeit Einstellen von Tag und Uhrzeit: a. Drücken Sie einmal die Taste DAY und die ‘Anzeige Tag’ beginnt zu blinken. b.
  • Seite 19 PROGRAMMIERUNG DES RAUMTHERMOSTAT Ändern des eingebauten Sie haben jetzt die Wahl, wie Sie Ihr Programm Heizprogramms für den nächsten Tag einstellen werden: f. i) Drücken Sie die Taste COPY DAY, um das a. Drücken Sie entweder die Tasten Programm vom Montag auf den Dienstag PROGRAM oder die Tasten zu kopieren.
  • Seite 20: Betrieb Des Raumthermostat

    BETRIEB DES RAUMTHERMOSTAT Auswählen des Betriebsmodus Temperatur manuell eingestellt werden, indem Sie die Tasten oder , oder die Taste Der Raumthermostat kann in drei drücken. Die ‘Zieltemperatur’ wird angezeigt verschiedenen Modi betrieben werden: und blinkt für 5 Sekunden – dabei kann mithilfe Automatisch, Manuell oder Off.
  • Seite 21: Störungsbehebung Raumthermostat

    STÖRUNGSBEHEBUNG RAUMTHERMOSTAT Symptom Mögliche Ursache Maßnahme Der Raumthermostat erhält 1) Das Raumthermostat Ein blinkendes Strom durch das Heizgerät ist nicht an die richtigen Symbol erscheint jedoch keine Informationen. Anschlüsse des Heizgerätes auf der Anzeige angeschlossen. Prüfen Sie die innerhalb der ersten Verdrahtung auf Richtigkeit.
  • Seite 22: Guía Del Usuario

    GUÍA DEL USUARIO Descripción Propiedades Un termostato de ambiente • Interfaz de usuario ergonómica programable que permite mostrada como “botón OK”. mantener una temperatura • Pantalla LCD (Pantalla de Cristal Líquido) de gran tamaño. confortable cuando se está • Programa de calefacción de 7 días para en casa y ahorrar energía adaptarse a su estilo de vida, maximizando cuando no se está.
  • Seite 23: Ajuste Del Termostato

    AJUSTE DEL TERMOSTATO Esta sección le indica cómo ajustar y hacer funcionar el termostato en 2 sencillos pasos: PASO 1: Ajuste del Día y la Hora Para ajustar el Día y la Hora: a. Pulse el botón DAY una vez y empezará a parpadear el “indicador de día”. b.
  • Seite 24 PROGRAMACIÓN DEL TERMOSTATO Modificación del Programa de de día “sin parpadear”, lo cual indica el día Calefacción de Fábrica copiado y el día deseado “parpadeando” en el cual hay que copiar el programa. Para cambiar el programa de calefacción Para aceptar este día pulse el botón verde de fábrica : .
  • Seite 25: Elección Del Modo De Funcionamiento

    FUNCIONAMIENTO DEL TERMOSTATO Elección del Modo de usarse el botón para modificar Funcionamiento el valor ajustado. Nota: Esta modificación de temperatura se cancela en el siguiente El termostato puede funcionar en tres modos cambio de temperatura programada. diferentes: Automático, Manual o Desactivado Para ajustar el modo de funcionamiento, pulse Utilización de las Funciones el botón AUTO, MAN u OFF.
  • Seite 26 SOLUCIÓN DE PROBLEMAS DEL TERMOSTATO Síntoma Causa posible Solución El Termostato recibe tensión 1) El Termostato no está conectado El símbolo del aparato de calefacción, a los bornes correctos del aparato aparece parpadeante pero no hay información. de calefacción. en la pantalla en Compruebe que el cableado el primer minuto esté...
  • Seite 27: Manuale Dell'utente

    MANUALE DELL’UTENTE Descrizione Caratteristiche Un termostato programmabile, • Interfaccia utente ergonomica dotata di un tasto “OK”. progettato per controllare in • Grande display LCD (Liquid Crystal Display) modo efficiente il sistema di • Programma di riscaldamento per 7 giorni conforme al riscaldamento e garantire una proprio stile di vita e con il massimo risparmio di energia.
  • Seite 28 CONFIGURAZIONE DEL TERMOSTATO Questa sezione mostra come configurare e far funzionare il Termostato con 2 semplici passaggi: FASE 1: Impostazione del giorno e dell’ora. Per impostare il giorno e l’ora: a. Premere una volta il tasto DAY : l’indicatore del giorno inizia a lampeggiare b.
  • Seite 29 PROGRAMMAZIONE DEL TERMOSTATO Modifica del programma di per il martedì. Il display si svuota, ad eccezione dell’indicazione del giorno ‘non riscaldamento di fabbrica lampeggiante’, che indica il giorno copiato Per modificare il programma di riscaldamento: e del giorno di destinazione ‘lampeggiante’ a.
  • Seite 30: Scelta Della Modalità Operativa

    USO DEL TERMOSTATO Scelta della modalità operativa Uso delle funzioni speciali Il Termostato può funzionare in tre diverse modalità: • Funzione VACANZA Automatica, Manuale e Off. Per impostare la La funzione Vacanza consente di modalità operativa, premere i tasti AUTO, MAN o impostare una temperatura costante OFF.
  • Seite 31 RISOLUZIONE DEI PROBLEMI DEL MODELLO TERMOSTATO Sintomo Possibile causa Azione La Termostato 1) Il Termostato non è collegato al Un simbolo riceve alimentazione corretto generatore dell’impianto lampeggiante dall’apparecchio di di riscaldamento. Controllare appare sul display riscaldamento, ma che il cablaggio Open Therm entro un minuto nessuna informazione.
  • Seite 32 42010941-024 AA...

Diese Anleitung auch für:

Navilink h55

Inhaltsverzeichnis