Inhaltsverzeichnis
Werbung
Verfügbare Sprachen
Verfügbare Sprachen
Quicklinks
Werbung
Inhaltsverzeichnis

Inhaltszusammenfassung für Noblex NR 1000
- Seite 1 SPORT OPTICS Mehr als 150 Jahre Erfahrung in Optik. NOBLEX NR 1000 ® Laserentfernungsmesser Laser Rangefinder Gebrauchsanleitung User Manual Mode d’emploi / Instruction d’utilisation Instrucciones para el uso Инструкции по эксплуатации...
- Seite 2 NOBLEX NR 1000...
- Seite 3 ACHTUNG Aufgrund der starken Bündelung des Lichtes kann eine direkte Beobachtung der Sonne mit einem Fernrohr zu Verletzungen der Augen führen und ist deshalb unbedingt zu vermeiden. NOTICE Due to the high and intense focussing of light a direct observation of the sun with the telescope may cause eye injuries and must by all means be avoided! ATTENTION...
- Seite 4 Hinweise zur Entsorgung von Geräten mit Elektronikanteil Geräte, die einen konstruktionsbedingten Elektroni- kanteil aufweisen, dürfen, wenn sie verbraucht sind, nicht mit gewöhnlichem Haushaltsabfall vermischt werden. Bringen Sie zur ordnungsgemäßen Behandlung, Rückgewinnung und Recycling diese Produkte zu den entsprechenden Sammelstellen, wo sie ohne Gebühren entgegengenommen werden.
-
Seite 5: Allgemeine Informationen
ALLGEMEINE INFORMATIONEN Der von Ihnen erworbene Laserentfernungsmesser ist ein Spitzenprodukt feinmechanisch - optischer Präzision. Er ist ein Produkt mit höchsten An- sprüchen an die optische Abbildungsleistung, nach neuestem Stand der Op- tikrechnung und Optiktechnologie gefertigt und solide in der Verarbeitung. Das Gerät ist für Brillenträger geeignet und wasserdicht. -
Seite 6: Bestandteile Des Gerätes
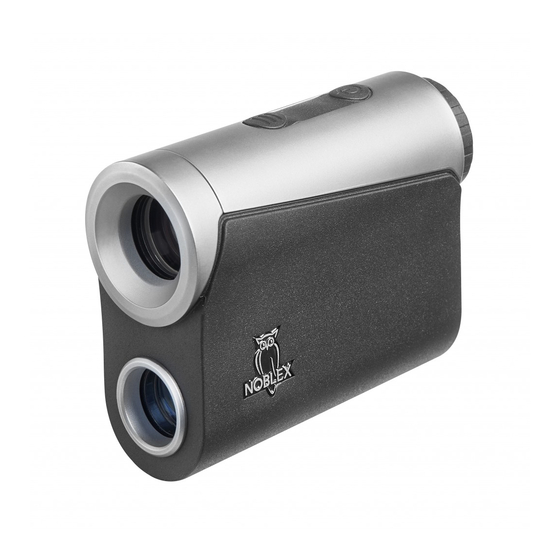
Max. Länge [mm] Max. Breite [mm] Masse [g] LIEFERUMFANG • Etui • Tragegurt • Batterie • NOBLEX Optikputztuch • Garantiekarte BESTANDTEILE DES GERÄTES A) Batteriefachkappe B) Okular mit Dioptrienring C) Einschalttaste D) Modustaste E) Objektivlinse und Laser-Empfangskanal F) Laser-Sendekanal INBETRIEBNAHME Einlegen und Entnehmen der Batterie Zuerst ist die Batteriefachkappe (A) abzuschrauben. -
Seite 7: Einschalten Und Ausschalten
EINSCHALTEN UND AUSSCHALTEN Zum Einschalten des Entfernungsmessers wird die Taste „ “ (C) betätigt. Die Abschaltung erfolgt stets automatisch. Nach dem erneuten Einschalten des Gerätes, befindet sich dieses im zuletzt verwendeten Modus. AUTOMATISCHE ABSCHALTUNG Wird über eine Zeit von 30 s keine Taste betätigt, schaltet sich das Gerät automatisch ab. -
Seite 8: Helligkeitssteuerung Der Anzeige
II. Regenmodus In diesem Modus wird die direkte Entfernung des Gerätes zum Zielob- jekt unter Regenbedingungen gemessen. Störende Regentropfen die das Messergebnis verfälschen könnten, werden bei diesem Programm herausgerechnet. III. Kurze Entfernungen : In diesem Modus wird die direkte Entfernung des Gerätes zu nahen Ziel- objekten gemessen. -
Seite 9: Wartung Und Pflege
MESSABLAUF Nachdem die Einschalttaste „ “ (C) betätigt wurde, muss der Kreis der ange- zeigten Zielmarke „ “ (1) auf das Zielobjekt ausgerichtet werden. Wird nun die Einschalttaste erneut betätigt, wird die Entfernung des Objektes gemessen und im Display angezeigt. Im Sichtfeld kann man die Aktivierung des Lasers dadurch erkennen, dass um den Kreis der Zielmarke herum das Symbol „... - Seite 10 Notes on the disposal of devices with electronic components Devices containing a build-up of electronic components may not be mixed with ordinary household waste after use. For proper treatment, recovery and recycling, take these products to the designated collection points, where they can be collected without charges.
-
Seite 11: General Information
GENERAL INFORMATION The laser rangefinder you have acquired is a top product with precision- mechanical parts. It is a product of the highest standards of optical imaging performance, according to the latest developments in the optical calculation and optical technology and is robust in processing. The device is also suitable for people who wear glasses and is protected against watertight. -
Seite 12: Scope Of Supply
SCOPE OF SUPPLY • Case • Carrying strap • Battery • NOBLEX optics cleaning cloth • Warranty card COMPONENTS OF THE DEVICE A) Battery compartment cap B) Eyepiece with diopter ring C) Switch-on button D) Mode button E) Objective lens and laser receiving channel... -
Seite 13: Measurement Modes
Switch-on and switch-off To switch on the rangefinder, press the “ ” (C) button. The switch-off is always done automatically. After switching the device on again, it is in the last used mode. Automatic switch-off If no button is pressed for a period of 30 seconds, the device switches itself off automatically. - Seite 14 II. Rain mode In this mode, the direct distance of the device to the target object under rain conditions is measured. By means of this program, the disturbing raindrops that could falsify the measurement result are eliminated. III. Near distance “Golf mode” : In this mode, the direct distance of the device to the near target object is measured.
- Seite 15 MEASURING SEQUENCE After the switch-on button “ ” (C) has been pressed, the circle of the dis- played target mark “ ” (1) must be aligned with the target object. If the switch-on button is pressed again, the distance of the object is mea- sured and shown in the display.
- Seite 16 Consignes relatives à l’élimination des dispositifs avec composants électro- niques Les appareils contenant des composants électroniques ne doivent pas être mélangés aux déchets ménagers habituels. Déposez ces produits dans des points de collecte appropriés afin qu‘ils soient traités, revalorisés et recyclés de manière professionnelle;...
-
Seite 17: Informations Générales
INFORMATIONS GÉNÉRALES Le télémètre à laser que vous avez acquis est un produit de pointe en matière de mécanique de précision ainsi que de précision optique. Il s’agit d‘un produit aux exigences les plus strictes aux performances d’imagerie optique, fabriqué conformément aux calculs et à la technologie optiques les plus récents. -
Seite 18: Étendue Des Fournitures
ÉTENDUE DES FOURNITURES • Étui • Sangle de transport • Batterie • Chiffon de nettoyage optique NOBLEX • Carte de garantie COMPOSANTS DE L’APPAREIL A) Couvercle de compartiment à piles B) Oculaire avec anneau dioptrique C) Bouton marche D) Bouton de mode E) Lentille de focalisation et canal de réception laser... -
Seite 19: Modes De Mesure
Mise en marche et à l’arrêt Pour la mise en marche du télémètre, il faut appuyer sur le bouton « » (C). La mise à l’arrêt se fait toujours automatiquement. Après une nouvelle mise en marche de l’appareil, ce dernier se remet dans le dernier mode sélectionné. - Seite 20 marche est actionné une nouvelle fois et que la mesure a réussi, alors la distance mesurée ainsi que l’angle d’inclinaison pendant la mesure sont retenus dans l’affichage. II. Mode pluie Ce mode permet de mesurer la distance entre l’appareil et l’objet-cible sous des conditions de pluie.
-
Seite 21: Unités De Mesure
de mode « » et on peut poursuivre sa mesure, respectivement repasser au mode souhaité. UNITÉS DE MESURE Avec le télémètre, il est possible de choisir entre les unités de mesure yard « Y » ou mètre « M » (3 ; 5). Pour changer l’unité de mesure de l’affichage de la distance, le bouton de mode «... -
Seite 22: Maintenance Et Entretien
MAINTENANCE ET ENTRETIEN Le télémètre ne requiert pas d’entretien particulier, il est pratiquement exempt de maintenance. Les surfaces optiques extérieures doivent être nettoyées avec un pinceau fin ou un chiffon doux en cas de besoin. Des par- ticules de saletés grossières doivent être rincées ou soufflés avant de pro- céder à... - Seite 23 Indicaciones para la eliminación de dispositivos con componentes electrónicos Los dispositivos que contienen una acumulación de componentes electrónicos, no deben eliminarse, una vez agotadas, mezcladas con la basura doméstica ordinaria. Para un tratamiento, recuperación y reciclaje adecua- dos, lleve estos productos a los puntos de recolección correspondientes, donde se recepcionarán y aceptarán de forma gratuita.
-
Seite 24: Informaciones Generales
INFORMACIONES GENERALES El medidor láser de distancias es un producto de vanguardia de mecánica fina, con una elevada precisión óptica. Es un producto con las máximas exi- gencias de reproducción óptica, fabricado de acuerdo con el último estado del cálculo y la tecnología ópticas y de construcción robusta. El equipo es adecuado para personas que usan gafas y es hermético al agua. -
Seite 25: Alcance Del Suministro
Estuche • Correa de transporte • Batería • Paño de limpieza de la óptica NOBLEX • Tarjeta de garantía COMPONENTES DEL EQUIPO A) Tapa del alojamiento de la batería B) Ocular con aro de corrección de dioptrías C) Tecla de encendido D) Tecla de modo E) Lente objetivo y canal de recepción del láser... -
Seite 26: Modos De Medición
Encendido y apagado Para encender el medidor de distancias se oprime la tecla “ ” (C). El apagado es automático. Cuando se vuelve a encender el equipo, éste está en el último modo utilizado. Apagado automático Si no se oprime tecla alguna dentro de los 30 segundos, el equipo se apaga automáticamente. - Seite 27 II. Modo de lluvia En este modo se mide la distancia directa hasta el objeto meta bajo condiciones de lluvia. Con este programa se eliminan por cálculo las gotas de lluvia que podrían falsificar el resultado. III. Distancias cercanas “Modo Golf” : En este modo se mide la distancia directa hasta objetos meta cercanos.
-
Seite 28: Mantenimiento Y Cuidado
DESARROLLO DE LA MEDICIÓN Una vez accionada la tecla de encendido “ ” (C), debe colocarse el círculo central de la cruz “ ” (1) sobre el objeto meta. Si ahora se oprime nuevamente la tecla de encendido, se mide la distancia al objeto y se muestra en la pantalla. - Seite 29 Указания по утилизации прицельных устройств с электронными компонентами Устройства, содержащие электронные компоненты, по окончании срока их эксплуатации запрещается ути- лизировать совместно с другими бытовыми отходами. Для надлежащей переработки, вторичного исполь- зования и утилизации доставьте данные продукты в соответствующие пункты сбора, где можно бесплатно сдать...
-
Seite 30: Общая Информация
ОБЩАЯ ИНФОРМАЦИЯ Данный лазерный дальномер является лучшим продуктом, сочетаю- щим в себе механическую и оптическую точность. Это продукт отвечает самым высокими требованиями к оптическим характеристикам изображения, изготовлен в соответствии с последними достижениями в области оптических расчетов и технологий и обладающий прочной конструкцией. -
Seite 31: Комплект Поставки
КОМПЛЕКТ ПОСТАВКИ • Футляр • Ремень для переноски • Батарейка • Салфетка для чистки оптических приборов NOBLEX • Гарантийный талон СОСТАВНЫЕ ЧАСТИ ПРИБОРА A) Крышка батарейного отсека B) Окуляр с диоптрийным кольцом C) Кнопка включения D) Кнопка режима E) Линза объектива и приемный канал лазера... - Seite 32 щайте диоптрийное кольцо до тех пор, пока целевой объект не будет отображаться четко и с высокой контрастностью. Включение и выключение Для включения дальномера нажать кнопку « » (С). Выключение всегда выполняется автоматически. осле повторного включения прибор нахо- дится в последнем использованном режиме. Автоматическое...
-
Seite 33: Регулировка Яркости Дисплея
исходя из угла между измерительным прибором, целевым объектом и горизонтальной плоскостью (см. заднюю обложку). Если еще раз нажать кнопку включения и измерение будет выполнено успешно, то измеренное расстояние, а также угол наклона во время измере- ния фиксируются на дисплее. II. Режим дождя В... -
Seite 34: Единицы Измерения
ЕДИНИЦЫ ИЗМЕРЕНИЯ Для дальномера можно выбрать ярды «Y» или метры «M» (3; 5). Для изменения единиц измерения отображения расстояния, нажать кнопку режима « » (D) и удерживать ее нажатой около 2 секунд. ПРОЦЕДУРА ИЗМЕРЕНИЯ После нажатия кнопки включения « » (C) круг отображаемой целевой метки... -
Seite 35: Техническое Обслуживание И Уход
ТЕХНИЧЕСКОЕ ОБСЛУЖИВАНИЕ И УХОД Лазерный дальномер не требует особого ухода и практически не требует технического обслуживания. Если это необходимо, то наруж- ные поверхности оптики следует чистить тонкой щеткой или мягкой салфеткой. Значительные загрязнения следует смыть или сдуть, после чего протереть. Чрезмерное трение при чистке оптических деталей может... - Seite 36 Durch ständige Weiterentwicklung unserer Erzeugnisse können Abweichun- gen von Bild und Text dieser Bedienungsanleitung auftreten. Die Wiedergabe – auch auszugsweise – ist nur mit unserer Genehmigung gestattet. Das Recht der Übersetzung behalten wir uns vor. Für Veröffentlichungen stellen wir Reproduktionen der Bilder, soweit vor- handen, gern zur Verfügung.
- Seite 38 NOBLEX GmbH Seerasen 2 D-98673 Eisfeld fon +49 (0) 3686 371-0 fax +49 (0) 3686 371-201 info@noblex-germany.com www.noblex-germany.com Stand / Release 11/2019 Art.-Nr. 508.080.093.24...