Herunterladen Inhalt Inhalt Diese Seite drucken

Werbung

Verfügbare Sprachen
  • DE

Verfügbare Sprachen

  • DEUTSCH, seite 1

Werbung

Inhaltsverzeichnis
loading

Inhaltszusammenfassung für auna multimedia AV2-CD608 BT

  • Seite 3: Konformitätserklärung

    Sehr geehrter Kunde, wir gratulieren Ihnen zum Erwerb Ihres Gerätes. Lesen Sie die folgenden Hinweise sorgfältig durch und befolgen Sie diese, um möglichen Schäden vorzubeugen. Für Schäden, die durch Missachtung der Hinweise und unsachgemäßen Gebrauch entstehen, übernehmen wir keine Haftung. INHALT Konformitätserklärung 3 Sicherheitshinweise 4...
  • Seite 4: Sicherheitshinweise

    SICHERHEITSHINWEISE • Reparaturen am Gerät sollten nur von einer autorisierten Fachwerkstatt durchgeführt werden. • Öffnen Sie in keinem Fall das Gerät. • Falscher Zusammenbau führt möglicherweise zu Fehlfunktionen oder dem Totalausfall. • Das Gerät sollte vor jeglichen Feuchtigkeit und direkter Sonneneinstrahlung geschützt werden.
  • Seite 5: Geräteübersicht

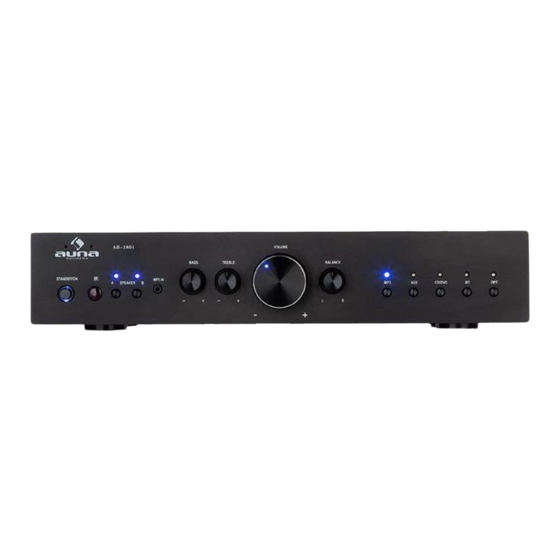
    GERÄTEÜBERSICHT Vorderseite Ein-/Ausschalter: Diese Taste betätigen, um den Verstärker ein- oder ausszuschalten 2 IR-Empfänger 3 Speaker A: Wahl des Lautsprechers A. 4 Speaker B: Wahl des Lautsprechers B. 5 MP3-Eingang: Stecken Sie den MP3-Stecker ein. 6 Bass +/- : Mit diesem Regler die Höhen einstellen. 7 Höhen +/- : Schließen Sie hier ein Mikrofon an.
  • Seite 6 Rückseite Anschluss für Frontlautsprecher (B): Anschluss an den Frontlautsprecher (B), wobei die Impedanz gleich oder größer als 6-16 OHM ist. 2 Anschluss für Frontlautsprecher (A): Schließen Sie den Frontlautsprecher (A) an, wobei die Impedanz gleich oder größer als 6-16 OHM ist. 3 Optisch: Anschluss an den optischen Audioausgang.
  • Seite 7 Fernbedienung 18. Vorwärts/tuning+ Tasten für die Verwendung des 19. A-b CD-Player 20. Speicher 21. Wiederholen STANDBY 22. 22. PLAY/PAUSE 2 Quelle 3 Öffnen/schließen Tasten für die Verwendung der 4 Zahlentasten Verstärker 5 Stereo/Mono 6 Kanal + 1. Standby 7 Zurück/tuning- 12.
  • Seite 8 INBETRIEBNAHME Systemverbindung Die Lautsprecherimpedanz muss korrekt sein, da sonst dieses Gerät oder dieser Lautsprecher beschädigt werden könnte. 2. Lassen Sie nicht zu, dass die freien Lautsprecherkabel einander oder andere Metallteile berühren, da dies das Gerät oder die Lautsprecher beschädigen könnte. 3.
  • Seite 9: Funktionen

    FUNKTIONEN Wählen Sie die Audioquelle aus, indem Sie die Taste INPUT auf der Fernbedienung oder die Tasten Mp3, AUX, CD/DVD, BT, OPTICAL auf der Frontplatte drücken. 2. Stellen Sie den Knopf LAUTSTÄRKE auf der Frontplatte oder die Taste VOL+1 auf der Fernbedienung ein, um die Einstellung des Hauptlautstärkereglers auf Ihren Hörpegel einzustellen.
  • Seite 10 FEHLERBEHEBUNG Problem Mögliche Ursache Lösungsvorschlag Die Anzeige leuchtet Netzkabel nicht richtig Überprüfen Sie das nicht und es gibt eingesteckt. Netzkabel und die keinen Ausgangston. Steckerverbindung Das Display leuchtet, Lautsprecheranschlüsse Verbinden Sie die aber es gibt keinen nicht richtig verbunden. Lausprecheranschlüsse Ton.
  • Seite 11: Declaration Of Conformity

    Dear Customer, Congratulations on purchasing this equipment. Please read this manual carefully and take care of the following hints to avoid damages. Any failure caused by ignoring the mentioned items and cautions mentioned in the instruction manual are not covered by our warranty and any liability.
  • Seite 12: Safety Instructions

    SAFETY INSTRUCTIONS • Repairs to the unit should only be carried out by an authorised specialist workshop. • Never attempt to open the device. • Incorrect assembly may result in malfunction or total failure. • The device should be protected from all moisture and direct sunlight. •...
  • Seite 13 OVERVIEW Front view Standy/ON Switch: Press this switch to turn the unit on or off remote sensor. 2 IR receiver signal head 3 Speaker A Selector: Press this switch to select speaker A. 4 Speaker B Selector: Press this switch to select speaker B. 5 MP3 INPUT: Insert MP3 plug.
  • Seite 14 Rear panel FRONT SPEAKER (B) TERMINAL: Connect to front speaker(B), the impedance equal or more than 6-16 OHM. 2 FRONT SPEAKER (A) TERMINAL: Connect to front speaker(A), the impedance equal or more than 6-16 OHM. 3 OPTICAL: Connect to the optical audio output 4 REC AUDIO OUTPUT JACK: Connect to REC signal input jack.
  • Seite 15 Remote control 18 F.WARD/TUNING+ Buttons for CD-Player use 19 A-B STANDBY 20 MENORY 2 SOURCE 21 REPEAT 3 0PEN/CLOSE 22 PLAY/PAUSE 4 NUMBER BUTTON 5 STEREO/MONO Buttons for Amplifier Use 6 CHANNEL+ l.STANDBY 7 B.WARD/TUNING- 12.VOLUME+ 8 STOP 13.INPUT 9 USB 14.VOLUME- 10 CHANNEL- 15.MUTE...
  • Seite 16 PREPARATION System connection The speaker impedance should be correct (read ,,Speaker Choice"),or this unit or speakers could be damaged. 2. Do not let the bare speaker wires touch each other or any other metal parts as this could damage this unit or speakers. 3.
  • Seite 17 FUNCTIONS Select audio source by pressing the INPUT key on the remote control or the Mp3,AUX,CD/DVD,BT, OPTICAL on the front panel. 2. Adjust the knob VOLUME on the front panel or the key VOL+l- on the remote control to adjust the setting of the main volume control to your listening level.
  • Seite 18 TROUBLESHOOTING Problem Possible Cause Suggested Solution The display does not light Power cord not plugged Check power cord & and there is no output in securely. is no output sound plug sound. connection. Display lights but sound is Speaker connections not Connect securely.
  • Seite 19: Inhaltsverzeichnis

    Chère cliente, cher client, Toutes nos félicitations pour l’acquisition de ce nouvel appareil. Veuillez lire attentivement et respecter les instructions de ce mode d’emploi afin d’éviter d’éventuels dommages. Nous ne saurions être tenus pour responsables des dommages dus au non-respect des consignes et à...
  • Seite 20: Consignes De Sécurité

    CONSIGNES DE SÉCURITÉ • Les réparations sur l'appareil ne peuvent être effectuées que par un professionnel autorisé. • N'ouvrez en aucun cas l'appareil. • Un assemblage incorrect peut provoquer des dysfonctionnements ou une panne définitive de l'appareil. • L'appareil doit être protégé de toute humidité et de l'ensoleillement direct.
  • Seite 21: Aperçu De L'appareil

    APERÇU DE L‘APPAREIL Face avant Bouton de marche/arrêt : appuyez sur cette touche pour allumer ou éteindre l'amplificateur 2 Capteur IR 3 Enceinte A: choix de l'enceinte A. 4 Enceinte B: choix de l'enceinte B. 5 Entrée MP3: branchez la fiche MP3. 6 Basses +/- : réglez les basses avec ce bouton.
  • Seite 22 Dos de l'appareil Prise de l'enceinte avant (B) : Connectez l’enceinte avant (B) avec une impédance égale ou supérieure à 6-16 ohms. 2 Prise de l'enceinte avant (A) : Connectez l’enceinte avant (A) avec une impédance égale ou supérieure à 6-16 ohms. 3 Optique : connexion à...
  • Seite 23 Télécommande 19. A-b Touches de commande du lecteur 20. Mémoire 21. Répétition STANDBY 22. Lecture/pause 2 Source 3 Ouverture/fermeture Touches de commande de 4 Touches numériques l‘amplificateur 5 Stéréo/Mono 6 Canal + 1. Veille 7 Retour/tuning- 12. Volume + 8 Stop 13.
  • Seite 24: Mise En Marche

    MISE EN MARCHE Connexion du système L'impédance des enceintes doit être correcte, faute de quoi cet appareil ou ces enceintes pourraient être endommagés. 2. Ne laissez pas les câbles d'enceinte entrer en contact entre eux ou toucher d'autres pièces métalliques, car cela pourrait endommager l'appareil ou les enceintes.
  • Seite 25: Fonctions

    FONCTIONS Sélectionnez la source audio en appuyant sur la touche INPUT de la télécommande ou sur les touches Mp3, AUX, CD / DVD, BT, OPTICAL du panneau avant. 2. Réglez le bouton VOLUME du panneau avant ou la touche VOL + 1 de la télécommande pour régler le volume principal sur votre niveau d’écoute.
  • Seite 26: Résolution Des Problèmes

    RÉSOLUTION DES PROBLÈMES Problème Cause possible Solution L'indicateur ne s'allume Le cordon d’alimentation Vérifiez le cordon pas et il n'y a pas de n’est pas branché d'alimentation et la fiche tonalité de sortie. correctement. L'écran est allumé mais Les enceintes ne sont pas Connectez les bornes il n'y a pas de son.
  • Seite 27: Declaración De Conformidad

    Estimado cliente, Le felicitamos por la adquisición de este producto. Lea atentamente el siguiente manual y siga cuidadosamente las instrucciones de uso con el fin de evitar posibles daños. La empresa no se responsabiliza de los daños ocasionados por un uso indebido del producto o por haber desatendido las indicaciones de seguridad : ÍNDICE...
  • Seite 28: Indicaciones De Seguridad

    INDICACIONES DE SEGURIDAD • Las reparaciones deberán ser realizadas por personal técnico autorizado. • No abra el aparato en ningún caso. • Un montaje deficiente conlleva una avería en el aparato o daños permanentes. • El aparato debe estar protegido de la humedad y de la luz directa del sol.
  • Seite 29: Descripción Del Aparato

    DESCRIPCIÓN DEL APARATO Parte delantera Interruptor encender / apagar: Pulse este botón para encender o apagar el amplificador 2 Receptor IR 3 Altavoz A: Selecciona el altavoz A. 4 Altavoz B: Selecciona el altavoz B. 5 Entrada de MP3: Enchufe un conector de MP3. 6 Bass +/- : Ajustar los agudos con este regulador.
  • Seite 30 Parte trasera Conexión para el altavoz delantero (B): conexión al altavoz delantero (B) donde la impedancia es igual o superior a 6-16 ohmios. 2 Conexión para el altavoz delantero (A): conexión al altavoz delantero (A) donde la impedancia es igual o superior a 6-16 ohmios. 3 Óptica: Conexión a la salida de audio óptica.
  • Seite 31 Mando a distancia 19. A-b Touches de commande du lecteur 20. Memoria 21. Repetir STANDBY 22. PLAY/PAUSE 2 Fuente 3 Abrir/cerrar Botón para utilizar el amplificador 4 Teclado numérico 5 Estéreo/Mono 1. Standby 6 Canal + 12. Volumen + 7 Regresar/sintonizar- 13.
  • Seite 32: Puesta En Marcha

    PUESTA EN MARCHA Conexión al sistema La impedancia de los altavoces debe ser correcta, pues de lo contrario el aparato o este altavoz podrían dañarse. 2. No permita que los cables pelados del altavoz se toquen entre sí o con otras piezas metálicas, pues el aparato o el altavoz podrían dañarse.
  • Seite 33: Funciones

    FUNCIONES Seleccione la fuente de audio presionando el botón INPUT en el mando a distancia o los botones MP3, AUX, CD/DVD, BT, OPTICAL en la parte delantera. 2. Regule el botón VOLUMEN de la parte delantera o pulse el botón VOL+1 del mando a distancia para ajustar el regulador principal de volumen como desee.
  • Seite 34: Resolución De Problemas

    RESOLUCIÓN DE PROBLEMAS Problema Posible causa Solución recomendada La pantalla no se El cable de alimentación Compruebe el cable de ilumina y no emite no está conectado alimentación y la conexión ningún sonido. correctamente. a la toma La pantalla se ilumina, Las conexiones del Conecte correctamente pero no se emite...
  • Seite 35: Dichiarazione Di Conformità

    Gentile Cliente, La ringraziamo per aver acquistato il dispositivo. La preghiamo di leggere attentamente le seguenti istruzioni per l’uso e di seguirle per evitare possibili danni tecnici. Non ci assumiamo alcuna responsabilità per danni scaturiti da una mancata osservazione delle avvertenze di sicurezza e da un uso improprio del dispositivo.
  • Seite 36: Avvertenze Di Sicurezza

    AVVERTENZE DI SICUREZZA • Le riparazioni al dispositivo devono essere realizzate solo da aziende tecniche autorizzate. • Non aprire il dispositivo in nessun caso. • Un assemblaggio sbagliato può causare malfunzionamenti o guasti. • Il dispositivo deve essere protetto da umidità e luce solare diretta. •...
  • Seite 37: Descrizione Del Dispositivo

    DESCRIZIONE DEL DISPOSITIVO Lato anteriore Interruttore On/Off: premere questo tasto per accendere o spegnere l’amplificatore. 2 Ricevitore IR 3 Speaker A: selezionare l’altoparlante A 4 Speaker B: selezionare l’altoparlante B 5 Ingresso MP3: inserire il connettore MP3. 6 Bass +/-: regolare i bassi. 7 Alti +/-: regolare gli alti.
  • Seite 38 Lato posteriore Collegamento per altoparlante frontale (B): collegamento dell’altoparlante frontale (B), con impedenza uguale o maggiore di 6-16 OHM. 2 Collegamento per altoparlante frontale (A): collegamento dell’altoparlante frontale (A), con impedenza uguale o maggiore di 6-16 OHM. 3 Ottico: collegamento all’uscita audio ottica. 4 Uscita audio REC: collegamento all’ingresso del segnale REC.
  • Seite 39 Telecomando 20. Memoria Tasti per controllare il lettore CD 21. Ripetere STANDBY 22. PLAY/PAUSE 2 Fonte 3 Aprire/Chiudere Tasti di controllo amplificatore 4 Tasti numerici 5 Stereo/Mono 1. Standby 6 Canale+ 12. Volume + 7 Indietro/Tuning- 13. Ingresso 8 Stop 14.
  • Seite 40: Messa In Funzione

    MESSA IN FUNZIONE Collegamento del sistema L’impedenza degli altoparlanti deve essere corretta, altrimenti possono risultare danni agli altoparlanti o all’amplificatore. 2. Non lasciare che i cavi degli altoparlanti liberi si tocchino tra loro o tocchino componenti metalliche, altrimenti si potrebbero danneggiare altoparlanti o dispositivo.
  • Seite 41 FUNZIONI Selezionare la fonte audio premendo INPUT sul telecomando o MP3, AUX, CD/DVD, BT, OPTICAL sul panello frontale. 2. Regolare il volume con la manopola VOLUME sul pannello frontale o con VOL+1 sul telecomando. 3. Premere il tasto SPEAKER AIB sul davanti del dispositivo per selezionare la modalità...
  • Seite 42: Correzione Degli Errori

    CORREZIONE DEGLI ERRORI Problema Possibile causa Soluzione consigliata Il display non si Il cavo dell’alimentazione Controllare il cavo illumina e non ci sono non è inserito di alimentazione e il suoni in uscita. correttamente. collegamento della spina. Il display si illumina, Altoparlanti non connessi Collegare correttamente ma non c’è...

Inhaltsverzeichnis