Herunterladen Inhalt Inhalt Diese Seite drucken
Inhaltsverzeichnis

Werbung

Verfügbare Sprachen
  • DE

Verfügbare Sprachen

  • DEUTSCH, seite 18
Garment Steamer
User Manual
STM 4116 B
EN DE FR TR ES
PL RO IT AR
01M-8817073200-3419-01

Werbung

Inhaltsverzeichnis
loading

Inhaltszusammenfassung für Beko STM 4116 B

  • Seite 1 Garment Steamer User Manual STM 4116 B EN DE FR TR ES PL RO IT AR 01M-8817073200-3419-01...
  • Seite 2 CONTENTS ENGLISH 8-17 DEUTSCH 18-31 FRANÇAIS 32-42 TÜRKÇE 43-56 ESPAÑOL 57-69 POLSKI 70-82 ROMANIAN 83-95 ITALIANO 96-108 2 / EN Garment Steamer / User Manual...
  • Seite 4 “cl ck” “lock”...
  • Seite 5 8 m n. Auto-O “2 sec.” “cl ck” 1 hour...
  • Seite 6 OPERATION CLEANING AND CARE BETRIEB REINIGUNG UND PFLEGE FONCTIONNEMENT NETTOYAGE ET ENTRETIEN KULLANIM TEMİZLİK VE BAKIM FUNCIONAMIENTO LIMPIEZA Y CUIDADOS OBSŁUGA CZYSZCZENIE I KONSERWACJA UTILIZARE CURĂ AREA ȘI ÎNGRIJIREA UTILIZZO PULIZIA E CURA ‫التشغيل‬ ‫التنظيف والعناية‬...
  • Seite 7: Meanings Of The Symbols

    2. Steam lock button 3. Steam button Dear Customers, 4. Water tank Thank you for selecting a Beko product. We 5. Water tank housing hope that you get the best results from your 6. Power switch product which has been manufactured with 7.
  • Seite 8: Important Safety And Environmen- Tal Instructions

    1 Important safety and environmen- tal instructions This section contains safety instructions that will help protect from risk of personal injury or material dam- age. Failure to follow these instructions invalidates the granted warranty. 1.1 General safety This appliance complies with the international •...
  • Seite 9 1 Important safety and environmen- tal instructions Unplug the appliance and wait for it to cool be- • fore removing or reinstalling the brush acces- sory. Do not put the appliance on its head piece when • it is in use or plugged in. Place the appliance on a stable and flat surface.
  • Seite 10 1 Important safety and environmen- tal instructions Only use the original parts or parts recom- • mended by the manufacturer. Do not attempt to dismantle the appliance. • Your mains power supply should comply with • the information given on the rating plate of the appliance.
  • Seite 11 1 Important safety and environmen- tal instructions Do not use the appliance in or near the areas • where combustible or inflammable places and materials exist. If you keep the packaging materials, store them • out of the reach of children. Do not leave the appliance unattended while •...
  • Seite 12: Compliance With Weee Directive And Disposing Of The Waste Product

    1 Important safety and environmen- tal instructions 1.2 Compliance with WEEE Directive and Disposing of the Waste Product This product complies with EU WEEE Directive (2012/19/EU). This product bears a classifica- tion symbol for waste electrical and electronic equipment (WEEE). This symbol indicates that this product shall not be disposed with other house- hold wastes at the end of its service life.
  • Seite 13: Operation

    2 Operation 2.1 Intended use This appliance is intended only for household use, removing the creases on your clothes and for various textile products including curtains; it is not suitable for professional use. 2.2 Before first use • Remove any sticker or protective cover from the steam head. •...
  • Seite 14 2 Operation When there is not enough water in the tank, the pump will automatically stop working within 25-35 seconds (Noise is normal during this process). Finally, “No water in the tank” icon blinks. 2.4 How to steam your garment It can be used on most fabrics as long as the fabric is hanging or where the garment steamer can be easily used in an upright position moving over the fabric in an up and down motion.
  • Seite 15 2 Operation 2.6 To steam upholstery • The garment steamer can be used to help freshen up upholstery, slipcovers and cushions. Before steaming, always test on a small area of the subject that is not visible. • For better results when removing stubborn creases, continuously steam over the selected area until creases are removed.
  • Seite 16: Cleaning And Maintenance

    3 Cleaning and maintenance 3.1 Cleaning and care • Never use gasoline, solvent and abrasive cleaning agents or hard brush to clean this appliance. • Do not put the garment steamer in water or any other liquid. • Do not drop, throw or try to bend the steamer. •...
  • Seite 17: Troubleshooting

    4 Troubleshooting Problem Possible solution The steamer does not heat up • Check main plug is inserted correctly. • Check power supply. • Check power button. The steamer does not produce steam • Check the water level and the water tank inlet cover is properly covered.
  • Seite 18 Informationen Anleitung! nützliche Tipps in Bezug auf die Sehr geehrte Kundin, sehr geehrter Kunde, Verwendung. Vielen Dank, dass Sie sich für ein Beko- WARNUNG: Warnhinweise Produkt entschieden haben. Wir hoffen, zu gefährlichen Situationen im dass Sie mit diesem Produkt, das mit den Hinblick auf die Sicherheit von höchsten Qualitätsanforderungen und der...
  • Seite 19: Anzeigebildschirm

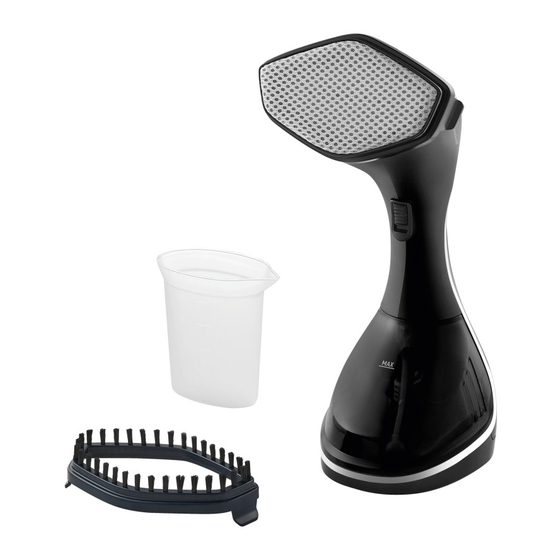
    Technische Daten 1. Heizplatte 2. Dampfsperrtaste Stromversorgung: 3. Dampfauslöser 220-240 V~, 50-60 Hz 4. Wassertank Leistung: 1400-1600 W 5. Basis für den Wassertank 6. Ein- / Austaste 7. Betriebsanzeige Technische und optische Änderungen 8. Aufsatz für empfindliche Textilien und vorbehalten. zum Entfernen von Staub 9.
  • Seite 20: Wichtige Anweisungen Zu Sicher- Heit Und Umwelt

    1 Wichtige Anweisungen zu Sicher- heit und Umwelt Dieser Abschnitt enthält Sicherheitsanweisungen, die beim Schutz vor Personen- und Sachschäden helfen. Bei Nichtbeachtung dieser Anweisungen erlischt die gewährte Garantie. 1.1 Allgemeine Sicherheit Dieses Gerät erfüllt die internationalen Sicher- • heitsstandards. Dieses Gerät kann von Kindern ab 8 Jahren sowie •...
  • Seite 21 1 Wichtige Anweisungen zu Sicher- heit und Umwelt Ziehen Sie den Netzstecker und warten Sie, • bis sich das Gerät abgekühlt hat, bevor Sie die Bürste entfernen oder erneut installieren. Gerät während der Benutzung oder bei An- • schluss an die Stromversorgung nicht auf das Kopfteil stellen.
  • Seite 22 1 Wichtige Anweisungen zu Sicher- heit und Umwelt Halten Sie Gerät und Netzkabel bei der Benut- • zung oder während des Abkühlens von Kindern unter 8 Jahren fern. Nur Originalteile und vom Hersteller empfoh- • lene Teile verwenden. Nicht versuchen, das Gerät zu demontieren. •...
  • Seite 23 1 Wichtige Anweisungen zu Sicher- heit und Umwelt Netzkabel nicht um das Gerät wickeln. • Gerät oder Netzstecker nicht mit feuchten oder • gar nassen Händen berühren, wenn das Gerät an die Stromversorgung angeschlossen ist. Gerät nicht an oder in der Nähe von Stellen be- •...
  • Seite 24: Einhaltung Der Weee-Richtlinie Und Entsorgung Von Altgeräten

    1 Wichtige Anweisungen zu Sicher- heit und Umwelt Ziehen Sie den Netzstecker während des Befül- • lens / Entleerens von Wasser oder bei Nichtge- brauch. Halten Sie den Dampf nicht an Teile, die elekt- • rische Komponenten enthalten, wie z.B. inner- halb der Öfen.
  • Seite 25: Bedienung

    1 Wichtige Anweisungen zu Sicher- heit und Umwelt 1.4 Hinweise zur Verpackung Die Verpackungsmaterialien des Produkts sind gemäß unseren nationalen Umweltschutzbestimmungen aus recyclingfähigen Materialien hergestellt. Entsorgen Sie die Verpackungsmaterialien nicht mit dem Hausmüll oder ande- rem Müll. Bringen Sie sie zu einer von der Stadtverwaltung bereitgestellten Sammelstelle für Verpackungsmaterial.
  • Seite 26 2 Bedienung 2.3 Montage/Bedienung Ihrer Dampfbürste • Beim Befüllen des Wassertanks den maximalen Füllstand nicht über- schreiten. • Drücken Sie die Ein-/Austaste (6); das blaue Licht der Betriebsanzeige blinkt und das Gerät beginnt sich zu erwärmen. Sie können die Dampf- bürste in Betrieb nehmen, wenn das blaue Licht aufhört zu blinken und das blaue Licht bleibt, was anzeigt, dass die Vorwärmung beendet ist.
  • Seite 27: Zum Dämpfen Von Vorhängen

    2 Bedienung • Du wirst Vibrationen spüren und ein subtiles Summen beim Dämpfen hören; dies ist normal. Der Dampf sollte von Ihnen wegfließen. • Stellen Sie sicher, dass der zu dämpfende Stoff während des Dämpfens gedehnt wird, um beste Ergebnisse zu erzielen. WARNHINWEISE •...
  • Seite 28 2 Bedienung WARNHINWEISE • Wenn das Kleidungsstück Metallzubehör hat, seien Sie vorsichtig und legen Sie die Dampfbürste nicht direkt über das Metall, da dies das Metall verfärben kann. • Stecken Sie immer die Dampfbürste aus, bevor Sie die Aufsätze anbringen oder abnehmen.
  • Seite 29: Reinigung Und Wartung

    3 Reinigung und Wartung 3.1 Reinigung und Pflege • Gerät niemals mit Benzin, Lösungsmitteln und scheuernden Reinigungs- mitteln oder harten Bürsten reinigen. • Stellen Sie die Dampfbürste nicht in Wasser oder eine andere Flüssigkeit. • Lassen Sie die Dampfbürste nicht fallen, werfen Sie ihn nicht und versu- chen Sie nicht, ihn zu verbiegen.
  • Seite 30: Fehlerbehebung

    4 Fehlerbehebung Problem Mögliche Lösung Die Dampfbürste erwärmt sich nicht • Überprüfen Sie, ob der Netzstecker richtig ein- gesteckt ist. • Überprüfen Sie die Stromversorgung. • Ein-/Austaste prüfen. Die Dampfbürste erzeugt keinen Dampf • Überprüfen Sie den Wasserstand und ob der Wassertank-Einlass richtig abgedeckt ist.
  • Seite 31 A-1230, Wien http://at.beko.com/ Sehr geehrter Kunde! Vielen Dank, dass Sie sich für ein Qualitätsprodukt von Beko entschieden haben! Unsere Geräte werden nach den neuesten technischen Erkenntnissen entwickelt, produziert und geprüft. Sollte trotzdem eine Störung auftreten, so bitten wir Sie, sich mit Ihrem Fachhändler bzw. mit der Verkaufsstelle in Verbindung zu setzen.
  • Seite 32: Caractéristiques Techniques

    2. Bouton de verrouillage vapeur 3. Bouton vapeur Chers clients, 4. Réservoir à eau Merci d' a voir choisi les produits Beko. Nous 5. Boîtier du réservoir d’ e au espérons que ce produit, fabriqué dans des 6. Interrupteur installations modernes et soumis à un processus 7.
  • Seite 33 1 Instructions importantes pour la sécurité et l'environnement Cette section contient des consignes de sécurité qui permettent de se prémunir contre les risques de bles- sures corporelles ou de dégâts matériels. Le non-respect de ces consignes annule la garantie. 1.1 Consignes générales de sécurité Cet appareil est conçu selon les normes interna- •...
  • Seite 34: Instructions Importantes Pour La Sécurité Et L'environnement

    1 Instructions importantes pour la sécurité et l'environnement Débranchez l’appareil et attendez qu’il refroi- • disse avant de retirer ou de réinstaller l’acces- soire brosse. Ne posez pas l’ a ppareil sur son support lorsqu’il • est en cours d’utilisation ou branché. Installez l’...
  • Seite 35 1 Instructions importantes pour la sécurité et l'environnement Utiliser uniquement des pièces d’origine ou • pièces recommandées par le fabricant. N’ e ssayez pas de démonter l’ a ppareil. • Assurez-vous que votre source d’alimentation • électrique soit conforme aux informations spé- cifiées sur la plaque signalétique de votre appa- reil.
  • Seite 36 1 Instructions importantes pour la sécurité et l'environnement Évitez de toucher l’ a ppareil ou sa prise avec des • mains humides ou mouillées lorsqu’il est bran- ché. N’utilisez pas l’appareil à proximité des lieux et • matériaux combustibles ou inflammables. Si vous conservez les matériaux d’emballage, •...
  • Seite 37: Conformité Avec La Directive Deee Et Mise Au Rebut Des Déchets

    1 Instructions importantes pour la sécurité et l'environnement Ne retirez pas le réservoir d’ e au pendant l’ u tili- • sation. 1.2 Conformité avec la directive DEEE et mise au rebut des déchets : Ce produit est conforme à la directive DEEE (2012/19/UE) de l’Union européenne). Ce produit porte un symbole de classification pour la mise au rebut des équipements électriques et élec- troniques (DEEE).
  • Seite 38: Utilisation Prévue

    2 Fonctionnement 2.1 Utilisation prévue Cet appareil est destiné uniquement à un usage domestique, pour éliminer les plis sur vos vêtements et divers produits textiles, y compris les rideaux ; il ne convient pas à un usage pro- fessionnel. 2.2 Avant la première utilisation •...
  • Seite 39 2 Fonctionnement • Appuyez de nouveau sur le bouton d’ a limentation (6), pour activer le mode vapeur économie d’ é nergie (ECO), le voyant correspondant s’ a llume en continu. • Le défroisseur vapeur dispose d’ u ne fonction intelligente de mise hors tension automatique.
  • Seite 40 2 Fonctionnement AVERTISSEMENT • Le défroisseur vapeur produit de la vapeur à haute température. Ne tou- chez pas la tête de vaporisation, assurez-vous que le défroisseur vapeur n’ e st pas tourné vers vous et qu’il se trouve en position verticale. •...
  • Seite 41: Nettoyage Et Entretien

    3 Nettoyage et entretien 3.1 Nettoyage et entretien • N’ u tilisez jamais d’ e ssence, de solvant ou d’ a gent nettoyant abrasif ou de brosse dure pour nettoyer votre défroisseur. • N’immergez pas le défroisseur vapeur dans l’ e au ou tout autre liquide. •...
  • Seite 42: Dépannage

    4 Dépannage Problème Solution possible Le défroisseur à vapeur ne • Vérifiez que la fiche principale est correctement chauffe pas insérée. • Vérifiez l’ a limentation électrique. • Vérifiez le bouton d’ a limentation. Le défroisseur à vapeur ne • Vérifiez le niveau d’ e au et assurez-vous que le cou- produit pas de vapeur vercle d’...
  • Seite 43 Bu kılavuzu okumadan ürününüzü çalıştırmayınız. Ürününüz ile ilgili garanti şartları, kullanımı ve sorun giderme yöntemleri kılavuzda yer almaktadır. Uygun Kullanım ve Garanti ile İlgili Dikkat Edilmesi Gereken Hususlar; Aşağıda belirtilen sorunların giderilmesi ücret karşılığında yapılır. Bu durumlar için garanti şartları uygulanmaz; 1.
  • Seite 44: Teknik Veriler

    Lütfen önce bu kılavuzu okuyun! 1. Ön yüz 2. Buhar kilidi düğmesi Değerli Müşterimiz, 3. Buhar düğmesi Beko ürününü tercih ettiğiniz için teşekkür 4. Su haznesi ederiz. Yüksek kalite ve teknoloji ile üretilmiş 5. Su haznesi yuvası olan ürününüzün size en iyi verimi sunmasını...
  • Seite 45: Önemli Güvenlik Ve Çevre Talimatları

    1 Önemli güvenlik ve çevre talimatları Bu bölümde, kişisel yaralanma ya da maddi zarar ris- kini önlemeye yardımcı olacak güvenlik talimatları yer almaktadır. Bu talimatlara uyulmaması halinde her türlü garanti geçersiz hale gelir. 1.1 Genel güvenlik Bu cihaz uluslararası güvenlik standartları ile •...
  • Seite 46 1 Önemli güvenlik ve çevre talimatları Fırça aksesuarını çıkarmadan veya tekrar tak- • madan önce cihazın fişini çekin ve soğumasını bekleyin. Kullanım esnasında veya fişe takılıyken cihazı • başlık kısmına koymayın. Cihazı düz ve sağlam bir yüzeyin üzerine yerleştirin. Cihaz kullanımdayken sıcak buhar emisyonuna •...
  • Seite 47 1 Önemli güvenlik ve çevre talimatları Cihazı sökmeye çalışmayın. • Ana güç kaynağınız, cihazın anma değeri plaka- • sında verilen bilgilere uygun olmalıdır. Cihazın şebeke beslemesi minimum 30 mA si- • gorta ile emniyete alınmalıdır. Cihazı topraklı bir prizle kullanın. •...
  • Seite 48: Aeee Yönetmeliğine Uyum Ve Atık Ürünün Elden Çıkarılması

    1 Önemli güvenlik ve çevre talimatları Su doldurma işlemini talimatlara göre gerçek- • leştirin. Elektrik kablosu veya cihaz hasarlıysa cihazı kul- • lanmayın. Yetkili servis ile iletişime geçin. Su doldurma/tahliye işlemleri esnasında veya • kullanılmıyorken cihazı fişe takmayın. Fırın içi gibi elektrikli bileşen içeren parçaları bu- •...
  • Seite 49: Kullanım Amacı

    2 Kullanım 2.1 Kullanım amacı Bu cihaz yalnızca, kıyafetlerinizdeki ve perdeler dahil çeşitli tekstil ürünlerindeki kırışıkların giderilmesi adına ev içinde kullanılmak üzere tasarlanmıştır; profesyonel kullanım için uygun değildir. 2.2 İlk kullanımdan önce • Buhar başlığında bulunan yapışkan veya koruyucu kaplamayı çıkartın. •...
  • Seite 50 2 Kullanım • Depoda yeterli su olmadığında, pompa 25-35 saniye içinde otomatik ola- rak durur (Bu işlem sırasında gürültü normaldir). Sonrasında “Depoda su yok” simgesi yanıp söner. 2.4 Buharın giysilere uygulanması Kumaşın asılı durumda olması veya buharlı kırışık gidericinin yukarı ve aşağı yönde kumaş üze- rinde dik konumda kullanılabildiği durumlarda birçok kumaş...
  • Seite 51 2 Kullanım 2.5 Buharın perdelere uygulanması • Perdeleri, kumaş türüne bağlı olarak, belirtilen şekilde yıkayıp kurulayın. • Perdeleri asın ve asılı konumda buhar verin. 2.6 Buharın döşemelere uygulanması • Buharlı kırışık giderici, koltuk minderlerinin ve mobilya örtülerinin temizlenmesinde yardımcı olarak kullanılabilir. Buhar işlemini uygulamadan önce, buharı, ürünün görünmeyen küçük bir noktasında deneyin.
  • Seite 52: Temizlik Ve Bakım

    3 Temizlik ve bakım 3.1 Temizlik ve bakım • Bu cihazı temizlemek için asla benzin, solvent, aşındırıcı temizlik malzeme- leri veya sert fırça kullanmayın. • Buharlı kırışık gidericiyi su veya diğer sıvıların içine batırmayın. • Buharlı kırışık gidericiyi düşürmeyin, fırlatmayın veya bükmeye çalışmayın. •...
  • Seite 53: Sorun Giderme

    4 Sorun giderme Sorun Muhtemel çözüm Buharlı kırışık giderici ısınmıyor • Ana fişin takılı olup olmadığını kontrol edin. • Güç kaynağını kontrol edin. • Güç düğmesini kontrol edin. Buharlı kırışık giderici buhar • Su seviyesini ve su haznesinin giriş kapağını üretmiyor kontrol edin.
  • Seite 54 * Yasal düzenlemelere uygun, objektif, adil ve gizlilik içinde ele alır ve değerlendiririz. * Bu geri bildirimleri süreçlerimizin daha mükemmel hale getirilmesinde kullanırız. • Beko olarak, mükemmel müșteri deneyimini yașatmayı ana ilke olarak kabul eder, müșteri odaklı bir yaklașım benimseriz.
  • Seite 55 Hizmet talebinin değerlendirilmesi Müșteri Bașvurusu Web sitesi 444 0 888 Yetkili Servis musteri.hizmetleri Yetkili Satıcı Faks @beko.com Çağrı merkezi 0216 423 23 53 Bașvuru kaydı Bașvuru Konusu Müșteri Adı, Soyadı Müșteri Telefonu Müșteri Adresi Hizmet talebinin alınması - Hizmet talebi analizi - Hizmet hakkında müșterinin bilgilendirilmesi...
  • Seite 56 Markası: Beko Cinsi: Buharlı Kırışık Giderici Adresi: Arçelik A.Ş. Karaağaç Caddesi No:2-6, 34445, Sütlüce / İSTANBUL Modeli: STM 4116 B Telefonu: (0-216) 585 8 888 Bandrol ve Seri No: Faks: (0-216) 423 23 53 Garanti Süresi: 2 YIL web adresi: www.beko.com.tr...
  • Seite 57: Significado De Los Símbolos

    2. Botón de bloqueo de vapor 3. Botón de vapor Estimados clientes, 4. Depósito del agua Gracias por escoger un producto Beko. 5. Carcasa del depósito de agua Esperamos que obtenga los mejores resultados 6. Interruptor de encendido de nuestro producto, que ha sido fabricado con 7.
  • Seite 58: Instrucciones Importantes Para La Seguridad Y El Medio Ambiente

    1 Instrucciones importantes para la seguridad y el medio ambiente Este apartado contiene instrucciones de seguri- dad que ayudarán a la protección contra los ries- gos de lesiones personales o daños a la propiedad. El incumplimiento de estas instrucciones causará la pérdida de la garantía.
  • Seite 59 1 Instrucciones importantes para la seguridad y el medio ambiente Desenchufe el aparato y espere a que se enfríe • antes de retirar o volver a instalar el accesorio del cepillo. No coloque el aparato sobre el cabezal cuando • esté...
  • Seite 60 1 Instrucciones importantes para la seguridad y el medio ambiente Utilice únicamente accesorios originales o bien • los que recomiende el fabricante. No trate de desmontar el aparato. • Su fuente de alimentación debe cumplir con la • información que figura en la placa de caracte- rísticas del electrodoméstico.
  • Seite 61 1 Instrucciones importantes para la seguridad y el medio ambiente No utilice el aparato en lugares con materiales u • objetos combustibles o inflamables, o cerca de ellos. Si guarda el material de embalaje, manténgalo • fuera del alcance de los niños. No deje el aparato desatendido mientras esté...
  • Seite 62: Conformidad Con La Normativa Weee Y Eliminación Del Aparato Al Final De Su Vida Útil

    1 Instrucciones importantes para la seguridad y el medio ambiente 1.2 Conformidad con la normativa WEEE y eliminación del aparato al final de su vida útil: Este producto es conforme con la directiva de la UE sobre residuos de aparatos eléctricos y electrónicos (WEEE) (2012/19/UE).
  • Seite 63: Uso Previsto

    2 Funcionamiento 2.1 Uso previsto Este aparato está destinado exclusivamente al uso doméstico, eliminando las arrugas de la ropa y de diversos productos textiles, incluidas las cortinas; no es apto para uso profesional. 2.2 Antes del primer uso • Retire cualquier etiqueta adhesiva o cubierta protectora del cabezal de vapor. •...
  • Seite 64 2 Funcionamiento • La plancha de vapor vertical tiene una función inteligente de apagado au- tomático. Cuando el usuario deja de utilizar este producto durante más de 8 minutos, el producto del circuito de control interno quedará sin suminis- tro de energía, los productos entrarán en el modo de espera, lo que puede garantizar una mayor seguridad y ahorro de energía.
  • Seite 65 2 Funcionamiento 2.5 Para planchar las cortinas con vapor • Lave y seque las cortinas tal y como se indican en las instrucciones, según el tipo de tejido. • Cuelgue las cortinas y aplique el vapor cuando estén colgadas en su lugar. 2.6 Para planchar la tapicería con vapor •...
  • Seite 66: Limpieza Y Mantenimiento

    3 Limpieza y mantenimiento 3.1 Limpieza y cuidados • Nunca use gasolina, productos de limpieza disolventes y abrasivos o un cepillo duro para limpiar la plancha. • No sumerja la plancha de vapor vertical en agua ni en ningún otro tipo de líquido.
  • Seite 67: Resolución De Problemas

    4 Resolución de problemas Problema Posible solución La plancha de vapor vertical no se • Compruebe que el enchufe principal esté co- calienta rrectamente conectado. • Compruebe la fuente de alimentación. • Compruebe el botón de encendido. La plancha de vapor vertical no • Compruebe el nivel de agua y que la tapa de produce vapor entrada del depósito de agua esté...
  • Seite 68                                                   ...
  • Seite 69                                                  ...
  • Seite 70: Znaczenie Symboli

    2. Przycisk blokady pary 3. Przycisk pary Szanowni Klienci! 4. Zbiornik na wodę Dziękujemy za wybranie produktu firmy Beko. 5. Obudowa zbiornika na wodę Mamy nadzieję, że wyrób ten, wyprodukowany 6. Przełącznik zasilania przy użyciu najnowszych technologii wysokiej 7.
  • Seite 71 1 Ważne instrukcje zachow- ania bezpieczeństwa i ochrony środowiska naturalnego Niniejszy rozdział zawiera instrukcje bezpieczeń- stwa, które pomagają uniknąć obrażeń ciała i uszkodzeń mienia. Nieprzestrzeganie tych instrukcji spowoduje unie- ważnienie udzielonej gwarancji. 1.1 Ogólne zasady zachowania bezpieczeństwa Urządzenie jest zgodne z międzynarodowymi •...
  • Seite 72 1 Ważne instrukcje zachow- ania bezpieczeństwa i ochrony środowiska naturalnego Dzieci nie powinny go czyścić ani konserwować, chyba że są pod nadzorem osoby dorosłej. Odłącz urządzenie od prądu i odczekaj, aż osty- • gnie, a następnie przystąp do zdjęcia lub zało- żenia szczotki.
  • Seite 73 1 Ważne instrukcje zachow- ania bezpieczeństwa i ochrony środowiska naturalnego Urządzenie nie nadaje się do stosowania na ze- • wnątrz budynków. Jeżeli urządzenie nie jest używane lub zostało • pozostawione do ostygnięcia, należy przecho- wywać je wraz z przewodem zasilającym poza zasięgiem dzieci poniżej 8 lat.
  • Seite 74 1 Ważne instrukcje zachow- ania bezpieczeństwa i ochrony środowiska naturalnego Nie należy wyjmować wtyczki z gniazdka, cią- • gnąc za przewód zasilający. Należy wyjąć wtyczkę z gniazdka przed przystą- • pieniem do czyszczenia urządzenia lub uzupeł- nienia poziomu wody. Nie wolno owijać przewodu wokół urządzenia. •...
  • Seite 75 1 Ważne instrukcje zachow- ania bezpieczeństwa i ochrony środowiska naturalnego Urządzenia nie wolno używać, jeśli jest uszko- • dzone lub uszkodzony jest jego przewód zasila- jący. Należy się skontaktować z autoryzowanym punktem serwisowym. Urządzenie należy odłączyć od gniazdka pod- • czas wlewania/spuszczania wody lub gdy nie jest używane.
  • Seite 76: Ważne Instrukcje Zachow- Ania Bezpieczeństwa I Ochrony Środowiska Naturalnego

    1 Ważne instrukcje zachow- ania bezpieczeństwa i ochrony środowiska naturalnego 1.3 Zgodność z dyrektywą RoHS: Niniejszy wyrób jest zgodny z dyrektywą Parlamentu Europejskiego i Rady RoHS (Ograniczenie użycia substancji niebezpiecznych) (2011/65/WE). Nie zawiera szkodliwych i zakazanych ma- teriałów, podanych w tej dyrektywie. 1.4 Informacje o opakowaniu Opakowanie tego wyrobu wykonano z materiałów nadających się...
  • Seite 77: Przed Pierwszym Użyciem

    2 Obsługa 2.1 Przeznaczenie Urządzenie jest przeznaczone wyłącznie do użytku domowego, usuwania zagnieceń z ubrań i różnych produktów tekstylnych, m.in. zasłon. Nie nadaje się do zastosowań profesjonalnych. 2.2 Przed pierwszym użyciem • Usuń naklejki lub osłonę ochronną z głowicy parowej. •...
  • Seite 78 2 Obsługa • Parownica do ubrań posiada funkcję inteligentnego automatycznego wy- łączania. Jeżeli użytkownik nie będzie obsługiwał tego produktu dłużej niż 8 minut, zasilanie wewnętrznego obwodu sterowania zostanie odłączone i urządzenie przejdzie do trybu czuwania. Zapewnia to większe bezpie- czeństwo i oszczędność energii. W tym czasie na wyświetlaczu miga nie- bieska ikona „Automatycznego wyłączania”.
  • Seite 79 2 Obsługa 2.5 Prasowanie zasłon • Upierz i wysusz zasłony zgodnie z zaleceniami, w zależności od rodzaju tkaniny. • Prasuj zasłony już powieszone na miejscu. 2.6 Prasowanie tapicerki • Parownica do ubrań może być używana do odświeżania tapicerki, pokrowców na meble i poduszek.
  • Seite 80: Czyszczenie I Konserwacja

    3 Czyszczenie i konserwacja 3.1 Czyszczenie i pielęgnacja • Do czyszczenia urządzenia nie wolno używać benzyny, rozpuszczalnika, ściernych środków czyszczących ani twardych szczotek. • Nie wkładaj parownicy do ubrań do wody lub innych płynów. • Nie upuszczaj, nie rzucaj i nie próbuj zginać parownicy. •...
  • Seite 81: Rozwiązywanie Problemów

    4 Rozwiązywanie problemów Problem Możliwe rozwiązanie Parownica się nie nagrzewa • Sprawdź, czy wtyczka jest poprawnie włożona. • Sprawdź zasilanie. • Sprawdź przycisk zasilania. Parownica nie wytwarza pary • Sprawdź poziom wody oraz czy pokrywa wlotu zbiornika na wodę jest poprawnie nałożona. • Mocniej naciśnij przycisk aktywacji pary.
  • Seite 83: Semnificaţia Simbolurilor

    Stimați clienți, 4. Rezervor de apă Vă mulțumim pentru selectarea unui produs 5. Carcasă rezervor de apă Beko. Sperăm să obţineţi cele mai bune 6. Întrerupător rezultate de la produsul dumneavoastră, care a 7. Ecran pentru afișaj fost fabricat la o calitate înaltă şi cu tehnologii 8.
  • Seite 84 1 Instrucțiuni importante referitoare la siguranță și mediu înconjurător Această secțiune conține instrucțiuni de siguranță care vă vor ajuta să vă protejați de riscul vătămărilor personale sau a pagubelor materiale. Nerespectarea acestor instrucțiuni anulează garanția furnizată. 1.1 Siguranţă generală Acest produs este conform cu standardele •...
  • Seite 85 1 Instrucțiuni importante referitoare la siguranță și mediu înconjurător Scoateți aparatul din priză și așteptați să se ră- • cească înainte de a-i îndepărta sau reinstala ac- cesoriul pentru periere. Nu sprijiniți aparatul pe capul său în timpul uti- • lizării sau atunci când acesta este conectat la priză.
  • Seite 86 1 Instrucțiuni importante referitoare la siguranță și mediu înconjurător Atunci când aparatul nu este utilizat sau este • lăsat să se răcească, mențineți produsul împre- ună cu cablul său de alimentare departe de copii cu vârsta mai mică de 8 ani. Utilizați doar componentele originale sau com- •...
  • Seite 87 1 Instrucțiuni importante referitoare la siguranță și mediu înconjurător Nu înfășurați cablul de alimentare în jurul pro- • dusului. În momentul când produsul este conectat la • priză, nu atingeți produsul sau ștecherul aces- tuia cu mâinile umede. Nu utilizați niciodată produsul în sau lângă zone •...
  • Seite 88: Conformitate Cu Directiva Rohs

    1 Instrucțiuni importante referitoare la siguranță și mediu înconjurător Nu îndreptați vaporii către piese conținând • componente electrice, precum interiorul cup- toarelor. Nu îndepărtați rezervorul de apă în timpul uti- • lizării. 1.2 Conformitate cu Directiva WEEE şi depozitarea la deşeuri a produsului uzat: Acest produs respectă...
  • Seite 89: Destinația De Utilizare

    2 Utilizarea 2.1 Destinația de utilizare Acest aparat este destinat numai pentru uzul casnic, îndepărtarea cutelor de pe haine și alte materiale textile, inclusiv draperii; produsul nu este recomandat pentru uz profesional. 2.2 Înainte de prima utilizare • Îndepărtați orice etichetă autocolantă sau capac de protecție de pe capul pentru abur. •...
  • Seite 90 2 Utilizarea • Aparatul de călcat cu abur are o funcție inteligentă de oprire automată. Atunci când utilizatorul nu mai folosește produsul timp de mai mult de 8 minute, circuitul intern de control va opri alimentarea iar produsul va intra în modul standby, prezentând astfel o mai mare siguranță...
  • Seite 91 2 Utilizarea 2.5 Pentru călcarea cu abur a draperiilor • Spălați și uscați draperiile conform materialului din care sunt fabricate. • Agățați draperiile și, în această poziție, deplasați aburul deasupra lor. 2.6 Pentru călcarea cu abur a tapițeriei • Aparatul de călcat cu abur poate fi utilizat pentru a reîmprospăta tapițeria, husele si pernele. Înainte de a porni aburul, testați întotdeauna aparatul pe o mică...
  • Seite 92: Curățarea Și Întreținerea

    3 Curățarea și întreținerea 3.1 Curățare și îngrijire • Nu utilizați benzină, solvent, agenți de curățare abrazivi sau raclete dure pentru curățarea produsului. • Nu introduceți aparatul de călcat cu abur în apă sau în alte lichide. • Nu scăpați, nu aruncați și nu încercați să îndoiți aparatul. •...
  • Seite 93 4 Depanarea Problemă Soluție posibilă Aparatul nu se încălzește • Verificați dacă ștecărul principal este introdus corect. • Verificați alimentarea cu energie. • Verificați butonul de pornire. Aparatul nu produce vapori. • Verificați nivelul de apă și capacul de admisie apă în rezervor să...
  • Seite 96: Significato Dei Simboli

    2. Pulsante blocco vapore 3. Pulsante vapore Gentile Cliente, 4. Serbatoio dell’ a cqua Grazie per aver scelto un prodotto Beko. Ci 5. Alloggiamento serbatoio dell’ a cqua auguriamo che riesca ad ottenere i risultati 6. Tasto accensione migliori da questo prodotto, realizzato con 7.
  • Seite 97: Istruzioni Importanti Per La Sicurez- Za E L'ambiente

    1 Istruzioni importanti per la sicurez- za e l'ambiente La presente sezione contiene istruzioni di sicurez- za che consentono di prevenire il pericolo di lesioni o danni a cose. L’inosservanza di queste istruzioni invalida la ga- ranzia accordata. 1.1 Sicurezza generale Questo apparecchio risulta conforme agli stan- •...
  • Seite 98 1 Istruzioni importanti per la sicurez- za e l'ambiente Scollegare l’apparecchio e aspettare che si raf- • freddi prima di rimuoverlo o riattaccare la spaz- zola. Non porre l’apparecchio sulla parte di testa • quando è in uso o collegato alla corrente. Met- tere l’apparecchio su una superficie solida e piatta.
  • Seite 99 1 Istruzioni importanti per la sicurez- za e l'ambiente Quando l' a pparecchio è in uso o si sta raffred- • dando, tenerlo con il cavo di alimentazione fuori dalla portata dei bambini di età inferiore agli 8 anni. Usare solo parti originali o quelle consigliate dal •...
  • Seite 100 1 Istruzioni importanti per la sicurez- za e l'ambiente Non avvolgere il cavo intorno all’ a pparecchio. • Non toccare l’ a pparecchio o la spina con le mani • bagnate o umide quando è collegato alla rete. Non utilizzare l’apparecchio all’interno o nei •...
  • Seite 101: Conformità Alla Direttiva Weee E Allo Smaltimento Dei Rifiuti

    1 Istruzioni importanti per la sicurez- za e l'ambiente Non rimuovere il contenitore d’acqua durante • l’ u so. 1.2 Conformità alla direttiva WEEE e allo smaltimento dei rifiuti: Questo apparecchio è conforme alla Direttiva UE WEEE (2012/19/EU). Questo apparecchio riporta il simbolo di classificazione per i rifiuti delle apparecchiature elettriche ed elettroniche (WEEE).
  • Seite 102: Funzionamento

    2 Funzionamento 2.1 Uso previsto Questo apparecchio è destinato al solo uso domestico, rimuovendo pieghe sui vestiti e su altri prodotti tessili differenti come tende; non è adatto all’ u so professionale. 2.2 Prima del primo utilizzo • Rimuovere qualsiasi adesivo o copertura di protezione dalla testina del vapore. •...
  • Seite 103 2 Funzionamento • Il vaporizzatore di tessuti ha una funzione intelligente di spegnimento automatico. Qualora l’ u tente arresta il funzionamento dell’ a pparecchio per più di 8 minuti, il circuito di controllo interno interromperà l’ a limenta- zione e il prodotto entrerà nella modalità stand by, garantendo sicurezza e risparmio energetico.
  • Seite 104 2 Funzionamento 2.6 Stirare tappezzeria • Il ferro a vapore per indumenti può essere utilizzato per rinfrescare tappezzerie, fodere e cuscini. Prima di utilizzare il vapore, testare su un’ a rea piccola non visibile. • Per risultati migliori in caso di pieghe ostinate, stirare in modo continuato sul tessuto finché...
  • Seite 105: Pulizia E Manutenzione

    3 Pulizia e manutenzione Pulizia e manutenzione • Non utilizzare mai gasolio, solventi e agenti abrasivi o spazzole dure per pulire questo apparecchio. • Non porre il vaporizzatore in acqua o altro liquido. • Non buttare a terra, lanciare o piegare il vaporizzatore. •...
  • Seite 106: Risoluzione Dei Problemi

    4 Risoluzione dei problemi Problema Possibile soluzione Il vaporizzatore non si riscalda • Verificare che la spina sia inserita corretta- mente nella presa. • Verificare l’ a limentazione • Verificare il pulsante di accensione. Il vaporizzatore non genera vapore • Verificare il livello dell’ a cqua e che il coper- chio del serbatoio dell’...
  • Seite 107 Condizioni di Garanzia 1. BEKO Italy S.r.l. garantisce l’ a pparecchio per un periodo di 2 anni dalla data di acquisto (12 mesi se acquistato con fattura di vendita e non con scontrino fiscale).
  • Seite 108 Si intendono a pagamento anche tutti gli eventuali trasporti necessari per lo svolgimento degli interventi legati ai casi citati. Il Servizio Assistenza di BEKO Italy S.r.l. è l’ u nico autorizzato a riparare i prodotti a marchio BEKO. Per ogni controversia è competente il foro di Milano.
  • Seite 109 ‫4 حل المشكالت‬ ‫الحل المحتمل‬ ‫المشكلة‬ ‫تحقق من إدخال قابس التيار الرئيسي‬ .‫المكواة البخارية ال تسخن‬ .‫بطريقة صحيحة‬ .‫تحقق من مزود الطاقة‬ .‫تحقق من زر الطاقة‬ ‫تحقق من مستوى الماء ومن تغطية غطاء‬ ‫المكواة البخارية ال تنتج بخارً ا‬ .‫مدخل خزان الماء‬ .‫اضغط...
  • Seite 110 ‫3 الصيانة والتنظيف‬ ‫1.3 التنظيف والعناية‬ • ‫ال تستخدم أب د ً ا الجازولين، أو مواد التنظيف المذيبة أو التي تؤدي‬ .‫إلى التآكل أو الفرشاة الخشنة لتنظيف هذا الجهاز‬ • .‫ال تغمر مكواة المالبس البخارية في الماء أو أي سائل آخر‬ .‫ال...
  • Seite 111 ‫2 التشغيل‬ ‫تحذيرات‬ • ‫تولد مكواة المالبس البخارية بخار ذا درجات حرارة عالية. ال‬ ‫تلمس رأس خروج البخار، وتأكد من أن الجهاز موج ه ً ا بعي د ً ا عنك‬ .‫في وضع مستقيم‬ • ‫ومع ذلك، عليك استخدام الفرشاة الشبكية (8) عند كي األقمشة‬ .‫الناعمة...
  • Seite 112 ‫2 التشغيل‬ • ‫تتمتع مكواة المالبس البخارية بخاصية إيقاف التشغيل التلقائي‬ ‫الذكي. عندما يتوقف المستخدم عن استخدام هذا المنتج ألكثر من‬ ‫8 دقائق، سيتم قطع دائرة التحكم الداخلية الخاصة بالمنتج عن‬ ‫مصدر الطاقة، وسوف يدخل المنتج في وضع االستعداد وذلك‬ ‫من...
  • Seite 113 ‫2 التشغيل‬ ‫1.2 االستخدام المرغوب‬ ‫هذا الجهاز م ُعد لالستخدام المنزلي فقط، لفرد ثنيات مالبسك وللمنسوجات المختلفة‬ .‫بما في ذلك الستائر ؛ وليس لالستخدام المهني‬ ‫2.2 قبل أول استخدام‬ • .‫أزل أي ملصق أو غطاء واقي على رأس خروج البخار‬ •...
  • Seite 114 ‫1 تعليمات مهمة للسالمة والبيئة‬ ‫2.1 االلتزام بالتشريعات الخاصة بنفايات المعدات الكهربائية‬ :‫واإللكترونية والتخلص من نفايات المنتجات‬ ‫يتوافق هذا المنتج مع التشريعات الخاصة بنفايات المعدات الكهربائية واإللكترونية‬ ‫). يحمل هذا المنتج رمز ً ا تصنيف ي ً ا لنفايات‬EU/2012/19( ‫لالتحاد األوروبي‬ .)WEEE( ‫المعدات...
  • Seite 115 ‫1 تعليمات مهمة للسالمة والبيئة‬ ‫ال تلمس الجهاز أو القابس أبد ا ً ويداك مبتلتان أو رطبتان‬ • .‫عندما يكون الجهاز متص ال ً بمصدر الطاقة‬ • ‫ال تستخدم الجهاز في أو بالقرب من األماكن والمواد القابلة‬ .‫لالحتراق، أو سريعة االحتراق‬ •...
  • Seite 116 ‫1 تعليمات مهمة للسالمة والبيئة‬ ‫قد يصبح الجهاز ساخ ن ً ا بسبب انبعاث البخار الساخن وهذا‬ • .‫قد يتسبب لك بحروق إذا قمت بمالمسته‬ • ‫إذا سقط الجهاز أو حدث به تسرب للماء أو حدث به عطل‬ ‫آخر، اتصل بقطاع الخدمة المعتمد. ال تستخدم الجهاز ما‬ .
  • Seite 117 ‫1 تعليمات مهمة للسالمة والبيئة‬ ‫يحتوي هذا القسم على تعليمات السالمة التي ستساعدك على‬ .‫تجنب خطر إصابة األفراد أو اإلضرار بالممتلكات‬ .‫عدم اتباع هذه التعليمات يؤدي إلى إبطال الضمان الممنوح‬ ‫1.1 السالمة العامة‬ • .‫يتوافق هذا الجهاز مع معايير السالمة الدولية‬ •...
  • Seite 118 ‫البيانات الفنية‬ ‫اللوحة األمامية‬ ‫زر قفل البخار‬ ،~‫مزود الطاقة: 042-022 فولت‬ ‫زر البخار‬ ‫06-05 هرتز‬ ‫خزان الماء‬ ‫مبيت خزان الماء‬ ‫الطاقة: 0061-0041 وات‬ ‫مفتاح الطاقة‬ ‫شاشة العرض‬ ‫حقوق التعديالت الفنية وتعديالت التصميم‬ ‫فرشاة شبكية‬ .‫محفوظة‬ ‫فرشاة قماشية‬ ‫شاشة العرض‬ .‫ال يوجد ماء في الخزان‬ ‫السيارات...
  • Seite 119 :‫من دليل المستخدم هذا‬ ،‫عزيزي العميل‬ ‫شكرً ا لك على شرائك هذا المنتج من‬ ‫معلموات هامة أو‬ ‫. نأمل أن تحصل على أفضل النتائج‬Beko ‫تنويهات مفيدة عن‬ ‫من جهازك والذي قد تم تصنيعه بأعلى‬ .‫االستخدام‬ ‫جودة وبأحدث التقنيات. ولذلك، يرجى‬...
  • Seite 120 ‫المحتويات‬ 5-13 ‫عربى‬ 2 / AR ‫مكواة البخارية / دليل المستخدم‬...
  • Seite 121 ‫مكواة البخارية‬ ‫دليل المستخدم‬ STM 4116 B 01M-8817073200-3419-01...

Inhaltsverzeichnis