
Verwandte Anleitungen für mothercare my first convertible


Inhaltszusammenfassung für mothercare my first convertible
- Seite 1 3 in 1 walker user guide IMPORTANT! KEEP FOR FUTURE REFERENCE COMBINED_3_IN_1_CAR_WALKER_SEAT.indd 1 2/7/09 16:23:21...
- Seite 2 The Mothercare My First Convertible 3 in 1 car walker can be used as a bouncer, walker and push along entertainment unit for children who are eager to walk. Only use the 3 in 1 car walker in walker or bouncer mode when your child can sit up unaided, from approximately 6 months of age.
-
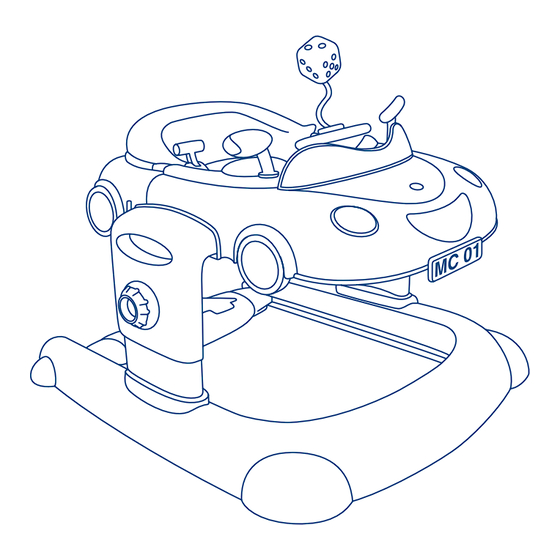
Seite 3: Parts Checklist
parts checklist lower base and kick pad seat and rear bumper support legs(2) main body Includes alphabet stickers to create the number plate of your choice. toy unit COMBINED_3_IN_1_CAR_WALKER_SEAT.indd 3 2/7/09 16:23:22... -
Seite 4: Preparation For Use
A. preparation for use seat and rear bumper assembly Please assemble the seat and rear bumper unit before attempting to construct the main unit Locate the rear of the back rest into the slot at the reverse of the seat and rear bumper unit, then clip the front of the back rest into place. - Seite 5 A. preparation for use Pull both of the safety ties through the appropriate slots. Turn the unit over and stretch the safety ties over the 2 raised locating points ensuring they are tightened by pulling back on the fabric cover. Firmly press the 2 ball studs into the sockets either side of the seat and rear bumper unit.
- Seite 6 preparation for use assembling the 3 in 1 car walker Squeeze together the 2 release levers in the centre of the kick pad and slide it along the runners to the back of the base until it clicks into place and forms a square.
- Seite 7 preparation for use assembling the 3 in 1 car walker Rest the main body on its side and push each support leg into the slots on either side until they click into place. Make sure they are secure by tugging on each support leg.
- Seite 8 preparation for use attaching the toys Before attaching the toy unit to the main body, turn the toy unit over and insert 3 AA batteries into the battery compartment on the underside. You’ll need a small cross head screwdriver to open the battery cover.
- Seite 9 preparation for use attaching the seat Slide the rear bumper and seat to the main body until the red buttons clip into place. COMBINED_3_IN_1_CAR_WALKER_SEAT.indd 9 2/7/09 16:23:25...
- Seite 10 in use There are three different ways to use the 3 in 1 car walker. The walker mode allows your child to use the 3 in 1 car walker as an interactive support. The bouncer mode allows your child to bounce up and down rather than walk. Once your child can walk unaided, the push along mode allows your child to use the 3 in 1 car walker as a fun walking support.
- Seite 11 in use using your 3 in 1 car walker as a bouncer Set the dial on each leg to bounce. Squeeze together the 2 release levers in the centre of the kick pad and slide it along the runners to the centre of the base until it clicks into place.
- Seite 12 in use using your 3 in 1 car walker as a push along walking support Ensure the dial on each leg support is set to lock and that the same number is visible in both windows. Squeeze together the 2 release levers in the centre of the kick pad and slide it along the runners to the front of the base until it clicks into place.
- Seite 13 in use adjusting the height of the 3 in 1 car walker There are three height options for the 3 in 1 car walker when used in walker or push along mode. Height adjustment should never be attempted whilst the 3 in 1 car walker is in use.
-
Seite 14: Removing The Seat Cover
B. removing the seat cover While pressing the 2 red buttons on either side of the walker slide the rear bumper and seat out of the main body. Release the 2 ball studs from the sockets either side of the seat and rear bumper unit. - Seite 15 B. removing the seat cover Pull both of the safety ties through the appropriate slots. Turn the unit over and release the rings from between the 2 raised points, pushing them back through the slots. Release the 4 sets of touch fasteners. COMBINED_3_IN_1_CAR_WALKER_SEAT.indd 15 2/7/09 16:23:29...
- Seite 16 B. removing the seat cover Squeeze the 4 safety harness ends together and pass them through the metal retainers. Pull the fabric cover over the back rest to release the seat cover. Please ensure you follow the wash care instructions on the seat cover’s care label.
-
Seite 17: Care Of Your Product
care of your product The main body of the 3 in 1 car walker can be cleaned by sponging with warm water and a mild detergent. Never clean with abrasive, ammonia based, bleach based or spirit type cleaners. Do not submerge the seat, or toy unit in water. The 3 in 1 car walker must be dried thoroughly before using or storing. - Seite 18 If you have a problem with this product or require any replacement parts, please contact your nearest Mothercare store or telephone the Mothercare Customer Care Line on 08453 30 40 30 alternatively write to: Customer Care Mothercare Cherry Tree Road Watford Herts.
- Seite 19 COMBINED_3_IN_1_CAR_WALKER_SEAT.indd 19 2/7/09 16:23:32...
- Seite 20 6 Le trotteur voiture 3 en 1 My First Convertible de Mothercare peut être Avant de fixer la tablette de jeux à la partie principale, retournez-la et utilisé comme sauteur, trotteur et jouet à pousser pour les enfants qui insérez les 3 piles AA dans le compartiment à...
- Seite 21 Mothercare. de suivre les instructions de lavage sur l’étiquette de la housse de siège. • Utilisez uniquement des pièces de rechange fournies par Mothercare. D’autres pièces pourraient rendre le trotteur voiture 3 en 1 dangereux. La partie principale de votre trotteur voiture 3 en 1 peut être nettoyée à...
- Seite 22 Überblick Bevor Sie sie am Hauptteil anbringen, drehen Sie die Spielzeugeinheit Der 3 in 1 Babywalker Mein Erstes Cabrio von Mothercare kann um und legen 3 AA Batterien in das Batteriefach an der Unterseite als Hopser, Babygeher und für laufeifrige Kinder als Spiel- und ein.
- Seite 23 Sie bitte die Verwendung des 3 in 1 Babywalkers Auto ein. Folgen Sie nach dem Waschen diesem Vorgang in umgekehrter • Werden die Gummikissen entfernt, müssen Sie von neuen Mothercare- Reihenfolge und achten Sie darauf, dass alle Sicherheitseinrichtungen Gummikissen ersetzt werden.
- Seite 24 Παιχνίδια εισαγωγή εικ 6 Η στράτα 3 σε 1 «Το πρώτο μου κάμπριο» της Mothercare είναι ριλάξ, Προτού συνδέσετε τα παιχνίδια στο κυρίως σώμα, αναποδογυρίστε τη στράτα ή περπατούρα για παιδιά που προσπαθούν να κάνουν τα πρώτα μονάδα και εισάγετε 3 μπαταρίες AA στη θήκη των μπαταριών στην κάτω...
- Seite 25 που θα προμηθευτείτε από τη Mothercare. του καλύμματος. • Χρησιμοποιείτε μόνο ανταλλακτικά που θα προμηθευτείτε από τη Mothercare. Διαφορετικά, ενδέχεται να καταστεί επιβλαβής η χρήση της Μετά το πλύσιμο, αντιστρέψτε τη διαδικασία για να τοποθετήσετε ξανά στράτας-αυτοκίνητο 3 σε 1.
- Seite 26 COMBINED_3_IN_1_CAR_WALKER_SEAT.indd 26 2/7/09 16:23:37...
- Seite 27 Pojemnik można otworzyć niewielkim śrubokrętem krzyżakowym. Trójfunkcyjny chodzik-samochodzik „Mój pierwszy kabriolet” firmy Mothercare może służyć jako bujaczek, chodzik albo popychanka i rys. 7 zabawiać dziecko, które z entuzjazmem zaczyna chodzić. Trójfunkcyjny Wsadzić blat z zabawkami w zagłębienie z przodu karoserii. Blat chodzik-samochodzik może być...
- Seite 28 • Zdjęte podkładki należy zastąpić nowymi podkładkami, dostarczonymi przez Mothercare. Po upraniu należy założyć w kolejności odwrotnej do zdejmowania, • Stosować tylko części zamienne dostarczane przez Mothercare. W starannie sprawdzając mocowanie wszystkich zabezpieczeń. przeciwnym wypadku można naruszyć bezpieczeństwo chodzika- samochodzika.
- Seite 29 введение ножки в отверстия, расположенные на каждой стороне нижнего основания Ходунки-автомобиль 3 в 1 фирмы “Mothercare” могут применяться как с ударной подушкой, и нажимайте на них, пока они не зафиксируются на боунсер, ходунки и толкатель, имеют игровой блок и предназначены для...
- Seite 30 После стирки повторите описанные выше процедуры в обратном порядке, резиновыми подушками, поставляемыми фирмой “Mothercare”. чтобы установить на место покрытие сиденья, проверяя, что все устройства • Используйте только запасные части фирмы “Mothercare”. Запасные части обеспечения безопасности надежно установлены. всех других производителей могут сделать ходунки-автомобиль 3 в 1 небезопасными.
- Seite 31 Colocación del módulo de juegos El coche andador 3 en 1 Mi Primer Descapotable de Mothercare se fig. 6 puede usar como asiento saltador, como andador o como correpasillos Antes de colocar el módulo de juegos en la estructura principal, dé...
- Seite 32 Mothercare proporcione. estén bien colocados. • Sólo de deben usar piezas de repuesto de Mothercare. De no ser así se podría perjudicar la seguridad del coche andador 3 en 1. La estructura principal del coche andador 3 en 1 se puede limpiar con la seguridad del niño es su responsabilidad...
- Seite 33 şek. 7 giriş Oyuncak birimini ana gövdenin ön kısmındaki oyuncak tablasına takınız. Mothercare My First Convertible 3’ü 1 arada arabalı yürüteç, zıplatıcı, Yerine oturduğunda klik sesi gelecektir. yürüteç ve yürümeye meraklı çocuklar için itmeli bir eğlence birimi olarak kullanılabilir. 3’ü 1 arada araba yürütecinizi, çocuğunuz yardım almadan şek.
- Seite 34 • Pedler değiştirildiğinde yerine Mothercare’den tedarik edilen yeni tutuculardan geçiriniz. pedler takılmalıdır. • Sadece Mothercare tarafından tedarik edilen yedek parçaları kullanınız. (şek B8) Oturak örtüsünü çıkarmak için kumaş örtüyü arkalığın üzerinden Diğerleri 3’ü 1 arada araba yürütecin güvenliğini bozabilir. çekiniz. Oturak örtüsünün üzerindeki yıkama talimatlarına uymaya özen Çocuğunuzun güvenliği sizin sorumluluğunuzdadır.