
Verwandte Anleitungen für Hifonics MRX168A Mercury series


Inhaltszusammenfassung für Hifonics MRX168A Mercury series
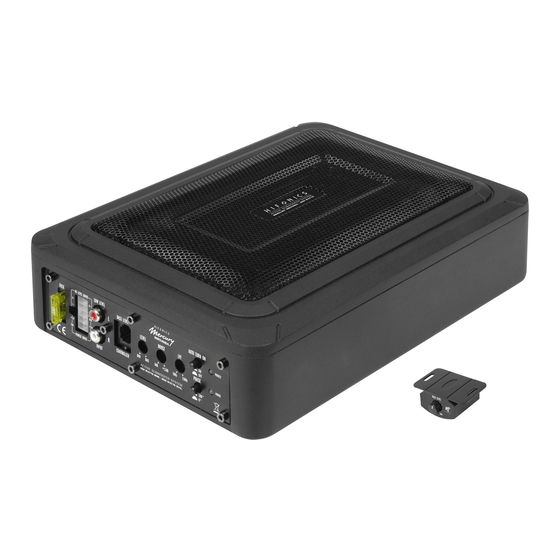
- Seite 1 BEDIENUNGSANLEITUNG USER’S MANUAL MODE D’EMPLOI MANUALE D’USO MANUAL DE USO ACTIVE SUBWOOFER SYSTEM MRX168A...
- Seite 2 INHALTSVERZEICHNIS TABLE OF CONTENT TABLE DES MATIÈRES SOMMARIO INDICE BEDIENUNGSANLEITUNG USER’S MANUAL MODE D’EMPLOI MANUALE D´USO MANUAL DE USO...
-
Seite 3: Technische Daten
Bitte lesen Sie die Bedienungsanleitung vollständig durch, bevor Sie mit der Instal- lation beginnen und den Verstärker in Betrieb nehmen. TECHNISCHE DATEN MRX168A Subwoofer 15 x 20 cm (6“ x 8“) Ausgangsleistung RMS 1 x 100 W Ausgangsleistung Max. 1 x 200 W Frequenzgang 30 –... -
Seite 4: Hinweise Vor Der Installation
HINWEISE VOR DER INSTALLATION • Dieses Gerät ist nur zum Anschluss an ein 12-Volt-System in einem Fahrzeug mit negativer Masse geeignet. • Achten Sie darauf, dass die Eingangs-/Ausgangskabel weit genug von den Stromversorgungskabeln ent- fernt sind, da es sonst zu Störeinstrahlungen kommen kann. •... -
Seite 5: Hochpegeleingänge
AUDIOSIGNALKABEL Beim Anschließen der Audiosignalkabel zwischen dem Cinch-Ausgang des Steuergeräts und dem Cinch-Ein- gang des Verstärkers [ 6 ] ist darauf zu achten, dass die Audiosignalkabel und Stromkabel möglichst nicht auf derselben Seite des Fahrzeugs verlegt werden. Eine räumlich getrennte Installation, d. h. eine Installation des Stromkabels im linken Kabelschacht und der Audiosignalkabel im rechten Kabelschacht des Fahrzeugs oder umgekehrt ist empfehlenswert, um von Störungen zu verringern. -
Seite 6: Schaltbare Phasenlage
REGELBARER BASS BOOST Mit dem Regler BOOST [ 10 ] können Sie die stufenlose Anhebung des Basspegels zwischen 0 -12 dB LOW LEVEL einstellen. ACHTUNG: Benutzen Sie diesen Regler mit Bedacht! HI LEVEL INPUT FUSE AUTO TURN ON BASS LEVEL MRX168A R–... -
Seite 7: Specifications
Please read the user‘s manual carefully before the installation and the first operation of the amplifier. SPECIFICATIONS MRX168A Subwoofer 15 x 20 cm (6“ x 8“) Output Power RMS 1 x 100 W Output Power Max 1 x 200 W Frequency Range 30 –... - Seite 8 IMPORTANT NOTES PRIOR TO INSTALLATION • This device is only suited for a 12 volt system with negative ground. • Ensure that the input and output cables are sufficiently separated from the power supply cables. Otherwise interferences may occur. • Ensure the accessibility of the fuse and the operating elements after installation. •...
- Seite 9 AUDIO SIGNAL CABLES When installing the audio cables between the RCA outputs of the head unit and the RCA inputs of the amplifier [ 6 ], the audio and power supply cables should, if possible, not be routed along the same side of the vehicle. We recommend a separated installation, e.g.
-
Seite 10: Phase Switch
VARIABLE BASS BOOST By using the BOOST controller [ 10 ] you are able to increase the bass enhancement from 0 to 12 dB. ATTEN- LOW LEVEL TION: Use the BASS BOOST wisely! HI LEVEL INPUT FUSE AUTO TURN ON BASS LEVEL MRX168A R–... -
Seite 11: Caractéristiques
Veuillez s’il vous plaît lire attentivement toutes les instructions d’installation avant que vous installiez l’amplificateur et le fassiez fonctionner. CARACTÉRISTIQUES MRX168A Subwoofer 15 x 20 cm (6“ x 8“) Puissance de sortie RMS 1 x 100 W Puissance de sortie Max. 1 x 200 W Gamme de fréquences 30 –... - Seite 12 RECOMMANDATIONS AVANT L’INSTALLATION - Cet appareil convient exclusivement au branchement à un système de 12 volt à masse négative. - Montez l’amplificateur de manière à ce qu’il soit protégé au maximum contre les secousses et vibrations ainsi que contre la poussière et les saletés. - Veillez à...
- Seite 13 CÂBLES AUDIO Lors de l‘installation du câble audio entre la sortie RCA de votre autoradio et l‘entrée RCA [ 6 ] de l‘amplificateur à l‘intérieur de votre voiture, aussi souvent que cela est possible, les câbles audio et alimentation ne doivent pas cheminer sur le même côté...
-
Seite 14: Circuit De Protection
BASS BOOST RÉGLABLE Avec le régulateur BOOST [ 10 ], vous pouvez ajuster le niveau de basses de 0 - 12dB. LOW LEVEL ATTENTION: Ne pas utiliser le BASS BOOST à bon escient! HI LEVEL INPUT FUSE AUTO TURN ON BASS LEVEL MRX168A R–... -
Seite 15: Dati Tecnici
Per favore leggere le istruzioni per il montaggio integralmente, prima di montare l’amplificatore e di metterlo in funzione. DATI TECNICI MRX168A Subwoofer 15 x 20 cm (6“ x 8“) Potenza di uscita RMS 1 x 100 W Potenza di uscita Max. 1 x 200 W Gamma di frequenza 30 –... - Seite 16 INDICAZIONI IMPORTANTI PRIMA DEL MONTAGGIO - Questo apparecchio e adatto unicamente ad essere collegato con un sistema elettrico a 12 Volt con massa negativa. - Montare l’amplificatore in modo tale che sia completamente protetto da urti, polvere e sporcizia. - Fare attenzione al fatto che i cavi d’ingresso e d’uscita siano sufficientemente lontani dai cavi dell’alimentazione elettrica, altrimenti si possono verificare irradiazioni di disturbo.
-
Seite 17: Funzione Di Accensione Automatica
CAVI AUDIO Durante l‘installazione dei cavi audio tra le uscite RCA dell‘unità principale e gli ingressi RCA del dispositivo [ 6 ], i cavi audio e di alimentazione dovrebbe, se possibile, essere instradato lungo lo stesso lato del veicolo. Con- sigliamo di effettuare un‘installazione isolata, facendo passare il cavo di alimentazione attraverso il battitacco che si trova lungo il lato sinistro e il cavo audio attraverso il battitacco che si trova sul lato destro, o viceversa. - Seite 18 BASS BOOST REGOLABILE Mediante il controllo BOOST [ 10 ] avete la possibilità di regolare il livello dei bassi da 0 a 12dB. LOW LEVEL HI LEVEL INPUT FUSE AUTO TURN ON BASS LEVEL MRX168A R– LEVEL BOOST PROTECT L– PHASE +12V +12V...
-
Seite 19: Datos Técnicos
Lea completamente las instrucciones de montaje antes de proceder a montar el amplificador y ponerlo en funcionamiento. DATOS TÉCNICOS MRX168A Subwoofer 15 x 20 cm (6“ x 8“) Potencia de salida RMS 1 x 100 W Potencia de salida Max. 1 x 200 W Rango de frecuencia 30 –... - Seite 20 INDICACIONES IMPORTANTES PREVIAS AL MONTAJE - Este equipo es adecuado sólo para la conexión a un sistema de 12 voltios con tierra negativa. - Instale el amplificador de forma que quede protegido de sacudidas, así como del polvo y la suciedad. - Asegúrese de que los cables de entrada y salida están colocados a la distancia suficiente de los cables de alimentación, ya que en caso contrario podrían producirse irradiaciones de ruido.
- Seite 21 CABLE AUDIO Conecte los cables de audio entre las salidas RCA de la unidad principal y las entradas RCA del amplificador [ 6 ]. En la instalación del audio cable entre la salida RCA de la radio del coche y la entrada RCA del amplificador en el coche debe prestarse atención a que el audio cable y el cable de alimentación eléctrica no sean tendidos en el mismo lado del vehículo.
-
Seite 22: Interruptor De Fase
BASS BOOST REGULABLE LOW LEVEL Con el regulador BOOST [ 10 ] se puede ajustar el nivel de 0 - 12dB. HI LEVEL INPUT FUSE AUTO TURN ON BASS LEVEL MRX168A R– LEVEL BOOST PROTECT L– PHASE +12V +12V POWER +12dB 50Hz 150Hz... - Seite 24 Audio Design GmbH Am Breilingsweg 3 · D-76709 Kronau/Germany Tel. +49 7253 - 9465-0 · Fax +49 7253 - 946510 www.audiodesign.de ©2019 Audio Design GmbH, All Rights Reserved...