Vego PARKSMART Bedienungsanleitung
Inhaltsverzeichnis
Verfügbare Sprachen
Verfügbare Sprachen
Kapitel
Inhaltsverzeichnis

Inhaltszusammenfassung für Vego PARKSMART
- Seite 1 Automatische Parkscheibe Ankunftszeit Bedienungsanleitung 1 Stand: 25.06.2019; Version 3.0...
-
Seite 2: Inhaltsverzeichnis
Inhalt ……………….3 Bedienungsanleitung…………… Inbetriebnahme……… ………… …..……………..4 Anbringung……………………………………………9 …………….11 Wichtige Hinweise………………… Technische Daten und Zertifizierungen ..12 2 Stand: 25.06.2019; Version 3.0... -
Seite 3: Bedienungsanleitung
Bedienungsanleitung Lebe wohl Strafzettel: Einmal an der Frontscheibe angebracht zeigt die Ankunftszeit automatisch und digital an. In Deutschland entwickelt und zugelassen überzeugt durch einfache Bedienung und absolute Zuverlässigkeit. Sie ist beständig gegenüber Temperatur und UV-Strahlung. wurde vom Bundesministerium für Verkehr, Bau und Stadt-entwicklung sowie vom Kraftfahrtbundesamt zugelassen und wurde labortechnisch überprüft. -
Seite 4: Inbetriebnahme
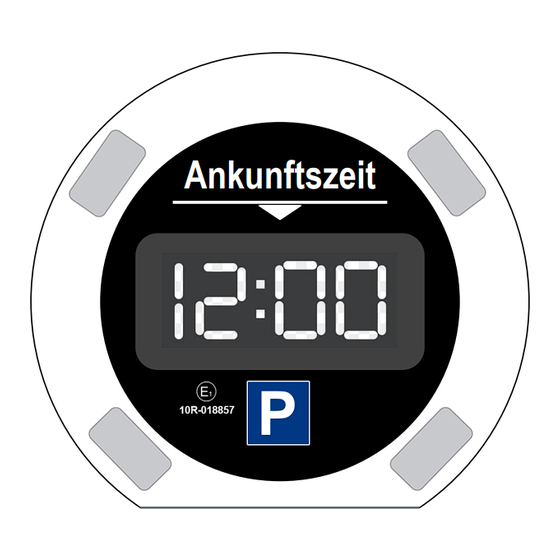
Inbetriebnahme PARK SMART Batteriefach Taste A Taste B 4 Stand: 25.06.2019; Version 3.0... - Seite 5 Inbetriebnahme Einlegen der Batterie Öffnen Sie das Batteriefach, legen Sie die Batterie ein und schließen Sie das Fach wieder. Nachdem erstmaligen Einlegen der Batterie erscheint auf beiden Displays 88:88 für drei Sekunden. Anschließend zeigt das kleine Display 0:00 an und startet automatisch. Die Anzeige auf dem großen Display erlischt.
- Seite 6 Automatische Anzeige der Parkzeit Großes Display • Das große Display schaltet ab, sobald das Fahrzeug 30 Sekunden in Bewegung ist. • Stoppt das Fahrzeug, wird innerhalb von 20 Sekunden die aktuelle Uhrzeit angezeigt. Nach weiteren ca. 20 – 30 Sekunden zeigt der Bildschirm die nächste halbe Stunde bzw.
- Seite 7 Manueller Einstellmodus für die Parkzeit (im Parkmodus) Drücken Sie die Taste B drei Sekunden lang. Auf dem großen und kleinen Display wird die nächste halbe Stunde bzw. volle Stunde der aktuellen Uhrzeit angezeigt. Nach jedem Drücken von Taste B wird die Uhrzeit um eine halbe Stunde addiert und statisch auf dem großen und kleinen Display angezeigt.
-
Seite 8: Anbringung
Anbringung Ankunftszeit Klebestreifen 8 Stand: 25.06.2019; Version 3.0... - Seite 9 Anbringung der an Frontscheibe Suchen Sie eine Stelle an der Frontscheibe, an der die von außen gut sichtbar und von innen weiterhin gut bedienbar ist. Achten Sie bei der Wahl der Anbringungsstelle auch darauf, dass ein Batteriewechsel weiterhin einfach möglich sind. Reinigen Sie die gewünschte Stelle mit ein wenig Spülmittel und einem feuchten Tuch.
-
Seite 10: Wichtige Hinweise
Wichtige Hinweise Nach dem Batteriewechsel muss die Uhrzeit neu eingestellt werden. Beachten Sie, dass Sommer- und Winterzeit manuell eingestellt werden. Im Fahrzeug darf immer nur eine Parkscheibe verwendet werden. Die korrekte Bedienung und Einstellung der Parkscheibe liegt in der Verantwortung des Fahrzeugführers. Der Hersteller erstattet keinerlei Park- oder Strafgebühren. -
Seite 11: Technische Daten Und Zertifizierungen
Zulassung durch Kraftfahr-Bundesamt unter Verweis auf ECE- Genehmigung Nr. E1 10R ** 05/01 8857**00 WEEE-Nr. DE60735058 Alle Rechte am Produkt sind Eigentum von: Hersteller: Martin Gottlewski Burgstr. 7, 71640 Ludwigsburg Deutschland www.vego-group.info Änderungen am Inhalt der Gebrauchsanweisung sind vorbehalten. 11 Stand: 25.06.2019; Version 3.0...