Inhaltsverzeichnis
Werbung
Verfügbare Sprachen
Verfügbare Sprachen
Quicklinks
DELTA-SPORT HANDELSKONTOR GMBH
Wragekamp 6 • DE-22397 Hamburg
GERMANY
12/2017
Delta-Sport-Nr.: SD-4707
IAN 293841
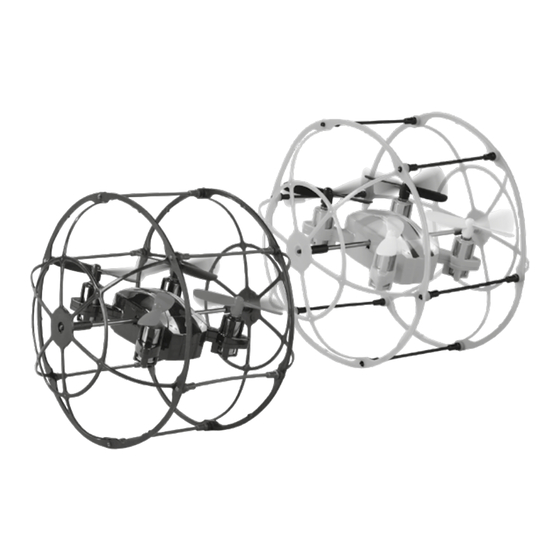
QUADROCOPTER-BALL
QUADROCOPTER BALL
QUADRICOPTÈRE AVEC CAGE
QUADROCOPTER-BALL
QUADROCOPTER BALL
Gebrauchsanweisung
Instructions for use
QUADRICOPTÈRE AVEC CAGE
QUADROCOPTERBAL
Mode d'emploi
Gebruiksaanwijzing
KVADROKOPTÉRA
CUADRICÓPTERO ESFÉRICO
Návod k použití
Instrucciones de uso
QUADRICOPTERO BOLA
Manual de instruções
IAN 293841
Klappen Sie vor dem Lesen die Seite mit den Abbildungen aus und machen Sie sich anschließend mit
allen Funktionen des Artikels vertraut.
Before reading, fold out the illustration page and get to know all of the functions of your unit.
Dépliez la page avec les illustrations avant la lecture et informez-vous ensuite au sujet des fonctions de
l'appareil.
Klap voor het lezen de pagina met de afbeeldingen open en maak u vervolgens vertrouwd met alle
functies van het apparaat.
Před čtením si nejdříve vyklopte stránku s obrázky a seznamte se se všemi funkcemi přístroje.
Antes de leer, abra la página con las ilustraciones y familiarícese seguidamente con todas las funciones
del aparato.
Antes de ler, vire o lado com as imagens para fora e familiarize-se com todas as funções do aparelho.
DE/AT/CH
Gebrauchs- und Sicherheitshinweise
GB/IE
Instructions and Safety Notice
FR/BE
Instructions d'utilisation et de sécurité
NL/BE
Gebruiksaanwijzingen en veiligheidsinstructies
CZ
Pokyny k používání a bezpečnostní upozornění
ES
Instrucciones de manejo y seguridad
PT
Manual de instruções e indicações de segurança
Seite
10
Page
20
Page
29
Pagina
40
Stránky 50
Página
59
Página
69
Werbung
Inhaltsverzeichnis

Inhaltszusammenfassung für Lidl Service SD-4707
- Seite 1 Návod k použití Instrucciones de uso GERMANY Pokyny k používání a bezpečnostní upozornění Stránky 50 QUADRICOPTERO BOLA Instrucciones de manejo y seguridad Página 12/2017 Delta-Sport-Nr.: SD-4707 Manual de instruções Manual de instruções e indicações de segurança Página IAN 293841 IAN 293841...
- Seite 2 50 - 60 2e 2f...
-
Seite 4: Inhaltsverzeichnis
Inhaltsverzeichnis /Contents Lieferumfang ............10 Package contents ..........20 Drohnenball ..........10 Drone ball ..........20 Fernsteuerung ........... 10 Remote control ......... 20 Technische Daten ..........10 Technical data ........... 20 Bestimmungsgemäße Verwendung ....10 Intended use ............20 Sicherheitshinweise ........11 - 13 Safety information ........ - Seite 5 Table des matieres/Inhoudsopgave Étendue de la livraison ........29 Leveringsomvang ..........40 Drone balle ..........29 Dronebal ........... 40 Télécommande ......... 29 Afstandsbediening ........40 Caractéristiques techniques ......29 Technische gegevens ........40 Utilisation conforme à sa destination ....29 Beoogd gebruik ..........
- Seite 6 Obsah/Índice Rozsah balení ........... 50 Alcance de suministro ........59 Dron v ochranné kouli ......50 Dron bola ..........59 Dálkové ovládání ........50 Control remoto ......... 59 Technické údaje ..........50 Datos técnicos ........... 59 Použití dle určení ..........50 Uso previsto ............
- Seite 7 Índice Volume de fornecimento ........69 Bola do drone .......... 69 Telecomando ..........69 Dados técnicos ..........69 Utilização prevista ..........69 Instruções de segurança ......70 - 72 Aviso relativo às pilhas/bateria! ..71 - 72 Inserir as pilhas no telecomando .... 72 - 73 Carregar a bateria ...........
-
Seite 8: Lieferumfang
Technische Daten Herzlichen Glückwunsch! Energieversorgung Batterie: Mit Ihrem Kauf haben Sie sich für einen 2 x 1,5 V Batterietyp AA, R6 hochwertigen Artikel entschieden. Machen Sie Energieversorgung Akku: sich vor der ersten Inbetriebnahme mit dem Artikel 3,7 V Li-Polymer 250 mAh vertraut. -
Seite 9: Sicherheitshinweise
• Achten Sie bei laufenden Rotoren darauf, dass Sicherheitshinweise sich weder Gegenstände noch Körperteile im Dreh- und Ansaugbereich der Rotoren befinden. • Achtung! Nicht geeignet für Kinder unter 8 Halten Sie Hände, Gesicht, Haare und lose Jahren. Kleidung von den Rotoren fern. •... -
Seite 10: Warnhinweise Batterie/Akku
• Der unsachgemäße Betrieb kann schwerwie- Warnhinweise Batterie/Akku! gende Personen- und Sachschäden verursa- ALLGEMEINE chen! Achten Sie deshalb beim Flugbetrieb auf WARNHINWEISE einen ausreichenden Sicherheitsabstand zu • Bewahren Sie Batterien immer außerhalb der Personen, Tieren und Gegenständen. Reichweite von Kindern auf. •... -
Seite 11: Batterie In Die Fernsteuerung Einsetzen
• Entfernen Sie die Batterien, wenn diese ver- • Laden und lagern Sie den Drohnenball niemals braucht sind oder der Artikel längere Zeit nicht in der Nähe von großen Hitzequellen oder verwendet wird. offenem Feuer, dies könnte einen Brand oder •... -
Seite 12: Akku Laden
Unterspannungs-Warnung Einsetzen der Batterien 1. Lösen Sie mit Hilfe des Kreuzschlitzschrauben- Die Lichter des Drohenballs fangen an zu blinken, drehers (6) die Schraube (2i) des Batterie- wenn der Akku fast leer ist. Laden Sie den Droh- fachdeckels (2j) auf der Rückseite der nenball, sobald Sie dies feststellen. -
Seite 13: Flug Starten
Flug starten (Abb. G) Links/rechts drehen (Gier) (Abb. I) Durch Betätigung des Gashebels (2c), nach Bevor Sie mit dem Flug starten, hier ein paar Tipps links oder rechts, wird der Drohnenball um die zur Steuerung des Drohnenballs: Hochachse gedreht, das heißt, der Drohnenball •... -
Seite 14: Non-Head Mode
Non-head Mode (Abb. O) Nach dem Überschlag ist der Drohnenball im nor- malen Flugmodus und Sie können einen weiteren Hierbei handelt es sich um eine Flughilfe, die den Überschlag wiederholen. Drohnenball (1) immer in die gesteuerte Richtung Drücken Sie die Taste erneut, wenn Sie doch kei- fliegen lässt, sobald diese aktiviert ist und zu emp- nen Überschlag machen wollen und diese schon fehlen, wenn nur wenig Flugerfahrung vorhanden... -
Seite 15: Flug Beenden
HINWEIS: Wiederholen Sie die Kalibrie- HINWEIS: rung, wenn der Drohnenball noch immer Es gibt zwei verschiedene Arten von Rotor- unkontrolliert in eine Richtung fliegt. blättern. Die Rotorblätter (A) sind rechts-drehend und die Rotorblätter (B) sind links-drehend. Hier Flug beenden zur besseren Veranschaulichung in der Anleitung Nachdem der Drohnenball (1) sicher gelandet ist, grau hinterlegt. -
Seite 16: Hinweise Zur Entsorgung
Hinweise zur Entsorgung Dies gilt auch für ersetzte und reparierte Teile. Nach Ablauf der Garantie anfallende Repara- Entsorgen Sie den Artikel und die Verpackungs- turen sind kostenpflichtig. materialien entsprechend aktueller örtlicher IAN: 293841 Vorschriften. Verpackungsmaterialien wie z. B. Folienbeutel gehören nicht in Kinderhände. Service Deutschland Bewahren Sie das Verpackungsmaterial für Kinder Tel.:... -
Seite 17: Mögliche Fehler
Mögliche Fehler Im Folgenden werden Ihnen mögliche Fehler, ihre Ursachen und die Behebung aufgezeigt. Fehler Mögliche Ursache Behebung Fernsteuerung (2) reagiert nicht. Fernsteuerung (2) ist Fernsteuerung (2) einschalten. ausgeschaltet. Batterien (5) falsch eingelegt. Batterien (5) richtig einlegen. Batterien (5) sind leer. Batterien (5) austauschen. -
Seite 18: Package Contents
Technical data Congratulations! Battery power supply: With this purchase you have opted for a high- 2 x 1.5V battery type AA, R6 quality item. Familiarise yourself with the item Battery power supply: before using it for the fist time. 3.7V Li-Polymer 250mAh Read the following instructions for use Range: approx. -
Seite 19: Safety Information
• Always switch off the drone ball when you are Safety information maintaining and cleaning it. • Do not take any risks when operating the drone • Caution! Not suitable for children under 8 years ball! Your own safety and that of your surround- of age. -
Seite 20: Battery Warning Notices
• In the event of a serious crash (for example from • Never throw batteries into fire or put them a great height), the electronic gyro sensors can on hot surfaces (e.g., a radiator or a stove). be damaged or mistuned. Before a new flight Never open the battery casing or the foil or therefore, it is imperative that complete function- short-circuit the contacts. -
Seite 21: Inserting The Batteries Into The Remote Control
Inserting the batteries into the • Charge only intact and undamaged batteries. If the battery is deformed or swollen it must not be remote control (Fig. D) charged under any circumstances. In this case CAUTION! Observe the following there is an acute risk of fire and explosion! instructions to avoid mechanical and •... -
Seite 22: Undervoltage Warning
3. The battery charge indicator of the USB 3. Keep your attention continuously focused on the charging cable (4) turns on, as soon as the drone ball during the flight! drone ball’s (1) rechargeable battery is Note: Always keep the drone ball in sight during flight operations! charged. -
Seite 23: Controlling The Drone Ball
Controlling the drone ball Automatic return to the pilot (Fig. P) Press the button (2f) if the drone ball is to fly back You have several controlling options: the route covered. Rising/sinking (throttle) (Fig. H) NOTE: Remember that the return route can By pressing the throttle (2c) forwards, the rotation- deviate due to rotation of the drone ball. -
Seite 24: Setting The Speed
Rotor protection Note: You need sufficient flight altitude for a 360° somersault (at least 10 metres). The rotor protection (1a) acts as protection Setting the speed (Fig. N) against injuries (e.g. cuts, skin injuries or eye You can adjust the flight speed by repeatedly injuries) and to protect against or in the event of pressing the throttle (2c) on the remote control (2). -
Seite 25: Disposal
Note: When you want to replace the A rotor With regard to complaints, please contact the blade, turn it clockwise to release it. following service hotline or contact us by e-mail. Our service employees will advise as to the When you want to replace the B rotor blade, turn it anti-clockwise to release it. -
Seite 26: Possible Defects
Possible defects In the following you will be shown possible defects, their causes and how to rectify them. Defect Possible cause Remedy Remote control (2) does not Remote control (2) is switched Turn on remote control (2). respond. off. Batteries (5) incorrectly inserted. Insert the batteries (5) correctly. Batteries (5) are dead. -
Seite 27: Étendue De La Livraison
Caractéristiques techniques Félicitations ! Alimentation en énergie pile : Vous venez d‘acquérir un article de qualité. 2 piles AA, R6 1,5 V Avant la première utilisation, familiarisez-vous Alimentation électrique de l’accumulateur : avec son fonctionnement. Pour cela, lisez li-polymère 3,7 V 250 mAh attentivement le mode d‘emploi suivant. -
Seite 28: Consignes De Sécurité
• Lorsque les rotors tournent, vérifiez qu’aucun Consignes de sécurité objet ni aucune partie du corps ne se trouve dans leur zone de rotation et d’aspiration. • Attention ! Ne convient pas aux enfants de Éloignez les mains, le visage, les cheveux et les moins de 8 ans. -
Seite 29: Avertissements Concernant Les Piles/L'accumulateur
• La mauvaise manipulation de l’article peut Avertissements concernant les gravement blesser des personnes et endomma- piles/l’accumulateur ! ger des biens ! Pendant l’utilisation, veillez par AVERTISSEMENTS conséquent à laisser une distance de sécurité GÉNÉRAUX suffisante par rapport aux personnes, animaux •... -
Seite 30: Mise En Place Des Piles Dans La Télécommande
• Remplacez toutes les piles en même temps. • Ne laissez pas le drone balle sans surveillance • Les piles qui ne sont pas rechargeables ne pendant qu’il charge et soyez attentif à une doivent pas être rechargées. éventuelle surchauffe de la partie inférieure du •... -
Seite 31: Recharge De L'accumulateur
Environnement de vol appro- Remplacement des piles 1. À l’aide du tournevis cruciforme (6), dévissez la prié vis (2i) du couvercle du compartiment à piles (2j) Pour un vol optimal, l‘environnement doit remplir au dos de la télécommande (2) et retirez-le (2j). les critères suivants : 2. -
Seite 32: Démarrage Du Vol
Démarrage du vol (fig. G) Tourner à gauche/droite (lacet) (fig. I) En actionnant la manette des gaz (2c) vers la Avant d’entreprendre un vol, voici quelques gauche ou vers la droite, le drone balle tourne conseils sur le pilotage du drone balle : autour de son axe vertical : il tourne vers la droite •... -
Seite 33: Mode Headless
Mode headless (fig. O) Il reprend ensuite son mode de vol normal et vous pouvez effectuer un nouveau looping. Cette aide au pilotage permet de toujours faire Appuyez de nouveau sur le bouton si vous ne voler le drone balle (1) dans la direction com- voulez plus faire de looping et que vous avez mandée dès que cette fonction est activée ;... -
Seite 34: Achèvement D'un Vol
REMARQUE : Renouvelez le calibrage si REMARQUE : le drone balle vole toujours de manière Il existe deux sortes de pales de rotor. Les incontrôlée dans une direction. pales de rotor (A) tournent vers la droite, tandis que les pales de rotor (B) tournent vers la gauche. Achèvement d’un vol Pour les illustrer plus clairement, elles sont grisées Une fois que le drone balle (1) a atterri en toute... -
Seite 35: Mise Au Rebut
Mise au rebut Nos employés du service client vous indiqueront la marche à suivre le plus rapidement possible. Éliminez l‘article et le matériel d‘emballage Nous vous renseignerons personnellement dans conformément aux directives locales en vigueur. tous les cas. La période de garantie n‘est pas Le matériel d‘emballage tel que les sachets en prolongée par d’éventuelles réparations sous la plastique par exemple ne doivent pas arriver... -
Seite 36: Article L217-12 Du Code De La Consommation
• s‘il correspond à la description donnée par le vendeur et posséder les qualités que celui-ci a présentées à l‘acheteur sous forme d‘échantillon ou de modèle ; • s‘il présente les qualités qu‘un acheteur peut légitimement attendre eu égard aux déclara- tions publiques faites par le vendeur, par le producteur ou par son représentant, notamment dans la publicité... -
Seite 37: Erreurs Possibles
Erreurs possibles Les erreurs possibles, leurs causes et la solution correspondante sont proposées ci-après. Erreur Cause possible Solution La télécommande (2) ne répond La télécommande (2) est La télécommande (2) est pas. éteinte. allumée. Les piles (5) sont mal installées. Les piles (5) sont correctement installées. -
Seite 38: Leveringsomvang
Technische gegevens Van harte gefeliciteerd! Stroomvoorziening batterij: Met uw aankoop hebt u gekozen voor een 2 x 1,5 V batterijtype AA, R6 hoogwaardig artikel. Zorg ervoor dat u voor de Energievoorziening accu: ingebruikname met het artikel vertrouwd raakt. 3,7 V Li-polymeer 250 mAh Lees de volgende gebruiksaanwijzing Actieradius: ca. -
Seite 39: Veiligheidstips
• Let er bij draaiende rotorbladen op dat zich Veiligheidstips geen voorwerpen of lichaamsdelen binnen het draai- en aanzuiggebied van de rotorbladen • Let op! Niet geschikt voor kinderen jonger dan bevinden. Houd handen, gezicht, haar en loszit- 8 jaar. tende kleding ver verwijderd van de rotorbladen. -
Seite 40: Waarschuwingen Batterij/Accu
• Laat de afstandsbediening altijd ingeschakeld zo • Gebruik de batterijen niet onder extreme lang de dronebal in is ingeschakeld. omstandigheden (bijv. verwarmingen of direct Schakel altijd eerst de dronebal uit. Pas daarna zonlicht). mag de afstandsbediening worden uitgeschakeld. • Ga zeer voorzichtig om met beschadigde of •... -
Seite 41: Batterijen In De Afstandsbediening Plaatsen
• Let bij het plaatsen op de juiste polariteit (+/-). De USB-laadkabel en de dronebal mogen niet • Voer gebruikte batterijen af conform de vochtig of nat worden. regelgeving en lever ze in bij gemeentelijke • Vervoer accu’s nooit in uw broekzak of in een inzamelpunten of winkels. -
Seite 42: Accu Laden
Accu laden (afb. E) • Voor vliegstunts, zoals loopings, moet in alle richtingen een vrije ruimte van ca. 10 m LET OP! Denk eraan dat de accu niet uit beschikbaar zijn. het artikel mag worden verwijderd. • Let erop dat u het artikel gebruikt in een droge, 1. -
Seite 43: Dronebal Besturen
3. Beweeg de gashendel (2c) helemaal naar Richting (roll- en nick-trimmen) (afb. L) voren en vervolgens helemaal naar achteren. Als de dronebal voor- of achterwaarts beweegt Uit de afstandsbediening (2) klinkt een signaal- zonder dat u de stuurhendel (2d) bedient, dan kunt toon. -
Seite 44: 360°-Salto
2. Druk opnieuw op de knop (2e) om de modus 3. Beweeg op de ingeschakelde afstandsbe- uit te schakelen. De LED-positielampjes (1e) diening (2) tegelijkertijd de gashendel (2c) branden weer continu. en de stuurhendel (2d) naar rechtsachter. De LED-positielampjes (1e) van de dronebal 360°-salto (afb. -
Seite 45: Rotorbladen Verwisselen
Afvalverwerking Rotorbladen verwisselen (afb. F) Verwissel de rotorbladen (A/B) meteen als ze Voer het artikel en verpakkingsmaterialen in beschadigd zijn. overeenstemming met actuele lokale voorschriften AANWIJZING: af. Verpakkingsmaterialen, zoals bv. foliezakjes, Er zijn twee verschillende soorten rotorbla- horen niet thuis in kinderhanden. Berg het den. - Seite 46 IAN: 293841 Service België Tel.: 070 270 171 (0,15 EUR/Min.) E-Mail: deltasport@lidl.be Service Nederland Tel.: 0900 0400223 (0,10 EUR/Min.) E-Mail: deltasport@lidl.nl NL/BE...
-
Seite 47: Mogelijke Fouten
Mogelijke fouten Hieronder worden mogelijke fouten, hun oorzaken en de oplossing weergegeven. Fout Mogelijke oorzaak Oplossing De afstandsbediening (2) De afstandsbediening (2) is Schakel de afstandsbediening reageert niet. uitgeschakeld. (2) in. De batterijen (5) zijn verkeerd Plaats de batterijen (5) correct. geplaatst. -
Seite 48: Rozsah Balení
Technické údaje Srdečně blahopřejeme! Zdroj energie baterie: Nákupem tohoto dronu jste se rozhodli pro 2 x 1,5 V baterie typ AA, R6 kvalitní výrobek. Před prvním použitím se prosím Napájení akumulátoru: seznamte s tímto výrobkem. 3,7 V Li-Po 250 mAh Přečtěte si pozorně... -
Seite 49: Bezpečnostní Pokyny
• Při spuštěných rotorech dbejte na to, aby v roz- Bezpečnostní pokyny sahu otáčení a nasávání vzduchu rotory nebyly žádné předměty ani části těla. Udržujte ruce, • Pozor! Tento výrobek není vhodný pro děti do 8 obličej, vlasy a volné oblečení v dostatečné let. -
Seite 50: Výstražná Upozornění Pro Baterie/ Akumulátor
• V případě závady nebo poruchy funkce nejprve • Zabraňte spolknutí baterie! Pokud dojde ke odstraňte příčinu, než dron znovu spustíte. spolknutí, okamžitě vyhledejte lékaře! • Nevystavujte dron ani dálkové ovládání po • Baterie ani akumulátor nikdy nevhazujte do dlouhou dobu přímému slunečnímu záření nebo ohně... -
Seite 51: Vložení Baterií Do Dálkového Ovládání
Vložení baterií do dálkového • Nabíjejte pouze neporušené a nepoškozené akumulátory. Pokud je akumulátor zdeformova- ovládání (obr. D) ný, resp. nafouklý, nesmí se v žádném případě POZOR! Dodržujte následující příkazy, používat. V takovém případě hrozí akutní abyste předešli mechanickým a nebezpečí... -
Seite 52: Varování Před Podpětím
Varování před podpětím • Jen lehce se dotkněte ovládací páčky (2d) v požadovaném směru, aby dron zatočil. Když je akumulátor téměř vybitý, začnou světla Upozornění: Vždy zapněte nejprve dálkové dronu blikat. Jakmile toto zjistíte, dron ihned ovládání. Ujistěte se, že je plynová páčka (2c) dobijte. -
Seite 53: Plachtění Doleva/Doprava (Náklon)
Plachtění doleva/doprava (náklon) 1. Pro aktivaci režimu Inteligentní řízení položte dron (1) a dálkové ovládání (2) za sebe a (obr. K) stiskněte tlačítko (2e) na dálkovém ovládání (2). Pokud chcete pohybovat dronem doprava nebo Poziční LED světla (1e) blikají, dokud je režim doleva, aniž... -
Seite 54: Kryt Rotorů
2. Zapněte dálkové ovládání (2) a plynovou UPOZORNĚNÍ: páčku (2c) dejte úplně dopředu a potom úplně Existují dva různé typy listů rotoru. Listy dozadu pro připravení dronu (1) k letu. rotoru (A) se otáčí doprava a listy rotoru (B) se 3. -
Seite 55: Likvidace Baterií
Likvidace baterií Respektujte prosím: že v případě baterií se jedná o zvláštní odpad, který se podle zákona nesmí likvidovat s domovním odpadem. Vysloužilé baterie můžete bezplatně odevzdat na sběrných místech komunálního odpadu nebo u obchodníka. Jsou zde k dispozici sběrné nádoby. Pokyny k záruce a průběhu služby Produkt byl vyrobený... -
Seite 56: Možné Chyby
Možné chyby Níže jsou uvedeny možné chyby, jejich příčiny a odstranění. Chyba Možná příčina Odstranění Dálkové ovládání (2) Dálkové ovládání (2) je Zapněte dálkové ovládání (2). nereaguje. vypnuté. Baterie (5) vloženy nesprávně. Vložte baterie (5) správně. Baterie (5) jsou vybité. Baterie (5) vyměňte. -
Seite 57: Alcance De Suministro
• Tornillo de la tapa del compartimento de las ¡Bienvenido! pilas (2i) Con su compra se ha decidido por un artículo de • Tapa del compartimento de las pilas (2j) alta calidad. Familiarícese con el artículo antes de • Compartimento de las pilas (2k) la primera puesta en marcha. -
Seite 58: Indicaciones De Seguridad
• Cuando los rotores estén en funcionamiento, Indicaciones de seguridad asegúrese de que no haya objetos ni partes del cuerpo en la zona de giro y aspiración de los • ¡Atención! No es apropiado para niños rotores. Mantenga las manos, el rostro, el pelo menores de 8 años. -
Seite 59: Advertencias Sobre Las Pilas/La Batería
• Deje el control remoto siempre encendido • No someta las pilas a condiciones extremas (p. mientras el dron bola esté en funcionamiento. ej. radiadores o radiación solar directa). Apague siempre el dron bola primero. Solo • Proceda con precaución en caso de que después se puede apagar el control remoto. -
Seite 60: Colocación De Las Pilas En El Control Remoto
• Nunca transporte las baterías en los bolsillos ADVERTENCIA ADICIONAL SOBRE LA BATERÍA (DRON BOLA) del pantalón o en bolsas. Preste atención a los objetos afilados o angulares que pueden dañar • La batería no se puede quitar del artículo. su batería. -
Seite 61: Carga De La Batería
Carga de la batería (Fig. E) • Para las acrobacias aéreas, como vueltas, debe haber un espacio de aprox. 10 m en todas las ¡ATENCIÓN! Tenga en cuenta que la bate- direcciones. ría no se puede sacar del artículo. • Asegúrese de que la zona está seca y libre de 1. -
Seite 62: Control Del Dron Bola
2. Ponga el interruptor de conexión y desconexión Planear hacia la izquierda/derecha del dron bola (1i) en ON. Las luces de navega- (ladeo) (Fig. K) ción LED (1e) del dron bola parpadean. Si quiere efectuar un movimiento hacia la derecha 3. -
Seite 63: Volteo De 360
Si este modo está desactivado, el dron bola (1) Velocidad 2 vuela en la dirección a la que apunta el lado (el pitido suena dos veces) delantero (incluso cuando se ha girado el dron Para pilotos con las primeras experiencias de bola (1)). -
Seite 64: Protección Del Rotor
Protección del rotor ADVERTENCIA: Si las palas del rotor están dañadas, existe peligro de que se La protección del rotor (1a) sirve para propor- suelten piezas de material durante el uso y cionar seguridad ante lesiones (p. ej. cortes, le- pueden provocar daños o peligros en el entorno. -
Seite 65: Medidas Para La Eliminación De Pilas
Medidas para la eliminación de pilas A tener en cuenta: las pilas son basura especial y, conforme a lo estipulado en la ley, no deben eliminarse en la basura doméstica. Puede entregar las pilas gastadas en los puntos de recogida municipales o en los comercios, sin coste alguno. -
Seite 66: Errores Posibles
Errores posibles A continuación se le muestran los posibles errores, sus causas y la solución. Errores Causas posibles Solución El control remoto (2) no El control remoto (2) está Encienda el control remoto (2). reacciona. apagado. Las pilas (5) están mal Coloque las pilas (5) colocadas. -
Seite 67: Volume De Fornecimento
• Tampa do compartimento das pilhas (2j) Muitos parabéns! • Compartimento das pilhas (2k) Com esta compra, optou por um produto de alta Dados técnicos qualidade. Antes de o utilizar pela primeira vez, familiarize-se com o produto. Alimentação de energia das pilhas: Para o efeito, leia com atenção o 2 x 1,5 V Tipo de pilha AA, R6... -
Seite 68: Instruções De Segurança
• Quando os rotores estiverem em funcionamen- Instruções de segurança to, certifique-se de manter objetos ou partes do corpo afastados das áreas de rotação e de ad- • Atenção! Não é indicado para crianças com missão dos rotores. Mantenha as mãos, o rosto, idade inferior a 8 anos. -
Seite 69: Aviso Relativo Às Pilhas/Bateria
• A utilização incorreta pode causar sérios danos • A limpeza e a manutenção por parte do utili- pessoais e materiais! Por isso, certifique-se de zador não podem ser realizadas por crianças que mantém uma distância segura relativamen- sem supervisão. te a pessoas, animais e objetos durante o voo. -
Seite 70: Inserir As Pilhas No Telecomando
• Observe a polaridade correta (+/-) ao inserir • Se a bateria queimar durante o carregamento, as pilhas. apague o fogo deste tipo de bateria com muita • Elimine adequadamente as pilhas usadas nos água. pontos de recolha municipais ou em lojas. •... -
Seite 71: Carregar A Bateria
Substituir as pilhas • Certifique-se de que presta muita atenção ao espaço em redor onde vai utilizar a bola ATENÇÃO! Observe as seguintes drone. instruções para evitar danos mecânicos e • Espaço sem obstáculos (por exemplo, sem elétricos. lâmpadas, etc.) Se as pilhas deixarem de funcionar, substitua-as •... -
Seite 72: Controlar A Bola Drone
Movimentos de avanço/recuo (arfa- Nota: ligue sempre primeiro o telecomando. Certifique-se de que, ao ligar o telecomando, gem) (Fig. J) a alavanca de velocidade (2c) se encontra Se mover a alavanca de comando direita (2d) ajustada para a posição mais baixa (motores para a frente ou para trás, a bola drone inclina-se desligados)! na direção correspondente. -
Seite 73: Looping De 360
Por exemplo, a bola drone (1) voa sempre para Ajustar a velocidade (Fig. N) a direita, do ponto de vista do piloto, se o modo Pode ajustar a velocidade de voo no telecoman- de orientação automática estiver ativado com o do (2) pressionando repetidamente a alavanca botão (2e) e a alavanca de comando (2d) for de velocidade (2c). -
Seite 74: Proteção Do Rotor
Terminar o voo Ambos os tipos têm marcas na parte superior (A e B) que devem ser respeitadas durante a substitui- Depois de a bola drone (1) aterrar em segurança, ção e corresponder às marcas na bola drone (1). desligue-a corretamente. 1. -
Seite 75: Medidas A Tomar Para A Eliminação Das Pilhas
Medidas a tomar para a eliminação das pilhas Tenha em atenção: Que se trata de baterias e lixo especial que, de acordo com a legislação, não deve ser eliminado no lixo doméstico. Pode entregar gratuitamente as baterias gastas nos pontos de recolha municipais ou no distribuidor. -
Seite 76: Possíveis Falhas
Possíveis falhas Abaixo, encontram-se listadas possíveis falhas, as respetivas causas e medidas de resolução. Falhas Possíveis causas Resolução O telecomando (2) não reage. O telecomando (2) está Ligar o telecomando (2). desligado. Pilhas (5) inseridas Insira as pilhas (5) incorretamente. corretamente.