Herunterladen Inhalt Inhalt Diese Seite drucken

Werbung

Verfügbare Sprachen

Verfügbare Sprachen

NT2 U3
2-Bay RAID Storage Enclosure
User Manual
August 2, 2011 – v1.0
EN
DE
ES
FR

Werbung

Inhaltsverzeichnis
loading

Inhaltszusammenfassung für Akitio NT2 U3

  • Seite 1 NT2 U3 2-Bay RAID Storage Enclosure User Manual August 2, 2011 – v1.0...
  • Seite 2: System Requirements

    NT2 U3 Introduction 1 Introduction 1.1 System Requirements 1.1.1 PC Requirements • Minimum Intel Pentium III CPU 500MHz, 128MB RAM • Windows Vista, Windows 7 • Your hardware device must have the correct corresponding port (e.g. USB 3.0 host controller) 1.1.2 Mac Requirements...
  • Seite 3 NT2 U3 Introduction 1.5 Detailed View Front View Rear View Confirm RAID mode RAID switch Kensington security slot USB 3.0 port Power switch Power receptacle 1.5.1 LED indication Status • Blue = Power on • Green = Status OK, USB connection to computer is established •...
  • Seite 4 NT2 U3 Introduction 1.6 RAID Modes For RAID 0/1, hard drives of identical capacities are recommended. If the capacities are different, the total amount of the space that can be used will depend on the drive with the smallest capacity.
  • Seite 5: System-Setup

    NT2 U3 System Setup 2 System Setup 2.1 Hard Drive Assembly The drives can be installed at any position, there is no specific order required. 1. Unlock the switch at the bottom of the case and lift the front panel upward and away from the housing to remove it.
  • Seite 6 NT2 U3 System Setup 2.2 Replacing Hard Drives When a drive fails, the corresponding HDD LED (A or B) will be blinking slowly, unless the RAID mode is set to Non-RAID, in which case the HDD will simply not be accessible anymore.
  • Seite 7: Connection To Computer

    NT2 U3 System Setup 2.3 Connection to Computer A few precautions and notes when using your external storage drive: • Do not expose the product to water or humid conditions. • Do not cover the enclosure’s ventilation holes. • Before connecting the device, install the hard drives and set your preferred RAID mode.
  • Seite 8: Specifications

    The information contained in this manual is believed to be accurate and reliable. AKiTiO assumes no responsibility for any errors contained in this manual. AKiTiO reserves the right to make changes in the specifications and/or design of this product without prior notice. The diagrams contained in this manual may also not fully represent the product that you are using and are there for illustration purposes only.
  • Seite 9 NT2 U3 RAID-Speichergehäuse mit zwei Einschüben Bedienungsanleitung 2. August 2011 - v1.0...
  • Seite 10: Systemanforderungen

    NT2 U3 Einleitung 1 Einleitung 1.1 Systemanforderungen 1.1.1 PC-Anforderungen • Mindestens Intel Pentium III-CPU mit 500 MHz, 128 MB RAM • Windows Vista, Windows 7 • Ihr Computer muss über den entsprechenden Anschluss verfügen (z. B. USB 3.0-Host- Controller) 1.1.2 Mac-Anforderungen •...
  • Seite 11: Detaillierte Übersicht

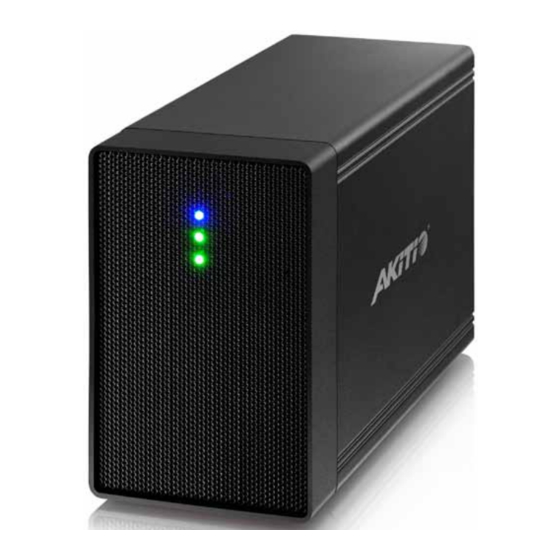
    NT2 U3 Einleitung 1.5 Detaillierte Übersicht Frontansicht Rückansicht Lüfter Bestätige RAID-Modus RAID-Schalter Öffnung für Kensington-Schloss USB 3.0 Anschluss Ein-/Ausschalter Netzanschluss 1.5.1 LED-Anzeige Status • Blau = Strom eingeschaltet • Grün = Status OK, USB-Verbindung zum Computer besteht • Aus = Leerer Laufwerksschacht oder noch keine USB-Verbindung •...
  • Seite 12 NT2 U3 Einleitung 1.6 RAID-Modi Bei RAID 0/1 empfehlen wir Festplatten mit identischer Kapazität. Wenn die Kapazitäten unterschiedlich sind, hängt die nutzbare Gesamtkapazität von der Festplatte mit der geringsten Kapazität ab. 1.6.1 Non-RAID Die Festplatten werden als unabhängige Laufwerke angezeigt. Zugriff und Formatierung jeder Festplatte kann separat durchgeführt werden.
  • Seite 13: Systemeinrichtung

    NT2 U3 Systemeinrichtung 2 Systemeinrichtung 2.1 Festplattenmontage Die Festplatten können in jeder Position installiert werden; die Reihenfolge spielt keine Rolle. 1. Entsperren Sie den Schalter an der Unterseite des Gehäuses; heben Sie die vordere Blende an und vom Gehäuse weg.
  • Seite 14 NT2 U3 Systemeinrichtung 2.2 Festplatten ersetzen Wenn eine der Festplatten ausfällt, blinkt die entsprechende Festplatten-LED (A oder B) langsam, ausser bei Non-RAID, wo die defekte Festplatte einfach nicht mehr zugreifbar ist. Falls nur eine der Festplatten defekt ist und der RAID-Modus auf RAID 1 eingestellt ist, können Sie nach wie vor auf die Daten zugreifen;...
  • Seite 15: Am Computer Anschließen

    NT2 U3 Systemeinrichtung 2.3 Am Computer anschließen Achten Sie bei der Nutzung des externen Speicherlaufwerk auf die folgenden Vorsichtsmaßnahmen und Hinweise: • Setzen Sie das Gerät keinem Wasser und keiner Feuchtigkeit aus. • Blockieren Sie die Lüftungsöffnungen des Gehäuses nicht.
  • Seite 16: Spezifikationen

    Die Informationen in diesem Handbuch sind nach bestem Wissen und Gewissen exakt und zuverlässig. AKiTiO übernimmt jedoch keine Veranwortung für Fehler in diesem Handbuch. AKiTiO behält sich das Recht vor, ohne Vorankündigung Änderungen an den Spezifikationen und/oder dem Produktdesign vorzunehmen. Die Abbildungen in diesem Handbuch repräsentieren Ihr Produkt möglicherweise nicht vollständig und dienen lediglich der...
  • Seite 17 NT2 U3 Carcasa de almacenamiento RAID de 2 bahías Manual de usuario 2 de agost 2011 – v1.0...
  • Seite 18: Marcas Comerciales

    NT2 U3 Introducción 1 Introducción 1.1 Requisitos del sistema 1.1.1 Requisitos para PC • Mínimo: CPU Intel Pentium III a 500 MHz, 128 MB de memoria RAM • Windows Vista, Windows 7 • Su dispositivo hardware debe contar con el puerto correspondiente adecuado (por ejemplo, un controlador de host USB 3.0)
  • Seite 19: Vista Detallada

    NT2 U3 Introducción 1.5 Vista detallada Vista frontal Vista posterior Ventilador Confirmar el modo RAID Conmutador RAID Conector de seguridad Kensington Puerto de USB 3.0 Interruptor de encendido Toma de alimentación 1.5.1 Indicador LED Estado • Azul = Encendido • Verde = Estado correcto, conexión con el equipo establecida •...
  • Seite 20 NT2 U3 Introducción 1.6 Modos RAID Si utiliza los modos RAID 0/1, se recomienda el uso de discos duros de idéntico tamaño. Si los tamaños son diferentes, el espacio total útil dependerá de la capacidad de la unidad de menor tamaño.
  • Seite 21: Configuración Del Sistema

    NT2 U3 Configuración del sistema 2 Configuración del sistema 2.1 Montaje de los discos duros Las unidades pueden instalarse en cualquier posición. No es necesario seguir un orden específico. 1. Libere el cierre situado en la parte inferior de la caja y levante el panel delantero hacia arriba, separándolo de la carcasa para extraerlo.
  • Seite 22 NT2 U3 Configuración del sistema 2.2 Cambiar unidades de disco duro Si una unidad se avería, el LED HDD correspondiente (A o B) parpadeará lentamente, a menos que el modo RAID esté establecido en No RAID, en cuyo caso simplemente no se podrá acceder a la unidad de disco duro.
  • Seite 23 NT2 U3 Configuración del sistema 2.3 Conexión a un equipo Durante el uso de su unidad de almacenamiento externo existen algunas precauciones y notas que deberá considerar: • No exponga el producto al agua o a condiciones de humedad. • No cubra los orificios de ventilación de la carcasa.
  • Seite 24: Especificaciones

    La información que contiene este manual se considera precisa y fiable. AKiTiO no asume ninguna responsabilidad derivada de los errores que pudiera contener en este manual. AKiTiO se reserva el derecho a realizar cambios en las especificaciones y / o el diseño del producto sin aviso previo. Las figuras que contiene este manual podrían no representar completamente el producto que está...
  • Seite 25: Manuel D'utilisation

    NT2 U3 Boîtier de stockage RAID à 2 baies Manuel d'utilisation 2 août 2011 – v1.0...
  • Seite 26: Configuration Système Requise

    NT2 U3 Présentation 1 Présentation 1.1 Configuration système requise 1.1.1 Configuration PC requise • CPU Intel Pentium III 500MHz, 128MB RAM au minimum • Windows Vista, Windows 7 • Votre périphérique matériel doit avoir le bon port correspondant (par ex contrôleur hôte USB 3.0) 1.1.2 Configuration Mac requise...
  • Seite 27: Vue Détaillée

    NT2 U3 Présentation 1.5 Vue détaillée Vue de face Vue arrière Ventilateur Confirmation mode RAID Interrupteur RAID Encoche de Sécurité Kensington Port USB 3.0 Commutateur d'alimentation Prise de courant 1.5.1 Indication LED État • Bleu = Sous tension • Vert = Etat OK, connexion USB à l'ordinateur établie •...
  • Seite 28 NT2 U3 Présentation 1.6 Modes RAID Pour le RAID 0/1, des disques durs de capacité identique sont conseillés. Si les capacités sont différentes, la quantité totale d'espace pouvant être utilisée dépend du lecteur de plus faible capacité. 1.6.1 Non-RAID Les lecteur s'affichent comme des volumes indépendants. Chaque lecteur peut être formaté et accédé...
  • Seite 29: Configuration Du Système

    NT2 U3 Configuration du système 2 Configuration du système 2.1 Montage du disque dur Les lecteurs peuvent s'installer dans n'importe quelle position, il n'y a pas d'ordre à respecter. 1. Déverrouillez le commutateur au fond du boîtier et soulevez le panneau avant vers le haut pour l'écarte du boîtier et l'enlever.
  • Seite 30: Remplacement Des Disques Durs

    NT2 U3 Configuration du système 2.2 Remplacement des disques durs Lorsqu'un lecteur connait une défaillance, le voyant LED de ce lecteur (A ou B) se met à clignoter lentement, à moins que le mode RAID soit réglé sur non-RAID, auquel cas le lecteur ne sera tout simplement plus accessible.
  • Seite 31: Branchement À L'ordinateur

    NT2 U3 Configuration du système 2.3 Branchement à l'ordinateur Quelques remarques et précautions lors de l'utilisation du lecteur de stockage externe : • N'exposez pas le produit à l'eau ni à des conditions humides • Ne couvrez pas les trous de ventilation du boîtier.
  • Seite 32: Spécifications

    / ou à la conception de ce produit sans préavis. Les diagrammes contenus dans ce manuel peuvent aussi de ne pas représenter le produit que vous utilisez et ne sont présents qu'à des fins d'illustration seulement. AKiTiO n'assume aucune responsabilité quant aux différences entre le produit mentionné dans ce manuel et le produit que vous...

Inhaltsverzeichnis