Manhattan 424868 Montageanleitung
Universal projector ceiling mount
UNIVERSAL
PROJECTOR
CEILING MOUNT
INSTALL GUIDE
MODEL 424868
English: Read all Safety Cautions listed in these instructions before proceeding with the installation of this product.
Deutsch: Bitte lesen Sie alle Sicherheitsanweisungen sorgfältig durch, bevor Sie mit der Installation dieses Produkts beginnen.
Español: Lea todas las precauciones de seguridad listadas en estas instrucciones antes de instalar el producto.
Français: Veuillez lire toutes les précautions de sécurité avant de commencer l'installation de ce produit.
Polski: Przed przystąpieniem do montażu tego produktu przeczytaj wszystkie ostrzeżenie i uwagi wymienione w tej instrukcji.
Italiano: Leggere tutte le Precauzioni di Sicurezza elencate nelle presenti istruzioni prima di procedere all'installazione di questo prodotto.
1
English Attach the mounting legs (K). Note: Don't fully tighten these bolts at this point.
Deutsch Befestigen Sie Montagefüße (K). Hinweis: Ziehen Sie diese Schrauben jetzt noch
nicht fest.
Español Sujete los pies del soporte (K). Nota: En este punto no apriete completamente los
tornillos.
Français Attachez les pieds de montage (K). Remarque: Ne serrez pas ces boulons entièrement
à ce point.
Polski Przykręć nóżki mocujące (K). Uwaga: Nie dokręcaj zbyt mocno śrub na tym etapie
montażu.
Italiano Fissare i piedini (K). Nota: Non stringere completamente queste viti durate questo
passaggio.
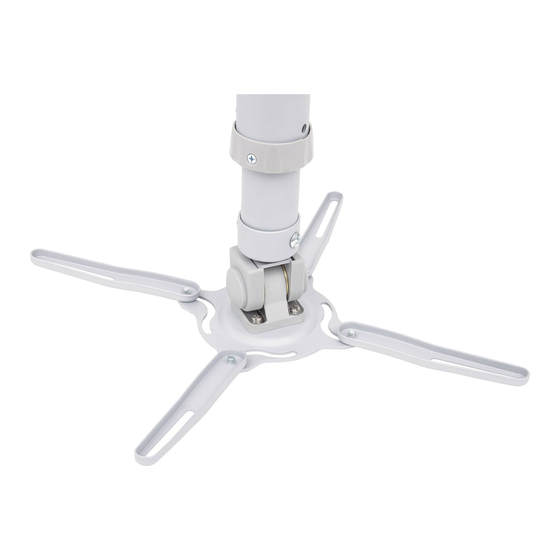
2
English Align the projector on the mounting legs (K) – which can still be rotated left or right
as needed – and secure in place (F or G with J; or H). CAUTION! Carefully test the bolts to
determine the correct size: They should thread easily and not come out when pulled.
Over-tightening can damage the projector.
Deutsch Setzen Sie den Beamer über den Montagefüßen an (K) – die, falls nötig, immer noch
nach links oder rechts gedreht werden können – und sichern Sie sie (F oder G mit J; oder H).
ACHTUNG! Testen Sie die Schrauben, um die korrekte Größe zu bestimmen: Sie sollten sich
leicht eindrehen, aber nicht herausziehen lassen. Ein Überdrehen kann den Beamer
beschädigen.
Español Alinee el proyector en los pies de apoyo (K) – permita el movimiento de izquierda a derecha según
sea necesario – y asegure (F o G con J; o H). ¡ATENCIÓN! Cuidadosamente pruebe los tornillos para
determinar la medida correcta: Estos deberían atravesar fácilmente y no salirse cuando se jalan. Apretarlos
demasiado puede dañar el proyector.
Français Alignez le projecteur sur les pieds de montage (K) – qui peuvent encore être pivotés à gauche ou
à droite comme souhaité – et fixez en place (F ou G avec J; ou H). ATTENTION! Vérifiez les boulons
soigneusement pour déterminer la taille correcte: Ils doivent être vissables facilement ne doivent pas se
laisser extraire en tirer. Serrez trop fermement peut endommager le projecteur.
3
English Use the ceiling plate (A) as a template to mark 2-4 hole locations
on the ceiling or joist. Drill the holes. Attach the ceiling plate (A) to the
ceiling using bolts (C/D).
Deutsch Verwenden Sie die Deckenplatte (A) als Schablone, um 2-4
Lochpositionen an der Decke oder Träger zu markieren. Bohren Sie die
Löcher. Befestigen Sie die Deckenplatte (A) mit den Schrauben (C/D) an
der Decke.
Español Utilice la placa de techo (A) como una plantilla para marcar 2, 3 o
4 locaciones de orificios en el techo o la viga. Taladre los orificios. Sujete la
placa (A) al techo utilizando los tornillos (C/D).
Français Utilisez la plaque de plafond (A) comme forme de référence pour
marquer 2-4 positions de trou au plafond ou la poutre. Percez des trous.
Attachez la plaque de plafond (A) au plafond utilisant les boulons (C/D).
Polski Użyj uchwytu sufitowego (A) jako szablonu, aby zaznaczyć na suficie
miejsca lub belka na 2-4 otwory. Nawierć otwory. Przykręć uchwyt (A)
do sufitu używając śrub (C/D).
Italiano Utilizzare la placca da soffitto (A) come una dima per segnare sul
soffitto o la trave le posizioni dei 2-4 fori. Effettuare con il trapano dei
fori. Fissare la placca (A) al soffitto utilizzando il viti autofilettanti (C/D).
4
English Secure (X) the extension pole (B) to the ceiling plate (A).
Deutsch Sichern Sie (X) die Verlängerungsstange (B) auf der
Deckenplatte (A).
Español Asegure (X) el poste extensión (B) a la placa de techo (A).
Français Fixez (X) la tige de rallonge (B) à la plaque de plafond (A).
Polski Przykręcić (X) uchwyt teleskopowy (B) z uchwytem sufitowy (A).
Italiano Assicurare (X) il palo prolunga (B) alla placca a soffitto (A).
A
B
E (4)
C (4)
M6 x 10
#14 x 2"
D (4)
J (4)
/
" x 2"
M5
1
4
1, 2
E
Polski Dopasuj odpowiednio nóżki mocujące projektora (K) – nóżki nadal mogą być obracane w lewo i w
prawo, jeśli zajdzie taka potrzeba – i przykręć (F lub G z J; lub H). UWAGA: Ostrożnie sprawdź, czy śruby
zostały dobrane odpowiednio. Powinny się łatwo wkręcać i nie wypaść podczas próby wyciągnięcia. Zbyt
mocne dokręcenie śrub może spowodować uszkodzenie projektora.
Italiano Allineare il proiettore sui piedini di montaggio (K) – i quali possono essere ruotati a sinistra o
destra come necessario – e fissare sul posto (F o G e J; o H). PRECAUZIONE! Verificare con attenzione
le viti per determinare la dimensione corretta: dovrebbero infilarsi facilmente e non uscire se vengono
tirate. Una stretta eccessiva può danneggiare il proiettore.
3
C/D
Cable • Kabel
Câble • Cordon
Kabel • Cavo
A
C/D
4
5
A
B
X
X
F (4)
G (4)
M4 x 16
M5 x 16
K (4)
5
Z
English Raise/lower/angle the projector to the desired position, then tighten (Y, Z).
Deutsch Heben/senken/drehen Sie den Beamer in die gewünschte Position, dann ziehen
Sie (Y, Z).
Español Suba/baje/gire el proyector a la posición deseada, entonces apriete (Y, Z).
Français Soulevez/baissez/mettez le projecteur à la position souhaitée, puis serrez (Y, Z).
Polski Podnieś/opuść/obracać projektor na pożądaną wysokość, następnie dokręć (Y, Z).
Italiano Alzare/abbassare/ruotare il proiettore fino ad individuare la posizione
desiderata, quindi stringere (Y, Z).
H (4)
M6 x 16
L
B
F/G/H
E
J
E
K
Y
L
MAN-424868-QIG-ML11013-03-0

Verwandte Anleitungen für Manhattan 424868


Inhaltszusammenfassung für Manhattan 424868
- Seite 1 K (4) D (4) J (4) MODEL 424868 ” x 2” English: Read all Safety Cautions listed in these instructions before proceeding with the installation of this product. Deutsch: Bitte lesen Sie alle Sicherheitsanweisungen sorgfältig durch, bevor Sie mit der Installation dieses Produkts beginnen.
- Seite 2 Wszystkie znaki towarowe i nazwy handlowe należą do ich właścicieli. Tutti i marchi registrati e le dominazioni commerciali sono di proprietà dei loro rispettivi proprietari. © IC Intracom. All rights reserved. Manhattan is a trademark of IC Intracom, registered in the U.S. and other countries.