iLuv TimeShaker WOW Bedienungsanleitung

Verwandte Anleitungen für iLuv TimeShaker WOW


Inhaltszusammenfassung für iLuv TimeShaker WOW
- Seite 1 English TSBOOMWOW TimeShaker® WOW Jumbo LED Dual Alarm Clock with Strong Wired Bed Shaker User Manual Ver 1.2...
-
Seite 2: What's Included
WHAT’S INCLUDED Wired Shaker Main Unit Power Adaptor... -
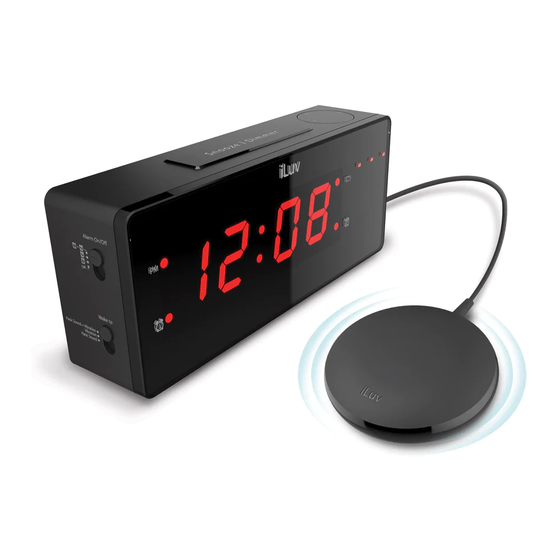
Seite 3: Product Overview
PRODUCT OVERVIEW 1. SNOOZE/DIMMER 2. ALARM SETUP S n ooze I Di mm er Alarm Time 3. TIME SETUP 4. TIME/ALARM INCREASE 5. TIME/ALARM DECREASE Front 6. DISPLAY 7. PM INDICATOR 8. ALARM 1 INDICATOR 9. ALARM 2 INDICATOR 10. LOW BATTERY INDICATOR Back 16. - Seite 4 Left 11. ALARM ON/OFF & SET: ALARM1+2, ALARM 1/SET, ALARM 2/SET 12. WAKE TO: PANIC SOUND+VIBRATION, VIBRATION, PANIC SOUND Right 13. PANIC SOUND VOLUME CONTROL Charge 14. VIBRATION STRENGTH: EARTHQUAKE, Phone STRONG, NORMAL, OFF 15. USB CHARGING PORT Bottom 21. BACK-UP BATTERY COMPARTMENT Serial No.:1FE00000 22.
-
Seite 5: Connecting To Power
POWERING ON Connecting to Power (Back) Designed by iLuv in New York Connect the included power adaptor to the Power Port located on the Shaker back of the unit and connect the wall plug to a working wall outlet... -
Seite 6: Time Set Up
TIME SET UP (Top) Default Time is set at 12:00AM 1. Press and HOLD the D S n o oze I D i m m e r Time Time Button for 3 Seconds Alarm or until the clock Display Time Alarm begins ashing 2. - Seite 7 Time Alarm (Back) Select Time Format (12/24 hr) Designed by iLuv in New York • To select your preferred time format, use the R Time Format ” switch located on the back of the device and ip the switch to 12hr Shaker or 24hr time format.
- Seite 8 PM time. The indicator will not appear during the 24hr format. (Back) Daylights Saving Mode* Designed by iLuv in New York To adjust your clock’s time -1/+1 hr VIA DST, use the S “Daylight Savings Time” switch located on the...
-
Seite 9: Alarm Set Up
ALARM SET UP The device is equipped with 2 separate alarm (Left) clocks and will need to be set individually. Ensure your alarms are engaged by checking the placement of the switch control after alarm setup is done. (see images) Alarm setup will only work with AL1 or AL2 Setup is not available on the placement of AL1+ AL2... - Seite 10 (Top) 2. Press and HOLD the C Alarm button to enter set-up S no oze I D i m m e r Alarm Time mode. Alarm Time (Front) 3. The LED display will blink if done correctly.
- Seite 11 4. Press the E “+” or F “-” button to adjust the time. Sn ooze I D immer Time Alarm For faster adjustment, press and HOLD the E “+” or F “-” button. Alarm Time 5. When the desired time is set, press the Sn ooze I D im m e r Alarm Time...
- Seite 12 Entering ALARM 2 SET-UP Mode (Left) 1. Adjust the L side switch to Alarm 2 Then repeat steps Alarm 1 Set Up steps 1 -5 for Alarm 2...
- Seite 13 Setting up the Alarm Source The alarm source selected will activate with the alarm(s). You can change the alarm alert source by using the M switch controls located on the left side of the device. • Panic Sound + Vibration •...
- Seite 14 Setting up Shaker Alarm To include the Pillow (Back) Shaker into your Designed by iLuv in New York alarm routine, follow these steps: Shaker 1. Connect the Pillow Shaker by plugging the unit into the back of the device in the T “Shaker”...
- Seite 15 2. The Pillow shaker alarm will activate ONLY on M Vibration or Panic Sound + Vibration Alarm settings. • Panic Sound + Vibration • Vibration • Panic Sound (X) 3.Vibration Strength Setting: Choose the strength level of vibration by using the O switch located on the right side of the device.
- Seite 16 Setting up Alarm Light (Back) Designed by iLuv in New York You can also add on the Q Alarm Light to your scheduled alarm by using the switch controls located on Shaker the back of the device. Alarm Light will work with all three alarm sources.
- Seite 17 Setting up Panic Volume Adjust the volume of the N Panic Alarm Sound by using the volume control located on the right side of the device. Charge Phone...
-
Seite 18: Switch Setting
ENABLE/DISABLE ALARM (Left) Please remember to activate/de-activate your alarm accordingly. If your turn o the alarm, you must enable it again for the alarm system to be activated. To activate/de-activate your alarm, use the L switch controls located on the left side of the device Switch setting •... - Seite 19 SNOOZE • When the alarm is activated, the following (Top) options are available • Snoozing your alarm: S n ooze I Di mmer Alarm Time Press the B “SNOOZE” button located on the top of the device temporarily snooze your alarm. S nooze I Di mmer The snooze will silence your alarm in increments...
-
Seite 20: Turning Off The Alarm
TURNING OFF THE ALARM • Stopping your alarm: To Sn ooze I D i m me r Alarm Time stop the alarm until the next scheduled time, press (Left) the C “Alarm” button located on the top of the Alarm Time device. -
Seite 21: Display Dimmer
DISPLAY DIMMER • The TimeShaker WOW is (Top) equipped with a display dimmer. You can select the S no oze I Di mmer brightness level by Alarm Time pressing the B SNOOZE/DIMMER button during stand-by mode. Sn ooze I D i mmer 5 level brightness setting (OFF >... - Seite 22 P USB Charging port located on Phone the right side of the device. Charge • The TimeShaker WOW Phone cannot access the content of the connected device. • The USB Charging port is compatible to most smartphones, tablets,...
-
Seite 23: Back Up Battery
BACK UP BATTERY BACK-UP BATTERY WILL NOT OPERATE THE CLOCK • The TimeShaker WOW is equipped with a timekeeping system that can be powered with (2) AAA batteries (not included). The power failure protection circuit will not operate unless battery is installed. - Seite 24 INSTALLING BACK UP BATTERY The Back-up Battery is NOT a secondary source of power. The function acts as a memory saver for your settings in case of a disconnection of power. It is recommended to replace the battery at least once a year. 1.
- Seite 25 Q: How do I replace the backup batteries without losing your settings? (If old batteries are dead your setting will not be saved) • Remove the power cord and shaker cord. • Locate the backup battery compartment on the bottom of the unit and open it with a Philips screwdriver then remove the cover.
- Seite 26 Français Español Deutsch TSBOOMWOW TimeShaker® WOW Jumbo LED Dual Alarm Clock with Strong Wired Bed Shaker Manuel de l'utilisateur / Manual de usuario / Bedienungsanleitung Ver 1.2...
-
Seite 27: Appareil Principal
CE QUI EST INCLUS/LO QUE ESTÁ INCLUIDO/CE QUI EST INCLUS Vibreur avec l Agitador con cable Shaker (Kopfkissenschüttler) mit Kabel Appareil Principal Unidad Principal Haupteinheit Adaptateur d’alimentation Adaptador eléctrico Netzadapter... - Seite 28 PRODUKTÜBERSICHT/DESCRIPCIÓN DEL PRODUCTO/PRODUKTÜBERSICH Dessus/Parte superior/Oberseite 1. Snooze/dimmer 2. Réglage De L'alarme/con gurar Alarma/ Weckereinstellung S n o oze I D im mer Alarm Time 3. Réglage De L'heure/con gurar Hora/ Uhrzeiteinstellung 4. Augmenter Heure/alarme Prolongar Tiempo/alarma / Uhr-/weckzeit Erhöhen 5. Diminuer Heure/alarme Disminuir Tiempo/alarma / Uhr-/weckzeit Verringern Avant/Parte frontal/Vorderseite 6.
- Seite 29 Gauche/Izquierda/Linke Seite 11. Alarm On/o & Set: Alarm1+2, Alarm 1/set, Alarm 2/set 12. Wake To: Panic Sound+vibration, Vibration, Panic Sound Droit/Derecha/Rechte Seite 13. Contrôle Du Volume Du Son Panique/ Control De Volumen De Sonido De Pánico/ Charge Phone Volumensteuerung Panikton 14.
- Seite 30 POWERING ON MISE SOUS TENSION/ENCENDERSE/EINSCHALTEN (Back) Connexion à l'alimentation "Connecter l'adaptateur d'alimentation inclus au port Designed by iLuv in New York d'alimentation (20) situé à l'arrière de l'appareil connecter la che murale dans une prise murale fonctionnelle" Conectando a la fuente de alimentación Shaker "Conectar el adaptador de corriente incluido al puerto de...
- Seite 31 RÉGLAGE DE L'HEURE/CONFIGURACIÓN DE LA HORA/UHRZEITEINSTELLUNG L'heure par défaut est réglée à 12:00 AM La hora predeterminada está establecida a las 12:00 A. M. (Top) Die Standardzeit ist auf 12:00 Uhr eingestellt. 1. Appuyer et TENIR le bouton de l'heure (3) pendant 3 secondes ou jusqu'à...
- Seite 32 Sélectionner le format de l'heure (12/24 h) (Back) Seleccione el formato de hora (12/24 horas) Wählen Sie das Zeitformat (12/24 Std.) Designed by iLuv in New York • Pour sélectionner le format d'heure désiré, utiliser le commutateur « Format de l'heure » situé à l'arrière de l'appareil et le basculer entre les formats d'heure on 12 h et 24 h.
- Seite 33 « Heure avancée » située à l'arrière de l'appareil pour ajuster. Designed by iLuv in New York • Para ajustar la hora de su reloj -1/+1 hora VIA DST (horario de verano), utilice el interruptor de “Horario de verano”...
- Seite 34 CONFIGURATION DE L'ALARME/CONFIGURACIÓN DE LA ALARMA/WECKER EINSTELLEN L'appareil est muni de deux réveille-matin qui doivent être réglés individuellement. S'assurer que les alarmes sont activées en véri ant la position du commutateur après la con guration de l'alarme. (voir les images) Le réglage de l'alarme fonctionne seulement avec AL1 ou AL2 Le réglage n'est pas disponible pour le placement de AL1+ AL2 ou si le commutateur est à...
-
Seite 35: Alarm Time
(Top) 2. Appuyer et TENIR le bouton « Alarme » pour entrer en mode de réglage 2. Pulse y MANTENGA pulsado el botón Alarma Sno oze I D im me r Alarm Time para introducir el modo con guración 2. HALTEN Sie die Weckertaste GEDRÜCKT, um in den Einstellungsmodus zu wechseln Alarm... - Seite 36 4. Appuyer sur le bouton (4) « + » ou (5) « - » pour ajuster l'heure. Pour un ajustement plus rapide, appuyer et TENIR le bouton (4) « + » ou (5) « - » 4. Pulse el botón (4) “+” o (5) “-” para ajustar la hora. Snooze I D imme r Time Alarm...
- Seite 37 Entrer en mode de RÉGLAGE DE L'ALARME 2 (Left) Introducir ALARMA 2 Modo CONFIGURACIÓN Auf den WECKER-2- EINSTELLUNGSMODUS zugreifen 1. Placer le commutateur latéral à Alarme 2 Répéter ensuite les étapes de réglage 1 à 5 de l'Alarme 1 pour l'Alarme 2 1.
- Seite 38 Régler La Source De L'alarme Con guración De La Fuente De Alarma Einrichten der Weckerquelle La source sélectionnée pour l'alarme s'active avec l'alarme/les alarmes. La fuente de alarma seleccionada se activará con la(s) alarma(s). Die ausgewählte Weckerquelle wird mit dem/n Weckalarm/en aktiviert. Vous pouvez changer la source de l'alarme en utilisant les commutateurs de contrôle situés sur le côté...
- Seite 39 Réglage De L'alarme Du Vibreur Con gurar La Alarma Del Agitador Einstellung des Schüttelweckers Designed by iLuv in New York Pour inclure le vibreur pour oreiller à votre routine d'alarme, suivez ces étapes : Para incluir el Agitador de almohada en su rutina de alarma, siga estos pasos: Führen Sie die nachfolgenden Schritte durch, um den...
- Seite 40 2. Le système de vibreur pour oreiller s'active SEULEMENT avec les réglages Vibration ou son panique + Alarme avec vibration. • Son panique + Vibration • Vibration • Son panique (X) 2. La alarma del agitador de almohada se activará SOLAMENTE en los ajustes de Vibración o de Sonido de pánico + Vibración •...
- Seite 41 Réglage de l'alarme lumineuse clignotante (Back) Con guración de la luz de alarma parpadeante Blinkenden Lichtwecker einstellen Designed by iLuv in New York Vous pouvez aussi ajouter la l'alarme lumineuse à votre alarme préréglée en utilisant les commutateurs situés à l'arrière de l'appareil.
- Seite 42 Réglage du volume du son panique Con guración del volumen de pánico Einstellung der Panikton-Lautstärke Ajuster le volume du son panique de l'alarme en utilisant les contrôles de volume situés sur le côté droit de l'appareil. Ajuste el volumen del Sonido de la alarma de pánico utilizando el control de volumen ubicado en la parte derecha Charge del dispositivo.
- Seite 43 ACTIVER/DÉSACTIVER L'ALARME /ACTIVAR/DESACTIVAR LA ALARMA / WECKER EIN /AUSSCHALTEN Veuillez vous rappeler d'activer/de désactiver votre alarme en conséquence. Si vous désactivez votre alarme, vous devez l'activer de nouveau pour que l'alarme du système (Left) soit activée. Pour activer/désactiver votre alarme, utiliser les commutateurs (11) situés du côté...
- Seite 44 RÉPÉTITION D'ALARME/DESPERTADOR/SCHLUMMERN (Top) • Lorsque l'alarme est activée, les options suivantes sont o ertes • Répétition de votre alarme: Appuyer sur le bouton (1) « RÉPÉTITION D'ALARME » situé sur le dessus de l'appareil met S n ooze I Dim mer Alarm Time en pause l'alarme pour la répéter un peu plus tard.
- Seite 45 DÉSACTIVER L'ALARME/APAGAR LA ALARMA/WECKER AUSSCHALTEN • Arrêter votre alarme: Pour arrêter l'alarme jusqu'à la prochaine alarme programmée, appuyer sur le bouton (2) situé sur le dessus de l'appareil S nooze I D im me r Alarm Time • Parar la alarma: para parar la alarma hasta la próxima alarma programada, pulse el botón (2) “Alarma”...
- Seite 46 • Le gradateur de l'a chage ne fonctionne PAS lorsque l'alarme est active. • El TimeShaker WOW está equipado con un regulador de intensidad de pantalla. Puede seleccionar el nivel de brillo pulsando el botón B SNOOZE/DIMMER durante el modo de espera.
- Seite 47 • Schließen Sie zum Au aden anderer Geräte, z. B. eines Smartphones oder Tablets, das USB-Ladekabel (nicht im Lieferumfang enthalten) an den USB-Ladeanschluss P an der rechten Seite des Geräts an. • TimeShaker WOW kann nicht auf den Inhalt des angeschlossenen Geräts zugreifen. • Der USB-Ladeanschluss ist mit den meisten Smartphones, Tablets, tragbaren Lautsprechern, drahtlosen Kopfhörern,...
- Seite 48 LES PILES D’APPOINT NE FAIT PAS FONCTIONNER L’HORLOGE • Le TimeShaker WOW est équipé d'un système de maintien de l'heure qui peut être alimenté avec (2) piles AAA (non incluses). Le circuit de protection contre les pannes de courant ne fonctionne pas si des piles ne sont pas installées.
- Seite 49 INSTALLATION DES PILES D'APPOINT/INSTALAR LA BATERÍA DE RESPALDO/ NOTSTROMBATTERIEN EINLEGEN Les piles d'appoint ne sont PAS une source secondaire d'alimentation. La fonction agit comme mémoire pour vos réglages en cas d'interruption de l'alimentation. Il est recommandé de remplacer les piles au moins une fois par année.
- Seite 50 Q : Comment puis-je remplacer les piles d'appoint sans perdre mes réglages? (Si les vieilles piles sont épuisées, vous réglages ne seront pas conservés) A: • Retire le cordon d'alimentation et le cordon du vibreur. • Localiser le compartiment pour piles sur la partie inférieure de l'appareil et l'ouvrir avec un tournevis Philips puis retirer le couvercle.
- Seite 51 Thank you for purchasing your new iLuv product. We are fully committed providing our customers the utmost satisfaction through the use of our products. For warranty service, please visit us at www.support.iluv.com and submit a ticket with your date of purchase, product model number and a brief summary of your issue. In the event of any issues with your product(s), please review the troubleshooting section provided in the user manual.
- Seite 52 8. Unplug TimeShaker WOW during lightning storms or when unused for long periods of time. 9. When main plug is connected, TimeShaker WOW is readily operatable. In order to disconnect TimeShaker WOW completely, the main plug should be disconnected from the main socket outlet.