Herunterladen Inhalt Inhalt Diese Seite drucken

Werbung

Verfügbare Sprachen
  • DE

Verfügbare Sprachen

  • DEUTSCH, seite 18
Consolle
Empire
ISTRUZIONI PER IL MONTAGGIO
ASSEMBLY INSTRUCTIONS
MONTAGEANLEITUNG
INSTRUCTIONS DE MONTAGE
INSTRUCCIONES DE MONTAJE
ИНСТРУКЦИЯ ПО СБОРКЕ

Werbung

Inhaltsverzeichnis
loading

Inhaltszusammenfassung für Devon&Devon Empire

  • Seite 1 Consolle Empire ISTRUZIONI PER IL MONTAGGIO ASSEMBLY INSTRUCTIONS MONTAGEANLEITUNG INSTRUCTIONS DE MONTAGE INSTRUCCIONES DE MONTAJE ИНСТРУКЦИЯ ПО СБОРКЕ...
  • Seite 2: Prima Di Iniziare

    Vi ringraziamo per aver scelto un prodotto Devon&Devon. Vi preghiamo cortesemente di leggere questo manuale prima di installare il prodotto. PRIMA DI INIZIARE Verificare le predisposizioni d’impianto necessarie prima del montaggio. Verificare la presenza di tutti gli articoli al’interno dell’imballo tramite il Packing List riportato alla pagina seguente.
  • Seite 3: Packing List

    PACKING LIST (STRUTTURA) A: Staffa supporto a muro (x1) B: Gambe (x2) C: Viti e tasselli per fissaggio a muro staffa (x2) D: Viti e tasselli in finitura per fissaggio a muro gambe (x8)
  • Seite 4 PACKING LIST (TOP IN MARMO) E: Top in marmo Empire (Nota: Non sono forniti viti e tasselli per il fissaggio a muro del lato posteriore del top)
  • Seite 5: Istruzioni Di Montaggio

    ISTRUZIONI DI MONTAGGIO Dopo avere rimosso il top in marmo dall’imballo (cassa di legno) appoggiate il top sul lato posteriore e rimuovete dall’imballo anche i componenti della struttura metallica. Notate che della parte superiore della gamba sporge la barra filettata che si trova all’interno della gamba.
  • Seite 6 Presentare a muro la struttura così assemblata. Verificare il posizionamento della struttura tramite una livella in direzione sia parallela che ortogonale a muro. ATTENZIONE: in questa fase ed in quelle successive di tracciatura dei fori di fissaggio, visto il peso del top, è...
  • Seite 7 Tracciare i fori di fissaggio della staffa di supporto a muro. La staffa ha una sezione a forma di “L” e deve essere posizionata sotto alla faccia posteriore del top che è a contatto con il muro. Rimuovere da muro la struttura assemblata ed eseguire tutte le forature secondo le tracciature.
  • Seite 8 Riposizionare la struttura a muro, fissarla con le viti sui braccetti delle gambe e sui portasciugamani. Fissare la parte posteriore del top tramite i due fori passanti. Fissare la staffa di supporto. Per permettere il fissaggio del top a muro, nella sua faccia inferiore sono ricavate due asole che danno l’accesso alle viti (non fornite in dotazione) una volta che queste hanno attraversato i fori passanti.
  • Seite 9 Sigillare anche il retro del top in marmo in corrispondenza dell’appoggio a muro. Al termine la consolle dovrebbe apparire come mostrato.
  • Seite 10: Before You Begin

    Thank you for choosing a Devon&Devon product. Please read this manual before installing the product. BEFORE YOU BEGIN Please check the existing layout of the system required before assembly. Verify the presence of all items inside the package using the Packing List included in the following page.
  • Seite 11 PACKING LIST (STRUCTURE) A: Bracket to fasten to wall (x1) B: Legs (x2) C: Screws and rawlplugs to fasten bracket to wall (x2) D: Screws and rawlplugs to fasten legs to wall (x8)
  • Seite 12 PACKING LIST (TOP) E: Ascot marble top (Note: the screws and rawlplugs to fasten the rear end of the top to the wall are not supplied.)
  • Seite 13 ASSEMBLY INSTRUCTIONS After removing the marble top from the packaging (wooden case) rest it on its rear and also remove the metal structure components. You will note that the top part of the leg protrudes from the threaded bar inside the leg. Tighten the threaded bar in the bush on the front corner in the bottom part of the marble top to lock it.
  • Seite 14 Lean the structure you have just assembled against the wall. Use a level to check that the structure is positioned correctly in both a parallel and perpendicular position to the wall. WARNING: during this step and the following ones for marking the position of the fastening holes, in view of the weight of the top, take particular...
  • Seite 15 Mark the fastening holes of the wall support bracket. The bracket has an L-shaped section and must be positioned under the top rear face that contacts the wall. Remove the assembled structure from the wall and drill all the holes as marked. Insert the rawlplugs in the holes.
  • Seite 16 Re-position the structure against the wall again, fasten it using the screws on the arms of the legs and on the towel rails. Fasten the rear part of the top through the two thru’ holes. Fasten the support bracket. To allow fastening the top to the wall, there are two slots in its bottom face, which give access to the screws (not supplied) once they have crossed the through holes.
  • Seite 17 Also seal the back of the marble top where it rests on the wall. Once you have finished the console should look as shown.
  • Seite 18: Bevor Sie Anfangen

    Wir danken Ihnen, dass Sie sich für ein Produkt von Devon&Devon entschieden haben und bitten Sie, diese Anleitung zu lesen, bevor Sie das Produkt installieren. BEVOR SIE ANFANGEN Überprüfen Sie vor der Montage die nötigen Vorrichtungen in IhremBadezimmer. Überprüfen Sie mit Hilfe der Packing List auf der nächsten Seite, ob in der Verpackung alle Artikel vorhanden sind.
  • Seite 19 PACKING LIST (GESTELL) A: Bügel zur Wandabstützung (x1) B: Beine (x2) C: Schrauben und Dübel zur Wandbefestigung des Bügels (x2) D: Schrauben und Dübel zur Wandbefestigung der Beine (x8)
  • Seite 20 PACKING LIST (TOP) E: Abdeckplatte Ascot aus Marmor (Hinweis: Die Schrauben und Dübel für die Wandbefestigung an der Rückseite der Abdeckplatte werden nicht mitgeliefert.)
  • Seite 21 MONTAGEANLEITUNG Die Marmorabdeckplatte aus der Verpackung (Holzkiste) nehmen und auf ihrer Rückseite ablegen. Die Bauteile der Metallstruktur ebenfalls auspacken. Sie werden bemerken, dass die im Bein vorhandene Gewindestange oben hervorsteht. Die Gewindestange in die Buchse in der vorderen Ecke unterhalb der Marmorabdeckplatte einschrauben und festziehen. Das Gleiche an beiden Beinen durchführen.
  • Seite 22 Die so zusammengebaute Trägerkonstruktion an die Wand stellen. Die Lage der Trägerkonstruktion mit einer Wasserwaage parallel und senkrecht zur Wand prüfen. ACHTUNG: dieser Arbeit beim Anzeichnen Befestigungsbohrungen ist wegen des Gewichts der Abdeckplatte besondere Vorsicht erforderlich, um ein Herabfallen zu vermeiden. Es wird empfohlen, zu Dritt zu arbeiten.
  • Seite 23 Die Befestigungslöcher für den Wandbefestigungsbügel anzeichnen. Der L-förmige Bügel muss unterhalb der Rückseite der Abdeckplatte angebracht werden, die die Wand berührt. Die zusammengebaute Trägerkonstruktion von der Wand entfernen und alle Bohrungen an den markierten Stellen ausführen. Die Dübel in die Löcher einsetzen.
  • Seite 24 Die Trägerkonstruktion wieder an die Wand stellen, mit den Schrauben an den Verbindungsstücken der Beine und an den Handtuchhaltern befestigen. Die Abdeckplatte an der Rückseite mit den beiden Durchgangslöchern befestigen. Den Haltebügel befestigen. Für die Wandbefestigung sind an der Unterseite der Abdeckplatte zwei Öffnungen vorhanden.
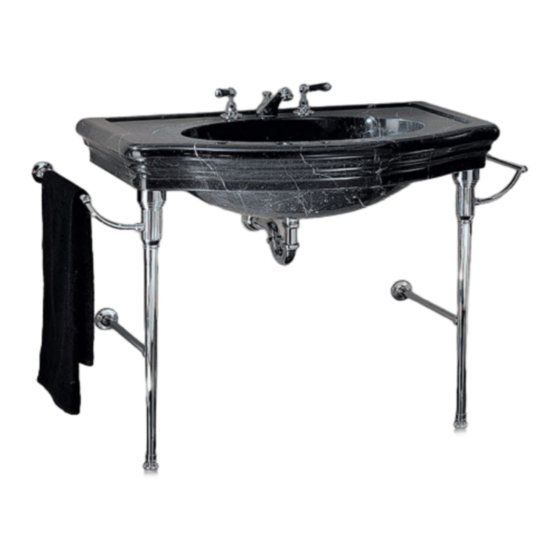
  • Seite 25 Die Marmorabdeckplatte auch hinten abdichten, wo sie an der Wand liegt. Zum Schluss sollte die Konsole so aussehen, wie dargestellt.
  • Seite 26: Avant De Commencer

    Nous vous remercions d’avoir choisi un produit Devon&Devon et vous prions de lire ce manuel avant d’installer le produit. AVANT DE COMMENCER Vérifier les dispositions d’installation nécessaires avant le montage. Vérifier la présence de tous les articles à l’intérieur de l’emballage grâce à...
  • Seite 27 LISTE DES ACCESSOIRES (STRUCTURE) A: Etrier de support mural (x1) B: Pattes (x2) C: Vis et chevilles pour la fixation de l’étrier au mur (x2) D: Vis et chevilles en finition pour la fixation des pieds au mur (x8)
  • Seite 28 LISTE DES ACCESSOIRES (PLAN) E: Dessus Ascot en marbre (Remarque : les vis et les chevilles pour fixer au mur le côté arrière du dessus ne sont pas fournies.)
  • Seite 29: Montage

    MONTAGE Après avoir retiré le dessus en marbre de l’emballage (caisse en bois), appuyez le dessus sur le côté arrière et enlevez de l'emballage les composants de la structure métallique. Veuillez remarquer que la barre filetée située à l’intérieur de la patte sort de la partie supérieure de la patte.
  • Seite 30 Adossez au mur la structure que vous avez assemblée. Vérifiez le positionnement de la structure au moyen d’un niveau en direction parallèle et perpendiculaire au mur. ATTENTION : à cette étape et aux étapes suivantes de traçage des trous de fixation, compte tenu du poids du dessus en marbre il convient de faire particulièrement attention à...
  • Seite 31 Tracez les trous de fixation de l’étrier de support au mur. L’étrier a une section en forme de « L » et il doit être positionné sous la face arrière du dessus qui est en contact avec le mur. Retirez du mur la structure assemblée et effectuez tous les trous selon les traçages.
  • Seite 32 Repositionnez la structure au mur et fixez à l’aide des vis la structure sur les bras des pattes et sur les porte-serviettes. Fixez la partie arrière du dessus au moyen des deux trous débouchants. Fixez l’étrier de support. Pour permettre de fixer le dessus au mur, deux fentes ont été obtenues sur sa face inférieure.
  • Seite 33 Scellez aussi la partie arrière du dessus en marbre à hauteur de l’appui au mur. A la fin, la console doit apparaître comme dans l'illustration ci-contre.
  • Seite 34: Antes De Comenzar

    Les agradecemos por haber elegido un producto Devon&Devon. Les rogamos que lean este manual antes de instalar el producto. ANTES DE COMENZAR Comprobar las predisposiciones para instalación necesarias antes del montaje. Comprobar que todos los artículos se encuentran en el interior del embalaje mediante la lista de contenido (ver página siguiente) y que ninguno de sus componentes presenta defectos visibles.
  • Seite 35 LISTA DE CONTENIDO (ESTRUCTURA) A: Platina de fijación en la pared (x1) B: Patas (x2) C: Tornillos y tacos para fijación de la platina en la pared (x2) D: Tornillos y tacos con acabados para fijación de las patas en la pared (x8)
  • Seite 36 LISTA DE CONTENIDO (ENCIMERA) E: Encimera Ascot de mármol (Nota: no están contenidos en esta dotación los tornillos y tacos para fijar en la pared la parte de atrás de la encimera.)
  • Seite 37: Instrucciones De Montaje

    INSTRUCCIONES dE MONTAJE Después de haber sacado la encimera de mármol de su embalaje (caja de madera) apoye la encimera por la parte de atrás y saque del embalaje los componentes de la estructura metálica. Nótese que por la parte de arriba de la pata sobresale la barra roscada situada en el interior de la misma pata.
  • Seite 38 Apoye la estructura en la pared tal y como está ensamblada. Compruebe la posición de la estructura utilizando un nivel en dirección paralela y ortogonal respecto a la pared. ATENCIÓN: Visto y considerado el peso de la encimera, es oportuno que en esta fase y en las sucesivas en las que se marcan los agujeros de...
  • Seite 39 Marque en la pared los agujeros de fijación de la platina de soporte. La platina tiene forma de “L” y debe ser colocada por debajo de la parte trasera de la encimera que está en contacto con la pared. Aparte de la pared la estructura ensamblada y haga los agujeros siguiendo las marcas.
  • Seite 40 Vuelva a colocar la estructura en la pared, fíjela con los tornillos en los brazos de las patas y en el toallero. Fije la parte trasera de la encimera utilizando los dos agujeros de paso. Fije la platina de soporte. Para fijar en la pared la encimera, en la cara inferior de ésta hay dos ranuras que permiten acceder a los tornillos (no proporcionados con el material), una vez que éstos han atravesado los agujeros de...
  • Seite 41 Selle también la parte de atrás de la encimera de mármol que quede en correspondencia con el respaldo. Al final, el lavabo de consola debe presentar el aspecto mostrado en la imagen.
  • Seite 42: Перед Началом Сборки

    Благодарим за выбор изделия Devon&Devon. Перед установкой внимательно прочитайте настоящую инструкцию ПЕРЕД НАЧАЛОМ СБОРКИ Перед тем, как приступать к сборке, убедиться в наличии всех элементов структуры. Проверить наличие всех деталей внутри упаковки, в соответствии с Упаковочным листом, приведенным на следующей странице. Убедиться, что...
  • Seite 43 УПАКОВОЧНЫЙ ЛИСТ (ОСНОВНАЯ КОНСТРУКЦИЯ) A: Кронштейн настенного крепления (x1) B: Ножки (x2) C: Винты и дюбели для стенного крепления кронштейна (x2) D: Винты и дюбели с отделкой для стенного крепления ножек. (x8)
  • Seite 44: Упаковочный Лист

    УПАКОВОЧНЫЙ ЛИСТ (ТОП) E: Мраморный верх Ascot (Прим.: не поставляются винты и дюбели для настенного крепления задней части мраморного верха.)
  • Seite 45: Инструкция По Сборке

    ИНСТРУКЦИЯ ПО СБОРКЕ Вынуть мраморный верх из упаковки (деревянный ящик), расположить его задней частью вниз и вынуть из упаковки все элементы металлической конструкции. Заметьте, что из верхней части ножки торчит конец резьбового штыря, вделанного в саму ножку. Ввинтить резьбовой штырь во втулку, расположенную в переднем углу...
  • Seite 46 Приставить собранную конструкцию к стене. Проверить уровнем правильное положение конструкции как параллельное, так и ортогональное, по отношению к стене. ВНИМАНИЕ: на этой стадии и на стадиях, следующих за отметкой точек для сверления отверстий, будьте особенно внимательны при перемещении тяжелого мраморного верха...
  • Seite 47 Отметить места для отверстий настенного крепления кронштейна. Кронштейн имеет L-образное сечение и должен располагаться ниже задней стороны мраморного верха, контактирующей со стеной. Отнять от стены собранную конструкцию и просверлить все намеченные отверстия. Вставить дюбели в отверстия.
  • Seite 48 Снова приставить конструкцию к стене, закрепить ее винтами, находящимися на концах ножек и полотенцедержателей. Закрепить заднюю часть мраморного верха при помощи двух сквозных отверстий. Закрепить опорный кронштейн. Для крепления столешницы к стене с её нижней стороны имеются два отверстия, через которые можно достать до винтов (не включены в...
  • Seite 49 Залить силиконом и заднюю часть мраморного верха в месте соприкосновения со стеной. По окончании монтажа консоль должна выглядеть как показано на рисунке.
  • Seite 50 Devon & Devon Viale A.Volta, 46 - 50131 Firenze Tel. 0039 055 5001173 - Fax 0039 055 5000628 www.devon-devon.com email: office@devon-devon.com...

Inhaltsverzeichnis