CAME Mini Dome Bedienungsanleitung
Ip-überwachungskameras
Inhaltsverzeichnis
Inhaltsverzeichnis

Verwandte Anleitungen für CAME Mini Dome


Inhaltszusammenfassung für CAME Mini Dome
- Seite 1 TELECAMERE IP PER VIDEOSORVEGLIANZA FA00187M04 GUIDA RAPIDA ALL'INSTALLAZIONE...
-
Seite 2: Avvertenze Generali
Avvertenze generali • Non esporre il prodotto a pioggia o umidità. • Verifi care che il dispositivo sia saldamente fi ssato alla parete o al soffi tto su cui viene installato. • Prima di usare la telecamera, verifi care che la tensione di alimentazione sia quella corretta. •... -
Seite 3: Presentazione Generale
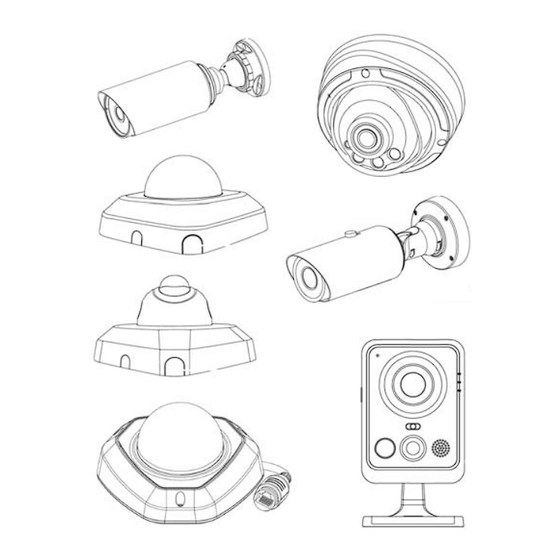
Presentazione generale Questa guida fornisce le istruzioni di base per l'installazione della telecamera di rete e spiega come accedervi. Per ulteriori dettagli, consultare il manuale d'uso. Telecamera di rete mini-dome Linguetta di sblocco Porta Ethernet (PoE) Obiettivo LED di errore LED di alimentazione Slot scheda micro-SD/SDHC Reset... - Seite 4 Telecamera di rete mini-dome IR Linguetta di sblocco Porta Ethernet (PoE) Obiettivo LED IR Led di errore Led alimentazione Sensore di luminosità Slot scheda Reset micro-SD/SDHC...
- Seite 5 Telecamera di rete mini-dome IR anti vandalismo Led IR Sensore di luminosità Microfono Vite di blocco telecamera Obiettivo Slot scheda micro-SD/SDHC Porta Ethernet (PoE) Reset LED di alimentazione e sistema...
- Seite 6 Telecamera di rete mini-cube Microfono Obiettivo Indicatori led Sensore di luminosità Altoparlante Led IR sensore PIR Slot scheda micro-SD Connettore alimentazione Porta Ethernet Connettore Pulsante SIP I/O allarmi Pulsante WPS/Reset *Nota: 1) Pulsante SIP: attivazione allarme tramite chiamata SIP. Dopo aver premuto questo pulsante, la telecamera chiamerà...
- Seite 7 Telecamera di rete mini-bullet Led IR Obiettivo Sensore di luminosità Porta Ethernet Slot scheda Pulsante micro-SD/SDHC Reset...
- Seite 8 Telecamera di rete pro-bullet Slot scheda Uscita Pulsante micro-SD/SDHC video CVBS Reset Fori di ventilazione Led IR Obiettivo Connettore Allarme / Audio Porta Ethernet (PoE) Connettore di alimentazione...
- Seite 9 Telecamera di rete pro-dome Microfono Obiettivo Sensore di luminosità Led IR Pulsante Slot scheda Reset micro-SD/SDHC...
- Seite 10 Installazione delle telecamere Telecamera di rete mini-dome 1. Rimuovere la cover della Dome. Linguetta di sblocco 2. Fissare le viti.
- Seite 11 3. Far passare un cavo Ethernet attraverso il soffi tto o la parete e collegarlo. 4. Regolare angolazione dell'obiettivo e messa a fuoco. Campo di brandeggio: +15° Campo di inclinazione: 0-90° 5. Fissare la cover della Dome.
- Seite 12 Telecamera di rete mini-dome IR 1. Rimuovere la cover della Dome. Linguetta di sblocco 2. Fissare le viti.
- Seite 13 3. Far passare un cavo Ethernet attraverso il soffi tto o la parete e collegarlo. 4. Regolare angolazione dell'obiettivo e messa a fuoco. Campo di brandeggio: +15° Campo di inclinazione: 0-90° 5. Fissare la cover della Dome.
- Seite 14 Telecamera di rete mini-dome anti vandalismo 1. Rimuovere la cover della Dome.
- Seite 15 2. Fissare le viti. 3. Far passare un cavo Ethernet attraverso il soffi tto o la parete e collegarlo.
- Seite 16 4. Allentare la vite e regolare angolazione dell'obiettivo e messa a fuoco. 5. Fissare la cover della Dome.
- Seite 17 Telecamera di rete mini-cube 1. Installare la telecamera "cube" a soffi tto/parete o posizionarla in orizzontale.
- Seite 18 2. Collegare adattatore di alimentazione e cavo Ethernet. Cavo di alimentazione Cavo Ethernet 3. Impostare l'inquadratura.
- Seite 19 Telecamera di rete mini-bullet 1. Rimuovere il connettore impermeabile e la tenuta di gomma corrispondente. 2. Aprire il cover posteriore. 3. Inserire una scheda micro-SD/SDHC, collegare un cavo Ethernet facendolo passare attraverso la tenuta di gomma e inserire all'interno della telecamera il sacchetto disidratante in dotazione (da sostituire ogni volta che si apre il cover posteriore).
- Seite 20 6. Far passare il cavo Ethernet attraverso il centro della staff a di montaggio, unire la staff a alla telecamera, ruotarla e fi ssarla con le viti. 7. Installare la telecamera a soffi tto o a parete.
- Seite 21 8. Impostare l'inquadratura. 9. Installare la telecamera a soffi tto o a parete. Nota: per ottimizzare la visuale, il parasole della telecamera mini-bullet può essere spostato in avanti (5 mm max.).
- Seite 22 Telecamera di rete pro-bullet 1. Contrassegnare con la Dima di foratura la posizione in cui si desidera installare la telecamera. Dima di foratura 2. Far passare il cavo Ethernet attraverso la base di fi ssaggio e fi ssare quest'ultimo a soffi tto o a parete. 3.
- Seite 23 4. Collegare un cavo Ethernet e agganciare la telecamera con il cavo di sicurezza. 5. Impostare l'inquadratura.
- Seite 24 Telecamera di rete Pro-dome 1. Contrassegnare con la dima di foratura la posizione in cui si desidera installare la telecamera. Installare la base in dotazione a soffi tto o a parete e stringere le viti. 2. Collegare un cavo Ethernet e farlo passare attraverso la guarnizione.
- Seite 25 3. Ruotare la telecamera nella direzione indicata nell'illustrazione e fi ssarla alla base con le viti in dotazione. 4. Collegare e instradare un cavo Ethernet e il cavo di alimentazione attraverso il soffi tto o la parete, quindi collegare la telecamera alla staff a.
- Seite 26 5. Svitare la vite di fi ssaggio della testa della telecamera. Ruotare l'obiettivo della telecamera nella posizione desiderata. Riserrare la vite di fi ssaggio della testa per fi ssare la telecamera. 6. Fissare la cover della Dome. Allineare i due riferimenti...
- Seite 27 Confi gurazione delle telecamere Accesso alla telecamera L'indirizzo IP di default della telecamera di rete è 192.168.5.190. Il nome utente di default è admin e la password è ms1234. Cambiare l'indirizzo IP di default Il software IPC Tools, permette di cambiare l'indirizzo IP della telecamera. Collegare la telecamera alla stessa LAN del computer.
- Seite 28 Passo 7: cliccando due volte sulla telecamera selezionata, è possibile accedere alla telecamera direttamente dal browser web. Si apre la fi nestra di Internet Explorer.
- Seite 29 Accesso alla telecamera mediante browser web La telecamera Milesight può essere utilizzata con sistemi operativi Windows e MAC. I browser raccomandati sono Internet Explorer/Firefox/Chrome/Safari. Accesso tramite il browser Internet Explorer/Firefox/Chrome/Safari Passo 1: aprire il browser Internet Explorer/Firefox/Chrome/Safari e inserire l'indirizzo IP della telecamera. Passo 2: inserire nome utente e password e cliccare su "Login".
- Seite 30 Nota: i browser attualmente supportati sono Internet Explorer 8 (o superiore)/Firefox/Chrome/Safari. Uso con Internet Exlorer 10 Selezionare "Compatible mode" come illustrato in Figura. Uso con Internet Exlorer 11 Selezionare "Compatibility View settings" come illustrato in Figura. Nota: fare riferimento al manuale utente per ulteriori istruzioni di confi gurazione.
- Seite 32 Came S.p.A. Via Martiri Della Libertà, 15 Via Cornia, 1/b - 1/c 31030 Dosson di Casier 33079 Sesto al Reghena Treviso - Italy Pordenone - Italy (+39) 0422 4940 (+39) 0434 698111 (+39) 0422 4941 (+39) 0434 698434 www.came.com...
- Seite 33 IP VIDEO CAMERAS FOR VIDEO SURVEILLANCE FA00187-EN QUICK INSTALLATION GUIDE English...
-
Seite 34: General Warnings
General warnings • Do not expose the product to rain or moisture. • Check that the device is securely attached to the wall or ceiling on which it is installed. • Before using the camera, check that the supply voltage is correct. •... -
Seite 35: General Presentation
General presentation This guide provides the basic instructions for installing the the network camera and explains how to access it. For more details, consult the user manual. Mini-dome network video camera Release tab Ethernet port (PoE) Lens Error LED Power supply LED Micro-SD/SDHC card slot Reset *N.B. - Seite 36 Mini-dome IR network video camera Release tab Ethernet port (PoE) Lens IR LED Error LED Power supply LED Brightness sensor Micro-SD/SDHC Reset card slot...
- Seite 37 Mini-dome IR anti-vandalism network video camera IR LED Brightness sensor Microphone Camera locking screw Lens Micro-SD/SDHC card slot Ethernet port (PoE) Reset Power supply and system...
- Seite 38 Mini-cube network video camera Microphone Lens Indicator LEDs Brightness sensor Loudspeaker IR LED PIR sensor Micro-SD card slot Power supply connector Ethernet port I/O alarm SIP button connector WPS/Reset button *N.B. 1) SIP button: alarm activation via SIP call. After pressing this button, the camera will call the SIP phone. 2) WPS button: press this button fi...
- Seite 39 Mini-bullet network video camera IR LED Lens Brightness sensor Ethernet port Micro-SD/SDHC Reset card slot button...
- Seite 40 Pro-bullet network camera Micro-SD/SDHC CVBS video Reset card slot output button Ventilation holes IR LED Lens Alarm/Audio connector Ethernet port (PoE) Power supply connector...
- Seite 41 Pro-dome network camera Microphone Lens Brightness sensor IR LED Reset Micro-SD/SDHC button card slot...
-
Seite 42: Installing The Cameras
Installing the cameras Mini-dome network video camera 1. Remove the cover of the Dome. Release tab 2. Tighten the screws. - Seite 43 3. Run an Ethernet cable through the ceiling or wall and connect it. 4. Adjust the lens angle and focus. Pan range: +15° Tilt range: 0-90° 5. Secure the cover of the Dome.
- Seite 44 Mini-dome IR network video camera 1. Remove the cover of the Dome. Release tab 2. Tighten the screws.
- Seite 45 3. Run an Ethernet cable through the ceiling or wall and connect it. 4. Adjust the lens angle and focus. Pan range: +15° Tilt range: 0-90° 5. Secure the cover of the Dome.
- Seite 46 Mini-dome anti-vandalism network video camera 1. Remove the cover of the Dome.
- Seite 47 2. Tighten the screws. 3. Run an Ethernet cable through the ceiling or wall and connect it.
- Seite 48 4. Loosen the screw and adjust the lens angle and focus. 5. Secure the cover of the Dome.
- Seite 49 Mini-cube network video camera 1. Install the “cube” camera on the ceiling/wall or place it horizontally.
- Seite 50 2. Connect the power adapter and Ethernet cable. Power cord Ethernet cable 3. Set the frame.
- Seite 51 Mini-bullet network video camera 1. Remove the waterproof connector and corresponding rubber seal. 2. Open the back cover. 3. Insert a micro-SD/SDHC card, connect an Ethernet cable by passing it through the rubber seal and place the desiccant bag supplied inside the camera (this need to be replaced every time you open the back cover). 4.
- Seite 52 6. Pass the Ethernet cable through the centre of the mounting bracket, attach the bracket to the camera, turn it and secure it using the screws. 7. Install the camera on the ceiling or wall.
- Seite 53 8. Set the frame. 9. Install the camera on the ceiling or wall. Note: for the best view, the mini-bullet camera sun shield can be moved forward (5 mm max.).
- Seite 54 Pro-bullet network camera 1. Use the drilling template to mark the position where you want to install the camera. Drilling template 2. Pass the Ethernet cable through the fi xing base and secure the base to the ceiling or wall. 3.
- Seite 55 4. Connect an Ethernet cable and attach the camera using the security cable. 5. Set the frame.
- Seite 56 Pro-dome network camera 1. Use the drilling template to mark the position where you want to install the camera. Install the base supplied to the ceiling or wall and tighten the screws. 2. Connect an Ethernet cable, and then pass it through the gasket.
- Seite 57 3. Turn the camera in the direction shown in the illustration and secure it to the base using the screws provided. 4. Connect and route an Ethernet cable and the power cord through the ceiling or the wall, then connect the camera to the bracket.
- Seite 58 5. Loosen the screw securing the camera head. Rotate the camera lens to the desired position. Tighten the screw securing the head to secure the camera. 6. Secure the cover of the Dome. Align the two references...
- Seite 59 Confi guring the cameras Accessing the camera The default IP address of the network camera is 192.168.5.190. The default user name is admin and the password is ms1234. Changing the default IP address The IPC Tools software allows you to change the IP address of the camera. Connect the camera to the same LAN as the computer.
- Seite 60 Step 7: by double-clicking on the selected camera, you can access the camera directly from the web browser. The Internet Explorer window opens up.
- Seite 61 Accessing the camera via a web browser The Milesight the camera can be used with Windows and MAC operating systems. The recommended browsers are Internet Explorer/Firefox/Chrome/Safari. Access via the Internet Explorer/Firefox/Chrome/Safari browsers. Step 1: open the Internet Explorer/Firefox/Chrome/Safari browser and enter the camera IP address. Step 2: enter your user name and password and click "Login".
- Seite 62 N.B. the browsers currently supported are Internet Explorer 8 (or higher)/Firefox/Chrome/Safari. Use with Internet Explorer 10 Select "Compatible mode" as shown in the fi gure. Use with Internet Explorer 11 Select "Compatibility View Settings" as shown in the fi gure. N.B.
- Seite 64 Came S.p.A. Via Martiri Della Libertà, 15 Via Cornia, 1/b - 1/c 31030 Dosson di Casier 33079 Sesto al Reghena Treviso - Italy Pordenone - Italy (+39) 0422 4940 (+39) 0434 698111 (+39) 0422 4941 (+39) 0434 698434 www.came.com...
- Seite 65 CAMÉRAS IP DE VIDÉOSURVEILLANCE FA00187-FR GUIDE RAPIDE D'INSTALLATION...
-
Seite 66: Instructions Générales
Instructions générales • Ne pas exposer la caméra à la pluie ou à l'humidité. • Contrôler que le dispositif est solidement fi xé au mur ou au plafond. • Avant d'utiliser la caméra, s'assurer que la tension d'alimentation est correcte. •... -
Seite 67: Présentation Générale
Présentation générale Ce guide fournit les instructions de base pour l'installation de la caméra réseau et explique comment y accéder. Pour de plus amples détails, consulter le manuel d'utilisation. Caméra réseau mini-dôme Languette de déblocage Port Ethernet (PoE) Objectif LED d'erreur LED d'alimentation Logement carte micro-SD/SDHC Remise à... - Seite 68 Caméra réseau mini-dôme IR Languette de déblocage Port Ethernet (PoE) Objectif LED IR Led d'erreur Led d'alimentation Capteur de luminosité Logement carte Remise à zéro micro-SD/SDHC...
- Seite 69 Caméra réseau mini-dôme IR anti-vandalisme Led IR Capteur de luminosité Micro Vis de blocage caméra Objectif Logement carte micro-SD/SDHC Port Ethernet (PoE) Remise à zéro LED d'alimentation et système...
- Seite 70 Caméra réseau mini-cube Micro Objectif Indicateurs led Capteur de luminosité Haut-parleur Led IR Capteur PIR Logement carte micro-SD Connecteur alimentation Port Ethernet Connecteur Bouton SIP E/S alarmes Bouton WPS/RàZ *Remarque : 1) Bouton SIP : activation alarme par appel SIP. Après enfoncement de ce bouton, la caméra appellera le téléphone SIP.
- Seite 71 Caméra réseau mini-bullet Led IR Objectif Capteur de luminosité Port Ethernet Logement carte Bouton micro-SD/SDHC Remise à zéro...
- Seite 72 Caméra réseau pro-bullet Logement carte Sortie Bouton micro-SD/SDHC vidéo CVBS Remise à zéro Orifi ces de ventilation Led IR Objectif Connecteur Alarme/Audio Port Ethernet (PoE) Connecteur d'alimen- tation...
- Seite 73 Caméra réseau pro-dôme Micro Objectif Capteur de luminosité Led IR Bouton Logement carte Remise à zéro micro-SD/SDHC...
-
Seite 74: Installation Des Caméras
Installation des caméras Caméra réseau mini-dôme 1. Enlever le couvercle du dôme. Languette de déblocage 2. Fixer les vis. - Seite 75 3. Faire passer un câble Ethernet à travers le plafond ou le mur et le connecter. 4. Régler l'angle de vue de l'objectif et la mise au point. Champ panoramique : +15° Champ d'inclinaison : 0-90° 5. Fixer le couvercle du dôme.
- Seite 76 Caméra réseau mini-dôme IR 1. Enlever le couvercle du dôme. Languette de déblocage 2. Fixer les vis.
- Seite 77 3. Faire passer un câble Ethernet à travers le plafond ou le mur et le connecter. 4. Régler l'angle de vue de l'objectif et la mise au point. Champ panoramique : +15° Champ d'inclinaison : 0-90° 5. Fixer le couvercle du dôme.
- Seite 78 Caméra réseau mini-dôme anti-vandalisme 1. Enlever le couvercle du dôme.
- Seite 79 2. Fixer les vis. 3. Faire passer un câble Ethernet à travers le plafond ou le mur et le connecter.
- Seite 80 4. Desserrer la vis et régler l'angle de vue de l'objectif ainsi que la mise au point. 5. Fixer le couvercle du dôme.
- Seite 81 Caméra réseau mini-cube 1. Installer la caméra « cube » au plafond/mur ou la positionner horizontalement.
- Seite 82 2. Connecter l'adaptateur d'alimentation et le câble Ethernet. Câble d'alimentation Câble Ethernet 3. Confi gurer le cadrage.
- Seite 83 Caméra réseau mini-bullet 1. Enlever le connecteur imperméable et son joint d'étanchéité en caoutchouc. 2. Ouvrir le couvercle postérieur. 3. Insérer une carte micro-SD/SDHC, connecter un câble Ethernet en le faisant passer à travers le joint d'étanchéité en caoutchouc et introduire dans la caméra le sachet déshydratant fourni (à remplacer à chaque ouverture du couvercle postérieur).
- Seite 84 6. Faire passer le câble Ethernet au centre de l'étrier de fi xation, raccorder l'étrier à la caméra, la tourner et la fi xer à l'aide des vis. 7. Installer la caméra au plafond ou au mur.
- Seite 85 8. Confi gurer le cadrage. 9. Installer la caméra au plafond ou au mur. Remarque : pour optimiser le champ de vision, il est possible de faire avancer le pare-soleil de la caméra mini-bullet (5 mm max.).
- Seite 86 Caméra réseau pro-bullet 1. Tracer à l'aide du gabarit de perçage la position d'installation de la caméra. Gabarit de perçage 2. Faire passer le câble Ethernet à travers la base de fi xation et fi xer ce dernier au plafond ou au mur. 3.
- Seite 87 4. Connecter un câble Ethernet et accrocher la caméra à l'aide du câble de sécurité. 5. Confi gurer le cadrage.
- Seite 88 Caméra réseau pro-dôme 1. Tracer à l'aide du gabarit de perçage la position d'installation de la caméra. Installer la base fournie au plafond ou au mur et serrer les vis. 2. Connecter un câble Ethernet et le faire passer à travers le joint.
- Seite 89 3. Tourner la caméra dans le sens indiqué sur la fi gure et la fi xer à la base à l'aide des vis fournies. 4. Connecter et faire passer un câble Ethernet et le câble d'alimentation à travers le plafond ou le mur, puis raccorder la caméra à...
- Seite 90 5. Dévisser la vis de fi xation de la tête de la caméra. Tourner l'objectif de la caméra sur la position souhaitée. Serrer à nouveau la vis de fi xation de la tête pour fi xer la caméra. 6. Fixer le couvercle du dôme. Aligner les deux repères...
- Seite 91 Confi guration des caméras Accès à la caméra L'adresse par défaut de la caméra réseau est 192.168.5.190. Le nom d'utilisateur par défaut est admin et le mot de passe ms1234. Modifi er l'adresse IP par défaut Le logiciel IPC Tools permet de modifi er l'adresse IP de la caméra. Connecter la caméra au même réseau LAN de l'ordinateur.
- Seite 92 Phase 7 : cliquer deux fois sur la caméra sélectionnée pour accéder à la caméra directement via le navigateur Web. La fenêtre d'Internet Explorer s'ouvre.
- Seite 93 Accès à la caméra via le navigateur Web La caméra Milesight est utilisable avec les systèmes d'exploitation Windows et MAC. Les navigateurs recom- mandés sont Internet Explorer/Firefox/Chrome/Safari. Accès via le navigateur Internet Explorer/Firefox/Chrome/Safari Phase 1 : ouvrir le navigateur Internet Explorer/Firefox/Chrome/Safari et saisir l'adresse IP de la caméra. Phase 2 : saisir le nom d'utilisateur et le mot de passe puis cliquer sur «...
- Seite 94 Remarque : les navigateurs actuellement supportés sont Internet Explorer 8 (ou version supérieure)/ Firefox/Chrome/Safari. Utilisation avec Internet Exlorer 10 Sélectionner « Compatible mode » comme illustré sur la fi gure. Utilisation avec Internet Exlorer 11 Sélectionner « Compatibility View settings » comme illustré sur la fi gure. Remarque : pour toute autre instruction de confi...
- Seite 96 Came S.p.A. Via Martiri Della Libertà, 15 Via Cornia, 1/b - 1/c 31030 Dosson di Casier 33079 Sesto al Reghena Treviso - Italy Pordenone - Italy (+39) 0422 4940 (+39) 0434 698111 (+39) 0422 4941 (+39) 0434 698434 www.came.com...
- Seite 97 IP-ÜBERWACHUNGSKAMERAS FA00187-DE SCHNELLINSTALLATIONSANLEITUNG...
-
Seite 98: Allgemeine Hinweise
Allgemeine Hinweise • Das Gerät vor Regen und Feuchtigkeit schützen. • Kontrollieren, dass das Gerät fest an der Wand oder an der Decke montiert ist. • Vor der Verwendung überprüfen, ob der Netzstrom der Betriebsspannung entspricht. • Kamera nicht auseinanderbauen oder verändern. Systemanforderungen •... - Seite 99 Einführung Diese Anleitung enthält die grundlegenden Installationsanweisungen für die Überwachungskamera und erklärt, wie Sie darauf zugreifen. Weitere Angaben, siehe Gebrauchsanleitung. Mini Dome Überwachungskamera Gehäuselasche Ethernet-Port (PoE) Blende LED-Störungsanzeige Strom-LED Mikto-SD/SDHC-Kartenslot Reset *Hinweis: 1) LED-Störungsanzeige: geht beim Einschalten oder bei Störungen an.
- Seite 100 Mini Dome IR-Überwachungskamera Gehäuselasche Ethernet-Port (PoE) Blende IR-LED LED-Störungsanzeige Strom-LED Helligkeitssensor Mikto-SD/SDHC-Kartenslot Reset...
- Seite 101 Vandalensichere Mini Dome IR-Überwachungskamera IR-LED Helligkeitssensor Mikrofon Sperrschraube Blende Mikto-SD/SDHC- Kartenslot Ethernet-Port (PoE) Reset Strom- und System-LED...
- Seite 102 Mini Cube Überwachungskamera Mikrofon Blende LED-Anzeigen Helligkeitssensor Lautsprecher IR-LED PIR-Sensor Mikro-SD-Slot Netzanschluss Ethernet-Port Anschluss SIP-Taster I/O-Alarme WPS-/Reset- Taster *Hinweis: 1) SIP-Taster: Alarmaktivierung durch SIP-Anruf. Nach Druck auf diesen Taster ruft die Kamera den SIP- Telefonapparat an. 2) WPS-Taster: zuerst diesen Taster und anschließend den WPS-Taster auf dem Router drücken, um die kabellose Verbindung automatisch zu konfi...
- Seite 103 Mini Bullet Überwachungskamera IR-LED Blende Helligkeitssensor Ethernet-Port Mikto-SD/SDHC- Taster Kartenslot Reset...
- Seite 104 Pro Bullet Überwachungskamera CVBS Videoausgang Mikro-SD/SDHC- Taster Reset Kartenslot Lüftungsöff nungen IR-LED Blende Alarm-/Audioanschluss Ethernet-Port (PoE) Netzanschluss...
- Seite 105 Pro Dome Überwachungskamera Mikrofon Blende Helligkeitssensor IR-LED Taster Mikro-SD/SDHC- Reset Kartenslot...
-
Seite 106: Kamerainstallation
Kamerainstallation Mini Dome Überwachungskamera 1. Die Abdeckung der Dome-Kamera entfernen. Gehäuselasche 2. Schrauben anziehen. - Seite 107 3. Ein Ethernetkabel durch die Decke oder die Wand ziehen und anschließen. 4. Den Blendenwinkel und den Fokus einstellen. Schwenkbereich: + 15° Neigungsbereich: 0-90° 5. Die Abdeckung der Dome-Kamera anbringen.
- Seite 108 Mini Dome IR-Überwachungskamera 1. Die Abdeckung der Dome-Kamera entfernen. Gehäuselasche 2) Schrauben anziehen.
- Seite 109 3. Ein Ethernetkabel durch die Decke oder die Wand ziehen und anschließen. 4. Den Blendenwinkel und den Fokus einstellen. Schwenkbereich: + 15° Neigungsbereich: 0-90° 5. Die Abdeckung der Dome-Kamera anbringen.
- Seite 110 Vandalensichere Mini Dome Überwachungskamera 1. Die Abdeckung der Dome-Kamera entfernen.
- Seite 111 2) Schrauben anziehen. 3. Ein Ethernetkabel durch die Decke oder die Wand ziehen und anschließen.
- Seite 112 4. Die Schraube lösen und den Blendenwinkel und den Fokus einstellen. 5. Die Abdeckung der Dome-Kamera anbringen.
- Seite 113 Mini Cube Überwachungskamera 1. Eine Cube Überwachungskamera an der Decke/Wand montieren oder horizontal anbringen.
- Seite 114 2. Das Netzteil und das Ethernetkabel anschließen. Netzkabel Ethernetkabel 3. Blickwinkel einstellen.
- Seite 115 Mini Bullet Überwachungskamera 1. Den wasserdichten Anschluss und die entsprechende Gummidichtung entfernen. 2. Die hintere Abdeckung öff nen. 3. Eine Mikro-SD/SDHC-Karte einstecken, ein Ethernetkabel durch die Gummidichtung ziehen und anschließen und den Beutel mit dem Luftentfeuchter im Innern der Überwachungskamera unterbringen (jedesmal wenn die hintere Abdeckung geöff net wird, ersetzen).
- Seite 116 6. Das Ethernetkabel durch die Mitte des Haltebeschlags führen, den Beschlag an die Überwachungskamera halten, drehen und festschrauben. 7. Decken- oder Wandmontage der Überwachungskamera.
- Seite 117 8. Blickwinkel einstellen. 9. Decken- oder Wandmontage der Überwachungskamera. Hinweis: für eine optimale Kameraanzeige kann man den Sonnenschutz der Mini Bullet Überwachungska- mera nach vorne schieben (max. 5 mm).
- Seite 118 Pro-Bullet Überwachungskamera 1. Mit der Bohrschablone die Löcher an der gewählten Stelle anzeichnen. Bohrschablone 2. Das Ethernetkabel durch die Montageplatte ziehen und diese an der Decke oder Wand anbringen. 3. Die hintere Platte montieren und anziehen und den Beschlag mit 4 Inbusschrauben an der Überwa- chungskamera befestigen.
- Seite 119 4. Ein Ethernetkabel anschließen und das Sicherheitskabel an der Überwachungskamera anbringen. 5. Blickwinkel einstellen.
- Seite 120 Pro Dome Überwachungskamera 1. Mit der Bohrschablone die Löcher an der gewählten Stelle anzeichnen. Die enthaltene Montageplatte an der Decke oder Wand anbringen und die Schrauben anziehen. 2. Ein Ethernetkabel anschließen und durch die Dichtung ziehen.
- Seite 121 3. Die Überwachungskamera in die abgebildete Richtung drehen und mit den enthaltenen Schrauben an der Montageplatte befestigen. 4. Ein Ethernetkabel und das Netzkabel anschließen und durch die Decke oder die Wand verlegen, danach die Überwachungskamera an der Halterung festschrauben.
- Seite 122 5. Die Sperrschraube auf dem Kamerakopf entfernen. Das Objektiv in die gewünschte Richtung drehen. Die Sperrschraube auf dem Kamerakopf wieder anziehen und die Überwachungskamera befestigen. 6. Die Abdeckung der Dome Überwachungskamera befestigen. Die beiden Einkerbungen ausrichten...
-
Seite 123: Kamerakonfi Guration
Kamerakonfi guration Kamerazugriff Die werkseingestellte IP-Adresse der Überwachungskamera ist: 192.168.5.190. Der werkseingestellte Benutzername ist admin und das Passwort ist ms1234. Änderung der werkseingestellten IP-Adresse. Mit der Software IPC Tools kann man die IP-Adresse der Überwachungskamera ändern. Die Überwachungskamera mit dem LAN-Netzwerk des Computers verbinden. IPC Tools erfasst automatisch die mit dem LAN-Netzwerk verbundenen Überwachungskameras, stellt die IP-Adressen ein und verwaltet Firmware-Updates. - Seite 125 Kamerazugriff über Web-Browser Die Überwachungskamera Milesight kann mit den Betriebssystemen Windows und MAC betrieben werden. Empfohlene Browser sind: Internet Explorer/Firefox/Chrome/Safari. Zugriff über den Browser: Internet Explorer/Firefox/Chrome/Safari. Schritt 1: Den Browser (Internet Explorer/Firefox/Chrome/Safari) öff nen und die IP-Adresse der Überwa- chungskamera eingeben. Schritt 2: Den Benutzernamen und das Passwort eingeben und auf "Login"...
- Seite 126 Hinweis: zur Zeit werden folgende Browser unterstützt: Internet Explorer 8 (oder höher)/Firefox/Chrome/ Safari. Verwendung mit Internet Explorer 10 "Compatible mode" wählen, siehe Abbildung. Verwendung mit Internet Explorer 11 "Compatibility View settings" wählen, siehe Abbildung. Hinweis: weitere Konfi gurationsanweisungen fi nden Sie im Benutzerhandbuch.
- Seite 128 Came S.p.A. Via Martiri Della Libertà, 15 Via Cornia, 1/b - 1/c 31030 Dosson di Casier 33079 Sesto al Reghena Treviso - Italy Pordenone - Italy (+39) 0422 4940 (+39) 0434 698111 (+39) 0422 4941 (+39) 0434 698434 www.came.com...