
Verwandte Anleitungen für lockncharge Carrier 15


Inhaltszusammenfassung für lockncharge Carrier 15
- Seite 1 USER INSTRUCTIONS Carrier 15 Charging Station™ www.pclocs.com.au www.lockncharge.com...
- Seite 2 Carrier 15 Charging Station™ Congratulations on your purchase. Follow these instructions for easy and fast set-up of your Carrier 15 Charging Station. PC Locs, LocknCharge and the Padlock device are Trademarks of IWS Global Pty Ltd. Copyright IWS Global Pty Ltd, July 2016.
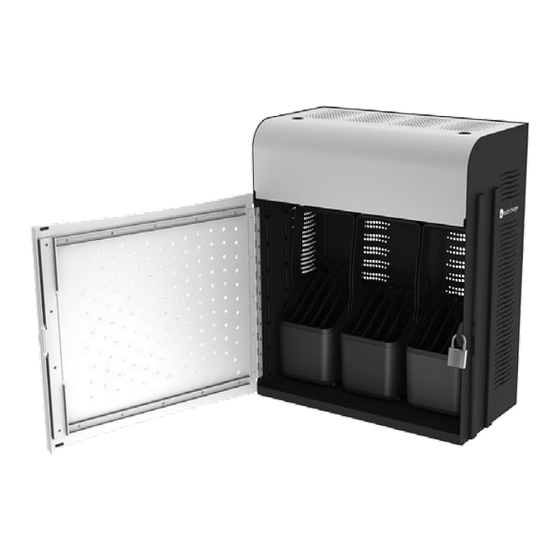
- Seite 3 INSTRUCTION MANUAL STEP 1 - Unpacking the Carrier 15 Charging Station After unpacking, open the door and remove the baskets. If you have devices that can fit in the plastic baskets, remove the Device Rack and mat, otherwise leave it in place.
- Seite 4 Push the device connector through the hole and then pull along the rubber grip cable holder. Repeat for the remaining device chargers. STEP 4 - Assembling your devices in the Carrier 15 Charging Station Place the basket with the devices into the Carrier 15 Charging Station.
- Seite 5 The power strips can be slid along the track to create space. Replace the lid over the charge compartment. Plug the Carrier 15 Charging Station power cable into the unit, then into the wall socket. Charging will commence automatically (may need to switch Close the door and use a padlock to secure.
- Seite 6 Note the mounting holes for desk mounting: STEP 6 - Resetting the Power Strips If there is a power surge and the power is tripped in the Carrier 15 Charging Station, press the red reset button on each power strip to reset.
-
Seite 7: Warranty
PC Locs/LocknCharge has been advised of the possibility of such damages. PC Locs/LocknCharge obligation is strictly and exclusively limited to the replacement or repair of any defective products. - Seite 8 www.lockncharge.com...
- Seite 9 BEDIENUNGSANLEITUNG Carrier 15 Charging Station™ www.pclocs.com.au www.lockncharge.com...
- Seite 10 Carrier 15 Charging Station™ Herzlichen Glückwunsch zu Ihrem Kauf. Folgen Sie diesen Anweisungen für eine einfache und zügige Inbetriebnahme. PC Locs, LocknCharge und die Padlock-Vorrichtung sind Marken der IWS Global Pty Ltd. Copyright IWS Global Pty Ltd, Juli 2016. Haftungsausschluss Diese Informationen sind geistiges Eigentum von IWS Global Pty Ltd.
- Seite 11 BEDIENUNGSANLEITUNG SCHRITT 1: Carrier 15 Charging Station auspacken Öffnen Sie nach dem Auspacken die Tür und entnehmen Sie die Körbe. Falls Ihre Geräte in die Kunststoffkörbe passen, nehmen Sie das Edelstahl- Gerätegestell und die Matte heraus. SCHRITT 2: Edelstahl-Gerätegestell herausnehmen Drücken Sie die Oberkante herunter, um die...
- Seite 12 Sie es entlang der gummibeschichteten Wiederholen Sie dieses für jedes Ladekabel. Kabelführung. SCHRITT 4: Carrier 15 Charging Station mit Geräten bestücken Setzen Sie den Korb mit den Geräten in die Carrier 15 Charging Station. Verbinden Sie die Geräte mit je einem Ladekabel.
- Seite 13 Stromversorgungsleisten können verschoben werden, um Platz zu schaffen. Setzen Sie den Deckel wieder auf das Ladefach. Stecken Sie das Netzkabel in die Carrier 15 Charging Station und verbinden Sie es mit einer Wandsteckdose. Der Ladevorgang wird Schließen Sie die Tür und sichern sie diese mit automatisch beginnen (sofern die Wandsteckdose einem Vorhängeschloss.
- Seite 14 WICHTIG: Dieser Arbeitsschritt sollte durch einen qualifizierten Monteur erfolgen. Konsultieren Sie einen Baufachmann, um zu prüfen, ob die vorgesehene Wand zur Anbringung einer voll beladenen Carrier 15 Charging Station geeignet ist. Stellen Sie bei der Wandmontage sicher, dass das Gerät waagerecht oder leicht nach hinten geneigt angebracht ist, damit die Tür nicht von selbst aufschwingt, wenn...
-
Seite 15: Garantie
Herstellungsfehlern sind. Zur Inanspruchnahme der Garantieleistung ist ein Nachweis über das Erstverkaufsdatum vorzulegen. Sollte in der Garantiezeit ein Defekt, eine Störung oder ein Ausfall auftreten, wird PC Locs/LocknCharge nach einer Prüfung die als fehlerhaft bestätigten Produkte in eigenem Ermessen reparieren oder ersetzen. Alle Transportkosten sind vom Eigentümer zu tragen. - Seite 16 www.lockncharge.com...
-
Seite 17: Instrucciones Para El Usuario
INSTRUCCIONES PARA EL USUARIO Carrier 15 Charging Station www.pclocs.com.au www.lockncharge.com... - Seite 18 Carrier 15 Charging Station Enhorabuena por su compra. Siga estas instrucciones para instalar de forma fácil y rápida la Carrier 15 Charging Station. Locs, LocknCharge y el dispositivo Padlock son marcas comerciales de IWS Global Pty Ltd. Derechos de autor de IWS Global Pty Ltd, julio de 2016.
- Seite 19 MANUAL DE INSTRUCCIONES PASO 1 – Desembalar la Carrier 15 Charging Station Después de desembalar la unidad, abra la puerta y saque las canastas. Si tiene dispositivos que caben en las canastas de plástico, quite la alfombrilla y el estante de acero inoxidable para dispositivos, en caso contrario déjelos en su lugar.
- Seite 20 Repita este procedimiento para el resto de los sujetacables de goma. cargadores de dispositivos. PASO 4 – Montar los dispositivos en el Carrier 15 Charging Station Coloque la canasta con los dispositivos en el Carrier 15 Charging Station. Conecte el cable al dispositivo.
- Seite 21 Vuelva a poner la tapa sobre el compartimento de deslizar por el riel para crear espacio. carga. Conecte el cable de alimentación de la Carrier 15 Charging Station a la unidad y, a continuación, enchúfelo a una toma de corriente. La carga Cierre la puerta y use un candado para mantenerla comenzará...
- Seite 22 PASO 6 – Restablecer la alimentación de las regletas Si tiene lugar una sobrecarga de energía y se interrumpe la alimentación de la Carrier 15 Charging Station, pulse el botón rojo de restablecer ubicado en cada una de las regletas para restablecer la alimentación.
-
Seite 23: Cumplimiento De Normativas Y Aprobaciones
PC Locs/LocknCharge haya sido avisado de la posibilidad de que ocurran esos daños. La obligación de PC Locs/LocknCharge se limita única y exclusivamente a sustituir o reparar cualquier producto defectuoso. - Seite 24 www.lockncharge.com...
-
Seite 25: Instructions D'utilisation
INSTRUCTIONS D'UTILISATION Carrier 15 Charging Station www.pclocs.com.au www.lockncharge.com... - Seite 26 Félicitations pour votre achat ! Suivez les instructions suivantes pour installer facilement et rapidement votre Carrier 10 Charging Station. PC Locs, LocknCharge et the Padlock device sont des marques déposées d'IWS Global Pty Ltd. Copyright IWS Global Pty Ltd, juillet 2016.
-
Seite 27: Notice D'utilisation
NOTICE D'UTILISATION ÉTAPE 1 – Déballage de la Carrier 15 Charging Station Après déballage, ouvrez la porte et retirez les paniers. Si vous disposez d'équipements pouvant être installés dans les paniers en plastique, retirez la baie d'équipement en acier inoxydable et le tapis, sinon laissez-la en place. - Seite 28 Répétez la procédure pour les autres chargeurs l'orifice, puis tirez sur le manchon porte-câble. d'équipements. ÉTAPE 4 — Assemblage de vos équipements dans la Carrier 15 Charging Station Disposez le panier avec les équipements dans la Carrier 15 Charging Station.
- Seite 29 NOTICE D'UTILISATION Ajustez la longueur des câbles afin de pouvoir Rangez les longueurs excédentaires de câbles en connecter vos équipements. les nouant proprement. Dans le compartiment de régénération, rangez les longueurs excédentaires de câble en les nouant proprement ensemble. Les barres d'alimentation peuvent être coulissées le long du rail afin d'offrir Placez à...
- Seite 30 Consultez un spécialiste des structures pour déterminer si le mur sur lequel vous comptez monter l'unité est capable de résister à la charge de la Carrier 15 Charging Station avec tous les équipements correspondants. Lorsque l’unité est montée sur un mur, assurez-vous qu’elle est montée de niveau ou légèrement inclinée vers l’arrière de manière à...
-
Seite 31: Conformité Et Homologations
En cas de défaut, dysfonctionnement ou panne survenant pendant la période de garantie, PC Locs/ LocknCharge s'engage à réparer ou à remplacer, à sa discrétion, les produits jugés défectueux par le fabricant selon des critères raisonnables d'appréciation. Tous les frais de transport sont à la charge du propriétaire. La partie prenant la décision du transport prend la responsabilité... - Seite 32 www.lockncharge.com...
-
Seite 33: Istruzioni Per L'utente
ISTRUZIONI PER L’UTENTE Carrier 15 Charging Station™ www.pclocs.com.au www.lockncharge.com... - Seite 34 Carrier 15 Charging Station Congratulazioni per il tuo acquisto. Seguire queste istruzioni per la configurazione semplice e veloce della tua Carrier 15 Charging Station. PC Locs, LocknCharge e il dispositivo Padlock sono marchi commerciali di IWS Global Pty Ltd. Copyright IWS Global Pty Ltd, luglio 2016.
-
Seite 35: Manuale D'istruzioni
MANUALE D’ISTRUZIONI PASSO 1 - Rimozione della Carrier 15 Charging Station dalla confezione Dopo la rimozione dalla confezione, aprire il portello e rimuovere i cestelli. Se hai dispositivi che possono adattarsi ai cestelli di plastica, rimuovere il rack del dispositivo in acciaio inox e il tappetino, altrimenti lasciarlo in posizione. - Seite 36 Ripetere per i caricabatterie del dispositivo presa in gomma. restanti. PASSO 4 - Assemblaggio dei dispositivi nel Carrier 15 Charging Station Pore il cestello con i dispositivi nel Carrier 15 Charging Station. Collegare il cavo al dispositivo.
- Seite 37 MANUALE D’ISTRUZIONI Regolare la lunghezza del cavo per raggiungere i propri dispositivi. Avvolgere e tenere in ordine il cavo in eccesso. Sistemare il cavo in eccesso nel vano di carica. Le strisce di alimentazione possono essere fatte scorrere lungo il binario per creare spazio. Riposizionare il coperchio sul vano di carica.
- Seite 38 è in grado di supportare la Carrier 15 Charging Station di carico completa. Nel montaggio a parete, assicurarsi che l’unità sia montata in piano o leggermente inclinata all’indietro perché...
-
Seite 39: Garanzia
PC Locs/LocknCharge riparerà o sostituirà, a propria discrezione, i prodotti che a giudizio di PC Locs/ LocknCharge sono da considerarsi difettosi. Tutti i costi di trasporto saranno a carico del proprietario e il rischio di perdita sarà a carico della parte che inizia il trasporto. - Seite 40 www.lockncharge.com...
-
Seite 41: Instruções De Utilização
INSTRUÇÕES DE UTILIZAÇÃO Carrier 15 Charging Station™ www.pclocs.com.au www.lockncharge.com... - Seite 42 Carrier 15 Charging Station Parabéns pela sua aquisição. Siga estas instruções para uma configuração rápida e fácil da sua Carrier 15 Charging Station. PC Locs, LocknCharge e o dispositivo Padlock são marcas comerciais da IWS Global Pty Ltd. Direitos de autor da IWS Global Pty Ltd, julho de 2016.
-
Seite 43: Manual De Instruções
MANUAL DE INSTRUÇÕES PASSO 1 - Desembalamento da Carrier 15 Charging Station Depois do desembalamento, abra a porta e retire os cestos. Se tiver dispositivos que caibam nos cestos de plástico, retire as prateleiras de dispositivos em aço inoxidável e o tapete, caso contrário, deixe-os no lugar. - Seite 44 Repita para os restantes carregadores do suporte de cabos em borracha. dispositivo. PASSO 4 - Montagem dos dispositivos na Carrier 15 Charging Station Coloque o cesto com os dispositivos na Carrier 15 Charging Station. Ligue o cabo ao dispositivo.
- Seite 45 Volte a colocar a tampa no compartimento de faixa para criar espaço. carregamento. Ligue o cabo de alimentação da Carrier 15 Charging Station à unidade e, em seguida, à tomada de parede. O carregamento começa automaticamente (pode ser necessário ligar a Feche a porta e utilize um cadeado para proteger.
- Seite 46 PASSO 6 - Reinício das faixas de alimentação Se houver um pico de corrente e um corte de energia na Carrier 15 Charging Station, prima o botão de reinício vermelho em cada faixa de alimentação para a reiniciar.
-
Seite 47: Conformidade E Aprovações
MANUAL DE INSTRUÇÕES Garantia A PC Locs/LocknCharge garante que o produto está isento de defeitos de concepção, materiais, montagem e fabrico por um período de doze meses após a data de compra ao comprador final original. Será necessário o comprovativo de compra original para obter o serviço da garantia. - Seite 48 www.lockncharge.com...