Der fuyl tower bietet für mobile geräte eine sichere lager- und ladestation mit einem zentralen elektronischen bedienfeld. das produkt verfügt über individuell gesicherte schächte für 15 geräte. (84 Seiten)
Seite 1
USER INSTRUCTIONS iQ 30 Cart™ www.pclocs.com.au www.lockncharge.com...
Seite 2
30 Cart™ Congratulations on your purchase of the iQ 30 Cart . Follow these instructions for easy and fast set-up of your iQ 30 Cart. PC Locs, LocknCharge and the Padlock device are Trademarks of IWS Global Pty Ltd.
Seite 3
INSTRUCTION MANUAL Section A - Setting up the iQ 30 Cart. STEP 1 - Opening the iQ 30 Cart. Swing the handle to unlock the sliding top. Slide the top to open. STEP 2 - Routing the cables. Remove the Carry Baskets.
Seite 4
30 Cart™ STEP 2 - Routing the cables continued... Lay the shelves on a scratch-proof surface. Insert all the device cables into the USB ports. ENSURE BOTH iQ SYNC CHARGE BOXES ARE SWITCHED ON Run the cable up through the hole at the end.
Seite 5
INSTRUCTION MANUAL STEP 3 - Devices ready for syncing and charging. Insert all your devices in the Carry Baskets and place back into the iQ 30 Cart. Plug the device cable end into the device. Unwind the power cable and When not used, wrap excess cable around plug into the wall socket.
Seite 6
30 Cart™ Section B - Setting up the Security Chain Kit. Tools required: The Security Chain Kit contains the following: • Masonry hammer-drill • 1 x 3 holed Anchor Plate and security chain • 10mm masonry drill bit •...
PC Locs/LocknCharge has been advised of the possibility of such damages. PC Locs/LocknCharge obligation is strictly and exclusively limited to the replacement or repair of any defective products.
Seite 8
Compliances and Approvals USA | CANADA: Conforms to UL60950-1 www.pclocs.com.au www.lockncharge.com...
Seite 9
BEDIENUNGSANLEITUNG iQ 30 Cart™ www.pclocs.com.au www.lockncharge.com...
Seite 10
30 Cart™ Herzlichen Glückwunsch zu Ihrem Kauf. Folgen Sie diesen Anweisungen für eine einfache und zügige Inbetriebnahme. PC Locs, LocknCharge und die Padlock-Vorrichtung sind Marken der IWS Global Pty Ltd. Copyright IWS Global Pty Ltd, Mai 2014. Haftungsausschluss Diese Informationen sind geistiges Eigentum von IWS Global Pty Ltd. Sie dürfen ohne vorherige schriftliche Genehmigung weder teilweise noch vollständig verteilt, reproduziert oder kopiert werden.
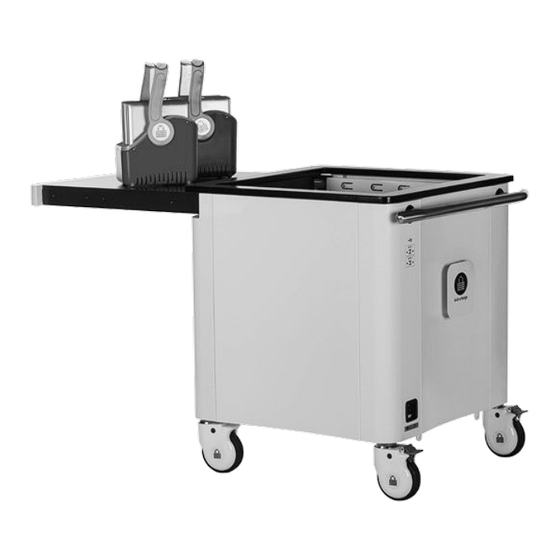
BEDIENUNGSANLEITUNG SCHRITT 1: Öffnen des iQ 30 Carts Entsperren Sie die obere Schublade mit dem Griff. Ziehen Sie die obere Schublade aus. SCHRITT 2: Verlegen der Kabel Entfernen Sie die Tragekörbe. Entfernen Sie die Matten. Lösen Sie die Rändelschrauben der internen Entfernen die 4 Fächer durch Anheben der Fächer.
Seite 12
30 Cart™ SCHRITT 2: Verlegen der Kabel - Fortsetzung Legen Sie die Fächer auf eine kratzfeste Stecken Sie alle Gerätekabel in die Oberfläche. USB-Anschlüssse. STELLEN SIE SICHER, DASS BEIDE iQ SYNC CHARGE BOXEN EINGESCHALTET SIND Verlegen Sie die Kabel durch die Öffnung am Führen Sie die Kabelenden durch die...
SCHRITT 3: Aufladen und Synchronisieren der Geräte Setzen Sie die Geräte in die Tragekörbe ein. Verbinden Sie die Gerätekabel mit den Geräten. Setzen Sie dann die Körbe in den iQ 30 Cart. Verbinden Sie das Netzkabel mit der Bei Nichtbenutzung wickeln Sie das Kabel um die Wandsteckdose.
30 Cart™ SCHRITT 4: Sicherheitskettensatz installieren Benötigte Werkzeuge: Der Sicherheitskettensatz umfasst Folgendes: • Bohrhammer • 1 x Ankerplatte mit drei Löchern und Sicherheitskette • Steinbohrer 10 mm • 3 x Ankerbolzen 8 mm, Länge 55 mm • Stift und Lineal oder Maßband •...
Herstellungsfehlern sind. Zur Inanspruchnahme der Garantieleistung ist ein Nachweis über das Erstverkaufsdatum vorzulegen. Sollte in der Garantiezeit ein Defekt, eine Störung oder ein Ausfall auftreten, wird PC Locs/LocknCharge nach einer Prüfung die als fehlerhaft bestätigten Produkte in eigenem Ermessen reparieren oder ersetzen. Alle Transportkosten sind vom Eigentümer zu tragen.
INSTRUCCIONES PARA EL USUARIO iQ 30 Cart™ www.pclocs.com.au www.lockncharge.com...
Seite 18
30 Cart™ Enhorabuena por su compra. Siga estas instrucciones para instalar de forma fácil y rápida el iQ 30 Cart. PC Locs, LocknCharge y el dispositivo Padlock son marcas comerciales de IWS Global Pty Ltd. Derechos de autor de IWS Global Pty Ltd, mayo de 2014.
Seite 19
MANUAL DE INSTRUCCIONES PASO 1 – Abrir el iQ 30 Cart Gire la manija para desbloquear la tapa superior deslizante. Deslice la tapa superior para abrir. PASO 2 – Tender los cables Saque las bandejas. Quite las alfombrillas. Afloje y quite las ruedecillas ubicadas en los Quite los cuatro estantes levantándolos por el...
Seite 20
30 Cart™ PASO 2 – Continuación de tender los cables… Coloque los estantes sobre una superficie a Inserte los cables de todos los dispositivos en los prueba de arañazos. puertos USB. ASEGÚRESE DE QUE AMBAS CAJAS DE CARGA Y SINCRONIZACIÓN iQ ESTÉN ENCENDIDAS...
Seite 21
PASO 3 – Dispositivos listos para sincronización y carga Inserte todos los dispositivos en las bandejas y Conecte el extremo del cable del dipositivo al vuélvalas a poner en el iQ 30 Cart. dispositivo. Desenrrolle el cable de alimentación y conéctelo Cuando no lo use, enrrolle el exceso de cable a a una toma de corriente.
Seite 22
30 Cart™ PASO 4 – Instalación del kit de la cadena de seguridad Herramientas necesarias: El kit de la cadena de seguridad contiene lo siguiente: • Taladro percutor para hormigón • Placa de anclaje perforada 1 x 3 y cadena de seguridad •...
PC Locs/LocknCharge haya sido avisado de la posibilidad de que ocurran esos daños. La obligación de PC Locs/LocknCharge se limita única y exclusivamente a sustituir o reparar cualquier producto defectuoso.
INSTRUCTIONS D’UTILISATION iQ 30 Cart™ www.pclocs.com.au www.lockncharge.com...
Seite 26
Félicitations pour votre achat ! Suivez les instructions suivantes pour installer facilement et rapidement votre iQ 30 Cart. PC Locs, LocknCharge et the Padlock device sont des marques déposées d'IWS Global Pty Ltd. Copyright IWS Global Pty Ltd, mai 2014.
Seite 27
NOTICE D’UTILISATION ÉTAPE 1 – Ouverture de l’iQ 30 Cart Faites pivoter la poignée pour déverrouiller la partie supérieure coulissante. Faites coulisser la partie supérieure pour ouvrir. ÉTAPE 2 – Guidage des câbles Retirez les paniers de transport. Retirez les nattes.
Seite 28
30 Cart™ ÉTAPE 2 – Guidage des câbles (suite) Déposez les tablettes sur une surface protégée Insérez tous les câbles de connexion dans les contre les rayures/éraflures. ports USB. ASSUREZ-VOUS QUE LES DEUX iQ SYNC CHARGE BOX™ SONT EN CIRCUIT Passez l’extrémité...
Seite 29
ÉTAPE 3 – Dispositifs prêts pour la synchronisation et le chargement Insérez tous vos dispositifs dans les paniers de Branchez l’extrémité du câble du dispositif dans transport et remontez-les dans l’iQ 30 Cart. le dispositif. Déroulez le câble d’alimentation et branchez-le Enroulez la partie éventuellement inutilisée du...
Seite 30
30 Cart™ ÉTAPE 4 – Installation du kit de chaîne de sécurité Outils requis : Le kit de chaîne de sécurité contient les outils suivants : • Marteau perforateur • 1 x plaque d’ancrage à 3 trous et chaîne de sécurité...
En cas de défaut, dysfonctionnement ou panne survenant pendant la période de garantie, PC Locs/ LocknCharge s'engage à réparer ou à remplacer, à sa discrétion, les produits jugés défectueux par le fabricant selon des critères raisonnables d'appréciation. Tous les frais de transport sont à la charge du propriétaire. La partie prenant la décision du transport prend la responsabilité...
ISTRUZIONI PER L’USO iQ 30 Cart™ www.pclocs.com.au www.lockncharge.com...
Seite 34
Congratulazioni per il tuo acquisto. Seguire queste istruzioni per una configurazione semplice e rapida dell’iQ 30 Cart. PC Locs, LocknCharge e il dispositivo Padlock sono marchi commerciali di IWS Global Pty Ltd. Copyright IWS Global Pty Ltd, maggio 2014. Esclusione di responsabilità.
MANUALE DI ISTRUZIONI PASSO 1 – Apertura di iQ 30 Cart Girare la maniglia e sbloccare la parte superiore scorrevole. Far scorrere la parte superiore per aprire. PASSO 2 – Posa dei cavi Rimuovere i cestelli di trasporto. Rimuovere i tappetini.
Seite 36
30 Cart™ PASSO 2 – Posa dei cavi (continua...) Poggiare i pannelli su una superficie antigraffio. Inserire tutti i cavi del dispositivo nelle porte USB. ASSICURARSI CHE ENTRAMBE LE iQ SYNC CHARGE BOX SIANO ACCESE Passare l’estremità del cavo attraverso il Far passare il cavo attraverso il foro all’estremità.
Seite 37
PASSO 3 – Dispositivi pronti per la sincronizzazione e la carica Inserire tutti i dispositivi nei cestelli di trasporto e Collegare l’estremità del cavo del dispositivo nel riposizionarli in iQ 30 Cart. dispositivo. Srotolare il cavo di alimentazione e collegarlo alla Quando non usato, avvolgere il cavo in eccesso presa elettrica.
Seite 38
30 Cart™ PASSO 4 – Installazione del Kit Catena di sicurezza Attrezzi necessari: Il Kit Catena di sicurezza contiene quanto segue: • Trapano a percussione per muratura • 1 x astra di ancoraggio a 3 fori e catena di sicurezza •...
PC Locs/LocknCharge riparerà o sostituirà, a propria discrezione, i prodotti che a giudizio di PC Locs/ LocknCharge sono da considerarsi difettosi. Tutti i costi di trasporto saranno a carico del proprietario e il rischio di perdita sarà a carico della parte che inizia il trasporto.
Seite 40
Compliances and Approvals USA | CANADA: Conforme a UL60950-1 www.pclocs.com.au www.lockncharge.com...
INSTRUÇÕES DE UTILIZAÇÃO iQ 30 Cart™ www.pclocs.com.au www.lockncharge.com...
Seite 42
30 Cart™ Parabéns pela sua aquisição. Siga estas instruções para uma configuração rápida e fácil do seu iQ 30 Cart. PC Locs, LocknCharge e o dispositivo Padlock são marcas comerciais da IWS Global Pty Ltd. Direitos de autor da IWS Global Pty Ltd, Maio de 2014.
MANUAL DE INSTRUÇÕES PASSO 1 – Abertura do iQ 30 Cart Puxe a pega para destrancar a parte superior deslizante. Faça deslizar a parte superior para abrir. PASSO 2 – Encaminhamento dos cabos Retire os Cestos de Transporte. Retire os tapetes.
Seite 44
30 Cart™ PASSO 2 – Encaminhamento dos cabos (continuação) Coloque as prateleiras numa superfície à prova Insira todos os cabos do dispositivo nas portas de riscos. USB. CERTIFIQUE-SE DE QUE AMBAS AS UNIDADES iQ SYNC CHARGE BOX ESTÃO LIGADAS Passe a extremidade do cabo através do passa-...
Seite 45
PASSO 3 – Dispositivos prontos para sincronização e carregamento Insira todos os seus dispositivos nos Cestos de. Ligue a extremidade do cabo do dispositivo ao Transporte e coloque-os no iQ 30 Cart. dispositivo. Desenrole o cabo de alimentação e ligue-o à...
Seite 46
30 Cart™ PASSO 4 – Instalação do kit da corrente de segurança Ferramentas necessárias: O kit da corrente de segurança contém o seguinte: • Berbequim • 1 placa de retenção com 3 orifícios e corrente de segurança • Broca de 10 mm •...
Na ocorrência ou detecção de um defeito, avaria ou falha durante o período de garantia, a PC Locs/LocknCharge reparará e substituirá, ao seu critério, os produtos que de acordo com uma análise razoável da PC Locs/ LocknCharge sejam considerados defeituosos.