Inhaltsverzeichnis
Werbung
Verfügbare Sprachen
Verfügbare Sprachen
Quicklinks
Quickstart Guide:
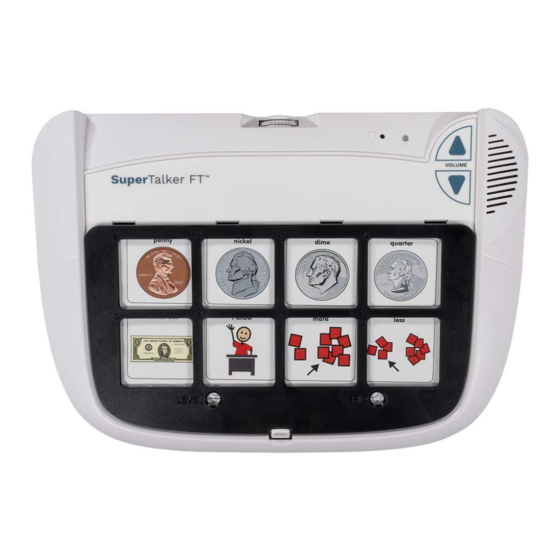
SuperTalker™ FT progressive communicator
3
Enter Record Mode
Press and Hold,
then Release
Press and Hold the RECORD button until the RECORD
Light activates, then Release.
1
Powering SuperTalker
Insert four AA batteries into the device as shown. Power
On/Off is located on the spine of the device.
www.ablenetinc.com
4
Record Messages
Press and Hold
while speaking
Press and Hold the desired Message location, begin
speaking when you hear a beep. Release when finished.
Repeat for additional messages.
RECORD Light will flash while recording.
NOTE: Speak close to the microphone for loud, clear sound.
Power
2
Select Level and Grid
Adjust as-needed
With the desired Overlay and Keyguard in place:
Select a LEVEL (1-8) and Grid (1, 2, 4, 8) using the
controls on the spine of the device.
NOTE: Be sure to match the Grid number to the Keyguard
and Overlay currently installed on the device.
For information on Overlays, Keyguards and Helpful Tips, see
reverse.
5
Exit Record Mode
Press and
Release
Press and Release the RECORD button to exit Record
Mode.
NOTE: This device has 16 minutes of total recording time.
The RECORD Light will turn yellow when only two minutes
remain.
Werbung
Inhaltsverzeichnis

Verwandte Anleitungen für AbleNet SuperTalker FT

Inhaltszusammenfassung für AbleNet SuperTalker FT
- Seite 1 Quickstart Guide: Powering SuperTalker Select Level and Grid SuperTalker™ FT progressive communicator Adjust as-needed With the desired Overlay and Keyguard in place: Select a LEVEL (1-8) and Grid (1, 2, 4, 8) using the controls on the spine of the device. Power NOTE: Be sure to match the Grid number to the Keyguard and Overlay currently installed on the device.
-
Seite 2: Advanced Features
RECORD Light will flash yellow. Warranty/Repair/Return Information External Switch jacks (see above). Volume Controls AbleNet offers a limited two-year warranty on the SuperTalker Keyguard Storage progressive communicator product. For full warranty details, Lock or Unlock SuperTalker’s Volume controls by pressing The keyguard storage area on the back of SuperTalker can visit www.ablenetinc.com... - Seite 3 Guide de démarrage rapide : Alimentation du SuperTalker Sélection d’un niveau et d’une grille Appareil de communication progressif SuperTalker™ FT Réglez au besoin Avec le calque et le protège-clavier en place : Sélectionnez un niveau [LEVEL (1-8)] et une grille [GRID (1, 2, 4, 8)] via les commandes situées sur le côté...
-
Seite 4: Fonctions Avancées
Garantie/Réparations/Informations pour le renvoi jaune. message correspondent aux prises de contacteur externe (voir ci-dessus). AbleNet offre une garantie limitée de deux ans pour l’appareil Commandes de volume de communication progressif SuperTalker. Vous trouverez des Espace de Stockage du protège-clavier Verrouillez ou déverrouillez les commandes de volume du informations détaillées sur la garantie sur le site... -
Seite 5: Supertalker Einschalten
Kurzanleitung: SuperTalker einschalten Ebene und Fingerführraster auswählen SuperTalker™ FT Kommunikator Gewünschte Einstellungen vorne- hmen Nachdem die gewünschte Schablone und der Fingerführraster angebracht wurden: Unter Verwendung der Regler an der Rückseite des Gerätes eine EBENE (LEVEL 1-8) und einen Raster (GRID 1, 2, 4, 8) wählen. -
Seite 6: Erweiterte Funktionen
Hinweise zur Garantie/Reparatur/Rücksendung Beim Drücken einer Taste, für die keine Mitteilung Buchsen für die externen Tastereingänge (siehe oben). aufgezeichnet wurde, blinkt die RECORD-Lampe gelb. AbleNet bietet eine zweijährige beschränkte Garantie für Staufach für Fingerführraster den progressiven SuperTalker Kommunikator. Ausführliche Lautstärkeregler Garantieinformationen finden Sie auf unserer Website unter Im Staufach an der Rückseite des SuperTalker können... - Seite 7 Guía de inicio rápido: Encendido del comunicador SuperTalker Seleccione el nivel y la red Comunicador progresivo SuperTalker™ FT Realice los ajustes necesarios Con el accesorio de superposición y el protector de teclado deseados y colocados en su lugar: Seleccione un NIVEL (1-8) y una Red (1, 2, 4, 8) utilizando los controles situados en el canto del dispositivo.
-
Seite 8: Características Avanzadas
Garantía/Reparación/Información de devolución Almacenamiento del protector de teclado Controles de volumen AbleNet ofrece una garantía limitada de dos años en el comunicador El área de almacenamiento del protector de teclado en la parte progresivo SuperTalker. Para obtener información detallada sobre la...