Herunterladen Inhalt Inhalt Diese Seite drucken
Suaoki S270 Handbuch

Suaoki S270 Handbuch

Portable solar generator
Vorschau ausblenden Andere Handbücher für S270:

Werbung

Verfügbare Sprachen
  • DE

Verfügbare Sprachen

  • DEUTSCH, seite 15
S270 Portable Solar Generator
User Manual

Werbung

Inhaltsverzeichnis
loading

Inhaltszusammenfassung für Suaoki S270

  • Seite 1 S270 Portable Solar Generator User Manual...
  • Seite 3 CONTENTS English····························1-11 Deutsch························12-22 Français·······················23-33 Italiano··························34-44 Español························45-55 日本語··························56-66...
  • Seite 4 ATTENTION: The specifications and the pictures in this manual are for reference only. The product is only used for emergency situations, it cannot replace the standard AC power for household appliances or digital products. Actual AC outlet and AC adapter would be different depending on the locations of customer.
  • Seite 5: Product Overview

    Thank you for choosing Suaoki. The purpose of this manual is to help you use the product correctly. Please read the manual carefully and follow the guidance. Product Overview [Left] AC Power Switch AC Indicator Light AC Outlet [Right] Handle 3.5mm DC Input Port...
  • Seite 6 [Front] 5.5mm DC Output Port (9V-12V/10A/15A Max) USB Output Port (4V-9V/2.1A Max) [Rear] 3 x USB Output Ports (5V/2.1A Max) [Top] Battery Check Button Battery Indicator Light EN-3...
  • Seite 7 Operation Guidance 1) How to charge with the DC output ports of this product? Connect your DC 12V appliances with the 5.5mm 12V DC output port. And your appliances would be charged automatically. ※ Note: Please check to make sure that your 12V DC appliance supports charging with the DC port of this product, which is 5.5mm in diameter.
  • Seite 8 2) How to charge with the AC outlet of this product? Connect the power cable plug of the AC electrical appliance to the AC outlet of the product. Turn on the AC power button and the product will start providing power to your appliances.
  • Seite 9 [Rear] Smart phone, tablet, etc. 4) How to use the flashlight This product is built with super bright LED flashlight. Single press the flashlight button to turn on the light and to switch modes: Solid → Flash → Off. Warning! Do not point the strong light directly at the eyes of human.
  • Seite 10 [Right] AC Socket ▼ ▲ AC Adapter (15V/2A) B. Charge through solar panel 1. Place your solar panel where it will get as much strong direct sunlight as possible. 2. Connect the output port of the solar panel with the input port of the product to start charging.
  • Seite 11 MPPT Technology With the built-in MPPT (Maximum Power Point Tracking) technology, this product could be charged by solar panel efficiently. MPPT technology is designed to use with wind turbines and photovoltaic (PV) solar systems to maximize power extraction under all conditions. With MPPT technology, the product can compare the output voltage of the solar panels with the battery voltage in real-time.
  • Seite 12: Cold Weather Usage

    Product Application Tips a) It is recommended to use this product when the ambient temperature falls within 10°C ~30°C, so as to obtain the optimal charging capacity. b) When charging this product, please keep it away from TV, radio and other equipment to avoid radio wave interference.
  • Seite 13: Product Specifications

    Modified Sine Wave Output This product generates modified sine wave, which is compatible with AC electric appliance that works with Sinusoidal waveform (power <100W). However, the product is only used for emergency situations. It cannot replace the standard DC or AC power supply for household appliances or digital products.
  • Seite 14: Package Contents

    Our company provides customers with warranty of 12 months from the date of purchase. Contact us For any inquiries or comments concerning our products, please send an email to support@suaoki.com, and we will respond to you as soon as possible. EN-11...
  • Seite 15 ACHTUNG: Die Spezifikationen und die Abbildungen in diesem Handbuch dienen nur als Referenz. Das Produkt wird nur für Notsituationen verwendet, es kann nicht den Standard-Wechselstrom für Haushaltsgeräte oder digitale Produkte ersetzen. DE-12...
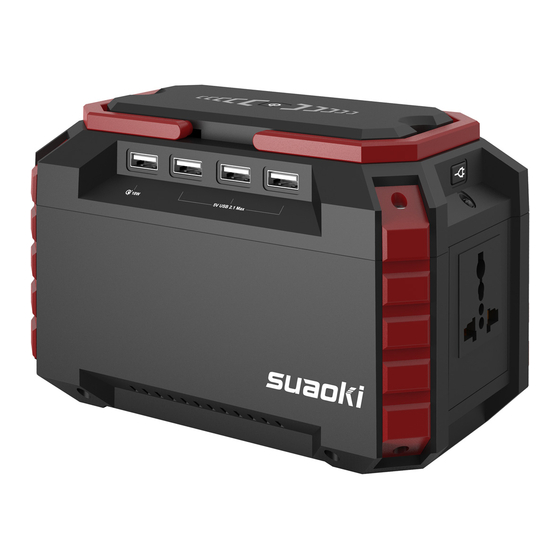
  • Seite 16 Vielen Dank für die Wahl von Suaoki. Der Zweck dieses Handbuchs ist es, den Käufern bei der korrekten Verwendung des Produkts zu helfen. Bitte lesen Sie die Bedienungsanleitung aufmerksam durch und befolgen Sie die Anleitung. Produktübersicht [Linke] AC Netzschalter AC-Kontrollleuchte...
  • Seite 17 [Vorn] 5,5 mm DC-Ausgang (9 V-12 V / 10 A / 15 A Max) USB-Ausgangsanschluss (4V-9V/2.1A Max) [Rückseite] 3 x USB-Ausgangsanschlüsse (5V/2.1A Max) [Oben] Batterie Prüfknopf Batterieanzeige DE-14...
  • Seite 18 Betriebsanleitung 1) Wie kann man mit den DC-Ausgangsanschlüssen des Produktes aufladen? Schließen Sie Ihre DC 12V Geräte an den 5,5 mm 12 V DC-Ausgang an. Und Ihre Geräte würden automatisch aufgeladen. ※ Hinweis: Stellen Sie bitte sicher, dass Ihr 12 V DC-Gerät das Laden mit dem DC-Anschluss des Produkts mit einem Durchmesser von 5,5 mm unterstützt.
  • Seite 19 2) Wie kann man mit der Steckdose das Produkt aufladen? Schließen Sie den Netzkabelstecker des Wechselstrom-Elektrogerätes an die Netzsteckdose des Produkts an. Schalten Sie den Netzschalter ein und das Gerät beginnt mit der Strom für Ihre Geräte zu versorgen. Bitte stellen Sie sicher, dass die Leistung der AC-Appliance weniger als 100 W beträgt.
  • Seite 20 [Rückseite] Handy, Tablet, usw. 4) Wie kann man die Taschenlampe benutzen? Das Produkt ist mit super helle LED-Taschenlampe gebaut. Drücken Sie die Taschenlampe-Taste, um das Licht einzuschalten und die Modi zu wechseln: Leuchtet → Blitz → OFF. Warnung! Richten Sie bitte nicht das starke Licht direkt auf die menschlichen Augen. 5) Wie kann man das Produkt aufladen? A.
  • Seite 21 [Recht] AC Steckdose ▼ ▲ AC Ladegerät (15V/2A) B. Ladung durch Solarpanel 1. Stellen Sie bitte das Solarpanel so auf, dass es möglichst starkes direktes Sonnenlicht erhält. 2. Schließen Sie den Ausgangsanschluss des Solarpanels an den Eingangsanschluss des Geräts an, um den Ladevorgang zu starten. Man kann sehen, dass das Produkt aufgeladen wird, wenn die blauen Batterieanzeigen blinken.
  • Seite 22 MPPT Technologie Mit der integrierten MPPT-Technologie (Maximale Power Point Tracking) kann dieses Produkt effizient mit Solarpanels aufgeladen werden. Die MPPT-Technologie wurde für den Einsatz in Windkraftanlagen und Photovoltaik-Solarsystemen entwickelt, um die Leistungsentfaltung unter allen Bedingungen zu maximieren. Mit der MPPT-Technologie kann das Produkt die Ausgangsspannung der Solarpanels in Echtzeit mit der Batteriespannung vergleichen.
  • Seite 23: Produktanwendungstipps

    h) Es ist normal, dass das Produkt beim Laden heiß werden kann. Seien Sie mit Vorsicht beim Umgang mit dem Produkt. i) Laden Sie bitte das Produkt nicht zu hoch. j) Trennen Sie bitte das Produkt bei vollständiger Ladung sofort von der Stromquelle. Produktanwendungstipps a) Es wird empfohlen, das Produkt bei der Umgebungstemperatur zwischen 10°C und 30°C zu verwenden, um die optimale Ladekapazität zu erreichen.
  • Seite 24: Modifizierter Sinus-Ausgang

    Modifizierter Sinus-Ausgang Dieses Produkt erzeugt eine modifizierte Sinuswelle, die mit einem Wechselstromgerät kompatibel ist, das mit einer sinusförmigen Wellenform (Leistung <100W) arbeitet. Das Produkt wird jedoch nur für Notfallsituationen verwendet. Es kann nicht die Standard DC- oder AC-Stromversorgung für Haushaltsgeräte oder digitale Produkte ersetzen. Elektronische Geräte, die einen AC Motor verwenden, werden bei einer modifizierten Sinuswelle nicht voll ausgelastet, und es kann Geräusche auftreten.
  • Seite 25 1 x Bedienungsanleitung Garantie Wir bieten den Kunden eine Gewährleistung von 12 Monaten ab Kaufdatum. Kontakieren Sie uns Für Anfragen oder Kommentare zu unseren Produkten senden Sie bitte eine Email an support@suaoki.com, und wir werden Ihnen so schnell wie möglich antworten. DE-22...
  • Seite 26 ATTENTION: Les spécifications et les images de ce manuel sont seulement pour la référence. Le produit n'est utilisé que pour des situations urgentes, il ne peut pas remplacer l'alimentation AC standard pour les appareils ménagers ou les produits numériques. FR-23...
  • Seite 27 Merci d'avoir choisi Suaoki. Le but de ce manuel est de vous aider à utiliser le produit correctement. Veuillez lire attentivement le manuel et suivre les instructions. Présentation de Produit [La gauche] Bouton D'alimentation AC Indicateur Lumineux  AC Prise Universelle AC...
  • Seite 28 [Devant] Port de sortie DC de 5.5 mm (9V-12V / 10A / 15A Maximum) Port de sortie USB (4V-9V / 2.1A Maximum) [Arrière] 3 * ports de sortie USB (5V / 2.1A Maximum) [Haut] Bouton de vérification de la batterie Indicateur Lumineux de batterie FR-25...
  • Seite 29 Guide D'opération 1) Comment Charger avec les Ports de Sortie DC de ce Produit? Connectez vos appareils DC 12V avec le port de sortie de 5.5 mm 12 V DC. Et vos appareils seraient facturés automatiquement. ※ Remarque: Veuillez vérifier que votre appareil 12V DC prend en charge la charge avec le port DC de ce produit, qui est de 5.5 mm de diamètre.
  • Seite 30 2) Comment Charger avec la Prise Secteur de ce Produit? Branchez la fiche du câble d'alimentation de l'appareil électrique AC sur la prise secteur du produit. Allumez le bouton d'alimentation secteur et le produit commencera à alimenter vos appareils. Assurez-vous que la puissance de l'appareil est moins de 100W.
  • Seite 31 [Arrière] Téléphone intelligent, tablette, etc. 4) Comment Utiliser la Lampe de Poche Ce produit est construit avec une lampe de poche LED super brillante. Appuyez une seule fois sur le bouton de la lampe de poche pour allumer la lumière et changer de mode: Solide →...
  • Seite 32 [Droite] Prise AC ▼ ▲ Adaptateur secteur (15V / 2A) B. charge par Panneau Solaire 1. Placez votre panneau solaire à l'endroit où il aura autant de lumière directe du soleil que possible. 2. Connectez le port de sortie du panneau solaire au port d'entrée du produit pour commencer la charge.
  • Seite 33 Technologie MPPT Avec la technologie intégrée MPPT (Maximum Power Point Tracking), ce produit pourrait être chargé efficacement par un panneau solaire. La technologie MPPT est conçue pour être utilisée avec des éoliennes et des systèmes photovoltaïques (PV) afin de maximiser l'extraction de puissance dans toutes les conditions.
  • Seite 34: Utilisation Par Temps Froid

    i) Le produit peut devenir chaud lors du chargement. C'est normal. Utiliser avec précaution lors de la manipulation du produit. j) Ne surchargez pas ce produit. k) Complètement chargé une fois , débranchez immédiatement le produit de la source d'alimentation. Conseils D'application du Produit a) Il est recommandé...
  • Seite 35: Caractéristiques Du Produit

    Sortie Sinusoïdale Modifiée Ce produit est modifié onde sinusoïdale modifiée, qui est compatible avec l'appareil électrique AC qui fonctionne avec la forme d'onde sinusoïdale (puissance <100W). Ce produit n'est utilisé que dans des situations d'urgence. Il ne peut pas remplacer l'alimentation DC ou AC standard pour les appareils ménagers ou les produits numériques.
  • Seite 36: Contenu Du Colis

    Notre société fournit aux clients une garantie de 12 mois à compter de la date d'achat. Contactez nous Pour toute question ou commentaire concernant nos produits, veuillez envoyer un email à support@suaoki.com, et nous vous répondrons dans les plus brefs délais. FR-33...
  • Seite 37 ATTENZIONE: Le specificazioni e le immagini nel manuale utente per il riferimento soltanto. Il prodotto è utilizzato solo per le situazioni di emergenza, non può sostituire l'alimentazione AC standard per gli apparecchi domestici o i prodotti digitali. IT-34...
  • Seite 38: Panoramica Del Prodotto

    Grazie per aver scelto Suaoki. Questo manuale utente in modo di aiutarti a usare il prodotto correttamente. Si prega di leggere il manuale attentamente e seguire la guida. Panoramica del Prodotto [Sinistra] AC Interruttore di Alimentazione AC Indicatore di Luce...
  • Seite 39 [Fronte] 5,5mm DC Porta di Uscita (9V-12V/10A/15A Max) USB Porta di Uscita (4V-9V/2.1A Max) [Posteriore] 3 x USB Porta di Uscita (5V/2.1A Max) [Sopra] Tasto di Controllo di Batteria Indicatore di Luce di Batteria IT-36...
  • Seite 40 Guida d’Operazione 1) Come caricare con le porte in uscita DC del prodotto? Connettere i tuogli apparecchi DC 12V con la porta in uscita 5,5mm 12V DC. E gli apparecchi saranno caricati automaticamente. ※ Note: Si prega di assicurare che gli apparecchi 12V DC supportano la carica con la porta DC di questo prodotto, il cui è...
  • Seite 41 2) Come caricare tramite la presa AC di questo prodotto? Connettere la spina del cavo di alimentazione dell'apparecchio elettrico AC alla presa AC del prodotto. Accendere il tasto di alimentazione AC e il prodotto inizia a fornire alimentazione agli apparecchi. Assicurarsi che la potenza dell'apparecchio AC sia inferiore a 100W.
  • Seite 42 [Posteriore] Cellulare, tablet, ecc. 4) Come usare la torcia Questo prodotto è dotato di una torcia a LED luminosa incorporata. Premere sigonolo il tasto di torcia per accendere la luce e per commutare le modalità: Fisso → Lampeggia → OFF Avviso! Non puntare direttamente la luce forte agli occhi delle persone.
  • Seite 43 [Destra] AC Presa femminile ▼ ▲ AC Adattatore (15V/2A) A. Ricaricarlo tramite pannello solare 1. Mettere il pannello solare in cui riceverà la luce solare forte e diretta. 2. Connettere la porta di uscita del pannello solare con la porta di entrata del prodotto per cominciare a caricare, sapendo che il prodotto sta caricando quando l'indicatore della batteria LED blu si accende e lampeggia Il prodotto è...
  • Seite 44 Tecnologia MPPT Con la tecnologia incorporata MPPT (Maximum Power Point Tracking), questo prodotto potrebbe essere caricato dal pannello solare in modo efficiente. La tecnologia MPPT è progettata per essere utilizzata con turbine a vento e sistemi fotovoltaici (PV) per massimizzare l'estrazione di potenza in tutte le condizioni. Con la tecnologia MPPT, il prodotto può...
  • Seite 45: Smaltimento E Riciclaggio

    j) Non sovraccaricare questo prodotto. k) Quando è completamente caricato, scollegare immediatamente il prodotto dalla fonte di alimentazione. Suggerimenti di applicazione per il prodotto a) Si raccomanda di utilizzare questo prodotto quando la temperatura ambiente scende entro 10°C ~ 30°C, in modo da ottenere la capacità di carica ottimale. b) Quando si carica questo prodotto, si prega di tenerlo lontano da TV, radio e altre apparecchiature per evitare l'interferenza dell'onda radio.
  • Seite 46: Specifiche Del Prodotto

    Uscita sinusoidale modificata Questo prodotto genera un'onda sinusoidale modificata, compatibile con l'elettrodomestico AC che funziona con la forma d'onda sinusoidale (potenza <100W). Tuttavia, il prodotto è utilizzato solo per situazioni di emergenza. Non può sostituire l'alimentazione standard DC o AC per elettrodomestici o prodotti digitali. Gli apparecchi elettronici che utilizzano un motore a corrente alternata non lavoreranno alla sua piena capacità...
  • Seite 47: Contenuto Del Pacco

    La nostra azienda offre ai clienti la garanzia di 12 mesi dalla data di acquisto. Contattaci Per eventuali richieste o commenti riguardanti i nostri prodotti, ti invitiamo a inviare una mail a support@suaoki.com e risponderemo al più presto possibile. IT-44...
  • Seite 48 ATENCIÓN: Las especificaciones y las imágenes en este manual son solo de referencia. El producto solo se usa para situaciones de emergencia, no puede reemplazar AC corriente alterna estándar para electrodomésticos o productos digitales. ES-45...
  • Seite 49: Descripción Del Producto

    Gracias por elegir Suaoki. El propósito de este manual es ayudarlo a usar el producto correctamente. Lea atentamente el manual y siga las instrucciones. Descripción del producto [Izquierda] Botón de encendido de AC Luz indicadora de AC Salida de AC universal...
  • Seite 50 [Parte trasera] Puerto de salida DC de 5,5 mm (9V-12V / 10A / 15A máximo.) Puerto de salida USB (4V-9V / 2.1A Máximo) [Parte delantera] 3 x puertos de salida USB (5V / 2.1A Máximo) [Parte superior] Botón de comprobación de la batería Luz indicadora de batería...
  • Seite 51: Guía De Operación

    Guía de Operación 1) ¿Cómo cargar con los puertos de salida de DC de este producto? Conecte sus dispositivos de 12V DC con el puerto de salida de 12V DC de 5.5mm. Y sus electrodomésticos se cargarán automáticamente. ※ Nota: Verifique que su dispositivo de 12V DC admita la carga con el puerto de DC de este producto, que tiene 5,5 mm de diámetro.
  • Seite 52 2) ¿Cómo cargar con la salida de AC de este producto? Conecte el enchufe del cable de alimentación del aparato eléctrico de AC a la salida de AC del producto. Encienda el botón de alimentación de AC y el producto comenzará...
  • Seite 53 [Parte delantera] Teléfono inteligente, tableta, etc. 4) Cómo usar la linterna Este producto está fabricado con linterna super brillante LED. Solo presione el botón de la linterna para encender la luz y para cambiar los modos: Sólido → Flash → Desactivado. ¡Advertencia! No señale la luz fuerte directamente a los ojos del ser humano.
  • Seite 54 [Derecha] Toma de AC ▼ ▲ Adaptador de AC (15V/2A) B. Carga a través del panel solar 1. Coloque su panel solar donde obtendrá la mayor luz solar directa posible. 2. Conecte el puerto de salida del panel solar con el puerto de entrada del producto para comenzar a cargar.
  • Seite 55 Tecnología MPPT Con la tecnología MPPT (Seguimiento del punto máximo de potencia) incorporada, este producto podría cargarse con un panel solar de manera eficiente. La tecnología MPPT está diseñada para usar con aerogeneradores y sistemas solares fotovoltaicos (PV) para maximizar la extracción de energía en todas las condiciones.
  • Seite 56 h) No cubra el producto con toallas, ropa y otros artículos. i) El producto puede calentarse al cargar. Esto es normal. Use con precaución al manipular el producto. j) No sobrecargue este producto. k) Cuando esté completamente cargada, desconecte el producto de la fuente de alimentación de inmediato.
  • Seite 57 Salida de Oda Sinusoidal Modificada Este producto genera una onda sinusoidal modificada, que es compatible con un dispositivo eléctrico de AC que funciona con una forma de onda sinusoidal (potencia <100W). Sin embargo, el producto solo se usa para situaciones de emergencia.
  • Seite 58: Contenidos Del Paquete

    Nuestra compañía ofrece a los clientes una garantía de 12 meses a partir de la fecha de compra. Contáctenos Para cualquier consulta o comentario sobre nuestros productos, envíe un correo electrónico a support@suaoki.com, y le responderemos lo antes posible. ES-55...
  • Seite 59 注意: 本ユーザーマニュアルに記載されている仕様と図は参考用です。 本製品は緊急状況用で、家電やデジタル製品の標準AC電流の電源として使用でき ません。 実際のACポートとACアダプタは、お客様の場所によって異なります。 JP-56...
  • Seite 60 Suaokiを選んでいただきありがとうございます。 本ユーザーマニュアルの目的は、お客様が製品を正確に使用できるためです。本 ユーザーマニュアルをよくお読みになり、指示に従ってください。 製品の概要 [左] AC電源ボタン ACインジケータライト ACポート [右] ハンドル 3.5mm DC入力ポート フラッシュボタン フラッシュ 冷却通気口 JP-57...
  • Seite 61 [前] 5.5mm DC出力ポート (9V-12V / 10A / 15A Max) USB出力ポート(最大4V-9V / 2.1A) [後] 3 x USB出力ポート (最大5V / 2.1A) [トップ] バッテリー検査ボタン バッテリーンジケー タライト JP-58...
  • Seite 62 操作ガイダンス 1) 本製品のDC出力ポートで充電する方法は? 2)DC 12Vデバイスを5.5mm 12V DC出力ポートに接続します。デバイスは自動的 に充電開始します。 ※ 注意: 12V DCデバイスが本製品の直径5.5mmのDCポートで充電をサポートし ていることを確認してください。 12V DCデバイスのメーカーまたは販売店で確 認できます。 [前] コネクタ(直径5.5mm)をDC出力ポートに直接差し 込んで12V DCデバイス(パワー<180W)に充電して ください。 または、シガライターソケットで12V DCデバイスの車用 充電器と12V DC出力ポートを接続します。 ※ 注意: 12V DC出力電圧は9V∼12Vで、最大出力電流は15Aです。バッテリ容 量が時間とともに減少すると、DC出力電圧も減少します。入力電圧安定化機能が 内蔵されていないデバイスと接続する場合は、本製品の入力電圧が低すぎると、 充電を自動中止します。そいう場合は、すぐ接続を中断し、時間内に本製品を充 電してください。 保護モード(DC出力): 短絡/過電圧保護:DC出力が短絡または過電圧(負荷が180Wを超え)の場 合、製品は自動オフします。製品を12Vデバイスから取り外し、再充電して ください。これは製品の復元に役立ちます。 JP-59...
  • Seite 63 2) 本製品のACポートで充電する方法は? ACデバイスのケーブルを製品のACポートに接続します。AC電源ボタンを押し、 ACデバイスを充電開始します。AC電器のパワーが100W以内であることを確認し てください。 [左] ※ 注意: ACポートが使用されていないときは、電力を節約するため、AC電源ボ タンをオフにしてください。 保護モード(AC出力): 短絡/過電圧保護: AC出力が短絡または過電圧(負荷が180Wを超え)の場 合、AC出力は自動オフします。本製品を充電し、AC出力ボタンを再度押し てください。 冷蔵庫、製氷機やレーザープリンタなどの電子機器では、サージパワーで起 動、動作させるがあります。サージパワーは100Wを超えると、過電圧保護 を引き起こす可能性があります。接続を中断し、デバイスの製造元に詳しく 確認してください。 3) 本製品のUSBポートで充電する方法は? デジタルデバイスのUSBケーブルを本製品のUSB出力ポートに接続します。バッ テリー検査ボタンを押し、USB電源出力をオンにします。USBポートで充電でき ない場合は、AC電源出力ボタンを押し、USB電源出力をトリガーします。デジタ ルデバイスがフール充電されるとき、電力を節約するため、AC電源出力をオフに してください。 JP-60...
  • Seite 64 [前] スマートフォン、 タブレットなど 4) 製品の使い方は? 本製品は超明るいLED照明灯を搭載します。フラッシュボタンを一回押し、フ ラッシュを点灯し、モードを切り替えます: ソリッド→フラッシュ→オフ 警告! 強光を人間の目に直接向かないでください。 5) 製品の充電方法は? A. ウォールチャージャーで充電する 製品をウォールチャージャーに接続して充電します。青色のバッテリーインジ ケーターが点滅すると、製品が充電中であることがわかります。 インジケ 1つイン 2つイン 3つイン 4つイン 5つイン ーターラ ジケータ ジケータ ジケータ ジケータ ジケータ イトの点 ーライト ーライト ーライト ーライト ーライト 滅する数 点滅する 点滅する 点滅する 点滅する 点滅する 80%-100% バッテリ...
  • Seite 65 [右] ACソケット ▼ ▲ ACアダプタ(15V / 2A) B. ソーラーパネルで充電する 1. できるだけソーラーパネルを強く直射日光がある場所に置きます。 2. ソーラーパネルの出力ポートを製品の入力ポートに接続し、充電開始します。 バッテリーインジケーターライトが青色に点滅すると、製品が充電中であるこ とがわかります。すべてのインジケーターライトが点滅を停止、点灯になる と、製品はフル充電しました。 [右] ▲ 充電入力 (13V-22V / 2AMax) JP-62...
  • Seite 66 MPPT 技術 ソーラーパネルは内蔵のMPPT (最大パワーポイントトラッキング) 技術によ り、製品への的効率に充電できます。MPPT技術は、風力発電と太陽光発電 (PV)システムに採用され、すべでの条件での充電効率を最大限に高めます。 MPPT技術により、ソーラーパネルの出力電圧をバッテリのリアルタイム電 圧と比較できます。それから、最優な電源を探し、充電効率を最大化にしま す。 ※ 実際の充電効率は、天気、温度、バッテリの充電状態などによって大きく 異なる場合があります。 C. 12V車のシガライターソケットで充電する 車用充電器を利用し、12V車のシガライターソケットに挿入します。バッテリー インジケーターライトが青色に点滅すると、製品が充電中であることがわかりま す。すべてのインジケーターライトが点滅を停止、点灯になると、製品はフル充 電しました。 注意: 車のバッテリーのパワー損失を避けるために、車のエンジンを始動 したときにシガライターソケットでを本製品を充電してください この機能は12V車専用です。 注意 a) 製品を短絡させないでください。短絡することを避けるために、すべての金属 物(コイン、ヘアピン、キーなど)から離れてください。 b) 製品を加熱したり、火に投じたり、水や他の液体を入れたりしないでくださ い。高温環境から離れてください。直射日光に当てないでください。 c) 高湿度やほこりが多い場所に置かないでください。 d) 本製品を分解または再度組立しないでください。 e) 落としたり、重い物を乗せたり、強い衝撃を与えたりしないでください。 f) 身体的、感覚的または精神的に能力が低下した人に向いていません。 g) 子供の手の届かないところに保管してください。 h) タオル、衣服などで製品を覆わないでください。...
  • Seite 67 製品アプリケーションのヒント a) 最適な充電容量が得られるために、10℃∼30℃のときご利用ください。 b) 充電するときは、電波妨害を避けるため、テレビ、ラジオなどのデバイスから 離れてください。 c) 長時間使用しない場合は、ケーブルを外してから保管してください。 d) 部分のポータブル電子デバイスを充電するには、あらかじめ電子デバイスを充 電モードに設定してください。具体的な情報は電子デバイスのユーザーマニュ アルに参考してください。 e) 製品(リチウム電池)の寿命を延ばすには、3ヶ月に1回充電するか、少なくと も6ヶ月に1回充電する必要があります。 寒い天気の使用 電池の化学的な特性より、低温(凍結以下)は製品の電池容量に影響を与える可 能性があります。零度以下の環境に生活する場合は、製品を断熱されたクーラー に保管し、電源(ソーラーパネル)に接続することをお勧めします。断熱クーラ ー内の製品の動作に生まれた熱量により、製品のバッテリー容量を最高に保ちま す。 廃棄とリサイクル 本製品を家庭廃棄物とともに廃棄しないでください。 製品とバッテリーは、現地 の法規に従って処分またはリサイクルしてください。 バッテリー情報 本製品には、取り外し不可能な充電式バッテリを内蔵しています。デバイスが破 損する可能性がありますので、バッテリを取り外さないでください。 バッテリーは500回以上充放電できますが、最終的には損耗します。 JP-64...
  • Seite 68 修正正弦波出力 本製品は正弦波形(電力<100W)で動作する交流電気機器に対応する修正正弦波 を生成します。でも、本製品は緊急状況用で、家電やデジタル製品の標準AC DC 電流の電源として使用できません。ACモーターを使用する電子機器は、修正正弦 波を利用すると、フル容量で動作できないし、騒音が響きます。冷蔵庫、電子レ ンジ、ACモータを使用するコンプレッサー、壊れやすい医療機器など長期間使用 する電器には、純正弦波インバーターを利用することをお勧めです。 製品仕様 電池 リチウムイオン電池, 18650, 13500mAh, 11.1V, 150Wh(Max) 寸法 (LWH) 184.5 x 109.5 x 118.5mm 重量 約1.3 kg 入力(アダプタ) DC 15V/2A 入力 (ソーラーパネル) MPPT 13V-22V/2A Max 7-8時間 ( 15V/2Aアダプタを利用する場合) 充電時間 USB 出力 1 x USB 出力 4V-9V/2.1A Max (QC 3.0) 3 x USB 出力...
  • Seite 69 パッケージ内容 1 x Suaoki ポータブルソーラー発電機 1 x 電源アダプタ 1 x シガライターアダプター 1 x DC-MC4 ソーラー充電ケーブル 1 x 車用充電器 1 x ユーザーマニュアル 保証 弊社は、購入日から12ヶ月の保証をお客様に提供します。 お問い合わせ 弊社の製品に関するお問い合わせやご意見は、support@suaoki.comまで電子メー ルでお送りください。できるだけ早く対応いたします。 JP-66...
  • Seite 72 MADE IN CHINA Web: www.suaoki.com E-mail: support@suaoki.com...

Inhaltsverzeichnis