Herunterladen Inhalt Inhalt Diese Seite drucken
Inhaltsverzeichnis

Werbung

Verfügbare Sprachen
  • DE

Verfügbare Sprachen

  • DEUTSCH, seite 65
marca propiedad de | est une marque de | trade mark propiety of |marchio di proprietà di:
El fabricante se reserva el derecho de modificar sin previo aviso las características de sus productos para introducir mejoras técnicas o cumplir con nuevas regulaciones oficiales./Le
constructeur se réserve le droit de modifier les caractéristiques de ses produits en vue d'y apporter des améliorations techniques ou de respecter de nouvelles réglamentations./The
manufacturer reserves the right to modify the specifications of its products in order to make technical improvements or comply with new regulations. Il produttore si riserva il diritto di modificare
senza preavviso le caratteristiche dei suoi prodotti al fine di introdurre dei miglioramenti tecnici o di conformarsi alle nuove normative ufficiali./Le constructeur se réserve le droit de modifier
les caractéristiques de ses produits en vue d'y apporter des améliorations techniques ou de respecter de nouvelles réglamentations./The manufacturer reserves the right to modify the
specifications of its products in order to make technical improvements or comply with new regulations.
BR16
ES|FR|IT|EN|DE
INDICADOR
INDICATEUR
INDICATORE
INDICATOR
ANZEIGE
Pol. Empordà Internacional Calle F. Parcela 15-16
17469 VILAMALLA - (Girona) SPAIN
T. (34) 972 527 212 - F. (34) 972 527 211
V.4
20190311

Werbung

Inhaltsverzeichnis
loading

Inhaltszusammenfassung für Baxtran BR16

  • Seite 1 BR16 ES|FR|IT|EN|DE INDICADOR INDICATEUR INDICATORE INDICATOR ANZEIGE 20190311 marca propiedad de | est une marque de | trade mark propiety of |marchio di proprietà di: Pol. Empordà Internacional Calle F. Parcela 15-16 17469 VILAMALLA - (Girona) SPAIN T. (34) 972 527 212 - F. (34) 972 527 211 El fabricante se reserva el derecho de modificar sin previo aviso las características de sus productos para introducir mejoras técnicas o cumplir con nuevas regulaciones oficiales./Le...
  • Seite 2 BR16...
  • Seite 3: Inhaltsverzeichnis

    BR16 INDICE 1. ESPECIFICACIONES 2. ALIMENTACIÓN 3. ANTES DE SU UTILIZACIÓN 4. CONSUMO 5. CONEXIÓN DE LA CÉLULA DE CARGA AL INDICADOR 6. DESCRIPCIÓN DEL DISPLAY Y DEL TECLADO 7. MODO CUENTA PIEZA 8. CONFIGURACIÓN DE PARÁMETROS 8.1 CUENTAS INTERNAS (A/D) I UF-1 8.2 CONFIGURACIÓN DE LOS LÍMITES DE PESO (SUPERIOR E INFERIOR) | UF-2...
  • Seite 4 BR16 1. SPECIFICHE 2. ALIMENTAZIONE 3. PRIMA DELL’USO 4. CONSUMO 5. COLLEGAMENTO DELLA CELLA DI CARICO ALL’INDICATORE 6. DESCRIZIONE DEL DISPLAY E DELLA TASTIERA 7. MODALITÀ CONTAPEZZI 8. CONFIGURAZIONE DEI PARAMETRI 8.1 CALCOLI INTERNI (A/D) | UF-1 8.2 CONFIGURAZIONE DEI LIMITI DI PESO (SUPERIORE E INFERIORE) | UF-2 8.3 DISATTIVAZIONE AUTOMATICA | UF-3...
  • Seite 5 BR16 INHALTSVERZEICHNIS 1. SPEZIFIKATIONEN 2. STROMZUFUHR 3. VOR DER INBETRIEBNAHME 4. VERBRAUCH 5. ANSCHLUSS DER WAAGE AN DIE ANZEIGE 6. BESCHREIBUNG DISPLAY UND TASTATUR 7. STÜCKZÄHLMODUS 8. KONFIGURATION DER PARAMETER 8.1 INTERNES ZÄHLEN (A/D) I UF-1 8.2 KONFIGURATION DER GEWICHTSGRENZEN (HÖCHST- UND MINDESTGEWICHT) | UF-2 8.3 AUTOMATISCHES ABSCHALTEN | UF-3...
  • Seite 6: Especificaciones

    MANUAL DE USUARIO BR16 1. ESPECIFICACIONES BR16 Precisión Clase III Rango de sensibilidad de la célula de carga 1.5 ~ 3.0mV/V No linealidad ≤0.01%F.S Voltaje célula DC 5V Escalón 1/2/5 (seleccionable) Frecuencia de muestreo 20 veces por segundo (fuera de metereologia) Resolución interna...
  • Seite 7 MANUAL DE USUARIO BR16 ESQUEMA CÉLULA DE 7 PINS CÉLULA CARGA PIN 1 EXC + PIN 2 SEN+ PIN 3 SIG + PIN 4 SIG - PIN 5 SEN - PIN 6 EXC - PIN 7 CONNEXIÓN RS232 PROTOCOLO UART signal of EIA-RS232 C SEÑAL UART DE EIA-RS232 C...
  • Seite 8: Descripción Del Display Y Del Teclado

    Pantone White Pantone 550 C Pantone Black Pantone 485 C MANUAL DE USUARIO BR16 6. DESCRIPCIÓN DEL DISPLAY Y DEL TECLADO Opció 1 Pulsar esta tecla para encender la balanza. Mantener pulsada esta tecla durante 2 segundos para apagar el indicador. 1º función Para cambiar de unidad de pesaje. 2º función Para salir de un menú.
  • Seite 9: Configuración De Parámetros

    MANUAL DE USUARIO BR16 8. CONFIGURACIÓN DE PARÁMETROS CUENTAS INTERNAS (A/D) UF-1 CONFIGURACIÓN DE LOS LÍMITES DE PESO (SUPERIOR E INFERIOR) UF-2 AUTODESCONEXIÓN AUTOMÁTICA UF-3 CONFIGURACIÓN DE LA ILUMINACIÓN DEL DISPLAY UF-4 FUNCIÓN HOLD UF-5 SALIDA DE DATOS RS-232 UF-6 CONFIGURACIÓN DE LA VELOCIDAD RS-232...
  • Seite 10: Autodesconexión Automática | Uf

    MANUAL DE USUARIO BR16 9. Utilizar las teclas para mover el cursor y la tecla para seleccionar el número deseado. 10. Pulsar la tecla para confirmar. Las indicaciones en pantalla apareceran en pantalla según el peso. Lo, Ok , Hi 8.3 AUTODESCONEXIÓN AUTOMÁTICA | UF-3 MODOS: Autodesconexión desactivada. AoFF 00 Autodesconexión activada, la balanza se apagará automáticamente transcurrido 1 minuto AoFF 01 sin ser utilizada. Seleccione el tiempo de autodesconexión antre 1 y 99 minutos. 1. Pulsar la tecla para acceder al parámetro.
  • Seite 11: Salida De Datos Rs-232 | Uf

    MANUAL DE USUARIO BR16 MODOS: • HOLD 0 : Desactivado. • HOLD 1 : Animal en movimiento. • HOLD 2 : Valor de pico. • HOLD 3 : Hold estable. • HOLD 4 : Hold estable con auto cancelación a cero. HOLD • Una vez se ha accedido a este parámetro, la pantalla muestra PCt, • Use las teclas para mover el cursor y la tecla para seleccionar el valor del rango de HOLD deseado de 001 a 100.
  • Seite 12 MANUAL DE USUARIO BR16 FORMATO DE LOS DATOS Ningún formato 232 0 Salida RS-232 Desactivada Formato 1 PC FORMATO AUTOMÁTICO DE PESO O PIEZAS 232 1 Envío de trama, sin acumulación, cuando consigue estabilidad con formato 1. ENVÍO DE TRAMA 232 2 Envío de trama continuo con formato 1. 232 3 Envío de trama, sin acumulación, manual presionando la tecla con formato 1. Formato 2 PC FORMATO AUTOMÁTICO DE...
  • Seite 13 MANUAL DE USUARIO BR16 Formato 4 impresora FORMATO AUTOMÁTICO DE PESO O PIEZAS NOTA: totalización no disponible en metrologia legal. ENVÍO DE TRAMA 232 9 Envío de trama y acumulación manual, pasando por cero y presionando la tecla con formato 4 Si estando la pantalla a 0, se presiona dos veces seguidas la tecla se imprime el resumen de tiquets Y se borra la memoria de pesadas NOTA: totalización no disponible en metrologia legal. ENVÍO DE TRAMA 232 10 Envío de trama y acumulación automática a la estabilidad, pasando por cero y presionando la tecla con formato 4.
  • Seite 14: Configuración De La Velocidad Del Convertidor| Uf-7 (*)

    MANUAL DE USUARIO BR16 FORMATO 1 (232 1 ~ 3): 18 BYTES ASCII PARA LAS UNIDADES kg, g, t, lb CR LF Cabecera 1 Cabecera 2 Datos Unidad 21 BYTES ASCII PARA LAS UNIDADES tl, T, lboz CR LF Cabecera 1...
  • Seite 15: Configuración De La Gravedad | Uf-9 (*)

    MANUAL DE USUARIO BR16 8.9 CONFIGURACIÓN DE LA GRAVEDAD | UF-9 (*) 1. Pulsar la tecla para acceder al parámetro. 2. Para cambiar el valor, pulsar la tecla , seguidamente utilizar las teclas, utilizar las teclas y para mover el cursor y la tecla para seleccionar el número deseado. 9. CALIBRACIÓN ( SOLO PARA EL PERSONAL AUTORIZADO) (*) CALIBRACIÓN DE CERO + PESO (SPAN) ECF-1 CALIBRACIÓN DE CERO...
  • Seite 16: Parámetros Técnicos

    MANUAL DE USUARIO BR16 10. PARÁMETROS TÉCNICOS NO MODIFIQUE LOS PARÁMETROS TÉCNICOS SI NO ES ESTRICTAMENTE NECESARIO. UNA MALA CONFIGURACIÓN DE ESTA SECCIÓN PUEDE PROVOCAR UN MAL FUNCIONAMIENTO DE LA BALANZA. En el caso de visores verificados, abra el visor y cambie el interruptor de calibración a la posición CAL ON. En este caso, recuerde que romper los precintos conlleva la perdida de la verificación. ENTRAR Y SALIR DE LA CALIBRACIÓN DISPLAY DESCRIPCIÓN y SECUENCIA DE USO • CON EL INTERRUPTOR INTERNO EN POSICION CAL ON. • Con el visor apagado, presione y mantenga presionada la tecla y encendida de equipo, cuando LF 1 1001 la pantalla muestre , suelte la tecla Presione la tecla para acceder a las teclas para cambiar de parámetro y la tecla...
  • Seite 17 MANUAL DE USUARIO BR16 CONFIGURACIÓN LF 2 DISPLAY DESCRIPCIÓN Y SECUENCIA DE USO PRIMER PASO 262144 • VISUALIZACIÓN DE LAS CUENTAS INTERNAS • POSIBLES VALORES DE LOS PARÁMETROS DE CONFIGURACIÓN SEGUNDO PASO A: Sistema Métrico 0:NO 1: kg B: Sistema Americano 0:NO 1: lb 2:lb oz C: otras unidades 0:NO 1: TW kg 2:HK kg 3:VISS 0 0 0 0 1...
  • Seite 18 MANUAL DE USUARIO BR16 VELOCIDAD DEL CONVERTIDOR AD LF 4 SPEED 1 velocidad estándar 15Hz. SPEED 2 alta velocidad 30Hz. SPEED 3 baja velocidad 7.5Hz *Esta función queda bloqueada cuando UF-5 se encuentra en modo HOLD 1. *El valor de fábrica es 1 DISPLAY DESCRIPCIÓN Y SECUENCIA DE USO •Presione para empezar o para salir del menú y la báscula se reiniciará automática- mente. SPEED 1 • Utilice y después para seleccionar la velocidad del convertidor AD (presione para salir de la configuración y volver al menú LF4)
  • Seite 19 MANUAL DE USUARIO BR16 CONFORMIDAD DE APROBACIÓN LF 6 DISPLAY DESCRIPCIÓN Y SECUENCIA DE USO nonE Versión no verificada OIML versión verificada NO MODIFIQUE BAJO NINGÚN CONCEPTO ESTE PARÁMETRO. OM LF 6 El cambio de este parámetro implica el bloqueo de ciertas funcionalidades. GRAVEDAD LF 7 *Introduzca la gravedad de su zona antes de realizar la primera calibración. *Introduzca la gravedad de destino después de realizar la calibración. *El valor de gravedad será denegado si es mayor que 9.83217 (gravedad de polo) o inferior que 9.78031 (gravedad del ecuador). Valor de fábrica: 9.801 DISPLAY DESCRIPCIÓN Y SECUENCIA DE USO •...
  • Seite 20: Garantía

    MANUAL DE USUARIO BR16 11. GARANTÍA Esta indicador está garantizado contra todo defecto de fabricación y de material, por un periodo de 1 año a partir de la fecha de entrega. Durante este periodo, GIROPÈS, se hará cargo de la reparación del indicador. Esta garantía no incluye los daños ocasionados por uso indebido o sobrecargas. La garantía no cubre los gastos de envío (portes) necesarios para la reparación del indicador.
  • Seite 21: Spécifications

    MANUEL D’UTILISATION BR16 1. SPÉCIFICATIONS BR16 Précision Classe III Plage de sensibilité de la capteurs de 1.5 ~ 3.0mV/V charge Non linéarité ≤0.01%F.S Voltage capteurs DC 5V Échelon 1/2/5 (sélectionnable) Fréquence d’échantillonnage 20 fois par seconde (au delà de la météorologie) Résolution interne 300.000~600.000 2. ALIMENTATION BR16 Entrée 100/240VAC...
  • Seite 22 MANUEL D’UTILISATION BR16 SCHÉMA CAPTEURS À 7 BROCHES CÉLULA CARGA PIN 1 EXC + PIN 2 SEN+ PIN 3 SIG + PIN 4 SIG - PIN 5 SEN - PIN 6 EXC - PIN 7 CONNEXION RS232 PROTOCOLE signal UART de EIA-RS232 C SIGNAL UART DE EIA-RS232 C Sortie série...
  • Seite 23: Description De L'affichage Et Du Clavier

    Pantone White Pantone 550 C Pantone Black Pantone 485 C MANUEL D’UTILISATION BR16 6. DESCRIPTION DE L’AFFICHAGE ET DU CLAVIER Opció 1 Appuyez sur cette touche pour faire mettre la balance en marche. Maintenez cette touche appuyée pendant 2 secondes pour éteindre l’indicateur. 1ère fonction Pour changer l’unité de pesage. 2ème fonction Pour quitter un menu. Pour régler l’affichage de lecture à zéro « 0 », la valeur d’affichage doit être inférieure à ± 2 % 1ère fonction de la capacité maximale. 2ème fonction Pour déplacer un espace vers la gauche ou vers le bas dans le mode de programmation. 1ère fonction Pour soustraire le poids d’un récipient.
  • Seite 24: Configuration De Paramètres

    MANUEL D’UTILISATION BR16 8. CONFIGURATION DE PARAMÈTRES COMPTES INTERNES (A/D) UF-1 CONFIGURATION DES LIMITES DE POIDS (SUPÉRIEURE ET INFÉRIEURE) UF-2 AUTOCONNEXION AUTOMATIQUE UF-3 CONFIGURATION DE L'ÉCLAIRAGE DE L'AFFICHAGE UF-4 FONCTION HOLD UF-5 SORTIE DE DONNÉES RS-232 UF-6 CONFIGURATION DE LA VITESSE RS-232 UF-7 MOYENNE DU ZÉRO...
  • Seite 25: Autodéconnexion Automatique | Uf

    MANUEL D’UTILISATION BR16 9. Utilisez les touches pour déplacer le curseur et la touche pour sélectionner le numéro désiré. 10. Appuyer sur la touche pour confirmer. Les indications à l’écran apparaîtront à l’écran selon le poids. Lo, Ok , Hi 8.3 AUTODÉCONNEXION AUTOMATIQUE | UF-3 MODES: Autodéconnexion désactivée. AoFF 00 Autodéconnexion activée, la balance s’éteindra automatiquement après 1 minute sans AoFF 01 utilisation. Sélectionnez le temps d’autodéconnexion entre 1 et 99 minutes. 1. Appuyez sur la touche pour accéder au paramètre. 2. Utilisez les touches pour déplacer le curseur et la touche pour sélectionner le temps désiré. 3. Appuyer sur la touche pour confirmer. 8.4 CONFIGURATION DE L’ÉCLAIRAGE DE L’AFFICHAGE | UF-4 MODES: Automatique.
  • Seite 26: Sortie De Données Rs-232 | Uf

    MANUEL D’UTILISATION BR16 MODES: • HOLD 0: Désactivé. • HOLD 1: Animal en mouvement. • HOLD 2: Valeur de pic. • HOLD 3: Hold stable. • HOLD 4: Hold stable avec auto-annulation à zéro. HOLD • Une fois que vous avez accédé à ce paramètre, l’écran affiche PCt, • Utilisez les touches pour déplacer le curseur et la touche pour sélectionner la valeur de la plage HOLD désirée de 00 à 100. • Appuyer sur la touche pour confirmer. • ’écran affichera time 8, utilisez les touches pour déplacer le curseur et la touche...
  • Seite 27 MANUEL D’UTILISATION BR16 Format 3 imprimante FORMAT AUTOMATIQUE DE POIDS OU PIÈCES 232 7 Envoi de trame et accumulation manuelle, en passant par zéro et en appuyant sur la touche avec format 3. Si l’écran est à 0, on appuie deux fois de suite sur la touche et la ligne totale est imprimée. Et on efface la mémoire des pesées. Remarque : Accumulation et totalisation non disponible pour la métrologie légale. ENVOI DE TRAME 232 8 Envoi de trame et accumulation automatique à la stabilité, en passant par 0 avec format 3. Si l’écran est à 0, on appuie deux fois de suite sur la touche et la ligne totale est imprimée. Et on efface la mémoire des pesées. Remarque : Accumulation et totalisation non disponible pour la métrologie légale.
  • Seite 28 MANUEL D’UTILISATION BR16 Format 4 imprimante FORMAT AUTOMATIQUE DE POIDS OU PIÈCES REMARQUE: totalisation non disponible en métrologie légale. ENVOI DE TRAME 232 9 Envoi de trame et accumulation manuelle en passant par zéro et en appuyant sur la touche avec format 4 Si l’écran est à 0, on appuie deux fois de suite sur la touche et le résumé des tickets est imprimé. Et on efface la mémoire des pesées. REMARQUE: totalisation non disponible en métrologie légale. ENVOI DE TRAME 232 10 Envoi de trame et accumulation automatique à la stabilité, en passant par zéro et en appuyant sur la touche avec format 4. Si l’écran est à 0, on appuie deux fois de suite sur la touche le résumé des tickets est imprimé. Et on efface la mémoire des pesées. REMARQUE: totalisation non disponible en métrologie légale. REMARQUE: Chaque fois qu’une accumulation est terminée, le viseur affiche le total cumulé pendant 3 secondes.
  • Seite 29: Configuration De La Vitesse Du Convertisseur | Uf-7 (*)

    MANUEL D’UTILISATION BR16 FORMAT 2 (232 4 ~ 6): 12 OCTETS ASCII POUR LES UNITÉS kg, g, t, lb CR LF Données Unité 15 OCTETS ASCII POUR LES UNITÉS tl, t, lboz CR LF Données Unité 13 OCTETS ASCII POUR L’UNITÉ pcs CR LF Données...
  • Seite 30: Étalonnage (Uniquement Pour Le Personnel Autorisé) (*)

    MANUEL D’UTILISATION BR16 9. ÉTALONNAGE (UNIQUEMENT POUR LE PERSONNEL AUTORISÉ) (*) ÉTALONNAGE DE ZÉRO+POIDS (PORTÉE) ECF-1 ÉTALONNAGE DE ZÉRO ECF-2 ÉTALONNAGE DE POIDS (PORTÉE) ECF-3 0. Déplacer le switch interne sur CAL ON. 1. Dans le mode de pesage normal, appuyez sur les touches , l’écran affichera le message ECF – 2. Appuyez sur les touches pour sélectionner la fonction désirée: ECF-1, ECF-2 o ECF-3 9.1 ÉTALONNAGE DE ZÉRO+POIDS| ECF-1 Appuyez sur la touche , l’écran affichera CALZ.
  • Seite 31 MANUEL D’UTILISATION BR16 les joints d’étanchéité implique la perte de la vérification. ENTRER DANS ET QUITTER L’ÉTALONNAGE ÉCRAN DESCRIPTION ET SÉQUENCE D’UTILISATION • AVEC INTERRUPTEUR INTERNE EN POSITION CAL ON. • Avec le viseur éteint, appuyez et maintenez la touche appuyée et sous tension lorsque l’écran LF 1 1001 affiche , relâchez la touche Appuyez sur la touche pour accéder aux touches pour modifier le paramètre et la touche pour quitter le menu et le viseur redémarrera automatiquement. ÉTALONNAGE DE POIDS LF 1 ÉCRAN DESCRIPTION ET SÉQUENCE D’UTILISATION L’étalonnage peut être effectué avec n’importe quel poids, mais le poids ne doit pas être inférieur à 1/3 LF 1 de la capacité maximale ou ne doit jamais être dépassé.
  • Seite 32 MANUEL D’UTILISATION BR16 CONFIGURATION LF 2 ÉCRAN DESCRIPTION ET SÉQUENCE D’UTILISATION PREMIÈRE ÉTAPE 262144 • VISUALISATION DES COMPTES INTERNES • POSSIBLES VALEURS DES PARAMÈTRES DE CONFIGURATION DEUXIÈME ÉTAPE A: Système métrique 0:NO 1: kg B: Système américain 0:NO 1: lb 2:lb oz C: autres unités 0:NO 1: TW kg 2:HK kg 3:VISS 0 0 0 0 1 D: PCS 0:OFF 1: ON...
  • Seite 33 MANUEL D’UTILISATION BR16 VITESSE DU CONVERTISSEUR AD LF 4 SPEED 1 vitesse standard 15Hz. SPEED 2 vitesse élevée 30Hz. SPEED 3 vitesse basse 7.5Hz *Cette fonction est bloquée lorsque UF-5 est en mode HOLD 1. *La valeur d’usine est 1. ÉCRAN DESCRIPTION ET SÉQUENCE D’UTILISATION •Appuyez sur pour démarrer ou sur pour quitter le menu et la balance redémarrera automatiquement.
  • Seite 34 MANUEL D’UTILISATION BR16 CONFORMITÉ D’APPROBATION LF 6 DISPLAY DESCRIPTION ET SÉQUENCE D’UTILISATION nonE Version non vérifiée OIML version vérifiée NE MODIFIER EN AUCUN CAS CE PARAMÈTRE. LF 6 La modification de ce paramètre implique le blocage de certaines fonctionnalités. GRAVITÉ LF 7 *Entrez la gravité de votre région avant de réaliser le premier étalonnage. *Entrez la gravité de destination avant de réaliser l’étalonnage. *La valeur de la gravité sera refusée si supérieure à 9,83217 (gravité de pôle) ou inférieure à 9,78031 (gravité de l’Équateur). Valeur d’usine: 9.801 ÉCRAN DESCRIPTION ET SÉQUENCE D’UTILISATION • Appuyez sur pour continuer ou sur pour quitter le menu et la balance redémarrera...
  • Seite 35: Garantie

    MANUEL D’UTILISATION BR16 11. GARANTIE Cet indicateur est garanti contre les défauts de fabrication et de matériaux pour une période de 1 an à compter de la date de livraison. Durant cette période, Giropès, se chargera de la réparation de l’indicateur.Cette garantie ne couvre pas les dommages causés par une mauvaise utilisation ou une surcharge. La garantie ne couvre pas les frais d’expédition (fret) nécessaires à la réparation de l’indicateur.
  • Seite 36: Specifiche

    MANUALE DI ISTRUZIONI BR16 1. SPECIFICHE BR16 Precisione Classe III Intervallo di sensibilità della cella di carico 1,5 ~ 3,0 mV/V Non linearità 0,01%F.S Voltaggio cella CC 5V Gradino 1/2/5 (selezionabile) Frequenza di campionamento 20 volte al secondo (al di fuori della metrologia) Risoluzione interna 300.000-600.000...
  • Seite 37 MANUALE DI ISTRUZIONI BR16 SCHEMA DELLA CELLA A 7 PIN CÉLULA CARGA PIN 1 EXC + PIN 2 SEN+ PIN 3 SIG + PIN 4 SIG - PIN 5 SEN - PIN 6 EXC - PIN 7 COLLEGAMENTO RS232 PROTOCOLLO...
  • Seite 38: Descrizione Del Display E Della Tastiera

    Pantone White Pantone 550 C Pantone Black Pantone 485 C MANUALE DI ISTRUZIONI BR16 6. DESCRIZIONE DEL DISPLAY E DELLA TASTIERA Opció 1 Per accendere la bilancia, premere questo tasto. Per spegnere l’indicatore, mantenere premuto questo tasto per 2 secondi. 1 funzione Per cambiare l’unità di pesatura. 2 funzione Per uscire da un menu. Per mettere la lettura del display sullo zero “0”, il valore del display deve essere inferiore a 1 funzione ±2% della capacità massima. 2 funzione Per spostarsi di uno spazio verso sinistra o verso il basso in modalità di programmazione.
  • Seite 39: Configurazione Dei Parametri

    MANUALE DI ISTRUZIONI BR16 8. CONFIGURAZIONE DEI PARAMETRI CALCOLI INTERNI (A/D UF-1 CONFIGURAZIONE DEI LIMITI DI PESO (SUPERIORE E INFERIORE) UF-2 DISATTIVAZIONE AUTOMATICA UF-3 CONFIGURAZIONE DELL’ILLUMINAZIONE DEL DISPLAY UF-4 FUNZIONE HOLD UF-5 USCITA DEI DATI RS-232 UF-6 CONFIGURAZIONE DELLA VELOCITÀ RS-232...
  • Seite 40: Disattivazione Automatica | Uf

    MANUALE DI ISTRUZIONI BR16 9. Utilizzare i tasti per muovere il cursore e il tasto per selezionare il numero desiderato. 10. Premere il tasto per confermare. Le indicazioni sullo schermo appariranno sullo schermo secondo il peso. Lo, Ok , Hi 8.3 DISATTIVAZIONE AUTOMATICA | UF-3 MODALITÀ: Disattivazione automatica disabilitata. AoFF 00 Disattivazione automatica abilitata, la bilancia si spegnerà automaticamente dopo 1 minuto- AoFF 01 senza essere utilizzata. Selezionare il tempo di disattivazione automatica tra 1 e 99 minuti.
  • Seite 41: Uscita Dei Dati Rs-232 | Uf

    MANUALE DI ISTRUZIONI BR16 MODALITÀ: • HOLD 0 : Disattivata • HOLD 1 : Animale in movimento. • HOLD 2 : Valore di picco. • HOLD 3 : Hold stabile. • HOLD 4 : Hold stabile con autocancellazione a zero. HOLD • Dopo aver acceduto a questo parametro, lo schermo visualizza PCt, • Utilizzare i tasti per spostare il cursore e il tasto per selezionare il valore dell’intervallo di HOLD desiderato...
  • Seite 42 MANUALE DI ISTRUZIONI BR16 FORMATO DEI DATI Nessun formato 232 0 Uscita RS-232 Disattivata Formato 1 PC FORMATO AUTOMATICO DI PESO O PEZZI 232 1 Invio di frame, senza accumulo, quando raggiunge la stabilità con formato 1. 232 2 Invio di frame continuo con formato 1. INVIO DI FRAME 232 3 Invio di frame, senza accumulo, manuale premendo il tasto con formato 1.
  • Seite 43 MANUALE DI ISTRUZIONI BR16 Formato 4 stampante FORMATO AUTOMATICO DI PESO O PEZZI N.B: totale non disponibile in metrologia legale. INVIO DI FRAME 232 9 Invio di frame e accumulo manuale, passando per zero e premendo il tasto con formato 4 Con lo schermo a 0, se si preme due volte consecutive il tasto stampa il riassunto degli scontrini. e si cancellano le pesature in memoria. N.B: totale non disponibile in metrologia legale.
  • Seite 44: Configurazione Della Velocità Del Convertitore| Uf-7 (*)

    MANUALE DI ISTRUZIONI BR16 FORMATO 1 (232 1 ~ 3): 18 BYTES ASCII PER LE UNITÀ kg, g, t, lb CR LF Intestazione 1 Intestazione 2 Dati Unità 21 BYTES ASCII PER LE UNITÀ tl, T, lboz CR LF Intestazione 1 Intestazione 2 Dati Unità...
  • Seite 45: Configurazione Della Gravità | Uf-9 (*)

    MANUALE DI ISTRUZIONI BR16 8.9 CONFIGURAZIONE DELLA GRAVITÀ | UF-9 (*) 1. Premere il tasto per accedere al parametro. 2. Per modificare il valore, premere il tasto , quindi utilizzare i tasti, utilizzare i tasti per spostare il cursore e il tasto per selezionare il numero desiderato. 9. CALIBRAZIONE (SOLO PER IL PERSONALE AUTORIZZATO) (*) CALIBRAZIONE DELLO ZERO + PESO (SPAN)
  • Seite 46: Parametri Tecnici

    MANUALE DI ISTRUZIONI BR16 10. PARAMETRI TECNICI NON MODIFICARE I PARAMETRI TECNICI SE NON È STRETTAMENTE NECESSARIO. UNA ERRATA CONFIGURAZIONE DI QUESTA SEZIONE PUÒ PROVOCARE UN MALFUNZIONAMENTO DELLA BILANCIA. In caso di schermi collaudati, aprire lo schermo e spostare l’interruttore di calibrazione nella posizione CAL ON. In tal caso, è opportuno ricordare che la rottura dei sigilli comporta la perdita del collaudo. ENTRARE E USCIRE DALLA CALIBRAZIONE DISPLAY DESCRIZIONE E SEQUENZA D’USO • CON L’INTERRUTTORE INTERNO IN POSIZIONE CAL ON. • Con lo schermo spento, tenere premuto il tasto e accensione di apparecchiatura; quando LF 1 1001...
  • Seite 47 MANUALE DI ISTRUZIONI BR16 CONFIGURAZIONE LF 2 DISPLAY DESCRIZIONE E SEQUENZA D’USO PRIMO PASSAGGIO 262144 • VISUALIZZAZIONE DEI CALCOLI INTERNI • POSSIBILI VALORI DEI PARAMETRI DI CONFIGURAZIONE SECONDO PASSAGGIO A: Sistema metrico 0:NO 1: kg B: Sistema americano 0:NO 1: lb 2:lb oz C: Altre unità 0:NO 1: TW kg 2:HK kg 3:VISS 0 0 0 0 1...
  • Seite 48 MANUALE DI ISTRUZIONI BR16 VELOCITÀ DEL CONVERTITORE AD LF 4 SPEED 1 velocità standard 15Hz. SPEED 2 alta velocità 30Hz. SPEED 3 bassa velocità 7.5Hz *Questa funzione rimane bloccata quando UF-5 è in modalità HOLD 1. *Il valore di fabbrica 1 DISPLAY DESCRIZIONE E SEQUENZA D’USO •Premere per iniziare o per uscire dal menu e la bascula si riavvierà automaticamente.
  • Seite 49 MANUALE DI ISTRUZIONI BR16 CONFORMITÀ DI APPROVAZIONE LF 6 DISPLAY DESCRIZIONE E SEQUENZA D’USO nonE Versione non verificata OIML versione verificata NON MODIFICARE PER NESSUN MOTIVO QUESTO PARAMETRO. OM LF 6 La modifica di questo parametro implica il blocco di alcune funzionalità. GRAVITÀ LF 7 *Prima di effettuare la prima calibrazione, inserire la gravità della propria zona. *Dopo aver effettuato la calibrazione, inserire la gravità di destinazione. *Il valore della gravità sarà rifiutato se è maggiore di 9.83217 (gravità del polo) o minore di 9.78031 (gravità dell’equatore). Valore di fabbrica: 9.801 DISPLAY DESCRIPCIÓN Y SECUENCIA DE USO...
  • Seite 50: Garanzia

    MANUALE DI ISTRUZIONI BR16 11. GARANZIA Questo indicatore è protetto da una garanzia contro qualsiasi difetto di fabbricazione e di materiali della durata di un anno a partire dalla data di consegna. Durante questo periodo, GIROPÈS SL si farà carico della riparazione della stesso. Questa garanzia non include i danni causati da uso improprio o sovraccarichi. La garanzia non copre le spese di spedizione (trasporto) necessarie alla riparazione dell’indicatore.
  • Seite 51: Specifications

    USER’S MANUAL BR16 1. SPECIFICATIONS BR16 Precision Clase III Load Cell Sensitivity Range 1.5 ~ 3.0mV/V Nonlinearity ≤0.01%F.S Voltage cell DC 5V Step 1/2/5 (selectable) Frequency of sampling 20 times per second (outside meteorology) Internal resolution 300.000~600.000 2. EXCITATION BR16 Input 230~240V Output 10V 600mA...
  • Seite 52 USER’S MANUAL BR16 7 PIN CELL SCHEME CÉLULA CARGA PIN 1 EXC + PIN 2 SEN+ PIN 3 SIG + PIN 4 SIG - PIN 5 SEN - PIN 6 EXC - PIN 7 CONNECTION RS232 PROTOCOL UART signal of EIA-RS232 C SIGNAL UART EIA-RS232 C Serial output...
  • Seite 53: Display And Keyboard Description

    USER’S MANUAL BR16 Pantone 7469 C Pantone White 6. KEYBOARD DESCRIPTION Pantone 550 C Pantone Black Pantone 485 C Opció 1 Press this key to turn on the balance. Press and hold this key for 2 seconds to turn off the indicator. 1º function To change the weighing unit. 2º function To exit a menu. To set the display reading to zero “0”, the display value must be less than ± 2% of the 1º...
  • Seite 54: Piece Counting Mode

    USER’S MANUAL BR16 7. PIECE COUNTING MODE 1. Press the key until the symbol PCS appears on the screen 2. Press the key successively to choose the quantity of pieces of the sample. On the screen will appear, successively, C10/C20/ C50/C100/C200. 3. Place the sample on the platform, and wait until the sign of stability and press the key 4. Place the product on the platform and the screen will show the number of pieces. The accumulation and the sending of data will depend on the mode chosen in the section UF-6. • To turn to the normal weighing mode, press the key • If the user wants to go back to the piece counting mode, using the same sample of reference, press the key again. • If the user want to change the sample of reference, the user must repeat the steps described above. 8. PARAMETERS CONFIGURATION INTERNAL COUNTING (A/D) UF-1 CONFIGURATION OF THE WEIGHT LIMITS (SUPERIOR AND INFERIOR)
  • Seite 55: Automatic Disarming | Uf

    USER’S MANUAL BR16 5. The display will show the message “000.00h” (Superior limit=Hi) 6. Use the keys to move the cursor and the key to choose the desired number. Note: If you need to change or modify the last digit you can place the cursor on it to do it. 7. Press the key to confirm. 8. The display will show the value. (configuration of the alarm) DISPLAY VALUE ESTABILITY There is no need to stabilize the alarm to make it ring The alarm must be stabilized to ring Always 0 Alarm switched off The alarm ring if it is place on the band OK ( between the limits Lo and Hi) The alarm rings if it is situated below the inferior limit Lo or above the superior limit 9. Press the keys...
  • Seite 56: Uscita Dei Dati Rs-232 | Uf

    USER’S MANUAL BR16 1. Press the key to access to the parameter. 2. Press the key to choose the desired mode. 3. Press the key to confirm. MODES: • HOLD 0 : Deactivated. • HOLD 1 : Animal in movement • HOLD 2 : Value of peak • HOLD 3 : Hold steady •...
  • Seite 57 USER’S MANUAL BR16 Format 3 printer DIFFERENT POSSIBLE FORMATS 232 7 232 8 Connection sending and manual accumulation, passing by zero and Connection sending and automatic accumulation to stability, passing pressing the key with format 3. 0 with format 3. If the user presses the key twice one after the other when the screen is in 0, the total line is printed. If the user presses the key twice one after the other when the screen is in 0, the total line is printed And the memory of the weights is removed And the memory of the weights is removed Format 4 printer DIFFERENT POSSIBLE FORMATS 232 9 232 10 Connection sending and manual...
  • Seite 58 USER’S MANUAL BR16 FORMAT 1 (232 1 ~ 3): 18 BYTES ASCII FOR THE UNITIES kg, g, t, lb CR LF Headboard 1 Headboard 2 data Unit 21 BYTES ASCII FOR THE UNITIES tl, T, lboz CR LF Headboard 1 Headboard 2 data Unit...
  • Seite 59: Converter Speed Configuration| Uf-7 (*)

    USER’S MANUAL BR16 8.7 CONFIGURATION OF THE SPEED OF THE CONVERTER | UF-7 1. Press the key to access the parameter. 2. Press the key to choose the desired mode: • Mode 1 : Normal • Mode 2: Fast • Mode 3: Slow 3. Press the key to confirm. 8.8 BLIND| UF-8 It appears 0 on screen until the next division is selected. It starts to show values from that division. Example: Scale with e =2g Blind in 5 divisions It will show 0 until it reaches 25= 10 g, the first value it will show will be 12g.
  • Seite 60: Calibration (Only For Authorized Personnel) (*)

    USER’S MANUAL BR16 9. CONFIGURATION OF THE READJUSTMENTS IN CALIBRATION 1. When the user is in the normal mode of weighing, he must press the keys , the message ECF-1 is going to appear on the display. 2. Press the keys to select the desired function: ECF-1, ECF-2 or ECF-3 * ECF-1 CALIBRATION OF ZERO + WEIGHT Press the key ,the display will show CALZ. Press the key ,to put the reading of the display to zero.
  • Seite 61 USER’S MANUAL BR16 P000 • With the visor switched off, press and hold the key until the message , appears on the LF 1 screen, then you can release the key 0020 • With the keys introduce the code • Press the key to start or the key to exit the menu and the indicator will begin again automatically. CALIBRATION OF THE WEIGHT LF 1 DISPLAY DESCRIPTION AND SEQUENCE OF USE The calibration can be done with any weight, but the weight ca not be inferior to 1/100 of the maxi- LF 1 mum capacity and it must also never be exceeded. CAL Z •Press the key...
  • Seite 62 USER’S MANUAL BR16 FOURTH STEP •Use the Keys to change the position of the DECIMAL POINT. dP 0.0 d 0.00 d 0.000 d 0.0000 0.00000 FIFTH STEP •Use to select the DIVISION: diV 01 diV 01, diV 02, diV 05, diV10, diV 20, diV 50 After introducing the parameters LF2, the indicator will show the last configuration saved. All the steps to follow must be completed, if they are not done the indicator will continue with the previous configuration. Proceed with the calibration of weight after LF2. LF 2 •Press the key to start and display the internal value. Press...
  • Seite 63 USER’S MANUAL BR16 •Press the key to start or the key to exit from the menu and the scale is going to begin again automatically. SPEED 1 •Use the key and then the key to select the speed of the AD converter ( press the key to exit from the configuration and go back to the menu LF4) LF 4 •Use the keys and then To continue with the other adjustment and press the key to exit from the menu and the scale will start again automatically. BLINF LF 5 DISPLAY DESCRIPTION AND SEQUENCE OF USE 0 OFF LF 5 1 One division will not show being at zero 2 Two division will not show being at zero 3 Three divisions will not show being at zero 4 Four divisions will not show being at zero 5 Five divisions will not show being at zero *This function is going to be blocked when UF-5 is in mode HOLD 1 *The value of factory is ZP 0 DISPLAY...
  • Seite 64: Warranty

    USER’S MANUAL BR16 *Introduce the gravity of your zone before doing the first calibration. *Introduce the gravity of destination after doing the calibration. *The value of the gravity will be denied if it is bigger than 9.83217 ( gravity of the pole) or inferior to 9.78031 ( gravity of the equator). Value of factory: 9.8035 DISPLAY DESCRIPTION AND SEQUENCE OF USE • Press the key to continue or the key to exit from the menu and the scale will start again LF 7 automatically. -00- • The screen is going to show the number of pre-calibration during one second. 9.8035 • Press the key to continue. 0 ~ 9 • Use the keys and then the key to introduce the value of 9.8035...
  • Seite 65: Spezifikationen

    BEDIENUNGSANLEITUNG BR16 1. SPEZIFIKATIONEN BR16 Präzision Klasse III Empfindlichkeitsbereich der Wägezelle 1.5 ~ 3.0 mV/V Keine Linearität ≤ 0.01 % F.S Netzspannung Wägezelle DC 5V Stufe 1/2/5 (wählbar) Stichprobenfrequenz 20x pro Sekunde (fällt nicht unter das Messwesen) Interne Auflösung 300.000~600.000 2. STROMZUFUHR BR16 Eingang 100/240 VAC Ausgang 12 V/1 A Akku 6 V/4 Ah 3.
  • Seite 66 BEDIENUNGSANLEITUNG BR16 SCHEMA WÄGEZELLE MIT 7 STIFTEN CÉLULA CARGA STIFT 1 EXC + STIFT 2 SEN+ STIFT 3 SIG + STIFT 4 SIG - STIFT 5 SEN - STIFT 6 EXC - STIFT 7 ANSCHLUSS RS232 PROTOKOLL UART signal of EIA-RS232 C UART SIGNAL EIA-RS232 C Serienausgang...
  • Seite 67: Beschreibung Display Und Tastatur

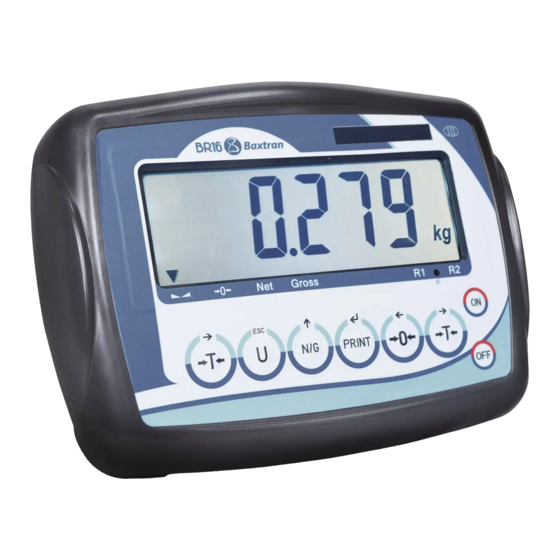
    Pantone White Pantone 550 C Pantone Black Pantone 485 C BEDIENUNGSANLEITUNG BR16 6. BESCHREIBUNG DISPLAY UND TASTATUR Opció 1 Drücken Sie diese Taste, um die Waage einzuschalten. Halten Sie diese Taste für 2 Sekunden gedrückt, um die Anzeige auszuschalten. 1. Funktion Zum Wechseln der Wiegeeinheit. 2. Funktion Zum Verlassen des Menüs. Um die Displayanzeige auf Null „0“ zu setzen, muss der angezeigte Wert weniger als ± 2 % 1. Funktion der Maximalkapazität betragen. 2. Funktion Um den Cursor im Programmiermodus eine Stelle nach links oder nach unten zu verschieben. 1. Funktion Um das Gewicht eines Behälters abzuziehen. 2. Funktion Um den Cursor im Programmiermodus eine Stelle nach rechts oder nach oben zu verschieben.
  • Seite 68: Konfiguration Der Parameter

    BEDIENUNGSANLEITUNG BR16 8. KONFIGURATION DER PARAMETER INTERNES ZÄHLEN (A/D) UF-1 KONFIGURATION DER GEWICHTSGRENZEN (HÖCHST- UND MINDEST- UF-2 GEWICHT) AUTOMATISCHES ABSCHALTEN UF-3 KONFIGURATION DER DISPLAYBELEUCHTUNG UF-4 HOLD-FUNKTION UF-5 DATENAUSGANG RS-232 UF-6 KONFIGURATION DER GESCHWINDIGKEIT RS-232 UF-7 NULL-TEILWERT UF-8 KONFIGURATION DER GRAVITATION UF-9 Um zur Konfiguration der Parameter zu gelangen, drücken Sie gleichzeitig die Tasten...
  • Seite 69: Automatisches Abschalten | Uf

    BEDIENUNGSANLEITUNG BR16 DISPLAY WERT STABILITÄT Zum Ertönen wird keine Stabilität benötigt Zum Ertönen wird Stabilität benötigt Immer 0 Alarm ausgeschaltet Alarm ertönt, wenn sich der Wert innerhalb des Bereiches Ok befindet (zwischen den Grenzwerten Lo und Hi) Alarm ertönt, wenn der Wert niedriger als der Mindestwert Lo oder höher als der Höchstwert Hi ist 9. Verwenden Sie die Tasten , um den Cursor zu bewegen und die Taste , um die gewünschte Zahl auszuwählen. 10. Drücken Sie die Taste , um zu bestätigen. Im Display erscheinen die Anzeigen nach dem Gewicht. Lo, Ok, Hi 8.3 AUTOMATISCHES ABSCHALTEN | UF-3 MODI: Automatisches Abschalten deaktiviert.
  • Seite 70: Hold-Funktion | Uf

    BEDIENUNGSANLEITUNG BR16 2. Drücken Sie die Taste , um den gewünschten Modus auszuwählen. 3. Drücken Sie die Taste , um zu bestätigen. 8.5 HOLD-FUNKTION | UF-5 Im Modus bleibt nach Entfernen des Objekts von der Wägeplatte das Gewicht im Display stehen, bis gedrückt wird. Sehr nütz- HOLD liche Funktion, zum Wiegen von Tieren. Bitte beachten: Wenn Sie den Hold-Modus aktiviert haben, KÖNNEN SIE WEDER DIE GRENZWERT- NOCH DIE SPEICHERFUNKTION VERWENDEN. 1. Drücken Sie die Taste , um auf den Parameter zuzugreifen. 2. Drücken Sie die Taste , um den gewünschten Modus auszuwählen. 3. Drücken Sie die Taste , um zu bestätigen. MODI: • HOLD 0 : Deaktiviert.
  • Seite 71 BEDIENUNGSANLEITUNG BR16 DATENFORMAT Kein Format 232 0 Ausgang RS-232 deaktiviert Format 1 PC AUTOMATISCHES FORMAT VON GEWICHT ODER STÜCK 232 1 Rasterübermittlung, ohne Speicherung, wenn bleibende Stabilität mit Format 1. RASTERÜBERMITTLUNG 232 2 Rasterübermittlung wird fortgesetzt mit Format 1. 232 3 Rasterübermittlung, ohne Speicherung, durch Drücken der Taste mit Format 1. Format 2 PC AUTOMATISCHES FORMAT VON GEWICHT ODER STÜCK 232 4 Rasterübermittlung, ohne Speicherung, wenn bleibende Stabilität mit Format 2.
  • Seite 72 BEDIENUNGSANLEITUNG BR16 Format 4 Drucker AUTOMATISCHES FORMAT VON GEWICHT ODER STÜCK HINWEIS: Summierung nicht durch rechtliches Messwesen erhältlich. RASTERÜBERMITTLUNG 232 9 Rasterübermittlung und manuelles Speichern über Null und durch Drücken der Taste mit Format 4. Wenn das Display 0 zeigt, drücken Sie zweimal nacheinander die Taste . Das Kartenergebnis wird gedruckt. Der Wägespeicher wird gelöscht. HINWEIS: Summierung nicht durch rechtliches Messwesen erhältlich. RASTERÜBERMITTLUNG 232 10 Rasterübermittlung und automatisches Speichern bei Stabilität, über Null und durch Drücken der Taste mit Format 4. Wenn das Display 0 zeigt, drücken Sie zweimal nacheinander die Taste . Das Kartenergebnis wird gedruckt. Der Wägespeicher wird gelöscht. HINWEIS: Summierung nicht durch rechtliches Messwesen erhältlich. BITTE BEACHTEN:...
  • Seite 73: Konfiguration Der Geschwindigkeit Des Stromrichters| Uf-7 (*)

    BEDIENUNGSANLEITUNG BR16 FORMAT 1 (232 1 ~ 3): 18 BYTES ASCII FÜR DIE EINHEITEN kg, g, t, lb CR LF Kopfzeile 1 Kopfzeile 2 Daten Einheit 21 BYTES ASCII FÜR DIE EINHEITEN tl, T, lboz 4 CR LF Kopfzeile 1 Kopfzeile 2 Daten Einheit 19 BYTES ASCII FÜR DIE EINHEIT pcs...
  • Seite 74: Konfiguration Der Gravitation | Uf-9 (*)

    BEDIENUNGSANLEITUNG BR16 8.9 KONFIGURATION DER GRAVITATION | UF-9 (*) 1. Drücken Sie die Taste , um auf den Parameter zuzugreifen. 2. Um den Wert zu ändern, drücken Sie die Taste , dann verwenden Sie die Tasten , um den Cursor zu bewegen und die Taste um die gewünschte Zahl auszuwählen. 9. KALIBRIERUNG (NUR FÜR AUTORISIERTES PERSONAL ) (*) KALIBRIERUNG VON NULL + GEWICHT ECF-1 (SPAN) KALIBRIERUNG VON NULL ECF-2 KALIBRIERUNG DES GEWICHTS (SPAN) ECF-3 0. Schieben Sie den internen Schalter auf CAL ON.
  • Seite 75: Technische Parameter

    BEDIENUNGSANLEITUNG BR16 10. TECHNISCHE PARAMETER ÄNDERN SIE DIE TECHNISCHEN PARAMETER NICHT, WENN DIES NICHT NOTWENDIG IST. EINE SCHLECHTE KONFIGURATION DIE- SES BEREICHS KANN ZUR FEHLFUNKTION DER WAAGE FÜHREN. Handelt es sich um eine geprüfte Anzeige, öffnen Sie diese und tauschen Sie den Kalibrierschalter aus, wenn dieser auf CAL ON gestellt ist. Denken Sie daran, dass bei Beschädigung der Plombe die Verifizierung verloren geht. KALIBRIERUNG BEGINNEN UND BEENDEN DISPLAY BESCHREIBUNG und ABFOLGE • DER INTERNE KALIBRIERSCHALTER MUSS AUF CAL ON GESTELLT SEIN. • DRÜCKEN Sie bei ausgeschalteter Anzeige die Taste für längere Zeit, wodurch das Gerät eingeschaltet LF 1 1001 wird. Wenn im Display erscheint, lassen Sie die Taste los. Drücken Sie die Taste , um Zugriff auf die Tasten zu erhalten oder , um den Parameter zu ändern. Drücken Sie die Taste , um das Menü zu verlassen. Die Anzeige startet automatisch neu. KALIBRIERUNG DES GEWICHTS LF 1 DISPLAY BESCHREIBUNG und ABFOLGE...
  • Seite 76 BEDIENUNGSANLEITUNG BR16 150,00 kg •Stellen Sie das erforderliche Gewicht auf die Waage, das im Display aufblinkt. 150,00 kg •Wenn sich die Anzeige stabilisiert, drücken Sie , um zu kalibrieren. (drücken Sie ESC, um die Kalibrierung zu beenden und zum Menü LF1 zurück zu kehren). DIE KALIBRIERUNG WIRD BEENDET UND DIE WAAGE KEHRT AUTOMATISCH ZUM WÄGEMODUS ZURÜCK. KONFIGURATION LF 2 DISPLAY BESCHREIBUNG und ABFOLGE ERSTER SCHRITT 262144 • ANZEIGE DER INTERNEN ZÄHLUNGEN • MÖGLICHE WERTE DER PARAMETER ZWEITER SCHRITT A: Metrisches System 0:NO 1: kg 3: g B:Amerikanisches Sys- 0:NO 1: lb 2:lb oz 1 0 0 0 0 1...
  • Seite 77 BEDIENUNGSANLEITUNG BR16 lb oz können nicht als Kalibriereinheiten ausgewählt werden. Der nächste Schritt kann nicht ausgeführt werden, wenn während der Programmierung ein Fehler auftritt. DRITTER SCHRITT Nach dem Zugreifen auf die Parameter LF2 erscheint in der Anzeige die letzte gespeicherte Konfiguration. Alle Schritte müssen abgeschlossen werden. Andernfalls kehrt die Anzeige zur vorigen Konfiguration zurück. Führen Sie nach Konfiguration von LF2 die Kalibrierung des Gewichts aus. LF 2 •Drücken Sie die Taste , um zu beginnen. Es erscheint der INTERNE WERT. Drücken Sie , um das Menü zu verlassen. Die Waage startet automatisch neu. •Drücken Sie , um mit der Konfiguration fortzufahren. (Drücken Sie , um die Konfiguration zu beenden 262144 und zum Menü LF2 zurück zu kehren). • Verwenden Sie , und dann , um die EINHEITEN UND DEN WÄGEMODUS gemäß 100001 der vorstehenden Tabelle auszuwählen. (Drücken Sie , um die Kalibrierung zu beenden und zum Menü LF2 zurück zu kehren). • Verwenden Sie , und dann , um die MAXIMALKAPAZITÄT auszuwählen. Dabei 000000kg müssen Sie die Anzahl der Dezimalzeichen beachten, die im nächsten Schritt ausgewählt wird. (Drücken Sie , um die Kalibrierung zu beenden und zum Menü LF2 zurück zu kehren). • Verwenden Sie und dann , um den Dezimalpunkt zu bewegen. (drücken Sie...
  • Seite 78 BEDIENUNGSANLEITUNG BR16 DISPLAY BESCHREIBUNG und ABFOLGE •Drücken Sie , um zu beginnen oder , um das Menü zu verlassen. Die Waage startet automatisch neu. SPEED 1 • Verwenden Sie und dann , um die Geschwindigkeit des Stromrichters AD auszuwählen (drü- cken Sie , um die Konfiguration zu beenden und zum Menü LF4 zurück zu kehren). LF 4 • Verwenden Sie und dann , um mit anderen Einstellungen fortzufahren oder drücken Sie , um das Menü zu verlassen. Die Waage startet automatisch neu. TEILWERT LF 5 DISPLAY BESCHREIBUNG und ABFOLGE 0 OFF LF 5 ZP 1 Eine Unterteilung befindet sich nicht auf Null...
  • Seite 79: Garantie

    BEDIENUNGSANLEITUNG BR16 GRAVITATION LF 7 *Geben Sie die Gravitation Ihres Gebietes ein bevor Sie die erste Kalibrierung durchführen. *Geben Sie die Gravitation des Bestimmungsortes ein nachdem Sie die erste Kalibrierung durchgeführt haben. *Der Gravitationswert wird abgelehnt, wenn er größer als 9.83217 (Polgravitation) oder kleiner als 9.78031 ist (Gravitation des Äquators). Werkseinstellung: 9.801 DISPLAY BESCHREIBUNG und ABFOLGE •Drücken Sie , um fortzufahren oder , um das Menü zu verlassen. Die Waage startet automatisch neu. LF 7 -00- • Im Display erscheint für eine Sekunde die Zahl der Vorkalibrierung. 9.8035 • Drücken Sie , um fortzufahren. 0 ~ 9 9.8035 • Verwenden Sie und dann , um den Gravitationswert einzugeben. (Drü- cken Sie ESC, um die Konfiguration zu beenden und zum Menü LF 7 zurück zu kehren). START-NULL LF 8 SEtZ Y setzt den Nullpunkt immer zurück wenn die Waage neu startet SEtZ n Zurücksetzen des Nullpunktes Off...
  • Seite 80 marca propiedad de | est une marque de | trade mark propiety of: Pol. Empordà Internacional Calle F. Parcela 15-16 17469 VILAMALLA - (Girona) SPAIN T. (34) 972 527 212 - F. (34) 972 527 211...

Inhaltsverzeichnis